Don’t Shoot me I’m only the piano player! Pt.
IV.
BY Mike Wilson
The final chapter! I’m sure you’re all as tired of reading about this project as I am of writing and building it. I finished the beast and this is it. I’ll be making a few comments regarding current trends in panel line shading and my feelings about some of the choices made by the “judges” at Tamiyacon at the end of this.
I want to let you know that the Tamiya F-4 while very nice has its shortcomings. Following is a list of problem areas that may help someone somewhere down the line.
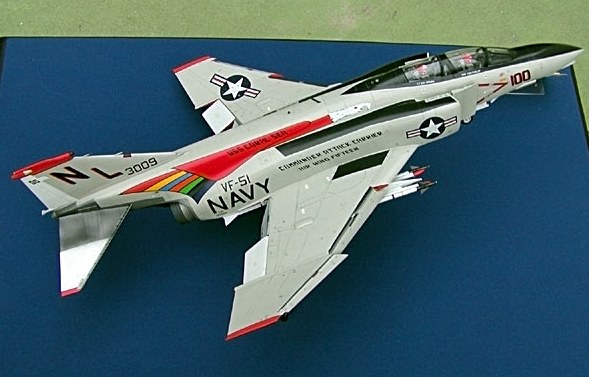
Decals: The Cam set for this a/c is really great. They’re really tough and respond extremely well to applications of full strength Solvaset. I tried to destroy these decals during testing and even I couldn’t do it. I can’t say enough about their strength and the way they look after overcoating.
The problems I encountered with them are as follows: The light blue in the feathers needs to be repainted a darker blue. Look at a color PICTURE to determine your shade. My perception of the blue may be different than yours. The 3009 for use on the vertical stab is too large. I replaced it with numbers from the Scalemaster SM-15A sheet, the 24” numbers seem about right. The small F-4B & Buno. decal for the lower fus. is too large and of the wrong style. I used the decal from the 48th scale Hasegawa VF-51 kit markings and it looks just right. I also used the 00 on the rudder and 100 on the inboard t/e flap from the same kit. I trimmed some of the red from the nose 100 and Vert. Stab. November Lima as I felt it was too wide. I cut the NL apart so I could reset the spacing between them. Other than those items, the decals are really great!!! I highly recommend them and with a little work they can be dead on accurate. I find it interesting that I’ve now gone full circle and I’m praising CAM and taking Tamiya to task.
Now for a personal note. To my way of thinking, stenciling should be hinted at rather than so big it’s the first thing I see. If I see an airplane in real life, stenciling and other maintenance markings are secondary to the overall effect. Sooooooooooooooooooooooo…… I reduced all of the colorful stencils, ejection seat triangles, front and rear canopy open handles and honeycomb warnings to 48th scale. I further reduced ALL other stencils to 72nd scale in hopes that they wouldn’t overpower the model. If I stand 32 feet (one foot in 32nd scale) away from an actual aircraft, I can’t read the words much less tell if it’s a grease smudge or a stencil! I feel understatement is always better. As an aside, there are about 350 separate decals on this model. It took me about a week to get them all put on.
 Landing
gear and doors. The finished items. Lots of work! Please refer to previous
article for construction details. Much planning went on before install. I
used thick gap filling hot stuff to attach things. It stays mostly where
you put it and can be used w/ kicker. Note extended nose gear oleo and
scissors.
Landing
gear and doors. The finished items. Lots of work! Please refer to previous
article for construction details. Much planning went on before install. I
used thick gap filling hot stuff to attach things. It stays mostly where
you put it and can be used w/ kicker. Note extended nose gear oleo and
scissors.
 Leading
and trailing edge flaps. Multiple shades of metalizer were used to depict
natural metal areas. I found that I had to use high contrast shades to get
them to look different. Over spraying seems to blend the colors.
Leading
and trailing edge flaps. Multiple shades of metalizer were used to depict
natural metal areas. I found that I had to use high contrast shades to get
them to look different. Over spraying seems to blend the colors.
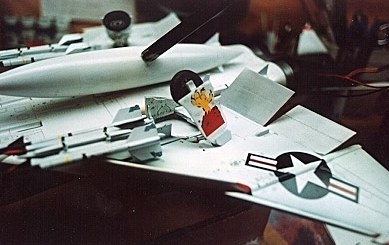
 Starboard inboard l/e flap. It’s hard to see but pivot mechanism is visible
in opening also 72nd stenciling. Red was usually found on moving
surfaces where you can loose a finger or hand if you’re careless.
Starboard inboard l/e flap. It’s hard to see but pivot mechanism is visible
in opening also 72nd stenciling. Red was usually found on moving
surfaces where you can loose a finger or hand if you’re careless.
 the Supersonic Can Opener! Some of the other squadrons at Miramar referred
to the Eagle as such. Cam decal was really great and went on well. I
repainted the light blue area while the decal was still on the paper and
used a blue vinyl 3M tape. Remember to keep tape on the decal and NOT to
let tape go from decal to paper (the paper can rip). No problems were
encountered removing tape or with Solvaset over paint. I used Testors
enamel to repaint feather color. It did take me awhile to get up the
courage to do this operation tho’. Much work still ahead at this point.
All paints were Testors Model Master and regular “little bottle” enamels.
the Supersonic Can Opener! Some of the other squadrons at Miramar referred
to the Eagle as such. Cam decal was really great and went on well. I
repainted the light blue area while the decal was still on the paper and
used a blue vinyl 3M tape. Remember to keep tape on the decal and NOT to
let tape go from decal to paper (the paper can rip). No problems were
encountered removing tape or with Solvaset over paint. I used Testors
enamel to repaint feather color. It did take me awhile to get up the
courage to do this operation tho’. Much work still ahead at this point.
All paints were Testors Model Master and regular “little bottle” enamels.
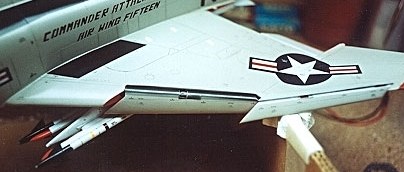 L/e flaps (drooped to 60 degrees inboard and 55 outboard) wing racks and
‘winders. Reshaped winder noses and relocated fins. A little hard to see in
this view. Yellow band on ‘winder denotes type of explosive used in
warhead; brown band shows type of rocket motor installed. A blue band or
any part of a missile that’s painted blue, denotes that part is inert. So
if you want a missile to be combat capable, don’t put any blue on it! The
same holds true for other munitions as well. According to my reference,
black bands are not applied to Navy ‘winders. Black is used for stenciling
only. AIM-9D, G, H model of ‘winder did not have laser type proximity fuse
as later 9L/M did. Panel lines are accented with pastels rather than the
current method of pre-shading. Note 72nd stenciling.
L/e flaps (drooped to 60 degrees inboard and 55 outboard) wing racks and
‘winders. Reshaped winder noses and relocated fins. A little hard to see in
this view. Yellow band on ‘winder denotes type of explosive used in
warhead; brown band shows type of rocket motor installed. A blue band or
any part of a missile that’s painted blue, denotes that part is inert. So
if you want a missile to be combat capable, don’t put any blue on it! The
same holds true for other munitions as well. According to my reference,
black bands are not applied to Navy ‘winders. Black is used for stenciling
only. AIM-9D, G, H model of ‘winder did not have laser type proximity fuse
as later 9L/M did. Panel lines are accented with pastels rather than the
current method of pre-shading. Note 72nd stenciling.
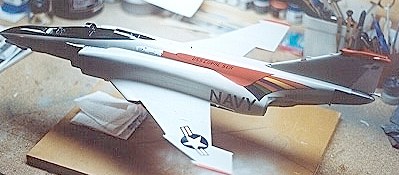
 Lots
of white!!! Ever since I was a kid I’ve really liked the gull gray and
white scheme. However, I still don’t understand why it took so long for the
Navy to realize that an airplane with a WHITE bottom and engines that left
a BIG BLACK SMOKE TRAIL that made the ground gunner’s job much easier.
Gear wells and the gear itself are kept pretty clean. There’s plenty of
plumbing attached to both and the ground crews need to be able to check for
leaks. The doors however are not kept as clean, some but not a lot of dirt
is allowed to build up.
Lots
of white!!! Ever since I was a kid I’ve really liked the gull gray and
white scheme. However, I still don’t understand why it took so long for the
Navy to realize that an airplane with a WHITE bottom and engines that left
a BIG BLACK SMOKE TRAIL that made the ground gunner’s job much easier.
Gear wells and the gear itself are kept pretty clean. There’s plenty of
plumbing attached to both and the ground crews need to be able to check for
leaks. The doors however are not kept as clean, some but not a lot of dirt
is allowed to build up.
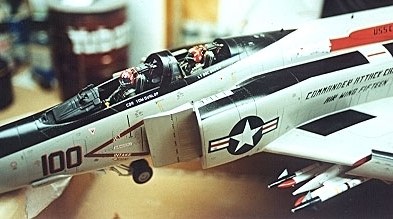 As my most recent ex-wife used to say, “I just love the little toy men in
their little toy chairs and their cute little outfits!” Her comments are
always in the back of my mind and help keep this hobby in perspective for
me. After all, we’re building snapshots of history, not fighting a war. We
want to get it right but let’s not take ourselves too seriously. Remember,
IT’S A HOBBY. The front c/p is pretty stock with the exception of the C
cockpit coaming, gun sight and the addition of Navy style ECM and PWI gear.
Also added were the AOA indexer and the wet compass to the front windshield
frames left and right respectively. The rear cockpit was backdated to B
configuration using the detail and scale Navy F-4 book. Face curtain
handles were replaced with small diameter wire. 48th scale photo
etched rear view mirrors were used on front and rear canopy frames.
As my most recent ex-wife used to say, “I just love the little toy men in
their little toy chairs and their cute little outfits!” Her comments are
always in the back of my mind and help keep this hobby in perspective for
me. After all, we’re building snapshots of history, not fighting a war. We
want to get it right but let’s not take ourselves too seriously. Remember,
IT’S A HOBBY. The front c/p is pretty stock with the exception of the C
cockpit coaming, gun sight and the addition of Navy style ECM and PWI gear.
Also added were the AOA indexer and the wet compass to the front windshield
frames left and right respectively. The rear cockpit was backdated to B
configuration using the detail and scale Navy F-4 book. Face curtain
handles were replaced with small diameter wire. 48th scale photo
etched rear view mirrors were used on front and rear canopy frames.
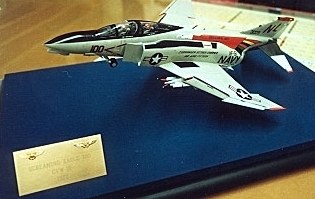
Rich Strickland gave me an F-4 book that allowed me to spend way too much time adding detail to the pilot and RIO. If it hadn’t been for him, I would have finished the model a year ago. Beware of E-2 moles bearing gifts.
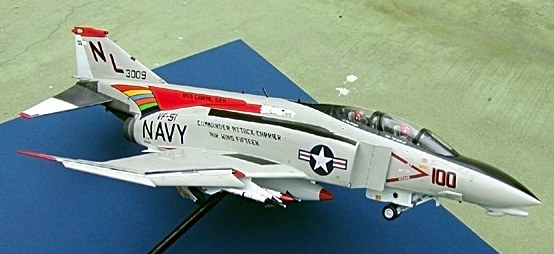 If
you have a picture of the real bird, please compare this to it. Hope you
agree that the reduced size of the 00 on the rudder the 3009 and small
lower fuselage Buno. look right. Also note the spacing of the NL . This and
the nose 100 were the decals I trimmed the red from. The large Navy is
from the old Revell kit because I misplaced the kit decals. Something old,
something new, something borrowed, something blue, or is that part of a
wedding thing??? Seems I should know!!!!!! The inboard trailing edge flaps
full down are at 60%. The outboards are drooped ailerons and lower to 16 ½
%. Ashore the flaps are usually only lowered to ½ or 30% for take off. The
flap setting for cat shots is usually, but not always, full down. The
leading edge flaps transit to the full down position whether the flap
handle is placed in the half or full down posit.
If
you have a picture of the real bird, please compare this to it. Hope you
agree that the reduced size of the 00 on the rudder the 3009 and small
lower fuselage Buno. look right. Also note the spacing of the NL . This and
the nose 100 were the decals I trimmed the red from. The large Navy is
from the old Revell kit because I misplaced the kit decals. Something old,
something new, something borrowed, something blue, or is that part of a
wedding thing??? Seems I should know!!!!!! The inboard trailing edge flaps
full down are at 60%. The outboards are drooped ailerons and lower to 16 ½
%. Ashore the flaps are usually only lowered to ½ or 30% for take off. The
flap setting for cat shots is usually, but not always, full down. The
leading edge flaps transit to the full down position whether the flap
handle is placed in the half or full down posit.
 Just off the cat, positive rate of climb established, slap the gear handle
up, accelerating, getting ready to bring the flaps to ½, then clean up and
climb to the CAP station. I hope any former Navy F-4 pilot or RIO will
remember the feeling. Thanks to CAPT.,CAPT. John Bishop (remember Catch
22?), Eli Raphael, Rich Strickland, Jack Kerr, Tamiya, CAM and many others.
These guys have made it so I have find a place to keep this monster. Thanks
for hanging with me and reading my ramblings. And, oh…. did I mention that
the rotator on the leading edge of the vertical stab works?
Just off the cat, positive rate of climb established, slap the gear handle
up, accelerating, getting ready to bring the flaps to ½, then clean up and
climb to the CAP station. I hope any former Navy F-4 pilot or RIO will
remember the feeling. Thanks to CAPT.,CAPT. John Bishop (remember Catch
22?), Eli Raphael, Rich Strickland, Jack Kerr, Tamiya, CAM and many others.
These guys have made it so I have find a place to keep this monster. Thanks
for hanging with me and reading my ramblings. And, oh…. did I mention that
the rotator on the leading edge of the vertical stab works?
As promised, a few words about the current trend in model panel line shading and judging at the 2003 Tamiyacon. Ahem,…… wait… let me get on my soap box………..Whew…..that’s a long climb for a short person……. OK,….
Frankly, I think the current trend of making ALL the panel lines look the same and very dark on an aircraft model isn’t realistic. I’ve never seen or flown an airplane that has that sort of exaggerated panel lines. I really think this trend is so far out of whack that it stinks. As my father always said: “A lot of modelers have never seen the real thing much less flown one and they don’t really know which end is supposed to point forward. Given the way model airplanes and their politically correct finishes are these days, I tend to agree with him. For better or worse, I don’t build my models from a modeler’s point of view; I try to build from a pilot’s standpoint. Each airplane has certain characteristics that set it apart from others. Even the same types fly differently and no two are exactly alike. Therefore, when I see ALL the panel lines on ALL the models done EXACTLY the same way, It’s really taking away from the realism of the actual aircraft. So……. I cast my vote to not to follow the trend, which no doubt is one of the many reasons I don’t do well in a contest situation.
Now to the most recent Tamiyacon “judging”. Well, I think parts of it could have been better. In some of the categories they seemed to have a good grasp of the situation and in others they seemed to have no clue. One person won a first place with what was actually more of a toy than a model. I even started to wonder if my old nemesis “Halfway Dan” was doing the judging. Anyway, The hit and miss judging continued throughout the afternoon. The feeling that I was left with was that a lot of the judges and Mr. Tamiya were looking for models that would look good on their website and increase sales rather than an accurately built model. Additionally, I think Mr. Tamiya and his staff had a lot of their taste in their mouths. I went on Tamiya’s web site a few days after the “contest” and when I saw the model that won a very major category, I was shocked. I won’t go back next year and waste my time. Sour grapes? Some I’m sure and I know I wasn’t the only one. A lot of the models there were FAR better in accuracy of markings, finish and were painted in accurate colors and all they got was the short end of the stick. Perhaps Mr. Tamiya needs new glasses or maybe he just doesn’t care. I know the guys that won the trips to Japan are happy with the judging though. I also know that Mr. Tamiya and his employees really don’t care about how I feel, it’s their contest, not mine and they can do whatever they wish. That’s just my opinion and it really doesn’t matter to anyone but me. Remember, IT’S JUST A HOBBY!!!!!!, SOB, SOB and much hand wringing. If you want to send hate mail, please send it to Scott, he’s the one that posts my inane ramblings. It’s all HIS fault !!!!!!!!!!!!!!!!!!!!!!!!!!!!!!!!!!!!!!!!!!!!!!!!!! (The editor takes the fifth....(hic)....)
Well, gotta go. The old sun dial says summer’s almost here and its time to trade my modeling tools for my surfboard, Margaritas and Pacific Ocean sunsets. Next winter the nights’ll be filled with the brutal cold of another dreary Southern California winter and I’ll be back at my modeling bench. Until then, warm beach sand, the gentle breezes of summer and the soft, tanned skin of California Girls with blonde hair will have to suffice. Did I tell you how bitchen’ my new board is and how great summer in La Jolla is? Oh never mind, I’m sure you’d rather stay inside and build models all summer!
See you at the beach,
Aloha & Mahalo
Mike