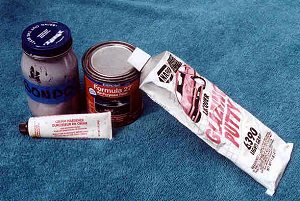
 The fillers. I don’t use
"modeling putties". Automotive fillers like Bondo, Evercoat (two Part mixes) and
Nitro-Stan work for me. These are all available at automotive stores. They smell
bad and take practice to use, but the results are worth it.
The fillers. I don’t use
"modeling putties". Automotive fillers like Bondo, Evercoat (two Part mixes) and
Nitro-Stan work for me. These are all available at automotive stores. They smell
bad and take practice to use, but the results are worth it. Don’t Shoot me, I’m only the Piano Player!!
by Mike Wilson
This is the first, and maybe last, of a very sporadic series of how one very old, very opinionated modeler is attempting to convert the Tamiya 1/32nd F-4J to a B using the Custom Aero Miniatures (CAM) conversion kit and too much reference material. You may not agree with the way the conversion is accomplished or what’s being written so please remember this: This is only one persons way and it’s only one persons opinion. If you don’t like what’s being written, stop reading! Please don’t send hate mail as this is a HOBBY. This is being written in the hopes that someone might have an easier time doing the conversion. If that happens, great, if not, then so be it. If you have a technique you’d like to share, please feel free to do so. This is for FUN!!!!!!!!!!!!!
Read previous review on this site re: The CAM F-4B conversion kit. To that add; "Everything that can be wrong with this kit, is".
The intent: Build a VF-51, 1/32nd F-4B using the Tamiya F-4J, CAM decals and B conversion kit. Build it in the take-off configuration with the gear half way up and the leading and trailing edge flaps down. Vertical stab rotator operation will be simulated with an LED.
Editor's note: I usually don't publish these 'in work' types of reviews. However, this is a special case. Mike's glacial construction pace has been known in the San Diego area for years. I can recall seeing the same 1/32 F-4S leading edge slat conversion at IPMS San Diego meetings as he proudly exhibited what had been done over a period of several years. Actually, it seemed to me that little was different from the time before though Mike swears that progress had been made. I figured I'd put this up in case he forgets what he has done and needs it to jog his memory!
Getting started:
The fillers. I don’t use
"modeling putties". Automotive fillers like Bondo, Evercoat (two Part mixes) and
Nitro-Stan work for me. These are all available at automotive stores. They smell
bad and take practice to use, but the results are worth it.
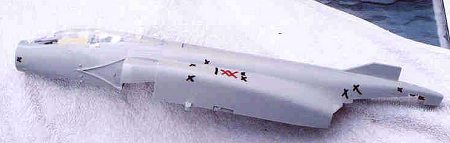
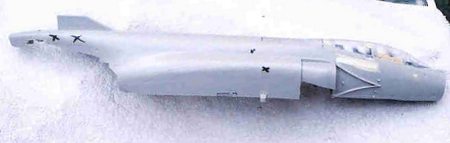
Removal of fuselage skin doublers. Remove ALL doublers marked with a black X. Leave the one with the red X, that’s the RAT door and it must stay. I saw one "how to" that describes the doublers as "BDR" or Battle Damage Repairs. They’re not, so remove them. Don’t forget to scribe in the Navy type chaff dispenser doors as Tamiya hasn’t put them on the J fuselage( one problem with commonality) See photos below. Lou Drendle’s Navy Phantom book has a couple of good photos of the door in the open position on pages 20 & 39. The doors are normally closed.
 |
 |
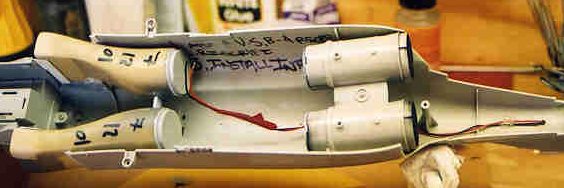
 Vertical Stab. LED. I
didn’t get any photos of this before I installed it. I cut a piece of
translucent red toothbrush, drilled it from behind, hot stuffed the LED to it,
soldered wires to the LED and attached it to the vertical then cut and sanded it
to shape. Schematic shown below. The CAM ECM antenna is all wrong.
Reconfigure per Image to right.
Vertical Stab. LED. I
didn’t get any photos of this before I installed it. I cut a piece of
translucent red toothbrush, drilled it from behind, hot stuffed the LED to it,
soldered wires to the LED and attached it to the vertical then cut and sanded it
to shape. Schematic shown below. The CAM ECM antenna is all wrong.
Reconfigure per Image to right.
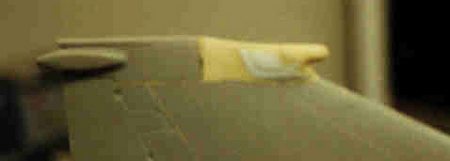
Refuel door installation. Unless you’re going to put the probe out, install part J-25 and fill-up the hole with Evercoat. The kit probe door(J-12) is too thick, yes, the probe door doesn’t always fit perfectly on the real airplane but the kit part is way out of scale in thickness.
Burner section installation. When you install the C-3 assembly in the fuselage, don’t tighten the screw all the way. It will ease things when you install B type burner cones. Cut the tabs off of parts J-41& 42 and glue them in place. This allows lateral movement of the C-3 assembly later.
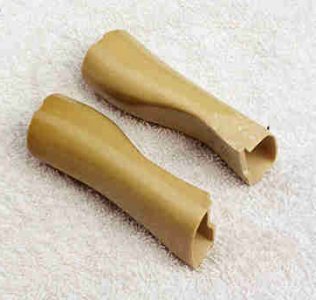
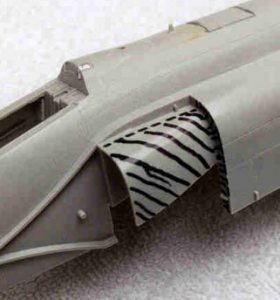
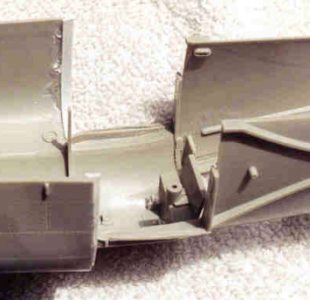
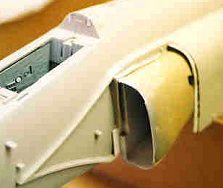
Intake installation. I used Seamless Suckers. They were provided by my sometime friend CAPT./CDR. John Bishop. John lives somewhere east of La Jolla Blvd. and my geography is somewhat hazy. Anyway, if you’re going to build your F-4 on the ground, make or buy intake covers. If in flight, the Seamless things take quite a bit of modification and fitting and still have some gaps. If you can borrow some to compare with the Tamiya parts, do so, and make your own decision. I personally feel they both have good and bad points. See photos below. The second, third and fourth image what you need to do to install the Seamless Suckers.
 |
 |
 |
 |
 |
Happy Modeling!!!!!!!!!!!!!!!!!!!!!!!!!!!!!!!!!!!!!!!!!!!!!!!!!!!!!!!!!!!!!!!!!

Wing modifications, undernose ECM mods, Meteor intake install, cockpit mods, wing install, cutting the horizontal stab in half and other fun stuff.
If you would like your product reviewed fairly and quickly by a site that averages thousands of visits a day, please contact me or see other details in the Note to Contributors.