Eduard 1/48 P-39D Airacobra
|
KIT # |
8064 |
|
PRICE: |
$29.95 |
|
DECALS: |
Three options |
|
REVIEWER: |
|
|
NOTES: |
Cutting Edge decals used |
|
HISTORY |
 The vast majority of P-39s were
exported to the Soviet Union. Some were sent to the British who rejected
the type as not being suitable for the European theater after trying out
some in squadron service. The aircraft's saving grace was that it was
rather heavily armed. In addition to six machine guns, it also carried a
20mm or 37 mm cannon in the nose, firing through the spinner. Thanks to
having the engine behind the pilot, there was lots of room in the nose
for weapons, a feature much loved by the Soviets.
The vast majority of P-39s were
exported to the Soviet Union. Some were sent to the British who rejected
the type as not being suitable for the European theater after trying out
some in squadron service. The aircraft's saving grace was that it was
rather heavily armed. In addition to six machine guns, it also carried a
20mm or 37 mm cannon in the nose, firing through the spinner. Thanks to
having the engine behind the pilot, there was lots of room in the nose
for weapons, a feature much loved by the Soviets.
Americans used them in the Southwest Pacific with the 5th Air Force in the Solomons and in New Guinea, where their ruggedness and heavy firepower made them especially good at ground attack (as the Soviets had already discovered). Though not able to hold their own against the more nimble Japanese fighters, they were able to do passably well in air to air combat when flown by an experienced pilot. The Soviets found them more than a match for the less agile 109s and even did well against the FW-190, often bringing the pilot home when his aircraft was heavily damaged.
The type eventually metamorphed into the excellent P-63, though none really saw any combat until the very last months of the war and then with the Soviets.
|
THE KIT |
 The Eduard P-39 comes in a number of different boxings and includes the
usual Profipack version with extra bits added in. The sprues in these
boxings are identical. The alert modeler can do any version with the bits
in at hand as long as he has the aftermarket decals for what he needs and a
good reference. I have one and was able to discern what bits are needed to
do a P-39D.
The Eduard P-39 comes in a number of different boxings and includes the
usual Profipack version with extra bits added in. The sprues in these
boxings are identical. The alert modeler can do any version with the bits
in at hand as long as he has the aftermarket decals for what he needs and a
good reference. I have one and was able to discern what bits are needed to
do a P-39D.
The kit itself is superbly molded in Olive Drab plastic with fine engraved panel lines and a very good fabric representation on the control surfaces. Flash, ejector pin marks and sink areas are nearly non-existent. I did find a few pieces bent/broken because of damage in the bag, but none that are not fixable. The kit also includes a nose weight, an essential bit for a tail heavy plane such as this one.
 A nice edition to the kit are a set of masks for the canopy, wheels, and
wing walk areas. Much of the canopy mask is only for the edges of the area,
the rest needing to be filled with liquid mask or some other material.
Markings are provided for three planes: A.I. Pokryshkin's P-39N from 9 GIAD
(a scheme that has seen much use from what I've noted at contests), a P-39K
of the 40 FS/35 FG in New Guinea during the summer of 1943 and a French
P-39N of GC II/6 in late 1944. All are in OD over Neutral Grey. I found it
interesting that all three schemes show the upper wing color slightly
wrapping around to the underside, something I've not seen in other
references. Decals are superbly printed and include a full stencil suite.
A nice edition to the kit are a set of masks for the canopy, wheels, and
wing walk areas. Much of the canopy mask is only for the edges of the area,
the rest needing to be filled with liquid mask or some other material.
Markings are provided for three planes: A.I. Pokryshkin's P-39N from 9 GIAD
(a scheme that has seen much use from what I've noted at contests), a P-39K
of the 40 FS/35 FG in New Guinea during the summer of 1943 and a French
P-39N of GC II/6 in late 1944. All are in OD over Neutral Grey. I found it
interesting that all three schemes show the upper wing color slightly
wrapping around to the underside, something I've not seen in other
references. Decals are superbly printed and include a full stencil suite.
|
CONSTRUCTION |
Construction, as with most of my models, began with the
interior. However, I'd decided to replace the kit seat with an excellent
resin replacement by Ultracast.
Nothing really wrong with the kit seat, just that Ultracast's is so much
better. And it includes the harness. After it was cut from the mold block,
it was glued into place on the floor. Then I added the other parts
Deciding to do something with it in order to make room for
more unfinished kits, I went back to work. I assembled the radio and after
painting it black, glued it in place. I also glued in the armored glass
behind the pilot. Some of the interior placard decals were applied at this
time and I glued together the nose gear well. This is an extremely fiddly
construct and so you have to really be on top of things to get everything
to line up properly.
Meanwhile, I glued in the wheel wells and then the landing
light. This latter item was painted silver on the inside. The wing leading
edge radiator inlets were then glued in place, followed by the upper and
lower wing halves. The trailing edge of the wing is a bit thick so you may
wish to thin down the inner wing to a more acceptable knife edge. I had to
putty the heck out of the entire wing seam.
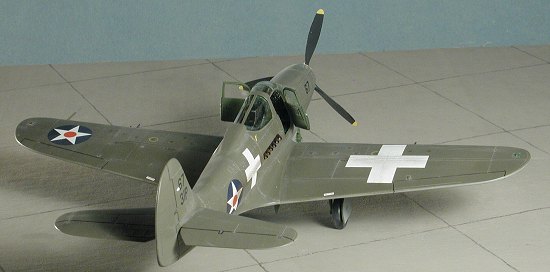
Next I glued on the canopy and then tried to fit in the doors prior to
painting. The truth is that the doors just don't fit well in the closed
position so the only real choice in things is to glue them open and attach
them after all is done. Now I'd rather not do that, but really have no
choice. The only other airframe bit that needed attached was the upper gun
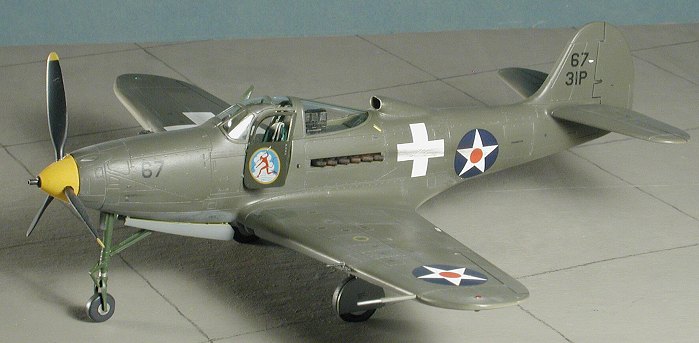
section. I'm doing my kit as a P-39D in a pre-war scheme so chose the one
without the pronounced dampeners on the back of each gun trough. Probably
got it wrong, but from what I could tell using the reference, this would be
most likely.
The next step was to glue the prop spinner and aft plate together. I chose
a three-bladed prop instead of one of the two four-bladed options that were
more likely to be used on late P-39s. There is no blade angle alignment
guide on the parts so one just has to follow the instructions to get it
right. I next glued on the stabilizers, stuffed all the holes with tissue
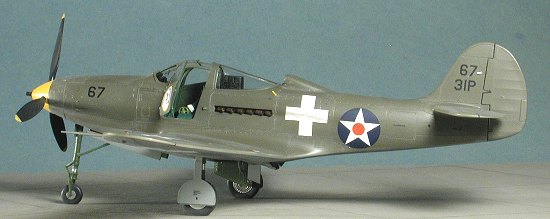
and headed for the paint shop. CAMOUFLAGE & MARKINGS During this portion of the build, I used all Testors ModelMaster enamels
for my various colors. First I painted the lower portion of the airframe
with Neutral Grey. This included the outside of the gear doors. When
dry, the tailplane undersides were masked off. Then the upper cockpit area
was painted FS 34097 as were all the landing gear parts and the insides of
the gear doors and various struts. This color comes pretty close to
matching the color images of the unrestored P-39 that is shown in the
reference. When that was dry, the upper surface was given a coat of Olive
Drab. I also painted the spinner
Back at the work bench, I wrapped the oleos of the landing gear struts
in Chrome Bare Metal Foil and then assembled the rest of the landing gear
bits. The oleo scissors fit well on the main gear, but seem a bit out of
place on the nose gear as there really isn't any concrete attachment
points. The wheels I painted aluminum as per the kit instructions, but I
feel I probably could have done these in Neutral Grey without anyone
batting an eyelash. The wheels then got painted a faded black that Floquil
produces. Next, I took the time to install the prop blades. Fit is a bit sloppy,
but the end result is OK. I then installed the four wing guns. These need
to have the holes in the leading edge of the wing drilled out all the way.
Then the guns merely slip on in and fit quite well. I then glued in the
main landing gear. Noting a seam that had opened in the lower front, I
refilled that and sanded it smooth. I also installed the wing pitot tube
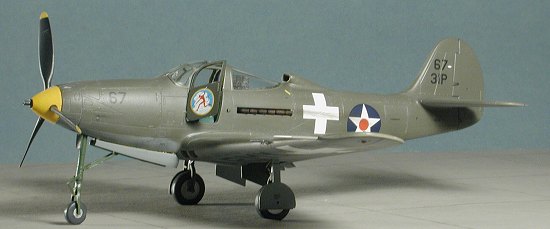
and took the kit back to the paint shop for some underside retouch. With that on and dry, it was time for decals. I decided to do a 40 PS/31
PG P-39D which took part in the Carolina Maneuvers in 1941. These markings
are on Cutting Edge 48-143 and
are designed for the Eduard kit. However, they are a tad oversized. At
least, they are according to the panel line placement as shown in the decal
instructions. Regardless, they are quite opaque and went on with no
trouble. The data decals had to come from the Eduard sheet as none are
provided with the CE aftermarket ones. The Eduard decals are very thin and
give you just one chance. I totally screwed up the thin line decals so had
to leave all of the warning stripe ones off. The rest succumbed to Solvaset
as did the CE decals. With the decals on, I cleaned off any dried solvent
and glue before giving the model a coat of clear matte acrylic. of the
cockpit tub that I could and spray painted the entire thing in Testors ModelMaster enamel FS 34097 to try to simulate Bell interior green. While that was drying, I
glued together the flattened main wheels and sanded the seam smooth. Then
other projects took over and the kit sat in the 'unfinished kit' pile for
about a year.
of the
cockpit tub that I could and spray painted the entire thing in Testors ModelMaster enamel FS 34097 to try to simulate Bell interior green. While that was drying, I
glued together the flattened main wheels and sanded the seam smooth. Then
other projects took over and the kit sat in the 'unfinished kit' pile for
about a year.
 While
that was drying, I completed installing all the little bits into the
cockpit. Placing the instrument panel isn't clearly delineated in the
instructions, so I left that off until it was t
While
that was drying, I completed installing all the little bits into the
cockpit. Placing the instrument panel isn't clearly delineated in the
instructions, so I left that off until it was t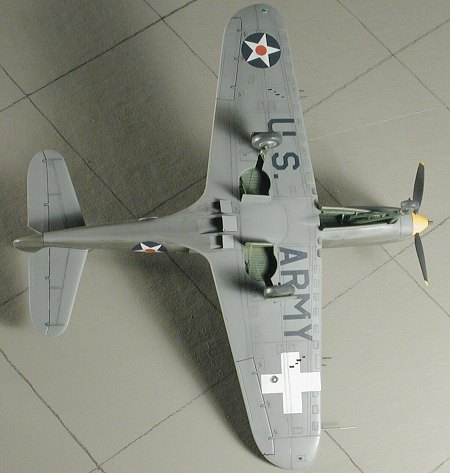 ime to glue the interior
into a fuselage half. Eduard gives you a killer nose weight that needs to
be slightly trimmed of its stub in the back before setting in place atop
the nose gear. Then the interior is glued in place and I was quite pleased
with the fit. After a few touch-ups, I glued the other half and
puttied the seams. I also glued on the lower wing at this time. Fit is
actually quite good, though there are some small gaps at the upper wing
root area. I added the usual filler to take care of those. With all that
done, the tail planes were added. No problems here at all.
ime to glue the interior
into a fuselage half. Eduard gives you a killer nose weight that needs to
be slightly trimmed of its stub in the back before setting in place atop
the nose gear. Then the interior is glued in place and I was quite pleased
with the fit. After a few touch-ups, I glued the other half and
puttied the seams. I also glued on the lower wing at this time. Fit is
actually quite good, though there are some small gaps at the upper wing
root area. I added the usual filler to take care of those. With all that
done, the tail planes were added. No problems here at all.
 white and then yellow. I did the usual
back and forth to try to cover everything. Naturally, more will have to be
done a bit later once I get the model on its landing gear.
white and then yellow. I did the usual
back and forth to try to cover everything. Naturally, more will have to be
done a bit later once I get the model on its landing gear. I also glued on all the landing gear doors, and found that the nose gear
doors took a bit of extra effort to get properly aligned. During this
process I also attached the wheels and found them to fit very well and
quite tightly. I also tried to attach the prop, but found that no matter
what I did, it wouldn't fit on the shaft. Perhaps the blades were fit in
too far or something, but I ended up cutting off the shaft and gluing the
spinner directly to the front of the airframe. I then outlined the control
surfaces with a drafting pen and headed back to the paint shop to have a
coat of gloss acrylic clear applied.
I also glued on all the landing gear doors, and found that the nose gear
doors took a bit of extra effort to get properly aligned. During this
process I also attached the wheels and found them to fit very well and
quite tightly. I also tried to attach the prop, but found that no matter
what I did, it wouldn't fit on the shaft. Perhaps the blades were fit in
too far or something, but I ended up cutting off the shaft and gluing the
spinner directly to the front of the airframe. I then outlined the control
surfaces with a drafting pen and headed back to the paint shop to have a
coat of gloss acrylic clear applied.
|
FINAL CONSTRUCTION |
 Returning to the bench, I replaced the two gear doors I knocked off
while handling the kit. Then I removed the masking from the canopy and the
inside and outside of the doors. The superb
Ultracast tubular exhaust
were then painted Burnt Iron and glued in. This was followed by the nose
cannon and finally, I glued on the cockpit doors. Then I used pastels to
make it look a bit less new and to give the exhaust some character.
Returning to the bench, I replaced the two gear doors I knocked off
while handling the kit. Then I removed the masking from the canopy and the
inside and outside of the doors. The superb
Ultracast tubular exhaust
were then painted Burnt Iron and glued in. This was followed by the nose
cannon and finally, I glued on the cockpit doors. Then I used pastels to
make it look a bit less new and to give the exhaust some character.
|
CONCLUSIONS |
As often happens, I don't get around to building a kit until all the buzz is gone and everyone else has done several! While not the amazing wonder kit that come from other companies, this one was no more difficult to build than any Monogram or Italeri kit and definitely takes Eduard out of the short run category.
August 2004
# 1329 in a series
Copyright ModelingMadness.com. All rights reserved. No reproduction in part or in whole without express permission from the editor.
|
REFERENCES |
Bell P-39 Airacobra, by Juszczak and Peczkowaski. Mushroom Models Publications 2003
If you would like your product reviewed fairly and fairly quickly, please contact the editor or see other details in the Note to Contributors.