
Hasegawa 1/72 Spitfire Mk VIII 'RAAF'
| KIT #: | 52042 (AP 142) |
| PRICE: | ¥1200 (probably around $16.98 MSRP in the US) |
| DECALS: | Two options |
| REVIEWER: | Scott Van Aken |
| NOTES: |
| BACKGROUND |
For a look at what comes in the box and a brief history, please visit the preview.
| THE KIT |
 Hasegawa's Spitfire kit has
been around for a lot longer than most of us realize. This particular
boxing has a 1997 date on it which means that it has been probably 10 years
or more that the basic Mk IX kit has been around. In fact, had I installed
the fixed tail wheel, I could have built this one as a late Mk. IX as the
two airframes were basically the same by that time.
Hasegawa's Spitfire kit has
been around for a lot longer than most of us realize. This particular
boxing has a 1997 date on it which means that it has been probably 10 years
or more that the basic Mk IX kit has been around. In fact, had I installed
the fixed tail wheel, I could have built this one as a late Mk. IX as the
two airframes were basically the same by that time.
Those of you who have a memory for things will realize that it wasn't that long ago that I did another 1/72 Spitfire; that time the less than satisfactory Fujimi PR.19 and a bit before that the Italeri LF 9. As we often do, I'm slowly building up a small collection of Spitfires using base kits rather than relying on conversions to complete the process. This particular kit is really a replacement for the old Frog Mk VIII that was offered many years ago (and a bit more crudely built by a MUCH younger modeler!).
| CONSTRUCTION |
I went into this fully expecting it to be a pretty simple build, and for the most part, that is exactly what I got. Hasegawa has been doing 1/72 airplane kits since its inception back in the 1960s and so they pretty much have a hold on what works and what doesn't. It also means that there are 'givens' when it comes to their kits. One thing is that the cockpit detail is fair, but not really that detailed. Another is that there are inserts for various versions. A third is that most of the time, the canopy is a single part so even if there was cockpit detail, it can't be that well seen through the closed hood.
 This build started off in a
very standard way with the building of the interior. There is a forward and
aft bulkhead, a floor, seat, and control stick. No sidewall detail of any
note and no option to open the access door. One thing that I wondered about
is that the instructions call for the head rest to be removed. Looking at
photos of Mk.VIIIs proved that this was, indeed, the correct thing to do,
so it was sliced off and the area sanded down. The entire interior was
given a nice coat of RAF Interior Green. I also painted the cockpit
sidewalls and the inside of the gear doors this color while I was at it.
When dry, a bit of drybrushing was done and the instrument panel decal put
in place.
This build started off in a
very standard way with the building of the interior. There is a forward and
aft bulkhead, a floor, seat, and control stick. No sidewall detail of any
note and no option to open the access door. One thing that I wondered about
is that the instructions call for the head rest to be removed. Looking at
photos of Mk.VIIIs proved that this was, indeed, the correct thing to do,
so it was sliced off and the area sanded down. The entire interior was
given a nice coat of RAF Interior Green. I also painted the cockpit
sidewalls and the inside of the gear doors this color while I was at it.
When dry, a bit of drybrushing was done and the instrument panel decal put
in place.
Then the interior was trapped between the fuselage halves. You can't put it in after the halves have been glued as there is a ridge that the bulkheads have to 'ride' on. As this was drying, the wing was assembled. The wing has separate tips (only the 'standard' ones are included' and as with all kits that have this feature, the fit is not perfect. This area required some filler. I also glued the lower cowling halves together. Fit is fairly good, though getting the seam out of the inside of the intake is basically impossible.
 With the fuselage, wing and
lower cowling done, I brought them all together. The fit was quite good.
Hasegawa does their rear wing/fuselage join a bit differently from most
kits. Instead of the upper and lower fairings joining with a seam along the
skinny edge, Hasegawa brings the join area totally to the underside of the
fuselage. This means that the thin edge is already molded in place and the
seam is on the bottom. It works very well and while some filler was needed,
it was much easier to handle. The lower cowl insert also fit well, but it
sinks down below the wing level by about a 32nd of an inch. Raising it
would leave a gap on the lower cowl line. I left it as it is.
With the fuselage, wing and
lower cowling done, I brought them all together. The fit was quite good.
Hasegawa does their rear wing/fuselage join a bit differently from most
kits. Instead of the upper and lower fairings joining with a seam along the
skinny edge, Hasegawa brings the join area totally to the underside of the
fuselage. This means that the thin edge is already molded in place and the
seam is on the bottom. It works very well and while some filler was needed,
it was much easier to handle. The lower cowl insert also fit well, but it
sinks down below the wing level by about a 32nd of an inch. Raising it
would leave a gap on the lower cowl line. I left it as it is.
I should also remind builders that there are two holes in the nose that need opened for scoops and bumps so do those before sealing things up. I nearly forgot! I also fitted the exhaust doors to the under wing radiators. These are not the best fit and I'm not sure if the rear of these doors is supposed to follow the aft radiator line, but they don't.
After the usual filler, I glued on the tail planes and the rudder. Moving to some of the smaller bits, the intake and small fairing for which the holes were drilled were added. I then installed and painted the gun sight, gluing the canopy on shortly afterwards. This was then masked and after gluing on the radio mast, it was time for some painting.
| COLORS & MARKINGS |
 The kit markings are for
some SEA aircraft, but I wanted to use one of my aftermarket sheets.
Frankly, there really wasn't much that I had for the Spit VIII. I had one
sheet for Aussie planes, but I wanted something different.
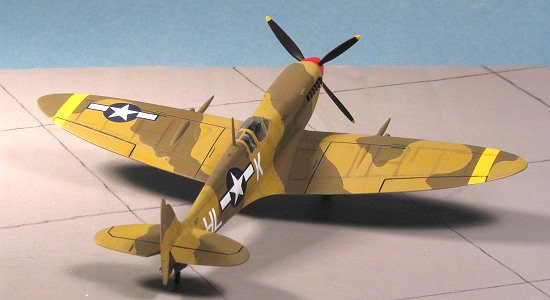
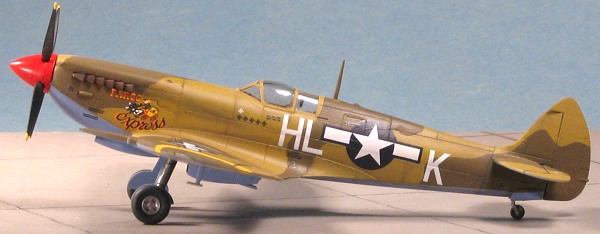
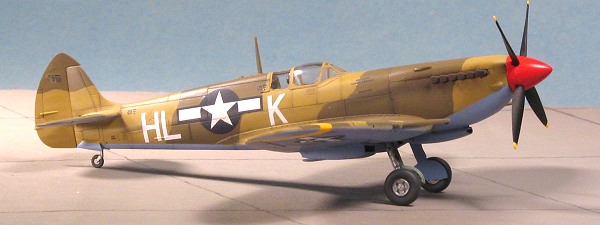
Aeromaster 72-202 for US Spitfires
offered one scheme for a rather famous aircraft; 'Fargo Express' as flown
by Cpt. Leland Molland in Italy during early 1944. This 308 FS/31 FG Spit
was in the standard scheme of Dark Earth/Midstone over Azure Blue.
The kit markings are for
some SEA aircraft, but I wanted to use one of my aftermarket sheets.
Frankly, there really wasn't much that I had for the Spit VIII. I had one
sheet for Aussie planes, but I wanted something different.
Aeromaster 72-202 for US Spitfires
offered one scheme for a rather famous aircraft; 'Fargo Express' as flown
by Cpt. Leland Molland in Italy during early 1944. This 308 FS/31 FG Spit
was in the standard scheme of Dark Earth/Midstone over Azure Blue.
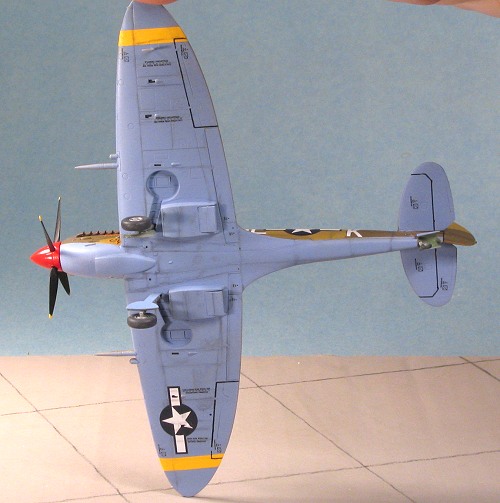
I started by painting the spinner white and then when dry, it was given a coat of red. Red spinners were an Allied ID marking for the Mediterranean Theater. The airframe was given the underside coating of Azure Blue using some of my old Aeromaster acrylics, which still worked just fine. A day to cure and it was masked off. I find that when doing 1/72 models, generally masking looks a lot better than freehand spraying, especially when it comes to the relatively hard edged factory paint schemes used by the British. Next the Midstone was applied, this time a ModelMaster enamel. Then the rather tedious job of masking and the final coat of Dark Earth was applied.
At this time, the model was returned to the work bench for landing gear. The tail gear simply glues into a slot. This was painted aluminum prior to attachment. I also painted the main gear and wheels aluminum, using Alclad II for all the metal finishes. I could probably have painted them the underside color if I wished.
The main gear doors were attached to
the main gear prior to gluing the gear in place. You have to nip a section
out of the upper doors to get them to fit. The fit of the main gear is very
loose. There is no 'preset' angle as with some other Spit kits so one just
has to 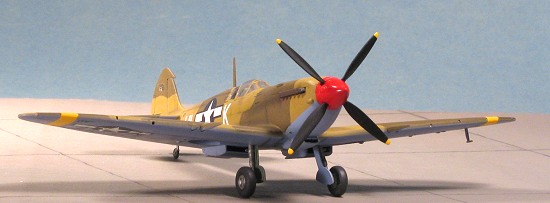 eyeball it and hope
that when it dries, nothing is amiss! With it now on its legs, a coat of
clear gloss acrylic (in this case Future) was applied in preparation for
the decals.
eyeball it and hope
that when it dries, nothing is amiss! With it now on its legs, a coat of
clear gloss acrylic (in this case Future) was applied in preparation for
the decals.
Decals are printed by Cartograf and are very well done. In addition to the main markings, a full stencil suite is provided for each option. These stencils took a while to apply. I also found that the Cartograf decals need a rather strong setting solution to properly conform to panel lines. Even after an application of Solvaset, some of the decals still refused to snuggle down.
The airframe was then wiped down with warm water to remove any dried solvent or glue.
| FINAL CONSTRUCTION |
Only a few bits to add at the end. I
painted the prop black and hand painted the tips yellow (sometimes it is
just faster that way and the result is just as good as masking), before
trapping it between the spinner halves. The exhaust had been painted Jet
Exhaust and then glued in place. I also glued in the wheels at this time as
well as the pitot tube and small rod antenna on the underside of the wing.
The rod antenna didn't even last until it was time to take pictures,
disappearing somewhere 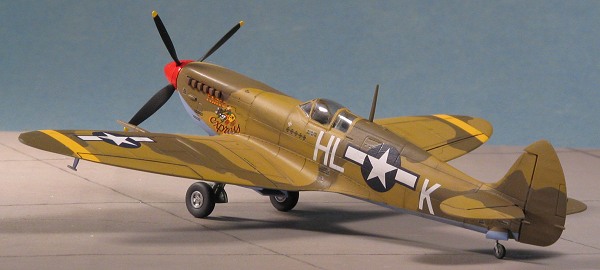 between
the workbench and the photo 'studio'! The rear gear doors were glued in
place. Then it was time to do any brush-work in terms of touch up. When
that was done, the entire model was given a coat of clear matte using a
mixture of Flat Base and Future that I've been using for well over a
decade.
between
the workbench and the photo 'studio'! The rear gear doors were glued in
place. Then it was time to do any brush-work in terms of touch up. When
that was done, the entire model was given a coat of clear matte using a
mixture of Flat Base and Future that I've been using for well over a
decade.
Then the model was given a pastel panel line treatment. This is where one takes a Micro-brush, scrubs it in some powdered pastel and then scrubs it into the panel lines (works best on a matte finish). Once you have a properly grungy looking model, take a clean cotton rag and start wiping in the direction of airflow. This removes most of the pastels leaving somewhat enhanced panel lines. I generally don't seal my models after doing this, but you can if you wish. The additional coat of clear often diminishes the effect so that is why I often don't do the sealing part. The last step was to push the prop into the nose and I was done.
| CONCLUSIONS |
Really, one can rarely go wrong with a modern Hasegawa kit. They are well designed, provide minimal hassles, and are generally accurate (I haven't heard if their 1/72 Spits are 'too short' as is the complaint of the 1/48 version). If you are like me and have been doing a lot of short run kits, it is nice to step back and do something that doesn't require a lot of advanced modeling skills!
February 2005
#1350 in a series
Copyright ModelingMadness.com. All rights reserved.
Review kit courtesy of me.
If you would like your product reviewed fairly and quickly, please contact the editor or see other details in the Note to Contributors.