
Fujimi 1/72 Spitfire PR.19
| KIT #: | 72004 |
| PRICE: | $19.96 MSRP |
| DECALS: | Four options |
| REVIEWER: | Scott Van Aken |
| NOTES: |
| BACKGROUND |
For a brief history on the type and a look at what comes in the box, please visit the preview.
| THE KIT |
 I won this kit in a raffle so decided
that perhaps it might not be a bad one to build. I've never built a Fujimi
Spitfire, though I have done a number of their other 1/72 kits and found a
wide variation in the quality. Not to say that there are any that are total
trash (well, maybe a couple, like their F-8 Crusader, for instance), but
some are just better engineered than others.
I won this kit in a raffle so decided
that perhaps it might not be a bad one to build. I've never built a Fujimi
Spitfire, though I have done a number of their other 1/72 kits and found a
wide variation in the quality. Not to say that there are any that are total
trash (well, maybe a couple, like their F-8 Crusader, for instance), but
some are just better engineered than others.
One of the problems with modern kits is that in order to maximize the profits from a kit, most kit makers are doing subjects that can be done in a multiple of variants. What this means to the builder is that instead of a fuselage being two halves, it may be 6, 8, or 10 parts in order to take into account differences between variants. More parts means more seams and more opportunities for the builder to really screw something up. Not to mention having to fill in those seams.
This kit is one of those.
| CONSTRUCTION |
Like any good modeler, I started by
looking over the instructions to see what holes I'd have to open and what
holes/panel lines I'd have to fill. It turns out that there are a number of
both that will have to be taken care of. First thin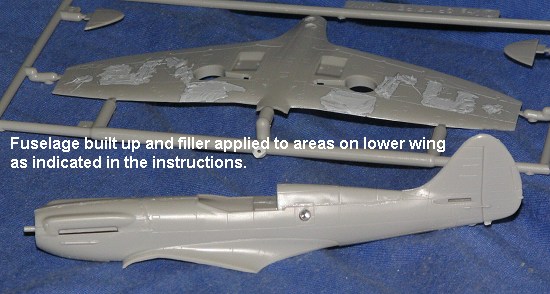 g I did was to take my
now paste-like Mr.Surfacer 500 and use it to fill in all the panel lines on
the top and bottom of the wings as shown in the instructions.
g I did was to take my
now paste-like Mr.Surfacer 500 and use it to fill in all the panel lines on
the top and bottom of the wings as shown in the instructions.
I then opened up all the camera
ports. There are two on the bottom of the wing and one on the left side of
the fuselage. I then installed the clear port on the fuselage part and cut
off the mounts on the right side as shown in the instructions. Since the
cockpit can be installed from underneath, I started gluing the fuselage
parts together. This inclu des
a two piece upper cowling and the aft fuselage spine. I found that the
upper engine cowling could be fit so that it was wide enough or tall enough
to match the rest of the fuselage, but not both. I chose the wide enough
option. The seam line for the aft fuselage spine seemed a bit odd as it
went right through access panels, but there you are and you have to deal
with what you are given.
des
a two piece upper cowling and the aft fuselage spine. I found that the
upper engine cowling could be fit so that it was wide enough or tall enough
to match the rest of the fuselage, but not both. I chose the wide enough
option. The seam line for the aft fuselage spine seemed a bit odd as it
went right through access panels, but there you are and you have to deal
with what you are given.
With all the panel lines to be
filled, the wings took a while to get done. I opened up the lower holes for
the two small blisters that go there. I'm thinking these are fairings for
the fuel pumps, but I'm not sure. After I finally had most of the filler
done, I attached the wing tips. These are, well, not really that great a
fit. They took several applications of filler as well. You can probably get
the idea that this kit doesn't fit that great and you'd be pretty well
right. After the umpteenth filler job on the fuselage, I glued the cockpit
to the lower wing after painting it British Interior Green. The instrument
panel was glued in place and the two small camera windows were glued into
the lower wing. Not much worry of damaging these as they don't fit flush
with the outside of the wing/fuselage.
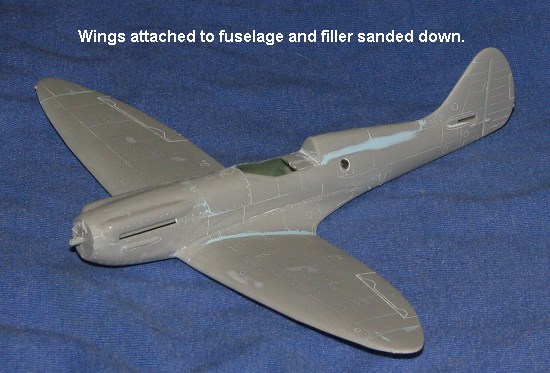
I did not install any cameras in the aircraft. One is that I felt a bit lazy and two is that for most of the time, cameras are not installed in the planes. They are only put in just before a mission and taken out right away. The last thing one wants is a camera sitting out on the tarmac for days getting corroded. Besides, what is provided is little more than a shape. I then glued the lower wing to the fuselage. Filler needed here as well.
 While all this was drying and being
sanded, I glued the radiator grilles into the under wing radiators. Then I
glued together the carb intake halves. This was sanded down once dry and no
filler was needed. Back at the fuselage, the carb intake was glued in
place. No positive locators for this so one just has to be a bit careful to
get things properly aligned. I also glued on the horizontal stabilizers at
this time making for a pretty complete airframe. Once that was dry, I
scrubbed the kit with an old too
While all this was drying and being
sanded, I glued the radiator grilles into the under wing radiators. Then I
glued together the carb intake halves. This was sanded down once dry and no
filler was needed. Back at the fuselage, the carb intake was glued in
place. No positive locators for this so one just has to be a bit careful to
get things properly aligned. I also glued on the horizontal stabilizers at
this time making for a pretty complete airframe. Once that was dry, I
scrubbed the kit with an old too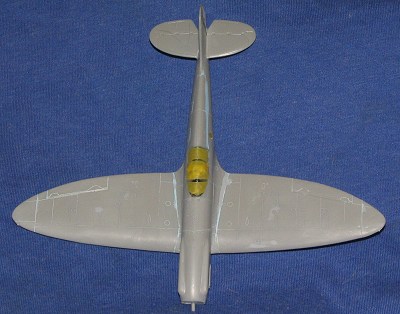 thbrush
to get rid of excess sanding dust and covered the camera ports with tape.
The radiators were painted British Interior Green on the inside and the
radiator grilles painted black then dry-brushed with aluminum.
thbrush
to get rid of excess sanding dust and covered the camera ports with tape.
The radiators were painted British Interior Green on the inside and the
radiator grilles painted black then dry-brushed with aluminum.
There is no detail at all behind the seat, which, if I'm not wrong, has to have something in there. Be that as it may, nothing is given in the kit so that area was painted British Interior Green. When dry, the canopy was glued in place and masked. I then glued in the two radiators. Fit on these was very good. I now had enough done so that I could paint it.
| COLORS & MARKINGS |
 According to the
instructions, I could have my PR 19 in any color as long as it was PRU
Blue. Having some Aeromaster acrylic left over from the Sabre that I did a
while back, I proceeded to give the kit and its spinner and outside gear
doors a good coat or two. The inner portion of the gear doors had already
been painted with aluminum. When all that was dry a few coats of Future
clear acrylic were misted on to prep things for the decals.
According to the
instructions, I could have my PR 19 in any color as long as it was PRU
Blue. Having some Aeromaster acrylic left over from the Sabre that I did a
while back, I proceeded to give the kit and its spinner and outside gear
doors a good coat or two. The inner portion of the gear doors had already
been painted with aluminum. When all that was dry a few coats of Future
clear acrylic were misted on to prep things for the decals.
Before that, however, I decided to
put the plane on its legs. The kit gear is very scale and appears a bit
fragile so I took care when doing this. I glued on the oleos and while that
was drying, brush painted the wheel wells with aluminum. I then glued in
the main gear struts. These seemed to me to be rather short and not to have
enough forward lean. However, any attempt to adjust things only made the
angle of the main wheels off center. I decided to let well enough along and
glued on the main wheels and tail wheel. To install the gear doors, I have
to cut off a section of them near the fuselage as shown in the
instructions. These were then glued in place. I a lso
glued in the exhaust which had been painted with Alclad II Jet Exhaust. The
prop blades had been painted and so they were then fit into the spinner.
Separate blades they are and I don't think I got everything properly
aligned. I really don't like separate blades on kits as I usually run into
alignment problems.
lso
glued in the exhaust which had been painted with Alclad II Jet Exhaust. The
prop blades had been painted and so they were then fit into the spinner.
Separate blades they are and I don't think I got everything properly
aligned. I really don't like separate blades on kits as I usually run into
alignment problems.
With basically everything there, I started putting on the decals. I know of no aftermarket markings for the PR 19 so one is pretty well stuck with what comes in the kit. The decals are thick and the whites are ivory and a bit transparent. The yellow data decals disappeared once they were applied. I did use Microsol solvent on them and got mixed results. It helped but also caused a wrinkle or two. There was some very minor silvering, some decals did not snuggle into panel lines and the white bits were off register just a tad. This was really only noticed on the tail flashes. I chose the lone aircraft with fuselage from the PRDU at RAF Benson in 1947/48. Once the decals had dried, the kit was wiped down and another coat of clear gloss followed by a coat of clear semi-matte was applied. Thanks to the thickness of the decals, they do stand a bit proud of the surface.
| FINAL CONSTRUCTION |
Not much left to do actually. I glued on the prop and the pitot tube. Then I applied pastel exhaust and some minor panel line detailing. The anti-collision lights were dabbed with color and the masking taken off the canopy. That really was it.
| CONCLUSIONS |
 The thing that really
strikes me about the completed kit is that it sure seems a lot more
'hump-backed' than I think a Spitfire should be. Of course, it may be some
of the photo angles, but there it is. The kit takes more work than you'd
think coming from Fujimi. General fit was not that good and the cockpit
detail level leaves a lot of room for improvement. However, with a bit of
work, one can have a nice late Spit to add to an ever-growing Spitfire
collection.
The thing that really
strikes me about the completed kit is that it sure seems a lot more
'hump-backed' than I think a Spitfire should be. Of course, it may be some
of the photo angles, but there it is. The kit takes more work than you'd
think coming from Fujimi. General fit was not that good and the cockpit
detail level leaves a lot of room for improvement. However, with a bit of
work, one can have a nice late Spit to add to an ever-growing Spitfire
collection.
Addendum:
Kit courtesy of my ability to win stuff at raffles! Thanks, IPMS Butch O'Hare!
December 2004
# 1344 in a series.
Copyright ModelingMadness.com. All rights reserved.
If you would like your product reviewed fairly and quickly, please contact the editor or see other details in the Note to Contributors.