Roden 1/48 OV-1A Mohawk
|
KIT #: |
406 |
|
PRICE: |
€30 in 2005 |
|
DECALS: |
Four options |
|
REVIEWER: |
Spiros Pendedekas |
|
NOTES: |
|
The Grumman OV-1 Mohawk is an armed military observation and attack aircraft
that was designed for battlefield surveillance and light strike
capabilities. It has a twin turboprop configuration, and carries two crew
members in side-by-side seating. The Mohawk was intended to operate from
short, unimproved runways.
 It entered production in October 1959 and served the US Army in Europe,
Korea, the VietNam War, Central and South America, Alaska, and during Desert
Storm in the Middle East. Apart from the U.S., other operators were The
Israeli Air Force and the Argentine Army Aviation. A total of 380 Mohawks
were produced.
It entered production in October 1959 and served the US Army in Europe,
Korea, the VietNam War, Central and South America, Alaska, and during Desert
Storm in the Middle East. Apart from the U.S., other operators were The
Israeli Air Force and the Argentine Army Aviation. A total of 380 Mohawks
were produced.
The first production OV-1A arrived with the US 7th Army in Germany in
February 1961. At first the aircraft had only two pylons underneath its
wings, intended for use with additional fuel tanks; shortly afterwards 54
aircraft were returned to service stations for an additional 2 pylons per
wing installation, in order to be able to carry containers for 2.75-inch
missiles, 500-pound bombs, or 5-inch Zuni missiles, with the modified
aircraft designated JOV-1A. Six of them were sent to the 23rd Special
Aviation Group in Vietnam as test platforms, but results were poor and the
“JOV” experiment was cancelled. The 54 modified aircraft were back named
OV-1A and, though they no longer performed the duties of army air support,
they kept the extra pylons.
Based out of Phu Hiep AB and later Tuy Hoa, first known as the Black Hawks,
then changed to Phantom Hawks, the brave guys of 225th Aviation Surveillance
Airplane Company flew Recon missions with their Mohawks into Cambodia, Laos
and other places.
You may read Scott’s thorough preview here (as
well as Tom’s and Dan’s wonderful
build reviews).
 I was really excited when I saw this kit hitting the shelves, back in 2005
and soon got my hands on it. Upon opening the box, I was amazed by the level
of detail: at last we had a detailed “mainstream” quarter scale Mohawk! On
the minus side, the styrene looked somehow brittle, which might be an issue
in detaching and handling little detail parts (such as the windscreen wipers
– yes, they are separate!). Also, the surfaces in general were a tad on the
pebbly side, which means a thorough all-around fine grit sanding might be
necessary before painting).
I was really excited when I saw this kit hitting the shelves, back in 2005
and soon got my hands on it. Upon opening the box, I was amazed by the level
of detail: at last we had a detailed “mainstream” quarter scale Mohawk! On
the minus side, the styrene looked somehow brittle, which might be an issue
in detaching and handling little detail parts (such as the windscreen wipers
– yes, they are separate!). Also, the surfaces in general were a tad on the
pebbly side, which means a thorough all-around fine grit sanding might be
necessary before painting).
I couldn’t hold myself and immediately started to detach the main parts from
the sprues and, in fact, attempted to glue a couple of subassemblies. Then,
for whatever reason, I lost mojo on it at those very early stages and stored
the practically unstarted kit in my SoD (Shelf of Doom), only to rediscover
it a few months ago, deciding to put it together.
I started by assembling the cockpit bits. These included the four piece
throttle quadrant, seven (!) piece instrument panel, two piece roof mounted
console and the two piece foot pedals. I particularly liked the well
detailed thin-styrene, roof console face that has to be bended and attached
onto the console body.
 I then glued the rear cockpit wall onto the cockpit floor (that doubles as a
front wheel well) and attached all cockpit bits onto the assembly, Basic
cockpit color was Hu140, with black instrument panels, anti glare dashboard,
stick grip and throttle handles, aluminum foot pedals and red fire
extinguisher (with black restrain belt). The instrument faces were silver
dry brushed, with some interest added by painting red, yellow and white
“switches”.
I then glued the rear cockpit wall onto the cockpit floor (that doubles as a
front wheel well) and attached all cockpit bits onto the assembly, Basic
cockpit color was Hu140, with black instrument panels, anti glare dashboard,
stick grip and throttle handles, aluminum foot pedals and red fire
extinguisher (with black restrain belt). The instrument faces were silver
dry brushed, with some interest added by painting red, yellow and white
“switches”.
The very detailed seats (each a 9-piece affair) were then assembled. They
were painted black, with black/yellow ejection and quick release handles,
red/green seat cushions and gray head cushions. Seat belts were fabricated
from khaki doped masking tape, their buckles simulated by my beloved
extrafine Pilot silver pen. The seats, as well as the control stick, were
left out to be installed at later phases. Apart from the lack of seat belts
(which is an easy fix), all in all I have to say that I was very satisfied
with the busyness of the cockpit (a most prominent area at the Mohawk), as
provided by the kit.
Next step was to attach the two fuselage parts together, with the assembled
cockpit and dashboard trapped between them. Fit was good, but please note
that, since this kit seems to fall into the “close tolerance” category (CAD
design?), all mating surfaces have to be thoroughly cleaned, in order to
avoid accumulative mismatches. I also attached the air brakes at “closed”
position, as most ground pics show them closed.
Moving onto the wings, I stuffed as many lead weights as I could inside the
front part of the nacelles, since the Mohawk model is a candidate for severe
tail sitting (alternatively, you may add weights aft of the cockpit, as Tom
and Dan did on their builds). The two wing halves were then joined, having
beforehand drilled out the corresponding pylons locating holes for the
version I was building. I attached the rear wing “extensions” aft of the
engines, as well as the two piece wingtips. I did not install the clear
wingtip lights (so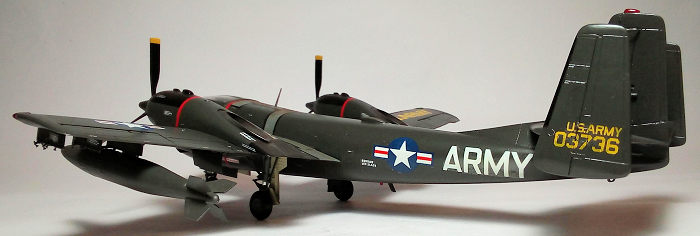 mething that I regretted, as I found out that they did not
conform well too late, with the model painted and decalled…).
mething that I regretted, as I found out that they did not
conform well too late, with the model painted and decalled…).
The instructions want you to insert the prop axles through the holes of the
engine fronts part and attach the rear parts of the prop hubs to the axles,
so the assembled props can rotate freely. Feeling that such procedure would
compromise the hub looks, I elected not to attach the rear hub parts.
Instead, I glued a styrene piece behind each axle’s rear end, as to trap the
axles, being able to attach the propellers at end phases. The engine front
parts were then attached to the wings and the wings were attached to the
fuselage. The props were assembled at that time, with their blades
feathered, as was the Mohawk’s ground posture.
The 8-piece tailplane with the two extra fins was assembled and attached at
the rear. Fit was good here, too. A balance check showed that the model’s
center of gravity was just in front of the main wheels. Though I was tempted
to add some more weight before attaching the nose, I refrained from doing
so, as the kit provided landing gear is definitely “scale”, meaning thin and
flimsy. Should some extra weight be needed, the only available minspace
would be the seats' interior…
Anyway, I attached the nose and, upon drying, I gave the model an initial
coarse sanding, followed by puttying wherever was needed (not really much).
After attaching the 4 minuscule air scoops on top of the engine nacelles and
the two exit louvers at their bottom, I gave the model, as well as the
already assembled 4-piece wing tanks, a final 1000 grit fine sanding and
headed to the paint shop!
I first painted landing gear parts, wheel rims, wheel bays and door innards
white (it is true that in those early camos the main gear doors innards were
often painted with the main camo color, an early Army practice, I assume,
but I went “all white”, which was also observed) The oleos were painted
silver, with my usual Pilot silver pen. I then painted the topside walkways
Hu140 Gull Gray. Upon curing, I appropriately masked everything, before
applying the main color.
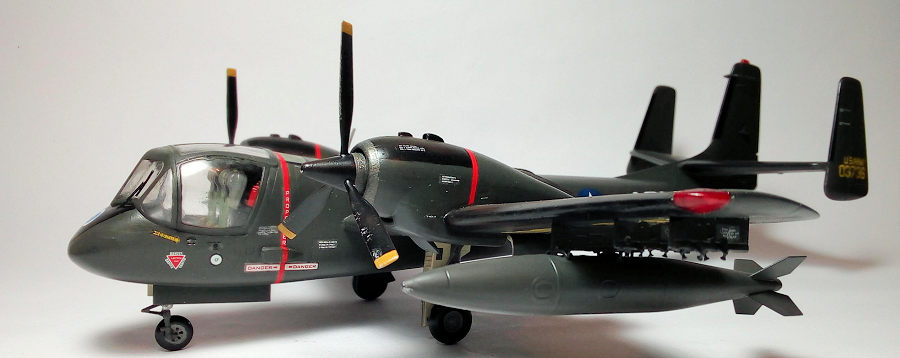
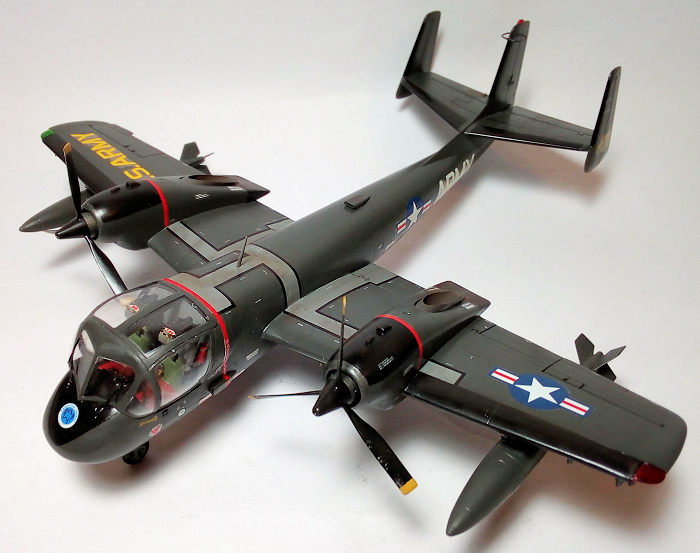
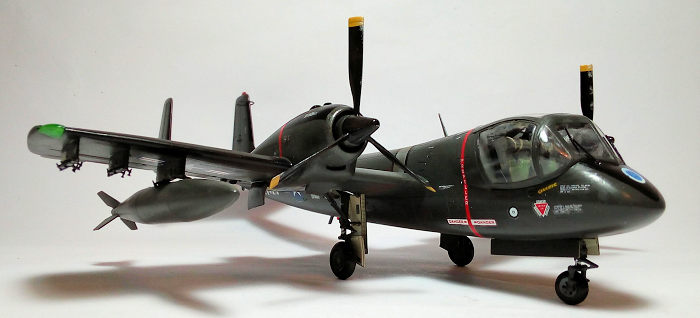 I decided to finish my Mohawk as the "Phantom Hawks” 60-3736 JOV-1A, flown
by Capt. Mike Langer, as it stood in Vietnam in December 1964. Instructions
state to paint it dark olive drab, but actually (and according to Scott’s
review) the correct color should be FS14064 “Gloss Olive Green”, which is a
dark green. One of the kit suggestions for the “dark olive drab” was Hu66. I
happen to have two 20yo bottles. Of pure curiosity I decided to use them,
as, upon stirring, the shade looked more dark green than drab, close to the
color I was opting for.
I decided to finish my Mohawk as the "Phantom Hawks” 60-3736 JOV-1A, flown
by Capt. Mike Langer, as it stood in Vietnam in December 1964. Instructions
state to paint it dark olive drab, but actually (and according to Scott’s
review) the correct color should be FS14064 “Gloss Olive Green”, which is a
dark green. One of the kit suggestions for the “dark olive drab” was Hu66. I
happen to have two 20yo bottles. Of pure curiosity I decided to use them,
as, upon stirring, the shade looked more dark green than drab, close to the
color I was opting for.
It was sprayed and cured like a charm (never had problems with Humbrol
enamel “greens”) and, after a good gloss coat with Future, I persuaded
myself that it was kind of the desired “Gloss Olive Green”! The two external
tanks, all 6 pylons and doors externals, were painted with the same color,
too.
I then masked and painted black the quite a few leading edges, the front
antiglare area and aft engine wing sections. The props were sprayed at that
time, too. The rear portion of the hubs, as well as the turboprop engine
intake lips, were carefully hand painted Testors Steel. A coat of Future
prepared the model for decals.
I used the kit decals, which, despite my initial worries, were adequately
opaque and thin, adhered well and did not silver at all.
I attached the seats and the control stick in the cockpit area. I then
attached the sway braces (painted gunmetal) to the six pylons and attached
the pylons to the wings. The external tanks were attached to the inner
pylons. The remaining 4 pylons were left unloaded. I then attached the
landing gear parts, taking my time, to obtain a reasonably aligned result.
The wheels had their tire area painted black and were attached to the
landing gear. After the glue cured, I let my Mohawk rest and, to my
satisfaction the weight added was just sufficient to prevent tail sitting,
since, as stated above, the “scale” landing gear is flimsy and will not
tolerate too much weight…
The three piece exhausts were assembled, sanded smooth, painted Testors
Burned Metal and attached. The props had their tips painted yellow (again, a
deviation from the instructions, which did not call it for the version I was
building, but I saw pics of contemporary examples sporting them). The top
antenna mast and the fin located mass balance were attached and painted
fuselage color.
 Since I had done no sun fading (meaning a relatively “fresh” painting, I
went “light” in weathering, mainly consisting in some hinges “escaping
grease”, engine staining and general dirtying. I used dry pastels of mainly
brown/black shades (some white for the exhausts, as well) and (for the
“greasing”) thinned droplets of brown tempera, faired towards the airflow.
The propeller blades received some chipping at their leading edges, too. I
then gave the model a final almost gloss coat (90/10 gloss/matt).
Since I had done no sun fading (meaning a relatively “fresh” painting, I
went “light” in weathering, mainly consisting in some hinges “escaping
grease”, engine staining and general dirtying. I used dry pastels of mainly
brown/black shades (some white for the exhausts, as well) and (for the
“greasing”) thinned droplets of brown tempera, faired towards the airflow.
The propeller blades received some chipping at their leading edges, too. I
then gave the model a final almost gloss coat (90/10 gloss/matt).
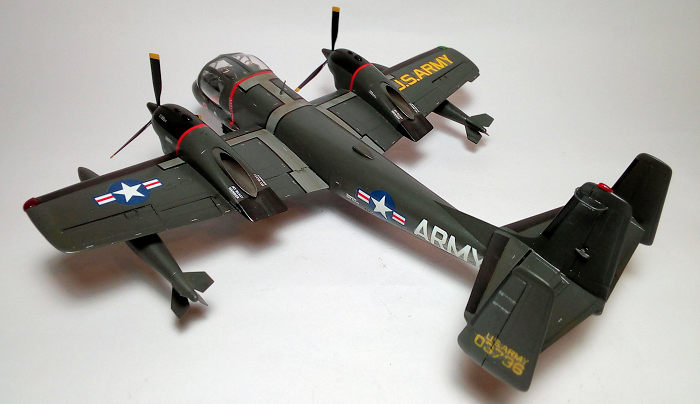
I affixed the fin top and under-fuselage beacon and the two wingtip lights,
accordingly painted with Humbrol clear red and green. I was not satisfied
with the fit of the wingtip lights, as they do not look blended enough – I
should have installed them at early construction phases and sand them
smooth….well, next time!
After I hand painted the well-defined frames of the 4 canopy parts, I
affixed them in place with spot amounts of styrene glue (I went for my usual
“closed” canopy posture, being lazy to super detail the cockpit, with the
“preserve the aircraft lines” cheap excuse…). I had to fiddle around a bit,
in order to get all 4 clear parts reasonably set, as to provide a homogenous
canopy look. The resulting gaps were taken care of white glue, with touch
ups performed as appropriate. Two windscreen wipers were fabricated from
stretched sprue, since the kit supplied ones were so brittle that they broke
upon my slightest attempt to detach them from the sprue. They were painted
black and attached to the windscreen.
There are Mohawk pics showing them sporting two aerial wires, run from the
middle fin to two different top of fuselage points. However, neither the
instructions called for any, nor there seem to be worn by Mohawks at the
early Vietnam era pics. Of course, this is just speculation, since the
blurred and “wrong angle” b/w pics leave a lot to the imagination…anyway, I
decided not to apply them.
I then called this Mohawk done!
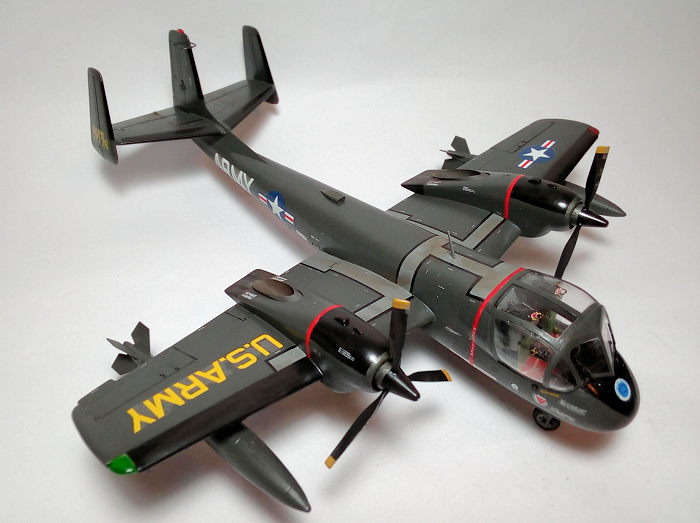
We were always dreaming of a detailed quarter scale Mohawk and Roden
provided it. The resulting model catches the distinctive shape of the Mohawk
well and looks very impressive and detailed, even out of the box (OOB). Kit
decals, despite initial concerns, behaved well, too.
Should you wish to go aftermarket, you will not be disappointed: apart from
decal options, there seem to be quite a few resin and PE enhancements out
there, ranging from PE and resin cockpit enhancements, beautiful resin
seats, bulged wheels, detailed wheel wells, nice open panel engines and
electronics bays, detailed props, wing pylons, one piece engine exhausts,
you name it!
It is not among the easiest builds, requiring good parts cleanup before
gluing, as the tolerances are tight. The smaller parts were on the brittle
side, so some extra care must be taken there. Clear parts also required some
careful placement, in order to fit in position, whereas the wingtip lights
do not fit at all, and should be attached at early wing construction stages,
in order to be sanded smooth (do the radical act to follow the instructions
here…). Taking into account the above considerations, this kit is not for
the novice modeler, but, rather for one with some accumulated experience.
Highly recommended!
Spiros Pendedekas
27 September 2021
Copyright ModelingMadness.com. All rights reserved. No
reproduction in part or in whole without express permission.
If you would like your product reviewed fairly and fairly quickly, please
contact the editor
or see other details in the
Note to
Contributors.
Back to the Main Page
Back to the Review
Index Page
Back to the Previews Index Page