Roden 1/48 OV-1A Mohawk
|
KIT # |
406 |
|
PRICE: |
$34.98 |
|
DECALS: |
Four options |
|
REVIEWER: |
Tom Cleaver |
|
NOTES: |
|
HISTORY |
September 28, 1964, Bac Lieu Airfield, Republic of Vietnam: U.S. Army Captain Freeman I. Howard taxies his Grumman JOV-1A “Mohawk” to the end of the 1,700-foot runway and prepares to take off for a return flight to Vung Tau. His Observer, ARVN 2d Lt. Don Ton That, watches as Howard applies the brakes and pushes the throttles forward to get maximum power from the two Lycoming T-53 turboprops. It’s a short, narrow strip and a warm day here in IV Corps. Dust from a previous airplane’s takeoff still obscures the field as Howard releases his brakes and the little Grumman surges forward. With a field density altitude of 2,280 feet and aircraft gross weight of 13,724 pounds, Howard will have to use the entire runway to obtain a takeoff speed of 85 knots. Just as he reaches the end of the runway, the dust clears enough for Howard to see a 20-foot high pile of gravel, 70 feet from the end of the runway and just off the centerline!
With no room to stop, Howard pulls back on the controls and rotates. As soon as the Mohawk lifts off, he hits the gear retract switch. There’s a big jolt, but the Mohawk keeps climbing. To Captain Bill Taylor, standing beside the runway, the JOV-1A seems to fly through a big cloud of dust right after liftoff.
 In the
cockpit, Howard realizes the left main gear hasn’t retracted. He cycles
the switch again, but there’s no response; the gear is down and unlocked
- the next landing is going to be hairy.
In the
cockpit, Howard realizes the left main gear hasn’t retracted. He cycles
the switch again, but there’s no response; the gear is down and unlocked
- the next landing is going to be hairy.
At Vung Tau, Howard performs a snap roll to try and lock the gear to no avail, and decides to fly on to Tan Son Nhut Air Base at Saigon, where there is paved runway and complete crash rescue facilities, including field foaming capability. By the time the Mohawk arrives, 3,000 feet of runway has been foamed for the landing. Howard makes three touchdown passes in an attempt to collapse the main gear and make a wheels-up landing, to no avail; in fact the left main locks after the first touchdown and the other won’t come down. With fuel running low, Howard decides to crash land since his observer has no training in use of the ejection seat.
Just before touchdown, Howard feathers the right engine and brings the left back to ground idle as he attempts to maintain directional control following touchdown with rudder and aileron until the right wing drops. He puts the left engine in reverse and maintains a straight rollout as the right wing settles to the ground. Fortunately, the right outboard ordnance pylon acts as a skid, which keeps the wingtip from touching the runway. After sliding 1,425 feet, the Mohawk turns right, using up another 325 feet of runway before coming to a stop just off the runway. Howard and his observer climb out uninjured.
It was later determined the airplane had struck the gravel pile at an initial point only 4 inches above the runway with all three landing gear, an event that should have pulled the Mohawk out of the sky right there. Two months later, the airplane was return for service to Vung Tau.
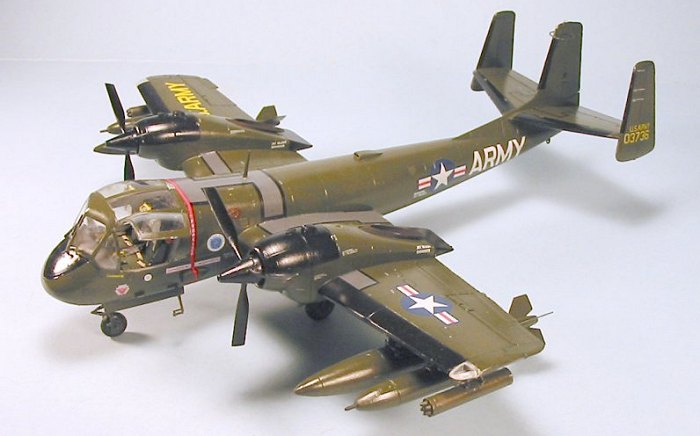
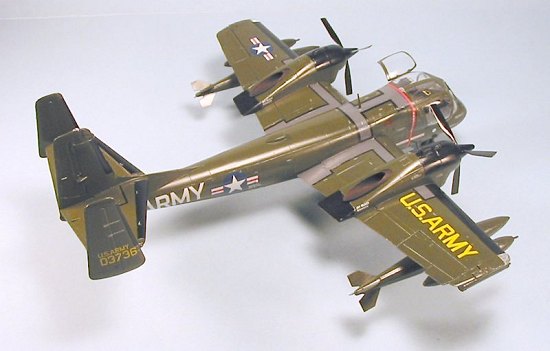
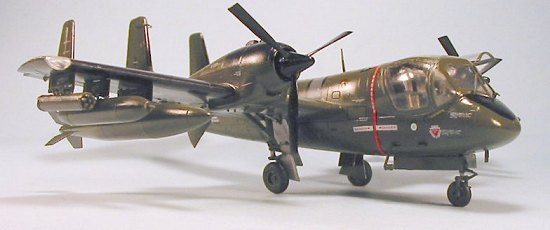
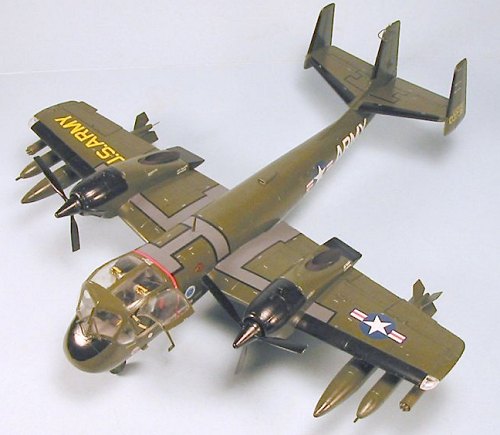
The Mohawk may have looked like a dragonfly, but it was definitely a product of the Grumman Iron Works.
 The Grumman
OV-1 Mohawk was firmly in the tradition of what was called “Corps
Reconnaissance” in the First World War, and “Army Co-Operation” in the
Second World War, i.e., purpose-built aircraft to work with the land
forces. Some of the more famous of this type are the D.H.4 and Bristol
Fighter of the First World War and the Lysander and Storch of the Second
World War. The Mohawk was firmly in the tradition of the D.H.4 - an
airplane that could definitely “hold its own” in tough circumstances.
The Grumman
OV-1 Mohawk was firmly in the tradition of what was called “Corps
Reconnaissance” in the First World War, and “Army Co-Operation” in the
Second World War, i.e., purpose-built aircraft to work with the land
forces. Some of the more famous of this type are the D.H.4 and Bristol
Fighter of the First World War and the Lysander and Storch of the Second
World War. The Mohawk was firmly in the tradition of the D.H.4 - an
airplane that could definitely “hold its own” in tough circumstances.
In 1954, in an attempt to come up with a more capable design than the then-operational Cessna L-19 “Bird Dog,” a design requirement was promulgated for a lightweight two-seat field-reconnaissance aircraft powered by twin turboprops, capable of short take off and landing from small unprepared strips, that would also be capable of being operated from U.S. Navy escort carriers. The winning design was the Grumman Model 134.
With the retirement of escort carriers, the Navy withdrew from the project, but the Army continued development and the first prototype flew in 1959, designated the YAO-1AF.
 Following the
Army tradition of naming Army aircraft after Indian tribes, the Grumman
Model 134 was first named the “Montauk,” then was later changed to
“Mohawk.” The design had a bug-like appearance, incorporating a wide
forward fuselage with bulged cockpit windows and a triple rudder, with
large engine nacelles atop a wide-chord short-span wing. When this
reviewer first saw one of these sitting on the Tan Son Nhut flight line
in 1964, it reminded me of a strange-looking dragonfly at rest.
Following the
Army tradition of naming Army aircraft after Indian tribes, the Grumman
Model 134 was first named the “Montauk,” then was later changed to
“Mohawk.” The design had a bug-like appearance, incorporating a wide
forward fuselage with bulged cockpit windows and a triple rudder, with
large engine nacelles atop a wide-chord short-span wing. When this
reviewer first saw one of these sitting on the Tan Son Nhut flight line
in 1964, it reminded me of a strange-looking dragonfly at rest.
What was by then known as the OV-1 achieved initial operational capability with the U.S. 7th Army in Germany in 1961, in time for involvement in the Berlin Crisis. The main task of this initial version was photo-reconnaissance, carrying a KA-60 high-resolution camera with night capability mounted in the fuselage.
54 OV-1s were returned to the factory for modification with six underwing pylons capable of carrying underwing fuel tanks, 500-lb bombs, 2.75-inch rockets or 5-inch Zuni missiles; with this modification, the aircraft became the OV-1A. Six of these were designated JOV-1As and sent to South Vietnam for combat service evaluation with the 23rd Special Aviation Group, which later became the 67th Aviation Company in 1965. The JOV-1As were responsible for a major blow-up between the Army and the Air Force in 1965, as ground commanders were calling on the armed Mohawks for ground support, which was supposed to be the job of the Air Force. The result was agreement that Army fixed-wing aircraft would no longer carry offensive armament. While the bureaucrats at Versailles-on-the-Potomac thought the argument was over, with the JOV-1As re-designated OV-1As, the airplanes continued to carry underwing armament throughout their active service in SEA, doing their job and not mentioning the missions to the Boys in Blue.
 While the
OV-1A may have looked strange, it was a thoroughly-competent warplane.
With its short, broad-chord wing, hydraulically operated flaps, leading
edge slats and hydraulic speed brakes, the Mohawk was very much a STOL
flying machine. More than half the wing span was within the wash of the
big, reversible pitch propellers, and the wing incorporated a pair of
hydraulically operated auxiliary ailerons that worked only when the flaps
were down, for better low-speed control. It was fully aerobatic, rated
plus 5G and minus 1.5G, and could reportedly pull up to 7Gs without
structural damage. A British test pilot who flew one when the RAF
considered operating them compared its low-level performance favorably
with the Gloster Meteor in terms of acceleration and power available.
Had MiGs ever appeared over its battlefield, it is more than likely the
little Mohawk could have more than held its own down at 100 feet or less
over the jungle.
While the
OV-1A may have looked strange, it was a thoroughly-competent warplane.
With its short, broad-chord wing, hydraulically operated flaps, leading
edge slats and hydraulic speed brakes, the Mohawk was very much a STOL
flying machine. More than half the wing span was within the wash of the
big, reversible pitch propellers, and the wing incorporated a pair of
hydraulically operated auxiliary ailerons that worked only when the flaps
were down, for better low-speed control. It was fully aerobatic, rated
plus 5G and minus 1.5G, and could reportedly pull up to 7Gs without
structural damage. A British test pilot who flew one when the RAF
considered operating them compared its low-level performance favorably
with the Gloster Meteor in terms of acceleration and power available.
Had MiGs ever appeared over its battlefield, it is more than likely the
little Mohawk could have more than held its own down at 100 feet or less
over the jungle.
The Marines made good use of Mohawk night recon data in the conduct of Operation Starlight in August 1965; at the Battle of Ia Drang in October 1965, and later during the Bong Son campaign, the few Mohawks available provided the ground forces with important visual reconnaissance reports. The Air Force used precision targeting data from OV-1s to direct B-52 strikes. Down in the Mekong Delta, Navy coastal patrol forces were directed to infiltration points discovered by Mohawk radar and infra-red sensors. The rugged construction of the airplane was a blessing for flight crews. One Mohawk returned to its base with more than 90 holes in one wing, while another came home with its tail nearly severed by hits from AAA. One Mohawk, nicknamed "Old Yeller" for all the zinc chromate dabbed over its battle patches, was finally written off after 900 combat hours. Returning to Vung Tau and discovering he couldn’t lower the gear, the pilot ordered the observer to eject, then followed himself. The abandoned Mohawk then obligingly crashed in a nearby scrap yard.
While building this model, I had a phone call from a director friend of mine here in Hollywood, who as an Army Ranger Lieutenant had served as an advisor with the ARVN Rangers in IV Corps in 1969-70. When I mentioned the model, he told me if it wasn’t for the Mohawk, he likely would have never survived for us to become friends. In late 1969, leading a patrol of Swift Boats in the Delta, he was warned of a VC ambush by a patrolling Mohawk which had discovered the enemy with its side-looking airborne radar (SLAR). Without the warning, they would have cruised straight into a very well-laid ambush. As it was, they were able to turn the tables on the enemy and hit a main VC battle unit hard. As he put it, “That airplane was underestimated by everyone who never worked with one.”
|
THE KIT |
Please visit the preview to see what comes in the box.
|
CONSTRUCTION |
 While this kit
represents a Major Step Forward in terms of production design and
production quality for Roden, and makes them at least the equal of a
new-production MPM kit, it does not yet put them in the same category as
a new-production Eduard kit like the Sopwith Camel for instance. There
is still quite a bit of flash to be cleaned up; this is a worthwhile
exercise, because the cleaner you get the parts, the better they will fit
together - properly cleaned up, the parts will fit nearly as well as a
contemporary Eduard kit. One additional point: please, Roden, polish your
molds better. Several smaller parts had a really rough surface, and it
turned out that even the larger parts have a surface that - under a coat
of paint and in the right lighting - will look like the modeler applied
the paint wrong and got an “orange peel.” In normal conditions, this
isn’t that obvious - and not obvious at all from a foot away - but it’s
apparent close up and could result in a “ding” if the model is entered in
a contest. My suggestion is that once the model is assembled, sand it
down lightly with some fine-grit sandpaper to get rid of this effect.
While this kit
represents a Major Step Forward in terms of production design and
production quality for Roden, and makes them at least the equal of a
new-production MPM kit, it does not yet put them in the same category as
a new-production Eduard kit like the Sopwith Camel for instance. There
is still quite a bit of flash to be cleaned up; this is a worthwhile
exercise, because the cleaner you get the parts, the better they will fit
together - properly cleaned up, the parts will fit nearly as well as a
contemporary Eduard kit. One additional point: please, Roden, polish your
molds better. Several smaller parts had a really rough surface, and it
turned out that even the larger parts have a surface that - under a coat
of paint and in the right lighting - will look like the modeler applied
the paint wrong and got an “orange peel.” In normal conditions, this
isn’t that obvious - and not obvious at all from a foot away - but it’s
apparent close up and could result in a “ding” if the model is entered in
a contest. My suggestion is that once the model is assembled, sand it
down lightly with some fine-grit sandpaper to get rid of this effect.
While I thought the kit assembled well enough that I didn’t use putty or Mr. Surfacer on any seams other than that of the nose cone to fuselage joint, it later turned out that I should have done some light application of Mr. Surfacer along the centerline seam, inasmuch as - once the model was painted - with the right light it is possible to see a “phantom seam” along the fuselage centerline. This doesn’t matter to me for this project, since I don’t build models for contests any more, but this is exactly the thing that would knock a model out of contention in a closely-judged contest, so my advice in retrospect would be to give the seams a bit of Mr. Surfacer and a light sanding-down, just for the drill.
 Another good
idea that turned out to be better in theory than practice was the
decision to wait on assembling the contents of the cockpit until after
the rest of the model was assembled. The result was that getting the
instrument and throttle consoles and the instrument panels into correct
position became much more “fiddly” than necessary, with some cutting and
trimming that would not have been necessary had these parts been attached
prior to gluing the fuselage halves together. So the advice in
retrospect here is, get the consoles and rudder pedals and instrument
panels in place first. I’d still leave the seats out until just before
assembling the canopy. Also, the roof “bridge” is fiddly and will need to
be modified slightly to get proper fit.
Another good
idea that turned out to be better in theory than practice was the
decision to wait on assembling the contents of the cockpit until after
the rest of the model was assembled. The result was that getting the
instrument and throttle consoles and the instrument panels into correct
position became much more “fiddly” than necessary, with some cutting and
trimming that would not have been necessary had these parts been attached
prior to gluing the fuselage halves together. So the advice in
retrospect here is, get the consoles and rudder pedals and instrument
panels in place first. I’d still leave the seats out until just before
assembling the canopy. Also, the roof “bridge” is fiddly and will need to
be modified slightly to get proper fit.
With regard to the canopy: these parts are so thin they could have been vacuformed; I haven’t seen injection-molded clear parts done that well. However, there is some slight distortion in the plastic from the molding. Even dipping it in Future - which will go a long way toward clearing things up - won’t completely solve this. I have heard some comments that the quality of this glass appears to vary from kit to kit, with some people saying it is definitely “wavy” in their kits. Mine was good enough I have no complaints. The side panels can be assembled open or closed, though the instructions show them assembled closed on both sides. If the glass in your kit is clear enough, you can do this and still see all the detail in the cockpit. One point to be sure of in assembling the canopy is to get all - and I do mean all - of the flash off the edges of the windshield. If you do this, you’ll only need a little white glue along the joint of windshield and fuselage to fair it in perfectly. The same is true with the roof part.
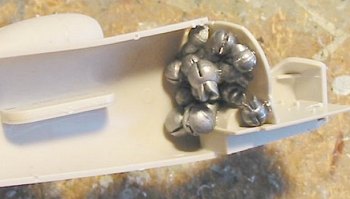 The other
important point in assembly is to get enough weight in there, because
there’s a lot of airplane model aft of the main gear. In addition to the
fish weights glued onto the back of the cockpit bulkhead shown in this
photo, I filled the nose parts of
each engine nacelle with weights. I also didn’t attach the engine
exhausts until after the model had proven it could nose sit successfully,
so that I could drop in a few more weights forward of the main gear if
necessary - in my case the original application of weight was sufficient,
but be sure to give yourself this “safety valve” of leaving the exhaust
installation to last, just in case.
The other
important point in assembly is to get enough weight in there, because
there’s a lot of airplane model aft of the main gear. In addition to the
fish weights glued onto the back of the cockpit bulkhead shown in this
photo, I filled the nose parts of
each engine nacelle with weights. I also didn’t attach the engine
exhausts until after the model had proven it could nose sit successfully,
so that I could drop in a few more weights forward of the main gear if
necessary - in my case the original application of weight was sufficient,
but be sure to give yourself this “safety valve” of leaving the exhaust
installation to last, just in case.
Beyond these
points, the assembly of the kit pres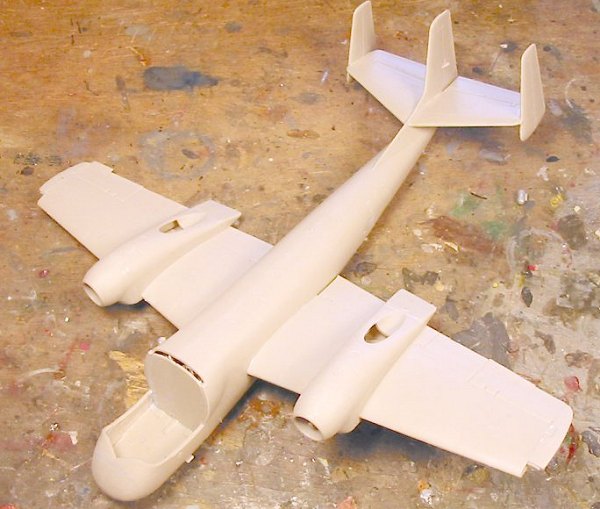 ented no difficulties. The
instructions are clear and easy to follow. I left all things like the
landing gear and the cockpit steps for final assembly. The nose strut is
designed to be attached during initial assembly, but it’s not hard to
trim the attachment points so it can be squeezed into position later. The
main thing is to take your time, test fit twice and glue once. This is
not one of those hard-to-assemble Roden kits.
ented no difficulties. The
instructions are clear and easy to follow. I left all things like the
landing gear and the cockpit steps for final assembly. The nose strut is
designed to be attached during initial assembly, but it’s not hard to
trim the attachment points so it can be squeezed into position later. The
main thing is to take your time, test fit twice and glue once. This is
not one of those hard-to-assemble Roden kits.
An important point which is not clear in the instructions is that the propellers should be assembled with the blades in full-feather if you are building a model that will be “sitting on the flight line.” All Mohawks sit on the ground in full-feather to keep the props from windmilling, since there is no gear in the turbine to stop this.
|
COLORS & MARKINGS |
Painting:
With the OV-1A, you have a markings choice of Glossy Olive Drab or Flat
Olive Drab overall. There is not (that I am aware of) an
off-the-shelf color of Olive Drab that is the correct greenish shade.
I mixed Gunze-Sangyo “Olive Drab 2" (the one that says it’s for “U.S.
Army Tank”) with Gunze-Sangyo “Khaki Green” until I got a color that
“eyeballed close” to what I was seeing in some color pictures. Having
seen one of these high-gloss Mohawks first-hand back in Vietnam, I am
aware that the
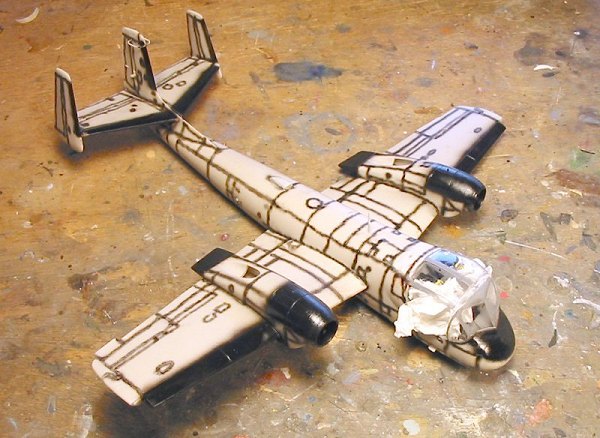 paint
was chosen because it stands up well to abusive conditions and takes
awhile to fade even in that environment. That said, after
pre-shading the model on all panel lines and then applying the mixed
color, I went back over various panels adding in first a bit more of the
Gunze-Sangyo Olive Drab color, and then a bit more of the Khaki Green
color, to get some slight tonal differences - these may not be visible in
the photos here, and it’s not that apparent in person without good light,
but it’s enough to keep the model from being completely monotone without
making it look freakishly faded. If you are going to do a later
flat-finish Olive Drab, it’s the same shade of OD-Green, but subject to
more fading, so you can “have at it” with sun-fading if that’s what you
want to do.
paint
was chosen because it stands up well to abusive conditions and takes
awhile to fade even in that environment. That said, after
pre-shading the model on all panel lines and then applying the mixed
color, I went back over various panels adding in first a bit more of the
Gunze-Sangyo Olive Drab color, and then a bit more of the Khaki Green
color, to get some slight tonal differences - these may not be visible in
the photos here, and it’s not that apparent in person without good light,
but it’s enough to keep the model from being completely monotone without
making it look freakishly faded. If you are going to do a later
flat-finish Olive Drab, it’s the same shade of OD-Green, but subject to
more fading, so you can “have at it” with sun-fading if that’s what you
want to do.
When I pre-shaded the model, I also painted the black areas of the engine cowlings, anti-glare panel and de-icer boots, masked them off, then painted the grey areas of the walkways and masked them off, then painted the wheel wells and interior of the gear doors gloss white and masked them off, before proceeding with the application of overall Olive Drab.
Decals:
 Roden has had a
so-so reputation with their decals, and I read a recent comment by a
modeler building this kit that he had experienced total kit decal failure
on his project. I had no problem with the kit decals, other than that
the black borders for the walkways were thin and two of them folded up unusably. I replaced all the walkway borders with narrow black decal
striping from a stripe sheet in the decal dungeon. The yellow “U.S.
ARMY” and serial numbers, and the white “ARMY” decals were opaque and
presented no problems. The sheet provides every little stencil the
airplane had, and I nearly went blind applying them following the decal
placement instructions, remembering that the hi-viz airplane had white
stencils. Given that there are some very interesting markings schemes
shown in the Squadron “In Action” book, one hopes the aftermarket folks
will come out with some additional decals for this kit and the upcoming
OV-1B/D kit.
Roden has had a
so-so reputation with their decals, and I read a recent comment by a
modeler building this kit that he had experienced total kit decal failure
on his project. I had no problem with the kit decals, other than that
the black borders for the walkways were thin and two of them folded up unusably. I replaced all the walkway borders with narrow black decal
striping from a stripe sheet in the decal dungeon. The yellow “U.S.
ARMY” and serial numbers, and the white “ARMY” decals were opaque and
presented no problems. The sheet provides every little stencil the
airplane had, and I nearly went blind applying them following the decal
placement instructions, remembering that the hi-viz airplane had white
stencils. Given that there are some very interesting markings schemes
shown in the Squadron “In Action” book, one hopes the aftermarket folks
will come out with some additional decals for this kit and the upcoming
OV-1B/D kit.
|
FINAL CONSTRUCTION |
 I took most of a modeling day to assemble the very detailed landing gear
in position. The cockpit side panels went into position with no
problem, and the last thing was to attach the props, give the model a
final nose-sit test and then attach the exhausts.
I took most of a modeling day to assemble the very detailed landing gear
in position. The cockpit side panels went into position with no
problem, and the last thing was to attach the props, give the model a
final nose-sit test and then attach the exhausts.
Unfortunately, it was after the model had been completed and taken out to Planes of Fame museum that some photos became available that showed the way the cockpit side panel opens, which is not from an upper hinge (as one could logically expect) as I did it here, but rather from fore and aft hinges so that the upper end of the side panel slips down inside the opening. Oh well - too late to take care of that now.
|
CONCLUSIONS |
As I said, the first time I saw a Mohawk, I thought it looked like a dragonfly, and the model captures that look perfectly. With only a little extra effort during construction to clean up the parts and test-fit everything first, the end result is a really good-looking model of an airplane that - as my friend said - “was underestimated by everyone who never worked with one.” The Mohawk is certainly a worthy inheritor of the tradition established by the D.H.4, and worthy of inclusion in any comprehensive model collection. Even modelers I know who don’t build modern airplane models like this model once they see it. I am definitely looking forward to the OV-1D, and if anyone comes up with the U.S. Geological Survey decals for this, I could see a third model showing up in the collection. The Mohawk is weird enough to be cool. Highly recommended.
June 2004
Copyright ModelingMadness.com. All rights reserved. No reproduction in part or in whole without express permission.
If you would like your product reviewed fairly and quickly, please contact the editor or see other details in the Note to Contributors.