| KIT #: | 07320 |
| PRICE: | $58.00 SRP |
| DECALS: | Two options |
| REVIEWER: | Andrew Garcia |
| NOTES: | December 2012 boxing. Resin with brass U12 Gunpack |
| HISTORY |
There have been many fine builds and histories of the Fw-190A appearing on Modeling Madness so I will point you to a good explanation of the “-5” series provided by Tom Cleaver.
In addition to Tom’s comments I would note many later Fw-190A fighters carried two 7.92 mm machine guns and two or four 20 mm cannon. Though impressive, this armament was frequently ineffective against American heavy bombers like the B-17. Gun pods were added beneath the wings, which increased the armament to two 7.92 mm machine guns and six 20 mm cannon. With that much firepower the Focke Wulf Fw 190A-5/U12 was a bomber killer but lost its edge against prowling escort fighter. The Fw-190A-5 was also a testbed for Rustsatz 1 (R1) kits for Fw 190A; two planes (BH+CC, W.Nr. 150813 and BH+CD, W.Nr. 150814) with such armament were completed.
| THE KIT |
FW-190 aficionados have been following the 1/48 scale FW-190 product release dynamics for many years. The current crop of state of the art kits started with Trimaster followed by DML/Dragon re-releases of the Trimaster kits. Then Hasegawa and Tamiya followed by more recent Eduard FW-190 kit releases provided increasing 1/48th scale builders with ongoing happiness with every new release. I have built them all and enjoyed all of them. In this kit review we look at Hasegawa providing us with their usual re-boxing with new decals and some minor added parts to bring a new release to life.
 For me
personally this was a humorous release because years ago (early 1990’s), I
saw a color profile in a Japanese language publication of and badly wanted to
model the aircraft featured is now in this releases box top art. At that time, I
used the Trimaster kit MA-8, did some hand drawn decals of the 2./JG11 unit
emblem which is some chap sitting on a top hat toilet painted with their
adversaries flags. That toilet humor marking did not impress me as much as the
overall painting of the airframe including a red stripe and white tail – but my
reference showed a yellow stripe! After
coming up dry with finding any aftermarket decals (Aeromaster released it later)
and feeling I had to have one, I scrounged up some of the under wing stores
along with the hand drawn decal and built it to call it my prized possession
(until my next conversion build). I still like that kit so it has stood the test
of time. (Your editor also built this same scheme using the
Academy 1/72 kit)
For me
personally this was a humorous release because years ago (early 1990’s), I
saw a color profile in a Japanese language publication of and badly wanted to
model the aircraft featured is now in this releases box top art. At that time, I
used the Trimaster kit MA-8, did some hand drawn decals of the 2./JG11 unit
emblem which is some chap sitting on a top hat toilet painted with their
adversaries flags. That toilet humor marking did not impress me as much as the
overall painting of the airframe including a red stripe and white tail – but my
reference showed a yellow stripe! After
coming up dry with finding any aftermarket decals (Aeromaster released it later)
and feeling I had to have one, I scrounged up some of the under wing stores
along with the hand drawn decal and built it to call it my prized possession
(until my next conversion build). I still like that kit so it has stood the test
of time. (Your editor also built this same scheme using the
Academy 1/72 kit)
Once again I can’t answer why Hasegawa released a new mould Fw-190 when so many other aircraft awaited the Hasegawa touch. After initially releasing the FW-190A using mostly DML/Dragon OEM parts, Hasegawa keeps coming out with new releases refining its FW-190A line with subtle improvements in kit engineering. For those who have built them, the ease of assembly and pleasant finished product is my gut feel of why Hasegawa keeps re-releasing and selling their FW-190’s with so many alternatives in the market.
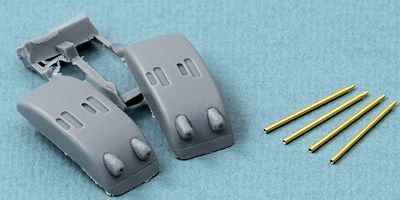 This limited
edition kit features a new gun pack and metal gun barrel parts, plus decals for
two Luftwaffe fighters. (Editor's note: to save on dwindling server space, I
have just included the image of the new bits. There are plenty of Hasegawa
FW-190 reviews that show the basic sprues) The A-5 saw several Umrüst-Bausätze
kits. A special version labelled “U12” was created for bomber attack, outfitted
with the standard 7.92 mm (.312 in) MG 17 and 20 mm MG 151 but replacing the
outer wing 20 mm MG-FF cannon with two under wing gun pods containing two 20 mm
MG 151/20 each, for a total of two machine guns and six cannon.
This limited
edition kit features a new gun pack and metal gun barrel parts, plus decals for
two Luftwaffe fighters. (Editor's note: to save on dwindling server space, I
have just included the image of the new bits. There are plenty of Hasegawa
FW-190 reviews that show the basic sprues) The A-5 saw several Umrüst-Bausätze
kits. A special version labelled “U12” was created for bomber attack, outfitted
with the standard 7.92 mm (.312 in) MG 17 and 20 mm MG 151 but replacing the
outer wing 20 mm MG-FF cannon with two under wing gun pods containing two 20 mm
MG 151/20 each, for a total of two machine guns and six cannon.
Despite the moulds being in constant use through re-releases, the moulding is still superb, with no flash or sink marks evident maintaining its crisp plastic surface. Surface detail is the usual Hasegawa with neatly engraved panel lines, crisp fasteners, along with a subtle fabric effect on the control surfaces. The transparent parts are thin and crystal clear.
As now happens frequently, due to the relatively high Hasegawa kit pricing months after a release you find many retailers putting them on sale at an attractive price due to slow sales at the high, new price points, in the U.S. market. Hasegawa’s Fw-190A features finely engraved panel lines, excellent overall shape and detail, a highly detailed cockpit, nice wheel wells and landing gear, a canopy with separate parts and an optional centerline drop tank so there is value there at the right price.
I prefer the Hasegawa kit releases with decals which are printed by Cartograph. They are so thin, well printed and compliant that when applied they add a lot of value to a kit. This release does not have any indication as being from Cartograph. They are a bit thicker but still usable. The artwork has superb details, somewhat more accurate than some of the aftermarket versions. There are no photo-etch parts with the kit but you can build a nice OOB build without them. The kit comes with excellent stencil details on the decal sheet. I have used the kit decals for the cockpit instrument panel and side panels but do not follow Hasegawa’s instructions stating “level surface before applying decal”. Instead, I retained the plastic surface contours and applied Microscale’s “set” solution, positioned the decal and then used Microscale’s “sol” on the top once the decal was positioned. The decals have conformed perfectly to the raised plastic detail and in my opinion appear much better than the flat dimensions of color etched parts If Hasegawa’s instructions are followed the decal would look similar to a flat etched part. By maintaining the plastic contours with the kit decals a better end result can be obtained. For an OOB build you will be very pleased this Hasegawa release.
At the current Hasegawa (MSRP) retail price or even when purchased for less from discounters’, it is a bit higher in price than I prefer given the alternatives from Tamiya, Eduard and DML. This is where the Eduard kit offers a very competitive alternative and at a much better price in the weekend edition. In my previous builds of this plastic I did not see any need for an aftermarket resin cockpit and just some Eduard color etch seatbelts filled the need for extra detailing with the Hasegawa kit. In my Trimaster/DML builds I used every resin aftermarket cockpit piece I could buy only to have them disappear into the narrow and closed up Fw-190 interior. With that memory in mind I feel no resin in the cockpit area is required unless you are building an ultimate Fw-190A build.
If cost or budget is your concern then I would suggest getting the Eduard or Tamiya kits – unless you can find Hasegawa on sale. After building this kit I enjoyed it so much that I now keep an eye out for Hasegawa Fw-190’s when they go on sale because it is a beautiful kit to build. If you don’t want to open up a lot of the interior and have an interest in a fast and smooth build I recommend you look at this kit.
This model is very easy to construct. The instructions are typical Hasegawa quality including the colors and markings section. The instruction booklet is what every modeler has come to expect from Hasegawa with Gunze Sangyo paints called out . Printed on non-gloss paper the details are reasonably clear and well illustrated. I did not find any other problems with the assembly sequence. I have used the clear plastic parts for the wing tips green and red formation lights. They look very nice once painted with clear Tamiya colors.
I like the Hasegawa kit plastic in the cockpit area. There is no dry fitting or other problems to deal with unlike that posed by some resin cockpits. Hasegawa’s plastic kit cockpit detailing in their recent kits is very nice. By adding some of the Eduard color etched bits to the Hasegawa plastic cockpit parts a very nice build can be had without getting into an AMS build.
Although you can paint the kit plastic instrument dials and dry brush the details because it would look “OK”, I prefer to use the kit supplied instrument dial decal instead. I do this with most Hasegawa FW-190’s and use the Eduard zoom etched or German colored etch for its seatbelts.
With careful placement the decals usually conform perfectly to the excellent kit plastic instrument moulding using Microsol and Microset. The benefit of this is you can drill into the decal once it is dry and place small rods made from thin guitar wire that allow for the attachment of the very small Eduard etched throttle and “T” handles for your instrument panel. Once attached and dry a dab of thin red paint on the “T” handles makes them look great.
I find attaching the “T” handles and small levers directly to Eduard’s etched metal to be too difficult or prone to installation accidents. If your skills are better than mine or you have mastered this step and can get the potential results from a direct attachment also adding all the levers to the Eduard painted parts without affecting them – go for it! I found the use of glued in metal guitar wire as backing posts to make the job easier.
The Hasegawa FW-190’s usually have a small fit problem with the underside wing to fuselage join. After building several of them and seeing the same problem with all of them to the conclusion it is a fundamental mould error. I have experienced the same exact gap with all the kits. It was in the same famous spot where many Hasegawa kits have a small problem – in the wing to fuselage join area. I fix it by using some thin plastic sheet as a shim and gluing it with MEK solvent which is the same as Testors liquid glue. Once dry and sanded it disappears.
I compared some photos to the Hasegawa upper wing to fuselage join and feel this area could be better. It looks good to a casual view and the seam cleans up nicely but when compared to the way the Fw-190 wing is attached it is not accurate. The join is a curved segment and the kit has a shallow almost 90 degree join.
Another problem area has been with the attachment and fit of the landing gear covers. I had to cut some just to get the right look in the past.
The main parts of the kit go together like a breeze. The fuselage halves clip together neatly, and the wings have interlocking tabs at the roots to ensure the seams looks just like a panel lines. The cowl assembly (a frequent source of frustration in some other manufacturer's radial engined '190s) is quite straightforward, and the stabilizers again have interlocking tabs to ensure they sit true and square. Basically, modellers with even minimal experience should have few problems with the styrene parts. The under wing gun packs are very neatly cast in gray resin, with minimal pour-stubs to clean-up. The parts are clearly marked L and R, and are designed to slot into recessed locations in place of the standard kit's optional panels for the original 20mm MG-FF outboard guns which were not carried on the 'A-5/U12. The fit is precise enough for them to simply clip into place. IN addition to the resin gun packs, the kit provides a set of four turned brass gun barrels. These have hollowed-out muzzles and are a definite improvement over solid plastic barrels. I only wish Hasegawa would have provided an extra matching pair for the wing-root guns.
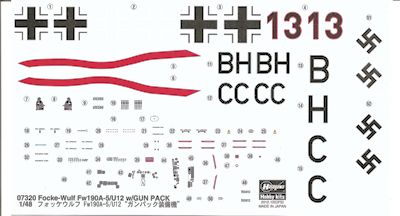 Two sets of
markings are provided:
Two sets of
markings are provided:
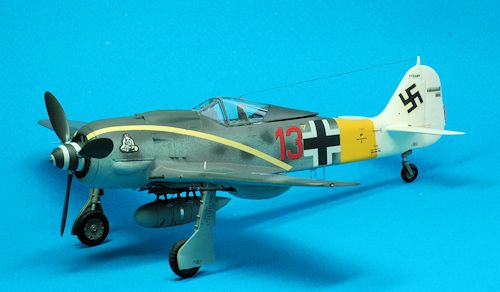
A. "Black 13", Wrk. Nr. 410266, flown by Lt. Erich Hondt, 2./JG 11, October 1943.
B. Prototype aircraft, Wrk. Nr. 150813, with the civil registration “BH-CC”.
There are two styles of swastikas printed at the edge of the sheet. I am not sure why two are on the sheet since only version #51 is called out for use in the kit instructions. I had read somewhere on the web that the Work Number, “Wrk. Nr.” for scheme A was printed on a small patch of RLM 76 to avoid the need for masking it on the aircraft's white tail. My kit did not have this small patch of RLM 76 so perhaps there are alternate market decal releases? That review noted that a reference photo of "BH-CC" shows the final 3 digits of the Work Number repeated in large white numerals on the cowling - although this may not have been a permanent addition.
| CONCLUSIONS |
The king of limited release kits has given us another nice factory conversion. I do like these as being well documented conversions and when on sale are very cost effective compared to buying a donor kit and other aftermarket component and decals releases. Taking a look at the wonderful Modleing Madness Kit Research tables contributed by Tony Hodun l found six other FW-190A-5 releases. Take a look at this link if you have not been exposed to this resource, take a brief look at the tables if you like Hasegawa kits – it is fantastic!
August 2013
If you would like your product reviewed fairly and fairly quickly, please contact the editor or see other details in the Note to Contributors.