Academy 1/72 FW-190A-5
Kit Number: 178
Price: $4.50
Decals: one version
Reviewer: Scott Van Aken
Date of Review: 7 August 1997
The FW-190 is an aircraft familiar to all Luftwaffe modelers. Needless to say it was the most successful war-time designed aircraft of the Luftwaffe, able to keep one step ahead of allied aircraft and improvements. Used first as a fighter and later developed into a very successful fighter-bomber, the Fw-190 saw action on all fronts and was used by many of Germany's allies during the war. Not modeled as much as the Bf-109, mainly, in my opinion, because it was not seen in as many different camouflage schemes as the more prolific 109. Fw-190s were basically RLM 74/75 upper with 76 lower surfaces and mottling on the sides. This is pretty much the standard scheme though late war and those units operating in the Soviet Union did deviate from this.
The Minicraft (now Academy) kit of the Fw-190 is one of the better 1/72 kits on the market, with nicely engraved surfaces that match, good cockpit and wheel well detail and a nice decal sheet. Molded in light grey, the kit has several options including different underwing armament, drop tank and two different canopies. There was no flash and mold separation lines were minimal making preparation a quick task.
Since I was doing an A-5, I needed to make one change and that was to remove the pitot tube from the wing tip and move it inboard, a simple matter of cutting it off, drilling a new hole in the wing and installing it. The kit itself was a true joy to build offering no problems at all during construction. I used the typical amount of putty for me (more than most of you would use), but this was contained to the fuselage and fuselage/wing join.
Cockpit accommodations are good for this scale including a properly molded seat, control column, instrument panel and (if I remember) rudder pedals. There is no sidewall detail. I would not suggest a lot of work in this area as one cannot see too much in the cockpit unless you have the canopy open (mine is closed). There is also no reason to do a lot of engine work as the cooling fan does a super job of denying visibility in this area.
Once the cockpit is suitably assembled and painted (RLM 66), the fuselage is assembled. Next question is if the cowling should be attached before or after the wings. I chose to attach the wings first. After they were glued on, the engine inserted in the cowling and the cowling attached. I chose to leave off the rotating prop option as it would have meant installation at this time. Great care needs to be taken installing the cowling as it must be aligned properly to fit well. Not a problem, just an area that needs several dry fits to prevent hassles. Once the glue set, the area was given whatever sanding and putty were needed. The tailplanes, windscreen and canopy were than attached , as were the underwing cannon, adf and other antennas, and the assembly ready for painting. At this time I also drilled out the gun barrels; not an easy task in 1/72!
 While that was drying, smaller items were attended to. This included
painting the prop, cooling fan, wheels, struts, and gear doors. It was also
time to pick a paint scheme. I already knew that it would be 74/75/76
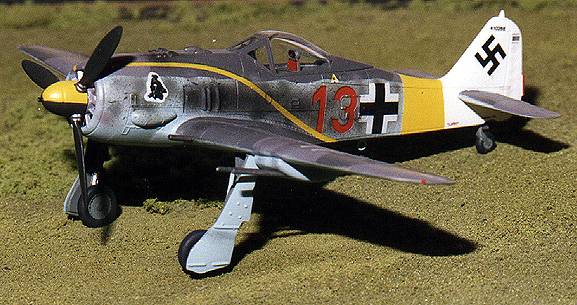
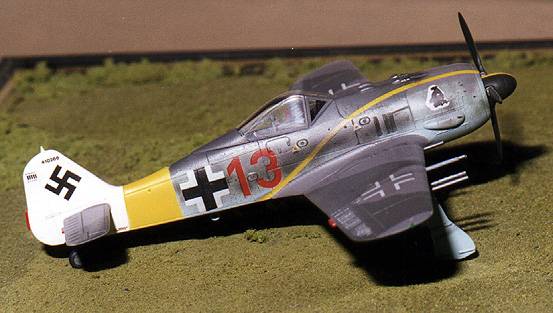
and the pattern was pre-determined as it seems all Fw-190As were painted
the same. I had an Almark decal sheet for Reich Defence (C10), that
had an interesting 190 with a yellow fuselage band, white tail and yellow
stripes running from the cowling to the aft wing root. This aircraft (werke
number 410226) was flown by Lt. Erich Hondt in late 1943 with 2/JG11. It
was an A-5/U12 with the underwing WB151/20 20mmcannon packs. These cannon
in addition to the four guns of the standard 190 must have given quite a
punch.
While that was drying, smaller items were attended to. This included
painting the prop, cooling fan, wheels, struts, and gear doors. It was also
time to pick a paint scheme. I already knew that it would be 74/75/76
and the pattern was pre-determined as it seems all Fw-190As were painted
the same. I had an Almark decal sheet for Reich Defence (C10), that
had an interesting 190 with a yellow fuselage band, white tail and yellow
stripes running from the cowling to the aft wing root. This aircraft (werke
number 410226) was flown by Lt. Erich Hondt in late 1943 with 2/JG11. It
was an A-5/U12 with the underwing WB151/20 20mmcannon packs. These cannon
in addition to the four guns of the standard 190 must have given quite a
punch.
Painting commenced with the standard scheme applied first using a combination of Gunze and Xtracolor paints. After that dried, suitable masking was done and the tail section was painted white. After that dried and was masked, the yellow tailband was added. The white and yellow were Testor's Model Master enamels. After the paint dried, the landing gear and doors were attached. The aircraft was then gloss coated using Future and set aside to dry. The decals worked very well. They are reminiscent of Modeldecal in thickness and quality. They reacted well to Solvaset, hugging every crack and bump. A compressive stencil set is included with the Almark set but I decided to forego most of them as it would have tripled the decalling time.
A final gloss coat followed by a semi-matte coat completed the scheme. The masking was removed from the canopy, exhaust stains sprayed on and the final bits added. A really fine kit. I'm unsure of its availability, but if you like the subject, I do recommend this kit to all.
For all you experts there is one major glitch in the model. See if you can find it.