Valom 1/72 Hampden Mk.I
| KIT #: | 72033 |
| PRICE: | $38.00 |
| DECALS: | Two Options |
| REVIEWER: | Lee Kolosna |
| NOTES: | Short run kit with photo etch parts. |
| HISTORY |
Great
Britain went to war in September, 1939 with five different bomber aircraft:
the Battle, Hampden, Whitley, Blenheim, and Wellington. Of those, the first
was obsolete, the Hampden and Whitley barely acceptable, the Blenheim was
upgraded in performance and served in other war theaters, and only the
Wellington was robust enough to continue serving for the rest of the war. 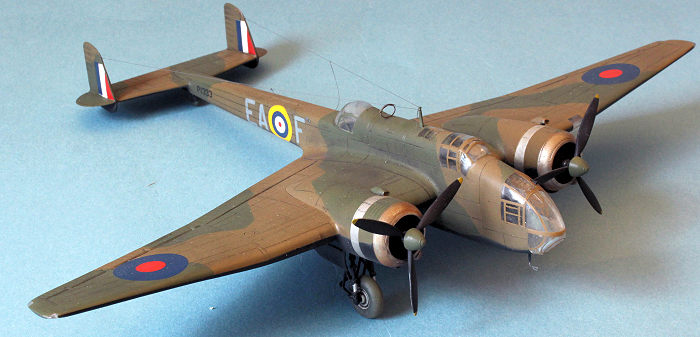 The
Hampden outfitted ten squadrons at the start of hostilities and was quickly
put to use observing German naval activity, dropping leaflets, and laying
mines. Based on the mauling that Blenheims received at the hand of 100
miles/hour faster German fighters in the early days, the Battle was retired,
and the Whitley, Hampden, and Wellington were devoted almost exclusively to
night operations. The Hampden continued service with Bomber Command and
Coastal Command for another three years before being drawn down in favor of
more modern designs.
The
Hampden outfitted ten squadrons at the start of hostilities and was quickly
put to use observing German naval activity, dropping leaflets, and laying
mines. Based on the mauling that Blenheims received at the hand of 100
miles/hour faster German fighters in the early days, the Battle was retired,
and the Whitley, Hampden, and Wellington were devoted almost exclusively to
night operations. The Hampden continued service with Bomber Command and
Coastal Command for another three years before being drawn down in favor of
more modern designs.
The Hampden was considered delightful to fly with excellent handling and good turning capabilities, but it was uncomfortable for the crew due to poor cockpit heating, a cramped internal environment limited by the narrow fuselage dimensions, and a genuine fear by crew members of being unable to bail out in time if the aircraft was going down. It had decent range and was the first British aircraft to bomb Berlin in August 1940. Coastal Command used the aircraft for anti-shipping and reconnaissance duties, finally being retired a year after Bomber Command gave theirs up for good.
| THE KIT |
Valom, a small Czech model manufacturer, issued this low-pressure injection-molded kit in 2008 in five different variations. This review is for the very first one issued, a B. Mk I. As with all Eastern Europe limited production kits from that era, one has to expect that fit will be a challenge, parts won’t have locating pins, the clear parts will be difficult to integrate into the model, photo-etch parts will be provided, and sprue attachment points will be thick. This kit exhibits all those characteristics. On the good side, there are nicely recessed panel lines on the wings and fuselage and the shape is accurate. Decals are provided for two aircraft, one from Bomber command in Dark Earth and Dark Green over Night and one from Costal Command in Dark Sea Grey over White. There are photo-etch seat harnesses, instrument panel, direction-finding antenna loop, and a few smaller interior parts. An acetate piece provides the instrument faces.
The kit has some issues that I addressed while building my model. Note that this isn’t a comprehensive list, but the ones that I encountered:
 · The
clear parts are too wide for their respective openings in the fuselage. I
needed to add a wedge of sheet styrene to spread the fuselage a bit wider to
make a reasonable attempt at getting them to look flush with the surrounding
fuselage. AZmodel made a complete replacement set of clear parts for this kit,
but I don’t know if this is available any longer.
· The
clear parts are too wide for their respective openings in the fuselage. I
needed to add a wedge of sheet styrene to spread the fuselage a bit wider to
make a reasonable attempt at getting them to look flush with the surrounding
fuselage. AZmodel made a complete replacement set of clear parts for this kit,
but I don’t know if this is available any longer.
· The landing gear are ridiculously too fragile for even this small and light model. I had to beef up the attachment points (if you can call them that – just dimples on the roof of the wheel wells) with reinforcements made from sheet styrene.
· The modeler has to create their own attachment point in the tail wheel well using sheet styrene. Valom does give the proper dimensions for this mounting piece.
· Interior detail is merely adequate. Valom includes some grainy period photographs of the interior sections as an aid to those who might want to spruce things up.
Both Carmel Attard and the late Greg Ewald reviewed this kit for Modeling Madness in the past and I encourage everyone to read those excellent reviews here and here. In my quest to build a collection of Bomber Command aircraft in 1/72 scale, a Hampden is a required subject. Airfix has an ancient offering with golf-ball sized rivets, raised panel lines, and almost no interior detail which still can be made into a decent representation of the aircraft. I knew going into this project that I was going to be tested with all the challenges that a limited-run kit presents. In this, I wasn’t disappointed. This model is a bear to build.
| CONSTRUCTION |
I started by painting the interior surfaces with Vallejo Model Air Interior Grey-Green. Photo-etch harnesses were draped over the pilot, navigator, and gunner seats and painted with Vallejo USAF Brown. The flight instruments acetate was placed behind the photo-etched panel and mounted in a fuselage half. The rudder pedals and throttles are also provided in photo-etch. Various consoles on the cockpit sides were painted Vallejo Flat Black and a dark wash was applied to the surfaces to break up the monotone color, followed by a dry-brushing of light gray to highlight the edges of interior components for the appearance of more depth.
Dry-fitting the fuselage halves together and testing the fit of the too-wide nose glazing and canopy pieces, I installed a shim cut from sheet styrene just ahead of the windscreen in order to slightly widen the fuselage to allow a better attachment for the clear pieces. I glued the fuselage pieces together with CA glue in order to prevent ghost seams appearing months later, and sanded the seams to a smooth finish.
 The modeler is instructed to produce a block of sheet styrene 2 x 3 x 5 mm
and insert it into the upper horizontal stabilizer piece as a mount for the tail
wheel strut. The top and bottom horizontal stabilizer pieces were glued
together and seams filled all around. The vertical stabilizers are butt joins
with the horizontal pieces, so those were glued and carefully monitored to
insure proper alignment while they dried, with seams filled at the roots.
The modeler is instructed to produce a block of sheet styrene 2 x 3 x 5 mm
and insert it into the upper horizontal stabilizer piece as a mount for the tail
wheel strut. The top and bottom horizontal stabilizer pieces were glued
together and seams filled all around. The vertical stabilizers are butt joins
with the horizontal pieces, so those were glued and carefully monitored to
insure proper alignment while they dried, with seams filled at the roots.
Next up were the wings. Two flat plates are glued inside the top wing pieces to act as a ceiling for the wheel wells. There are only very shallow dimples to allow for the landing gear struts to be glued to, which is completely unacceptable. I drilled the dimples out and added a strip of sheet styrene towards the rear to give the landing strut assemblies something to butt up against and support the weight of the model.
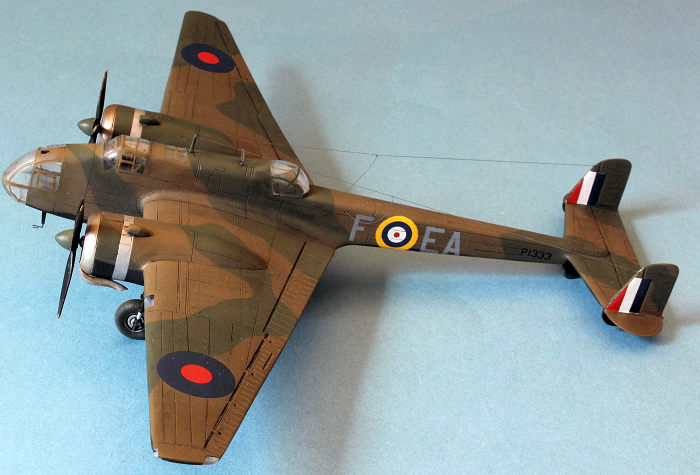
The wings were glued together and notches cut out of the front and rear of the wingtips in order to add clear position light covers. I drilled a hole in the corners and added a tiny drop of red paint (port wing) and green paint (starboard wing) to represent the colored light bulbs. The kit gives you the front covers as clear pieces, but nothing for the back ones, so I cut some pieces out of a clear plastic sprue and glued them in. I sanded the clear covers to conform with the surrounding wing surfaces. These were polished back to clarity with a nail buffer.
I painted the engines with Alclad II Lacquer Jet Exhaust, added a dark wash to accentuate the recesses of the cylinder cooling jackets, and inserted them into the cowlings, which are molded as a top and a bottom piece with air intakes added to both. The resultant seams had to be filled.
I cleaned up the landing gear struts and assembled them. Who in the world designed this ridiculously fragile set of kit parts? The plastic used by Valom is kind of rubbery, which doesn’t help instill confidence. The hoop that goes around the wheel is particularly prone to breakage.
 Now, the hard part. First, the twin guns for the upper emplacement need
slots cut out of the clear glazing, and the bottom canopy needs to have a hole
drilled for a single gun to pass through. I did neither after realizing how
much gluing, filling, sanding, and polishing was going to be needed to get these
ill-fitting pieces in place in line with the fuselage contours. My model’s
defensive armament is going to be depicted in the stowed position, or that’s
what I said to myself. I had a terrible time getting these clear pieces looking
somewhat decent, with multiple sessions devoted to the seams and polishing,
polishing, polishing to get the clear plastic back to some semblance of
transparency.
Now, the hard part. First, the twin guns for the upper emplacement need
slots cut out of the clear glazing, and the bottom canopy needs to have a hole
drilled for a single gun to pass through. I did neither after realizing how
much gluing, filling, sanding, and polishing was going to be needed to get these
ill-fitting pieces in place in line with the fuselage contours. My model’s
defensive armament is going to be depicted in the stowed position, or that’s
what I said to myself. I had a terrible time getting these clear pieces looking
somewhat decent, with multiple sessions devoted to the seams and polishing,
polishing, polishing to get the clear plastic back to some semblance of
transparency.
Similarly, the attachment of the three-piece cockpit canopy and the two-piece nose glazing sucked up enormous amounts of time. This process also obliterated all the outlines of the canopy frames. I was moderately successful in getting a smooth transition between the fuselage contours and the too-wide nose greenhouse and cockpit canopy. The two mid-section gun emplacements also were faired in pretty well, but I was not able to get the plastic to behave and the underside emplacement still has a frosted look to it. Oh well.
The wings are a butt join to the fuselage sides. I used Tamiya Extra-thin cement to attach the pieces, and filled the resultant gaps with CA glue for strength. The same arrangement was made for the rear empennage, with yet another butt join to the thin fuselage section.
All the panel lines lost in the extensive seam-filling process were restored with a scriber. I washed the model in a mild solution of dish soap and rinsed it with clean water, allowing it to air dry. I masked off all the clear sections: nose glazing, cockpit canopy, cockpit window, two fuselage windows, both gun emplacements, and four position light covers as I prepared for paint.
| COLORS & MARKINGS |
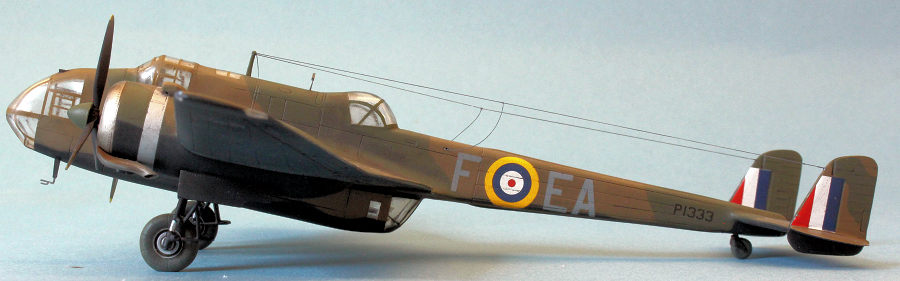
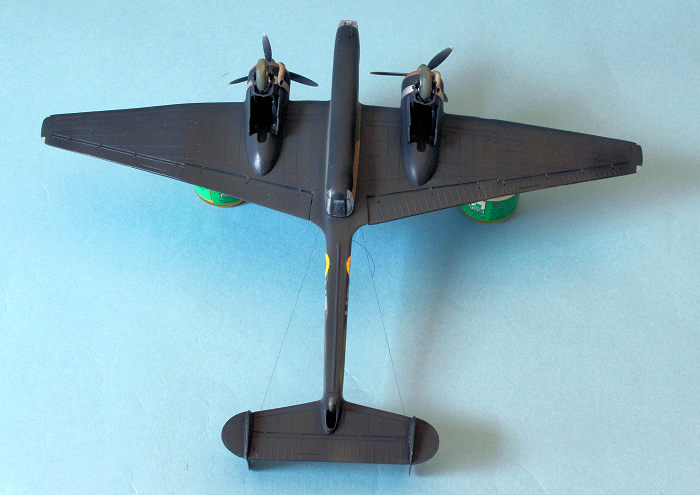
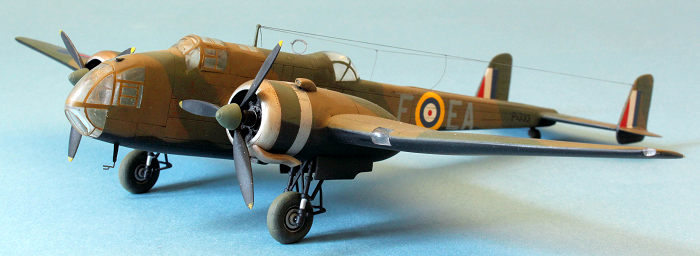
I first primed the entire model, including the wheel wells, with Vallejo black Surface Primer. Period photos of Hampdens show that the landing gear were also painted Night, rather than the silver indicated in the kit painting instructions. Vallejo’s Surface Primer is not a pure black and does a good job in this scale of replicating the tonal qualities of Night. I masked off the demarcation line with the topside camouflage and sprayed Vallejo Model Air RAF Dark Earth and let that dry. The next day, I drew the disruptive camouflage pattern on drafting tape, applied it to the topsides, and sprayed the exposed areas with Vallejo USAF Dark Green FS34079, which is also a reasonable match for the RAF Dark Green paint.
Model manufacturers usually instruct the modeler to paint the radial engine exhaust collectors on the leading edge of the cowls with either bronze or copper paint. This may be appropriate for a brand-new airplane that has never been flown, but period photographs don’t corroborate this recommendation. The Pegasus engines of the Hampden had an aluminum ring at the front the cowl, followed by a patchy red-brown color aft. I sprayed the front of the cowls with Alclad Aluminum, and then harshly rubbed in red and brown chalk pastel dust in the section behind that. It turned out just okay, and in future projects with subjects featuring British radial engines, I’ve chosen to use a transparent layer of red-brown paint instead.
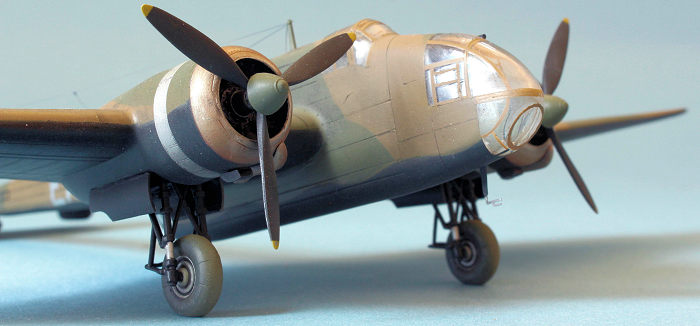 The cowl flaps are unpainted aluminum, so they were masked off and painted
with Alclad. With that, the painting was done and the masks removed. A coat of
Quick Shine Multi-purpose Floor Polish was used to prepare the model for decals.
The cowl flaps are unpainted aluminum, so they were masked off and painted
with Alclad. With that, the painting was done and the masks removed. A coat of
Quick Shine Multi-purpose Floor Polish was used to prepare the model for decals.
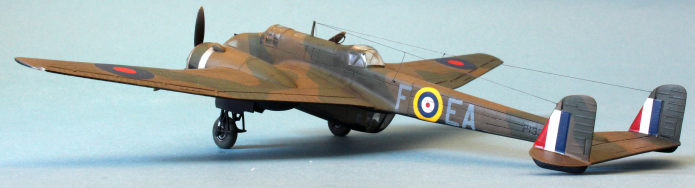
The kit decals for Hampden P1333 as serving with 49 Squadron in 1940 were applied to the model, using a small drop of Quick Shine to aid in adhesion. These went on well and did not present any difficulties. Another coat of Quick Shine was sprayed over the decals after they dried and it was time to weather the finish.
I applied a pre-mixed dark enamel wash made by MIG Productions to the panel lines. Staining emanating from the exhaust port down the starboard side of each nacelle was done with dark chalk pastel applied with a brush.
The wheels were painted with Vallejo Tire Black and sprayed with a thinned mixture of Polly Scale Mud around the circumference. The propellers were painted Vallejo Flat Black with Yellow tips (4 scale inches!!). The prop hubs were Vallejo USAF Dark Green. Propeller abrasion was replicated with a thin mist coat of Aluminum on the back side of the blades with a silver color pencil used to depict chipped paint on the leading edges.
A filter of highly-thinned Vallejo USAF Brown was sprayed over the entire model to tone down the starkness of the colors. A coat of Vallejo Matt Varnish sealed all the weathering effects.
Then it was on to the tedious job of masking and restoring all the canopy frames. I used photographs to determine what went where and carefully masked the frame widths with Tamiya tape. This took several hours of effort and lots and lots of touchups, but I think I got it looking reasonably accurate.
| FINAL CONSTRUCTION |
 There
are tiny balance horns provided for the elevators. Nope – not gonna use those
because experience has taught me that they wouldn’t last more than five minutes
before I snapped those off. I glued in the landing gear, glad that I had
drilled out the locator holes for the struts and fashioned a stop at the rear of
the wheel well ceiling to give the rear struts something to attach to for
strength. The props and their hubs went on the shafts. The fiddly bits like
the antenna mast, ADF direction loop, pitot tube, and forward-firing machine gun
were carefully installed. I gave some thought to drilling holes in the two gun
emplacement transparencies but decided against it because it would mean that I
would have gun barrels sticking out on the outside without corresponding gun
breaches on the inside, which would look silly. The very last task was to
attach the twin aerial wires and their leads, which were fashioned with nylon
“invisible” thread and painted a dark gray. With that I was done, and frankly, I
was exhausted by this model.
There
are tiny balance horns provided for the elevators. Nope – not gonna use those
because experience has taught me that they wouldn’t last more than five minutes
before I snapped those off. I glued in the landing gear, glad that I had
drilled out the locator holes for the struts and fashioned a stop at the rear of
the wheel well ceiling to give the rear struts something to attach to for
strength. The props and their hubs went on the shafts. The fiddly bits like
the antenna mast, ADF direction loop, pitot tube, and forward-firing machine gun
were carefully installed. I gave some thought to drilling holes in the two gun
emplacement transparencies but decided against it because it would mean that I
would have gun barrels sticking out on the outside without corresponding gun
breaches on the inside, which would look silly. The very last task was to
attach the twin aerial wires and their leads, which were fashioned with nylon
“invisible” thread and painted a dark gray. With that I was done, and frankly, I
was exhausted by this model.
| CONCLUSIONS |
Yuck! I knew going in that this was going to be a challenging model to build and for that, it met every expectation. The Hampden is a fairly important aircraft in that it served with Bomber Command for three years and Coastal Command for four before being replaced by more modern designs. I think this subject is begging for Airfix to come out with a new-tool kit, and there is always hope that this will appear sometime in the future. For now, we have the 1968-era Airfix kit, or we have this limited-production kit from Valom that is difficult to build. I wanted a Hampden in my 1/72 scale collection of British World War II bombers, and I got one. But I can’t say that I enjoyed the experience at all.
5 June 2026 Copyright ModelingMadness.com. All rights reserved. No
reproduction in part or in whole without express permission from the editor.
If you would like your product reviewed fairly and fairly quickly, please
contact the editor or see other details in the
Note to
Contributors.