Valom 1/72 P5 Hampden
| KIT #: | 72045 |
| PRICE: | $69.99 MSRP |
| DECALS: | Two options |
| REVIEWER: | Greg Ewald |
| NOTES: | Short run kit with so-so clear bits |
| HISTORY |
One
of the earlier twin engine bombers in the arsenal of Great Britain, the Hampden
was a mixed bag of good ideas and marginal engineering.
It enjoyed a fairly “stealthy” profile and good speed (260 mph or so),
but was limited in its bomb loadout and crew multi-tasking.
The fuselage was so thin in profile that you could bang
 both of your
elbows just attempting to turn around for another cup of tea.
both of your
elbows just attempting to turn around for another cup of tea.
Each of the four crew members was separated from the others during the flight,
which must have really sucked for those in the plane who lost a pilot during a
run. One can imagine the shouts of “hey, what the H is going on up there?”
ringing about the cramped aircraft.
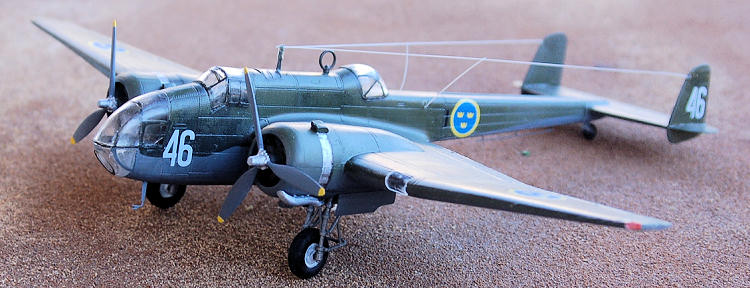
Sweden bought one of the aircraft for testing, and named it the “P5” (provflyplan
5=test plane 5), but decided to buy the much more adaptable JU-86 from Germany
as a medium bomber (which doesn’t say much for the Hampden). Saab acquired the
airframe and used it for a series of tests, for what I do not know, unless it
would be testing how far the human body can bend into small spaces for a lengthy
period of time.
The Hampden was fairly ineffectual as a low level bomber, but did have a bit of a hay day with spotting enemy shipping and during night attacks. Those who flew in her really earned their salt. It certainly was an interesting looking bird, and a fun subject to model.
| THE KIT |
This is the same model produced by Valom for the British version, just with
different decals, and it has the exact same attributes and negatives.
The scribing of the panel lines is superb, almost beyond belief, but the
fit of the parts is horrendous. I
did build this one OOB, but if not for a review, I would have vacuum formed the
canopies over, as they are far oversized and hard to get into place.
 The styrene is of the highest quality, easy to sand and fill (thank the heavens)
without destroying the detail.
The styrene is of the highest quality, easy to sand and fill (thank the heavens)
without destroying the detail.
The instructions are easy to follow, if you ignore the parts listing on the
first page, a number of the parts are mis-labeled.
Some of the moldings were confusing to me, as they were split up into
multiple parts for no reason I could fathom. If there is going to be zero detail
in the undercarriage bay, why mold it separately?
You get a fantastic set of instructions, and a separate colour guide to help you
through the building process, even with some b/w shots of the real aircraft’s
cabin. I wonder how they fit a
camera in there?
Decals are as good as they get ! Thin, pliable, and stick to the surface like a remora on a fat tiger shark (they are very nice decals).
| CONSTRUCTION |
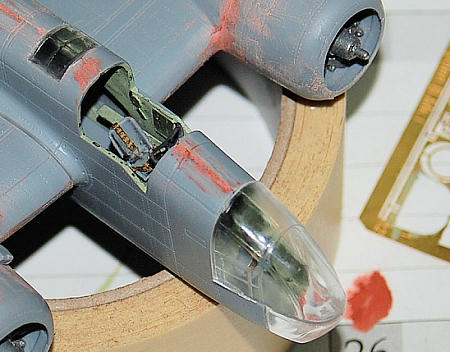
Well, as in most scale planes the real work begins in the cockpit, so, steps 1-4
deal with this directly. 12 pieces
go into the pilot’s den, and they are tiny, so work over a broad area or
sacrifice to the carpet monster. The detail is unbelievably great, too bad that
it will be covered up by the clear bits in the end.
The photo etched seatbelts are superb, but I didn’t care for the levers and foot
pedals as they were just too thin to really work with. A trim tab lever is
usually a fair amount thicker than a belt. Superdetailers will want to replace
these pieces.
 On top of paying for a kit, in step five, you get to make your own parts! Isn’t
this exciting? Yep, you need to make a block to center the tail wheel into.
Trust me, don’t skip this bit of scrapping, or you’ll regret it later. Placing
the block in the tail section was easy, as long as you have some scrap styrene.
This goes along with the main gear as being confusing to me why it just wasn’t
engineered into the kit?
On top of paying for a kit, in step five, you get to make your own parts! Isn’t
this exciting? Yep, you need to make a block to center the tail wheel into.
Trust me, don’t skip this bit of scrapping, or you’ll regret it later. Placing
the block in the tail section was easy, as long as you have some scrap styrene.
This goes along with the main gear as being confusing to me why it just wasn’t
engineered into the kit?
The engine casting is magnificent, but the cowls are something else, if yours
fit together marginally, you are doing very well. Putty, sand, repeat. The
outside of the cowls are wonderful, and if you are careful with the psr, come
out quite nicely, with fine detail that hopefully you have managed to not cover
up.
The wheels. Oh, the wheels. The exploded diagram in step 7 will give you the
willies, but continue on, brave modeler! I put together the gear sans wheels at
first, using a slow setting gel super glue, I knew these things would be in for
a workout. Sturdy once completed, yes !
Set them aside to dry thoroughly. A week or so should do it.
After test fitting, I found that just
gluing the front prongs together is the easiest way to get these things in line.
Step 8 , in which you attach the fuselage halves together ,is possibly the most
difficult part of the build (and we are just about half way through!). Ambiguous
location points and myriad details can confound the builder. I recommend using a
fast setting C/A glue for the navigator’s seat, as well as the belly
gunner/spotter’s.
If you are building the Swedish version, don’t bother with the guns (though they
are well cast), as I don’t believe it carried them. Well, at least it spares you
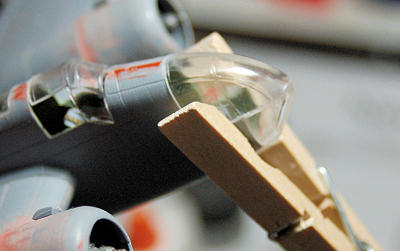
some time from drilling through the solid canopies, right?
 Unfortunately, now we come to step 9, which was the most problematical for
me. Mr. Attard, in his wonderful build, did manage to keep glue smears from
interrupting his work
-see here.
Unfortunately, now we come to step 9, which was the most problematical for
me. Mr. Attard, in his wonderful build, did manage to keep glue smears from
interrupting his work
-see here.
I, however, do not posses the mad finger-knotting skills of Carmel, and did
manage to get one pane smeared with glue. I tried sanding, but to no avail. I
will just have to put it down to “battle damage” !
I centered the clear canopy, using some scrap styrene to offset the
difference, and then when it was dry, began to fill. While the filler was
drying, I did mask off the whole thing, prior to the next few sessions of PSR.
This will take some time, as you have to be careful to not remove any of the
detail, yet actually make the clear parts look like they are part of the
airframe.
Attaching the wings to the fuselage.
The fit is actually quite nice, and only a minimal amount of putty is
needed to get them into ready. Once again, I used a heavy and slow setting gel
to lock these things into position.
Now, with the wings on, you can finally glue on the tail and get it straight.
Use a slow setting glue so you can adjust the tail section while your spouse
asks you what the he** you are doing, due to the lack of location points, and
loud groaning noises. If I was
going to build this kit again, I would make a jig.
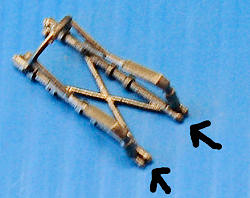 Attaching the landing gear is a real…a real…well, let’s just call a spade a
spade, shall we? Horrible location points and flimsy bits of styrene don’t work
together well. I tried doing it two ways:
Attaching the landing gear is a real…a real…well, let’s just call a spade a
spade, shall we? Horrible location points and flimsy bits of styrene don’t work
together well. I tried doing it two ways:
One: following the directions. Whoops.
Two: gluing the upper main carriage gear strut ends together prior to
attachment. +1 ! This way, the struts actually work as struts, and are easily
attached to the flat panel with dimples on the bottom of bay, as noted above.
(see photo)
Do be sure to use a very, very, very heavy glue to affix the carriage bases to the nacelles, they will be bearing the weight of the craft while it sits on your shelf. We wouldn’t want Aunt Bessie to crumble down, now would we?
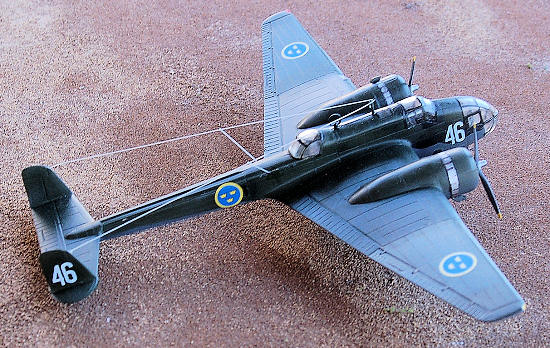
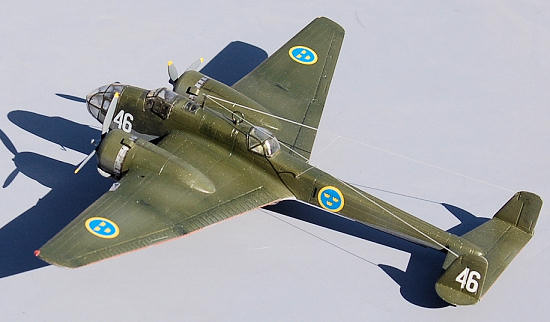
| COLORS & MARKINGS |
Lots of greenhouse on this bird, so
break out the tape or a fine brush when you go to paint it up. The Swedish
version is rather dull, standard dark green over a light gray bottom, but at
least the decals set it off somewhat.
I sprayed mine (after masking) with a light gray, then taped off the
bottom. I used India ink for the subtle panel lines,
it works wonders! For those
of you who haven’t tried it yet, give it a whirl- it doesn’t bleed through at
all, and is easy to airbrush on.
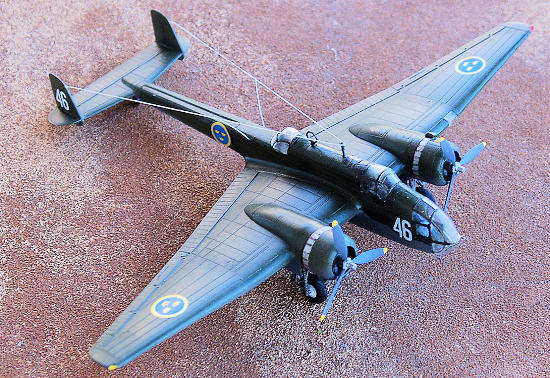 When the green went over the top ( I used Tamiya acrylics), the lines barely
show, absolutely perfect ! Instead of spraying the model with Future, as I
normally do, I decided to try something new, and used a tile floor polish (Jasco)
because it is sold in a satin, gloss, and flat. Wow. A gallon for 20 bucks? Sign
me up ! It dries fast and smooth,
and gives off a nice sheen without being too glaring.
When the green went over the top ( I used Tamiya acrylics), the lines barely
show, absolutely perfect ! Instead of spraying the model with Future, as I
normally do, I decided to try something new, and used a tile floor polish (Jasco)
because it is sold in a satin, gloss, and flat. Wow. A gallon for 20 bucks? Sign
me up ! It dries fast and smooth,
and gives off a nice sheen without being too glaring.
I did not paint the props to match the original, and I can only plead the cause
of boredom, they needed some sort of yellow on them, so I did the tips. The
Swedish plane had metal propellers that were unpainted or just primed, looking
at the photos.
Speaking of the decals, these have to be about the finest I have ever used. They flatten nicely, zero silvering, and are in perfect register. I think the other hobby-kit makers could use a lesson from these people. The yellow comes off crisp and clean, even over the dark green ! Hey, that rhymes!
| FINAL CONSTRUCTION |
Adding on the metal who-has and what not is the easiest part of this model. The
photo-etch is superb. Rigging the aerials turned out to be somewhat of a
disaster for me at first, turns out I was using some junky styrene for the
stretched sprue that melted with a/c glue. My fault.
Attach the line at the top of the tail fin(s) and let it dry, then run it
over (gently) to the top of the antennae mast and glue it (them) in position.
Wait a bit. Do something fun for half an hour, and then come back and glue on
the lines that go from the fuselage to the wires. Another quick whoop-de-do with
the Jasco satin, and you are set !
| CONCLUSIONS |
 If you really, really want an accurate Hampden bomber, then this kit is for you.
It is definitely not for the faint of heart, or someone who is not used to short
run kits. The detail is exquisite, the fit so-so.
If you really, really want an accurate Hampden bomber, then this kit is for you.
It is definitely not for the faint of heart, or someone who is not used to short
run kits. The detail is exquisite, the fit so-so.
This type of model almost becomes a legendary part of your life, having to
battle through some shortcomings, but in the end, is absolutely spectacular.
I really wish they had molded the clear pilot’s canopy in one piece, so that it
could be pushed back as a static airplane, and show off all of that wonderful
detail, though.
| REFERENCES |
http://www.avrosys.nu/aircraft/Misc/925P5.htm
Thanks to Valom for providing the review kit.
April 2009
If you would like your product reviewed fairly and quickly, please contact me or see other details in the Note to Contributors.