UM 1/72 Armored Self-Propelled Leningrad railroad car
| KIT #: | 604 |
| PRICE: | $11.95 from http://www.scale-model-kits.com |
| DECALS: | Yes, there are decals |
| REVIEWER: | Scott Van Aken |
| NOTES: |
| HISTORY |
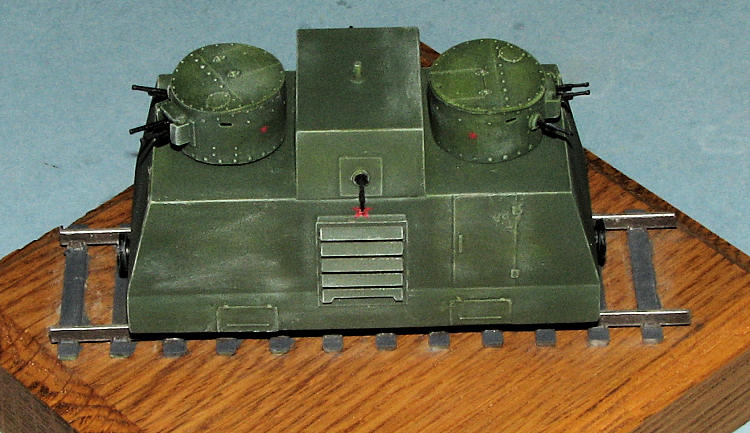
As usual with things like this, I was unable to find a whole lot about this particular vehicle outside what little is provided by the kit instructions. Basically, this was built in 1941 by the Kirov plant and was part of the armored train 'National Avenger'. Built of 8-12 mm armored sheet steel, there were armored doors and ventilation sections, but it must have been a miserable existence to be inside one of these when it operated. Using BT-2 turrets, each with two DA-2 machine guns and a single DT gun, and two more on the side of the hull, their ability to inflict damage on attacking infantry was considerable. Crewed by 7 or 8 men, these sorts of weapons were effective, especially in the long expanses of the Soviet Union. This particular self propelled car operated until the end of the war
| THE KIT |
If you have built many or any UM kits, you'll find that they are generally molded in a green plastic. This one is no exception to that and UM provides three sprues as well as a photo etch sheet. Two of the sprues are for the BT-2 turrets and there are parts that are not used on this and the main sprue, pointing to possibly other types of armored railroad cars. The quality of UM kits is generally very good and so it is with this one. I found no real problem areas aside from the way the section of track is provided. This has a lot of ejector pin marks on the ties that will need to be sanded down as they are on the 'up' side. I was also somewhat disappointed that there was no wood grain detail on the track ties, but since many of them will be sanded smooth, perhaps this isn't such a bad deal.
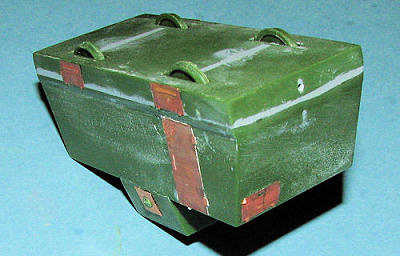
There really isn't that much to things as there are not any grab handles, tools or other things you'd normally find on a tank. Most of your construction will be with the turrets and adding the photo etch. Etched brass is used for all the doors and the side cooling vents for the engine area. This particular piece will need some careful folding to portray these vents open. In with the photo etch are additional machine gun barrels that look to be a bit better molded than those on the sprues.
Kit instructions are nicely drawn with lots of clear illustrations. Paint information is generic and Humbrol numbers with basically steel, black and olive drab being the main colors. A nicely done decal sheet is provided. This sheet is quite generic and though the instructions show three decals being used on the turrets and side of the car, it gives no indication as to which three they are!
| CONSTRUCTION |
 Looking through the kit and instructions prior to building, I noticed that there were quite a few unused parts, which often means a relatively short build. So it was in this case. The first thing I did was to fill in the sink areas. There are some large ones under the bottom as well as on the sides where the alignment pins are located. These will filled with Tamiya putty, with a couple of three applications being needed.
Meanwhile, I looked for other things to do and found them in the form of cleaning up the wheels where the sprue attachment points invaded the flanges. This was a bit of a pain to clean up, but using small files, I was eventually able to get things carved down. I also had to drill some holes in the gun mounts for the turrets. The instructions are rather vague on just where these go, but I broke out the drill twist and soon had these done. Then I fit the gun mount piece into it and set it aside.
The turrets are two halves and a top for the basic construction. These were cemented together with the usual filler needed, and when dry, I tried to fit in the small gun mount. Either the mount is too large, the opening too small or both. I enlarged the opening until the mount piece fit properly, again, using small files.
 Back at the body, I glued the supplied axles into the wheels, first doing one wheel and when dry, attaching the other. The axle is quite thin and flimsy and I'd recommend replacing it with either metal rod or thicker plastic rod if you want the wheels to roll. These were then installed in the lower body section. This section also needs the holes for the bumpers drilled out. They attach about where the alignment pins are located so that makes it easy to locate the proper place to drill. There are small round machine gun ports that go on the turrets and upper body work. These were glued in place. They are a real pain to cut and clean so take care.
At this time, I attached the upper section to the large body piece and started gluing on the photo etch. This material is paper thin, making it easy to remove, a bit more difficult to clean, and something one has to be careful of when attaching. I made the mistake of gluing these bits on before gluing on the lower section. Don't do it until the body is pretty well complete aside from attaching turrets, guns and bumpers. I managed to damage a couple of these during later sanding. Fortunately, they are thin and one could even say that the damage looks authentic.
Back at the turrets, the top was glued in place along with the little curved shields around the gun opening. Instructions were a tad vague on exact placement, but the box top art helped. I left off the guns until later as well as the end bumpers.
| COLORS & MARKINGS |
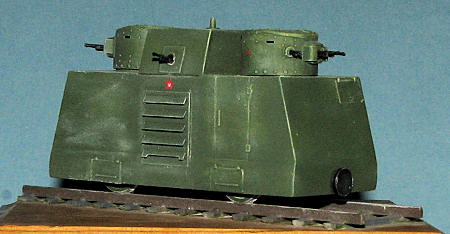
With basically all the bits in place, everything was painted in Russian Armor Green. It seems a bit dark to my eyes, but later dry-brushing (I used a light grey and light green), were able to brighten things up a bit. The guns and bumpers were painted black. I then realized I'd forgotten to put on the large vent piece. This was trimmed and the vents opened by grabbing them at the hinge line with a pair of flat nose pliers then running a thin piece of sprue behind them to open them up. When one does this, start at the bottom and work up or you'll run out of room to hold on with the pliers. This was glued on and the area painted again.
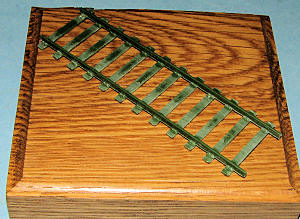 As this is meant to be on rails, a section of track is included. All of ejector pin marks used to push the part out of the mold were on the ties. This made it easy to clean up. I found an old awards base (thank, IPMS EH Miller) and put the track on in the diagonal after trimming off a tie so it would fit. I'd thought about adding grass and gravel, but decided to leave it as it was. When it came to paint, everything was done with a brush. I first painted the rails and attaching bits withTrackbase: Track Color Paint as it had the look of old, rusted metal. The ties were painted with several different shades to see which looked best. I settled on Model Master US Army Helo Drab. Then the rail tops were painted with Humbrol Aluminum as the tops of rails are always shiny if the track is used. This was applied to the face of the wheels as well.. I also used the Warpigs Weathering Pigments that I reviewed a couple of days back and they added some color and interest to things as well. Then, I used some of the small red stars from the decal sheet and put those on the turret an body sides. The instructions just say to apply markings so I used the stars. Figured they'd be on there. Used Solvaset on them as I didn't put down a gloss beforehand.
| FINAL CONSTRUCTION |
 This consisted of gluing the vehicle to the rails (superglue), then adding the guns. You get three on the sprues and the other five in the bag with the photo etch. These latter ones are quite thin compared to the ones on the sprues. The bumpers were also glued in place and the turrets pushed into the very tight holes in the upper bodywork. Then some more dry brushing, more pastels and a coat of matte clear was painted on. That was it.
| CONCLUSIONS |
OK, so I know that some of you will think this is little more than turrets on a box. But it was fun to build, is something that most of us don't do, and makes for a conversation piece. Besides, I know many of you read MM because you get to see stuff like this. It allows some practice with photo etch for those still squeamish about using it and it doesn't take up much shelf space. Total build time was around 10 days, thanks to its simplicity and had I not filled in sunken areas and seams, it would have been much less.
| REFERENCES |
 Kit instructions for the most part.
July 2009
Copyright ModelingMadness.com. All rights reserved. Thanks to http://www.scale-model-kits.com for the review kit. Get yours today at a good discount. If you would like your product reviewed fairly and fairly quickly, please contact the editor or see other details in the Note to Contributors. Back to the Review Index Page
2018