Revell 1/72 Bf-109G-10
| KIT #: | ? |
| PRICE: | $8.00 SRP a while ago! |
| DECALS: | Two options |
| REVIEWER: | Scott Van Aken |
| NOTES: | Loon Models upgrade wing and fuselage sets |
| HISTORY |
To me, the
G-10 was probably the most interesting of the109 series produced. These
airframes were partially rebuilds of older airframes, but mostly new build
construction. What was done was that these aircraft were brought up to 109K-4
standards as much as could be. G-10s are difficult to tell from late G-6s and
G-14s unless one could read the serial numbers as these reconstructed air frames
got new serials. Thanks to information from Ferdinando D'Amico, I have
learned that the G-10 was produced new in large numbers, which is new
infor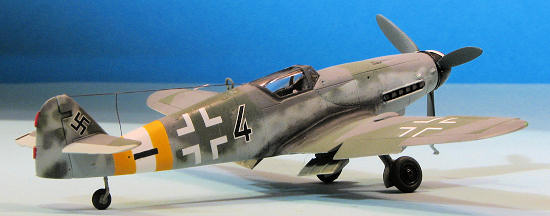 mation to most of us who thought they were all reconstructed
airframes.
mation to most of us who thought they were all reconstructed
airframes.
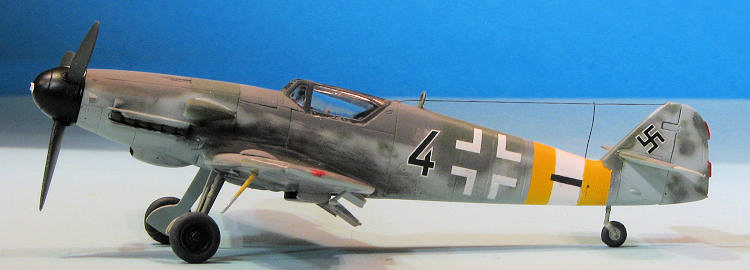
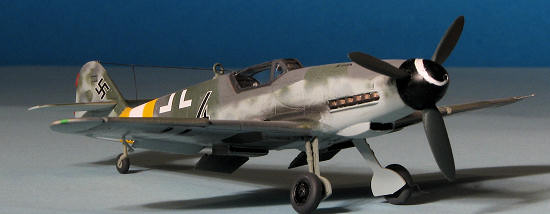
Things in common with all G-10s was the lack of the cannon bulges on the upper cowling, the use of an Erla Haube canopy (the one without all the framing) and a taller wooden fin and rudder. The wheels could be the wider ones like the K and some G-14s, in which case there would be the wide strip down the wing to cover them, but not all G-10s had this feature. In fact, most did not. There could also be a taller tail wheel strut. Most G-10s did have this option, but again, that wasn't always the case.
The G-10 did have two different types of cowlings. The real way to tell the difference between the two is to look at the left side of the fuselage just under the windscreen. The most common type had a fairing that curved on the underside. This is the 'type 100' cowling. If you have built the Revell 1/48 Bf-109G-10, or the new Hasegawa 1/32 Bf-109G-10, then you've built one with the type 100 cowling. The other, which is what is on this conversion, is 'taller' and flat. It does not have a curve and extends the full height of the fuselage. These 'type' numbers were not used by the factory but are a concoction of Jean-Claude Mermet, who did the ground breaking research on this several years back.
| THE KIT |
 First released in the US under the ProModeler boxing,
the Revell 109G-10 is a basically accurate G-10 that in many ways, looks as if
it was resized from their 1/48 kit. However, Revell did some very odd things on
the way to making this kit, one of them being the incorporation of the head
armor into the fuselage halves. The kit also has a super thick canopy and though
detailed better than some, it has a basic cockpit that, for some reason, has a
separate seat back. Later 109s had no separate seat, only a seat pan.
First released in the US under the ProModeler boxing,
the Revell 109G-10 is a basically accurate G-10 that in many ways, looks as if
it was resized from their 1/48 kit. However, Revell did some very odd things on
the way to making this kit, one of them being the incorporation of the head
armor into the fuselage halves. The kit also has a super thick canopy and though
detailed better than some, it has a basic cockpit that, for some reason, has a
separate seat back. Later 109s had no separate seat, only a seat pan.
So it is not Hasegawa or Tamiya quality, but it is a lot less expensive than the very nice Fine Molds kit and is more geared towards the experienced modeler than the rather new Hobby Boss kit. It also has wide wheel bulges on the upper wings and the short tail wheel strut of the Monogram 1/48 kit.
| CONSTRUCTION |
Fortunately, for those who want a greater detailed
109G-10, Loon Models does two major conversions you'd be interested in. One is a
fuselage
conversion to do an Erla produced G-10 with the 'type 110
cowling'. The other is a wing with extended slats, flaps and cooler exhaust.
Both are well molded though a bit on the flashy side, but nothing major and
easily cleaned up. In fact, one
 probably uses about 15% of the kit parts on this
one.
probably uses about 15% of the kit parts on this
one.
I started slowly by first building up the interior and painting the inner fuselage halves. This included installing the exhaust and the supercharger intake. Then, for some reason, I wandered away from this one for well over 7 months before slowly getting back into it. I did install some Eduard belts in the interior, though not much will be visible through the thick canopy. Fuselage seams required the usual super glue filler as did the rear wing/fuselage join on the underside. The resin wing did fit quite well and I had little trouble with the upper radiator doors, which I installed flat with the upper wing.
The kit tailplanes were glued in after enlarging the resin slots. I also glued on the resin rudder that is provided. The cockpit had some tape put over it and it was off to the paint shop.
| COLORS & MARKINGS |
 I could not find a decal sheet that had a 109G-10
with the proper cowling in 1/72 scale (a bunch in 1/48 though). Thankfully,
these planes were not heavy into special markings so after looking into an
excellent book on late 109s by
MMP Books,
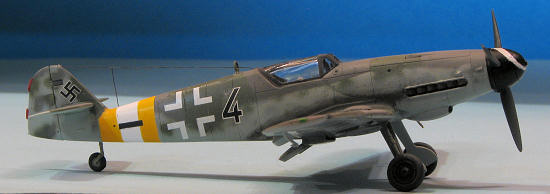
I keyed on something I could do with a bit of work. This one was with 6./ JG 2
in early 1945 and had the proper canopy type. It was in RLM 82/75/76 with
sections of the wing unpainted.
I could not find a decal sheet that had a 109G-10
with the proper cowling in 1/72 scale (a bunch in 1/48 though). Thankfully,
these planes were not heavy into special markings so after looking into an
excellent book on late 109s by
MMP Books,
I keyed on something I could do with a bit of work. This one was with 6./ JG 2
in early 1945 and had the proper canopy type. It was in RLM 82/75/76 with
sections of the wing unpainted.
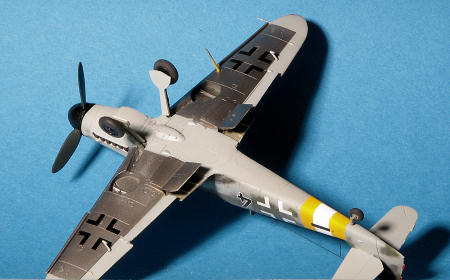
I first painted the RVD band area white, masked the
white and painted the yellow, then masked the whole thing. The underside of the
wing was painted with Alclad Aluminum, masked and the rest of the underside of
the aircraft as well as the
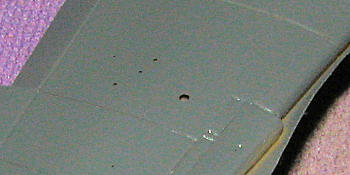
 upper side of the elevators was painted RLM 76. More
masking and the upper surface was painted RLM 75. This showed some rather pesky
air holes that need to be taken care of so an application or two of superglue,
some sanding and more painting were in the cards.
upper side of the elevators was painted RLM 76. More
masking and the upper surface was painted RLM 75. This showed some rather pesky
air holes that need to be taken care of so an application or two of superglue,
some sanding and more painting were in the cards.
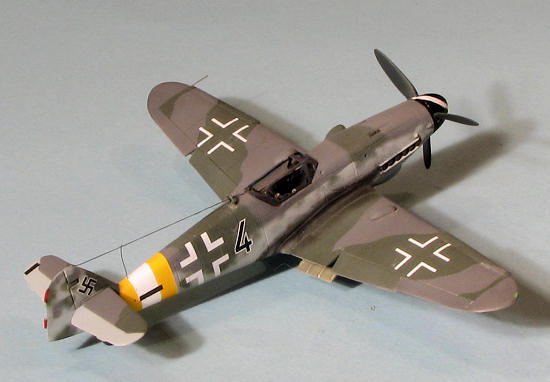
The surfaces were masked and then painted with the RLM 82. More back and forth with very thin RLM 76 and the mottles were then painted on. I know some will say I should have free-handed it all, but really, to my eyes, either method works well in this scale.
| FINAL CONSTRUCTION |
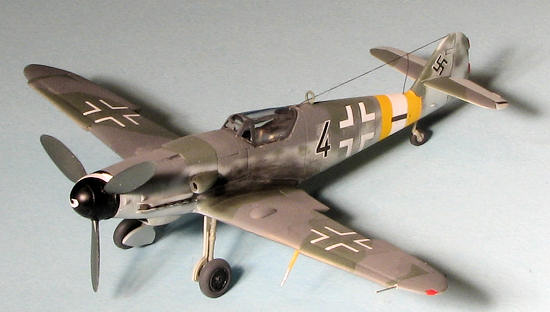
The kit was then put on its landing gear. I used the
kit gear for the main gear, after drilling out the attachment holes. The wing
holes are round and the gear tabs are square. ExtraBoost supplied the tail gear.
The Loon resin one is quite prototypical, which
 Insignia
from an Eagle Strike sheet for 1/72 109s while the spares bit came up with the
black stripes and an Aeromaster FW-190 sheet supplied the black 4.
Insignia
from an Eagle Strike sheet for 1/72 109s while the spares bit came up with the
black stripes and an Aeromaster FW-190 sheet supplied the black 4.
I had to paint on the spinner spiral as I was unable to find one in the decal stash. I installed some Eduard belts and then glued the canopy in place. The fit on the right side sucks big time. There is a very large gap that I filled as best I could with white glue, but it isn't good. Sharp eyed readers will notice there is no head armor. None is given in the kit and none is provided in the conversion sets. For the antenna, I used fine EZ-line. This stuff is elastic so once glued on, it can be deflected a great deal. Perfect for the fumble-fingers among us who are constantly snapping stretched sprue or wire. You have to buy it from the source so hit up Google for more info.
All the other small bits were put in place and the airframe given a flat coat. Tamiya weathering kit provided the black pastels as I sooted up the exhaust quite a bit. This is typical of late war German planes due to the poor quality of the gasoline. I peeled off the masks and it was done.
| CONCLUSIONS |
Though it took a very long time to finish, it makes for an interesting variant of the 109 family. One is impeded somewhat by a dearth of appropriate decal sheets for a type 110 cowling G-10, but with a bit of digging in the decal bin and looking through reference photos, a proper scheme can be found. Not the best 1/72 109 I've done, but not bad either.
| REFERENCES |
 Messerschmitt Me 109 pt 2, Michulec, AJ Press, 2002
Aero Detail #5, Messerschmitt Bf-109G, 1992
Eagle Files #3, Augsburg's Last Eagles, Green, 2000
Messerschmitt Bf-109 Recognition Manual, Fernandez-Sommerau, Classic,2004
Bf-109 Late Versions: Camouflage and Markings, MMP Books, 2010
July 2011
Thanks to
www.rollmodels.com for the Loon bits and me for the rest. If you would like your product reviewed fairly and quickly, please
contact
me or see other details in the
Note to
Contributors.