Trumpeter
1/24 Bf-109G-6
|
KIT # |
02407 |
|
PRICE: |
$110.00 MSRP |
|
DECALS: |
Two options |
|
REVIEWER: |
Scott Van Aken |
|
NOTES: |
Clear fuselage and
control surfaces |
PAGE 4
Back to Page 3
October 17-19
 During this weekend, I
did several things. One was that I spent a lot of time in bed. I've come
down with a cold or something so it tends to slow me down a bit. What I did
do was to get started on the painting. This meant a lot of masking to keep
paint from where it isn't wanted. I taped the underside of the tail planes
and the wheel wells. I also applied tape to the underside of the upper
radiator exit cooling doors. Since the cowling had already been painted,
the underside of the engine was masked off as was the front of the
aircraft. Then, I painted the entire underside with RLM 76 using Testors
Model Master. That was left to dry.
During this weekend, I
did several things. One was that I spent a lot of time in bed. I've come
down with a cold or something so it tends to slow me down a bit. What I did
do was to get started on the painting. This meant a lot of masking to keep
paint from where it isn't wanted. I taped the underside of the tail planes
and the wheel wells. I also applied tape to the underside of the upper
radiator exit cooling doors. Since the cowling had already been painted,
the underside of the engine was masked off as was the front of the
aircraft. Then, I painted the entire underside with RLM 76 using Testors
Model Master. That was left to dry.
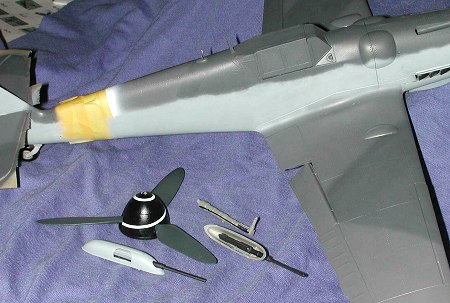
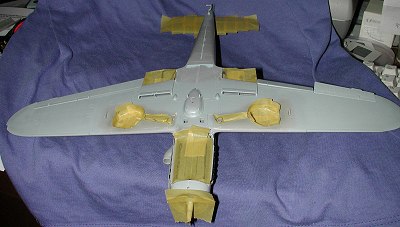 Meanwhile, I managed to finish up a few more subassemblies such as the
under wing cannon and the landing gear. For the cannon, there is no need to
paint more than the barrel as you won't be seeing the rest of the gun in
the gondolas. I also drilled out the barrels. Odd that this is provided for
the cowl MG, but not for the cannon. The other item is the landing gear.
The oleo scissors were painted RLM 02 and glued in place. They tell you not
to glue where the two scissor pieced attach to each other, but you have to
glue the scissors to the oleo as there is no mechanism to allow them to
move. Kinda stupid to have a working suspension and not be able to have the
scissors move! Were I not building this OOB, I'd drill out the scissor
attachment points on the gear and insert a small piece of rod.
Meanwhile, I managed to finish up a few more subassemblies such as the
under wing cannon and the landing gear. For the cannon, there is no need to
paint more than the barrel as you won't be seeing the rest of the gun in
the gondolas. I also drilled out the barrels. Odd that this is provided for
the cowl MG, but not for the cannon. The other item is the landing gear.
The oleo scissors were painted RLM 02 and glued in place. They tell you not
to glue where the two scissor pieced attach to each other, but you have to
glue the scissors to the oleo as there is no mechanism to allow them to
move. Kinda stupid to have a working suspension and not be able to have the
scissors move! Were I not building this OOB, I'd drill out the scissor
attachment points on the gear and insert a small piece of rod.
Then the brake lines were attached to the struts. They are too short.
You can glue in one end, stretch that miserable, slimy plastic to fit the
other end, but no way will the center be done. You'll also have a case of
the oleo being fully extended, which
 is not the normal way the
plane sat unless it was totally out of fuel and other heavy stuff. It will
be interesting to see how it looks when attached to the airframe. I also
cleaned up the head armor. This piece is supposed to
have a piece of clear bullet-proof glass in the center of it so the pilot
can look over his shoulder to see if anyone is behind him. Trumpeter
somehow missed this minor point and molded it solid (with two huge ejector
pin marks in the backside). I'm going to cut out the center section and put
a piece of clear decal over it to at least make it look a bit more
realistic. Using clear decal will not violate the OOB rules.
is not the normal way the
plane sat unless it was totally out of fuel and other heavy stuff. It will
be interesting to see how it looks when attached to the airframe. I also
cleaned up the head armor. This piece is supposed to
have a piece of clear bullet-proof glass in the center of it so the pilot
can look over his shoulder to see if anyone is behind him. Trumpeter
somehow missed this minor point and molded it solid (with two huge ejector
pin marks in the backside). I'm going to cut out the center section and put
a piece of clear decal over it to at least make it look a bit more
realistic. Using clear decal will not violate the OOB rules.
I also painted the tail wheel RLM 02 and put a coat of clear gloss on
the spinner. When the RLM 76 was good and cured, I glued on the aft canopy
section, then stuffed the center section in place as best I could. The
radio mast and DF loop antenna (which I broke taking off the sprue), were
glued on the top of the fuselage. I also decided at this time that I was
going to at least have the left and lower engine cowlings glued in place. I
fit them as best I could and glued them in place. They really don't fit
that well and I'm not sure just what is preventing a tight seal as I tried
all I could to get them snug. Then the airframe was painted RLM 75 on all
the upper surfaces. To be honest, I'm not sure just what paint I used for
this, but since it is drying glossy, I'll have to assume that I've used
Xtracolor enamels!
October 20
With the upper dark grey on and dry, it was time to choose a set of
markings so I could continue with the painting. Naturally, I didn't want to
use either of the kit markings though I will test one of them on the clear
bits given to me so you will know how well they work. Since I had a couple
of sheets from Cutting Edge to pick from, I chose the 7./JG 3 gunboat from
sheet CE 24004. Several
reasons for this. First of all, the other two options didn't have the under
wing cannon. To use either of them would have meant filling a bunch of
holes in the lower wing. Now I'm not really sure just why Trumpeter didn't
offer the cannon as an option which would have meant little more
than opening a few holes with a hobby knife, instead of doing things the hard way, but there it is.
Secondly, to have done the Barkhorn option, I'd have had to use the
optional G-5 right cannon bulge, which I didn't install.
with a hobby knife, instead of doing things the hard way, but there it is.
Secondly, to have done the Barkhorn option, I'd have had to use the
optional G-5 right cannon bulge, which I didn't install.
 Since my choice has a
white fuselage band, I sprayed the tail of the model with white and waited
for it to dry before masking it off. Yes, it does make a bit of a mess, but
I always have to go back and forth with my camo schemes so it isn't
really that big a deal for me. While that was drying, I cut open the
back of the head armor in preparation for its clear decal. It was then
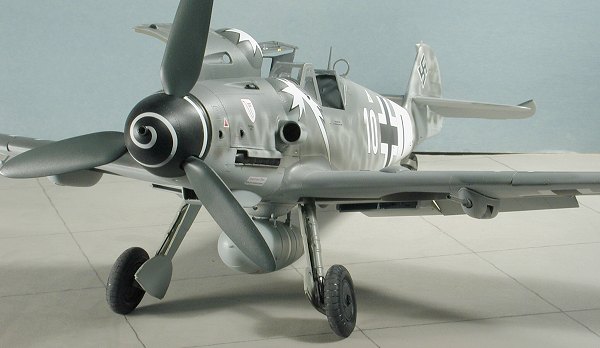
painted RLM 66. With the clear nice and dry on the prop spinner, I cut out
the spiral decal from the sheet and applied it. It isn't as tight as shown
in the artwork as it isn't long enough for all those 'laps'. I used a bit
of Solvaset to get this decal to snuggle down onto the spinner. When dry, I
glued the prop to the backing plate and then the spinner itself.
Since my choice has a
white fuselage band, I sprayed the tail of the model with white and waited
for it to dry before masking it off. Yes, it does make a bit of a mess, but
I always have to go back and forth with my camo schemes so it isn't
really that big a deal for me. While that was drying, I cut open the
back of the head armor in preparation for its clear decal. It was then
painted RLM 66. With the clear nice and dry on the prop spinner, I cut out
the spiral decal from the sheet and applied it. It isn't as tight as shown
in the artwork as it isn't long enough for all those 'laps'. I used a bit
of Solvaset to get this decal to snuggle down onto the spinner. When dry, I
glued the prop to the backing plate and then the spinner itself.
With the white dry, it was masked off and the kit then had the RLM 74
green-grey added to the paint scheme. This was done freehand as it seems
though the real plane was treated in such a manner. I don't know about you,
but I've always found greens to be a bit more difficult to apply smoothly
than the usual greys.
October 21
 What work done today was
to mask off the white tail band and repainted the RLM 76 areas. I also
found some very thin paper and used it to mask off the exhaust so I could
spray on the area around there. I installed the wing cannon in the gondolas
for when they would be installed under the wing after the decals have been
applied. I also managed to totally crunch the DF
loop antenna while handling the model during painting. Typical for me to do
a boneheaded thing like that. Now I have to figure a way to replace it,
though I'm leaning towards using the appropriate size of plastic strip. I
also assembled the tail wheel and glued the other half of the tail wheel
strut in place. Hopefully I won't break that as well!
What work done today was
to mask off the white tail band and repainted the RLM 76 areas. I also
found some very thin paper and used it to mask off the exhaust so I could
spray on the area around there. I installed the wing cannon in the gondolas
for when they would be installed under the wing after the decals have been
applied. I also managed to totally crunch the DF
loop antenna while handling the model during painting. Typical for me to do
a boneheaded thing like that. Now I have to figure a way to replace it,
though I'm leaning towards using the appropriate size of plastic strip. I
also assembled the tail wheel and glued the other half of the tail wheel
strut in place. Hopefully I won't break that as well!
Still a few bits in the box, but those are mostly clear bits and the
gear doors. Now that most of the camouflage is on the plane, I'll glue the
main gear in place after the tail wheel has dried sufficiently. Many of you
will note that at no time, have I done any 'pre-shading'. Yes, it is used a
LOT by modelers, but face it, it isn't prototypical at all. It isn't that I
never do this or use panel line shading, but the vast majority of the work
I see like this is WAY overdone. Just look at the more recent show images
and you will see a great number of models that have this effect applied in
a manner that is just too much, even in the larger scales. People who have
actually worked around military aircraft or who see them regularly will
note that they've never seen a plane like that. I seriously doubt if a crew
chief has gone to his plane and said to himself "Hmmm...., I need to get
some grunge on those panel lines as they don't stand out...".
More tomorrow.
October 22
Well, I'd really planned to do some more painting, but other things got
in the way of that. What I did do was to glue in the landing gear. These
fit a bit loosely so you need to be sure to allow a long dry time when you
install them. Then on went the gear doors and the wheels. The wheels are
held in place by small caps. You place a drop of glue in the cap and then
push it on the axle. Well, as luck would have it, one of my wheel caps
didn't hold well and when I turned over the model after I thought it was
dry, the wheel and cap went rolling onto the floor. Finding the wheel was
no problem, but the cap has disappeared into the carpet (which just happens
to be about the same color as the cap). Bummed out I am so I just glued the
wheel on the axle in hopes that the cap will eventually turn up. I also
glued on the gear doors but didn't attach the brake lines. For some reason,
these lines attach into the upper gear door! Most odd if I say so myself. I
did manage to do some touchup painting on the doors and the tail wheel leg.
I then put the model away so I could do some silent weeping...
October 27
 The weekend was taken up
with preparing for and recuperating from a road trip so no modeling was
done. Today, however, I continued with the painting. There are those who
can finish a paint job in a day or two, but it usually takes me the better
part of a week, depending on the complexity of the job and how much other
stuff needs done in terms of prep.
The weekend was taken up
with preparing for and recuperating from a road trip so no modeling was
done. Today, however, I continued with the painting. There are those who
can finish a paint job in a day or two, but it usually takes me the better
part of a week, depending on the complexity of the job and how much other
stuff needs done in terms of prep.
On this one the only real prep was to mask off the wing roots and
repaint them the appropriate colors to take care of the overspray from the
RLM 76 fuselage. Then I started into the mottling. First, removing the
masking, I used the RLM 75 and applied a number of rather large mottles to
much of the side of the fuselage. This plane was to be rather heavily
mottled. With the 75 done, I then put on the 74 mottles, then gave all of
the mottled area a bit of a mist with the RLM 74 to increase its density.
Then all the masking was removed to show the finished camo scheme. After
it dries, I'll start on the clear coat and the decals. I also went and used
Bare Metal Foil for the aluminum strap that commonly goes around the drop
tank. I've seen these in everything from a bright aluminum to painted over
so there is no absolute on this. Still haven't found the cap for the
wheel.....
October 28

 Today
was mainly spent breaking more parts from the fuselage (in this case, the
radio mast - image to left) and applying decals. The decals are going on
quite well and are reacting well to Solvaset, which is good as the nose
'comets' have to go over the small intakes under the side windscreen
panels (right). I'm having a bit of trouble with wrinkling of the large
insignia, but repeated applications of setting solution should take care of
that. As I expected, the solution is reacting with the Future that was
applied and creating large white splotches (see image to the right for an
example of this). These will disappear once the matte clear coat is
applied. It will take several days to finish up the decals as I'm not one
of these people who can do all the decals on a project of this size in one
day.
Today
was mainly spent breaking more parts from the fuselage (in this case, the
radio mast - image to left) and applying decals. The decals are going on
quite well and are reacting well to Solvaset, which is good as the nose
'comets' have to go over the small intakes under the side windscreen
panels (right). I'm having a bit of trouble with wrinkling of the large
insignia, but repeated applications of setting solution should take care of
that. As I expected, the solution is reacting with the Future that was
applied and creating large white splotches (see image to the right for an
example of this). These will disappear once the matte clear coat is
applied. It will take several days to finish up the decals as I'm not one
of these people who can do all the decals on a project of this size in one
day.
October 29
 More decal work so not
much new to show you. I did take one of the swastika bits from the kit
decal sheet and apply it to a spare part. The decal is a bit brittle as
when I pressed it down over the intake, it started cracking. It also took
two applications of Solvaset before it would snuggle down. The sheet says
it is done by Aeromaster, but I've never had an Aeromaster sheet crack or
to require two coats of Solvaset before. I'm inclined to think that perhaps
the masters were done by Aeromaster and Trumpeter used someone locally to
print them.
More decal work so not
much new to show you. I did take one of the swastika bits from the kit
decal sheet and apply it to a spare part. The decal is a bit brittle as
when I pressed it down over the intake, it started cracking. It also took
two applications of Solvaset before it would snuggle down. The sheet says
it is done by Aeromaster, but I've never had an Aeromaster sheet crack or
to require two coats of Solvaset before. I'm inclined to think that perhaps
the masters were done by Aeromaster and Trumpeter used someone locally to
print them.
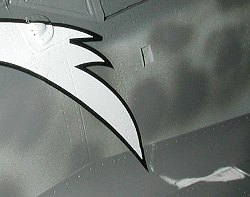
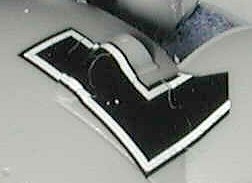
I noted on the Cutting Edge sheet that they give you several options
regarding some of the data markings. One thing the sheet doesn't tell you
is which are not appropriate for which aircraft. You have to do a bit of
research to find which should apply and which may not be right for the
aircraft you are modeling. They also give you way more wing walk markings
that one will use on three planes! With all the decals on, the model was
given a coat of matte clear using a mixture of Future and Gunze Flat Base.
October 30
 It has been a month since I started on this kit and it seems as if the
end is in sight. Though the journey has been relatively long, it has been
one that has, for the most part, been quite enjoyable. I've learned quite a
few things and hopefully you've also enjoyed sharing these experiences with
me.
It has been a month since I started on this kit and it seems as if the
end is in sight. Though the journey has been relatively long, it has been
one that has, for the most part, been quite enjoyable. I've learned quite a
few things and hopefully you've also enjoyed sharing these experiences with
me.
With the decals finally on, there is little else to do but put on the
final bits. However, in a kit of this size, there are a LOT of final bits.
First thing I did was to glue on the gun pods, which had already been
prepainted. This was followed by the aileron balances. I then scrounged the
radio mast and glued it back in place. Having pieced together the broken DF
loop (and pretty it isn't), it was also glued in place. I'll have to find a
more permanent fix for that in the next few days, but for the review, it
will suffice. I left off the lower antenna for two reasons. One is that it
will continually be broken off. Second, it isn't close to being round.
Molding or something, but by the time you remove the mold seams it is
decidedly 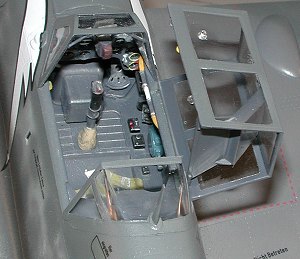 flat! Last major airframe bit is the pitot tube, which looks a
bit short. I'd expect something of that length on a 1/48 kit.
flat! Last major airframe bit is the pitot tube, which looks a
bit short. I'd expect something of that length on a 1/48 kit.
Turning to the canopy, I pulled off all the masking and painted the
windscreen grab handles RLM 66. On the canopy section itself, I installed
the canopy locking handle, painted it RLM 66 and the knob itself white. The
small clear window handles were attached using clear paint. I also used
this material to glue on the tail light and the wing tip lamp covers after
painting the wing tip lights red and green.
At this stage, the kit was returned to the paint shop for a bit of touch
up painting. This includes having the exhaust stain applied using Tamiya
Smoke. I didn't use pastels on this one due to the size of the model more
than anything else. When that was dry, more flat clear was sprayed on to
cut down a bit on the glossyness of the exhaust. I also painted the tip of
the pitot tube aluminum. I glued in place the brake lines and
the drop tank. I then glued on the the right side engine cover and inserted
the metal brace. Final bits were to put the tape over the back of the head
armor to represent the clear glass, glue the armor in the canopy and then
glue the canopy in the open position. I decided against doing a radio wire at this stage as I
wanted to have it finished in time for today's update.
The model was done.
OK, the big question is 'Is it worth $110.00'. Well, I have to say not
really. Yes, it does make an impressive model. Yes it does have a lot of
goodies and is pretty well detailed, but it isn't $110 detailed and that is
it's big downfall. When you consider the level of detail in Hasegawa's 1/32
kit (which is only slightly smaller and is only 35% of the cost), one
expects at least that same detail level (and I mean mostly the cockpit
section when I talk detail, here).
 To have no interconnecting wiring and other plumbing is unconscionable
in a kit of this scale and price. There should also be at least a set of
shoulder harnesses and rudder pedal straps included. Then there are the
non-working struts. Yes, one can easily drill out the joints and have it
work, but that should have been included. I've also come to find out over
the time of building the kit that the hinge mechanisms are not that sturdy.
Both the flaps and rudder have had one hinge break loose from the airframe.
To have no interconnecting wiring and other plumbing is unconscionable
in a kit of this scale and price. There should also be at least a set of
shoulder harnesses and rudder pedal straps included. Then there are the
non-working struts. Yes, one can easily drill out the joints and have it
work, but that should have been included. I've also come to find out over
the time of building the kit that the hinge mechanisms are not that sturdy.
Both the flaps and rudder have had one hinge break loose from the airframe.
Finally there is that miserable flexible plastic. Sorry folks, but that
stuff totally sucks. I'd rather have photo etched material, despite it
being two dimensional. And offer us the rubber tires as an option but
include plastic ones. I know it sounds as if I'm dumping on the kit, but I
feel these things should be included. Leave out the clear fuselage and
control surfaces (which almost no one will use) and give us these
additional details.
Fortunately for us all, these kits can be found at less than retail from
many places, including North
American Hobbies, where I bought mine. I'm glad that I had the chance
to build the kit and despite its omissions is a super addition to my 109
collection.
October 2003
# 1289 in a series
Aero Detail #5, 1992, Shigeru Nohara, ¥2900
For Comparison, here are 109s in the five most modeled
scales.
Copyright ModelingMadness.com. All rights reserved.
If you would like your product reviewed fairly and fairly quickly, please contact the editor or see other details in the Note to
Contributors.
Back to the Main Page
Back to the Reviews Index
Page 2020