October 12
 With a
contest last Saturday, it meant that Friday was spent getting ready for it
and most of today spent recuperating from it! However, I did manage to do a
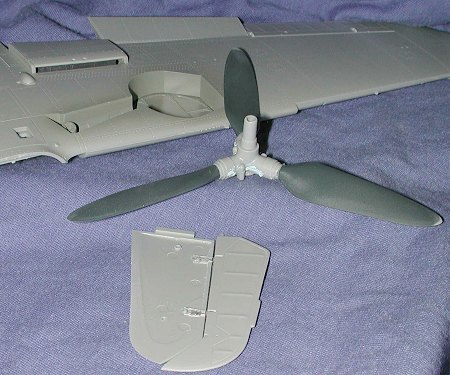
few things on it late this evening. First, I cut the prop blade/hub bits
from the sprues. I'd already painted the prop blades, but that was sort of
ruined by the need to sand on the tips where the sprue gates were located.
Next I attached them to one half of the hub and glued the other atop it.
Fit isn't very good as I had a gap all around it. That was clamped in place
and when dry, filler placed into the spaces. Now I do realize that much of
this won't be seen once I get the spinner in place, but the flashlight gang
will be able to peer in there and so I wanted to get it smoothed out.
With a
contest last Saturday, it meant that Friday was spent getting ready for it
and most of today spent recuperating from it! However, I did manage to do a
few things on it late this evening. First, I cut the prop blade/hub bits
from the sprues. I'd already painted the prop blades, but that was sort of
ruined by the need to sand on the tips where the sprue gates were located.
Next I attached them to one half of the hub and glued the other atop it.
Fit isn't very good as I had a gap all around it. That was clamped in place
and when dry, filler placed into the spaces. Now I do realize that much of
this won't be seen once I get the spinner in place, but the flashlight gang
will be able to peer in there and so I wanted to get it smoothed out.
 The other part of the modeling time was spent on some
controls. For the wing, I superglued the little etched 'hooks' into the
lower half of the wing for each surface. You have to use accelerator on
these or you'll have a real mess on your hands. I also had a bit of trouble
gluing the wing in this area. I pre-glued it, but overdid it a bit as some
glue oozed out of the join opposite the flaps/ailerons when I fit the upper
wings in plad, and stuck them up. Fortunately, I discovered the glitch and
spent quality time moving these up and down to keep the glue from drying
completely and freezing them in place. During this one of the right flap
hinge attachments broke loose inside the wing. No way to fix it so
hopefully it won't be real noticeable. The upper wings did fit quite well.
The other part of the modeling time was spent on some
controls. For the wing, I superglued the little etched 'hooks' into the
lower half of the wing for each surface. You have to use accelerator on
these or you'll have a real mess on your hands. I also had a bit of trouble
gluing the wing in this area. I pre-glued it, but overdid it a bit as some
glue oozed out of the join opposite the flaps/ailerons when I fit the upper
wings in plad, and stuck them up. Fortunately, I discovered the glitch and
spent quality time moving these up and down to keep the glue from drying
completely and freezing them in place. During this one of the right flap
hinge attachments broke loose inside the wing. No way to fix it so
hopefully it won't be real noticeable. The upper wings did fit quite well.
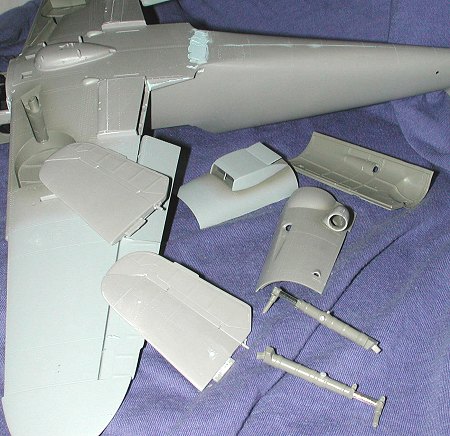
There are also little forward hinged areas on the front of
the radiator inlets. These can be cemented in the lowered position if one
wants, but rarely are they seen like this unless the engine is running. It
is unfortunate that they don't fit as well as most of us would like in the
'up' position. Finally, I glued one of the elevators onto the lower section
and left the top of the tailplane off so you could see how they are
attached.
October 13
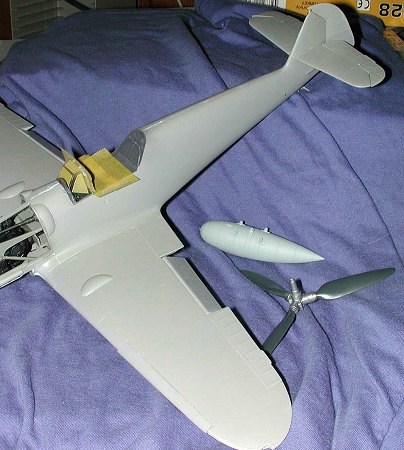
 Well, today
was a big day; the wing to fuselage mating ceremony! I first test fit it to
ensure no glitches. I found one and fixed it by trimming off the sprue
stubs on the inside of the upper wings. Just goes to prove that cleaning
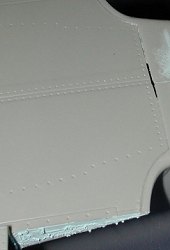
every bit helps. The fit of the wing was really very g
Well, today
was a big day; the wing to fuselage mating ceremony! I first test fit it to
ensure no glitches. I found one and fixed it by trimming off the sprue
stubs on the inside of the upper wings. Just goes to prove that cleaning
every bit helps. The fit of the wing was really very g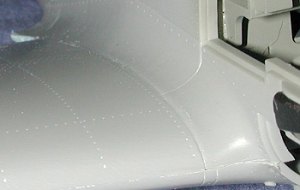 ood.
As you can see from the images, most of it was very tight and that was
especially true of the upper wing join. The very front will need a bit of
filler and a lot more will be needed in the back. There is a rather
substantial gap and were I to do this kit again, I'd stick in a small
section of card back there prior to gluing on the wing.
ood.
As you can see from the images, most of it was very tight and that was
especially true of the upper wing join. The very front will need a bit of
filler and a lot more will be needed in the back. There is a rather
substantial gap and were I to do this kit again, I'd stick in a small
section of card back there prior to gluing on the wing.
While I had the wing there, I sanded all the joins where
I'd glued it yesterday. It looks pretty clean so perhaps no filler will be
needed there, either. I also took the time to add filler to the outer aft
wing roots as the seam there will be visible when the cooler doors are
glued in place. I also glued on the drop tank rack. The large indented hole
in the front can be drilled out if one wants. I'd have liked to have seen
some bolt head detail on the four attachment areas on the rack. Hasegawa
has no trouble providing that in
 1/48. The rack is properly
offset. On the upper side, I installed the small hatch on the back of the
cockpit. Fit is fairly good, but could be better as it leaves some small
gaps. Paint should fill those.
1/48. The rack is properly
offset. On the upper side, I installed the small hatch on the back of the
cockpit. Fit is fairly good, but could be better as it leaves some small
gaps. Paint should fill those.
On other items, I sanded down the filler on the prop hub
and repainted the blades with Testors RLM 70 enamel. I also took the
opportunity to attach the other elevator and glue the two tail planes.
These were then sanded smooth. I cut the canopy and windscreen from the
sprues and masked them. A rather easy job, but I did notice that the upper
frame line on the canopy and the windscreen was particularly indistinct.
The clear is also not very clear and has quite a few stress lines in it. It
seems as if there is a small etched section on the windscreen that is for a
desiccant pack for the pressurized version. However, it isn't on any of the
other clear bits. It basically means that your windscreen isn't totally
clear and there is nothing you can do about it as it appears it won't sand
out. The small areas around where the handle for the canopy sliding section
is located is also just as etched as the windscreen section. I should
mention that the rear section seems somewhat oddly done at the very bottom.
It has a notch in it which corresponds with a similar notch in the
fuselage. I had always thought that the rear of the back piece was a
straight shot down to the lower canopy line. According to the reference,
it is not and this notch should be there.
October 14
 Work steadily
continues as the number of unused parts in the box dwindles down to a mere
shadow of its former self. Today's work consisted mainly of sanding and
some small component builds. First of all, I sanded down the tail planes to
get rid of the glue oozes. It was then that I noticed some sink areas on
one side. Apparently, I had gotten too much glue in the alignment
receptacles and it had softened the plastic. I filled those with putty and
sanded it smooth once it had dried. You can spot those areas on the
picture.
Work steadily
continues as the number of unused parts in the box dwindles down to a mere
shadow of its former self. Today's work consisted mainly of sanding and
some small component builds. First of all, I sanded down the tail planes to
get rid of the glue oozes. It was then that I noticed some sink areas on
one side. Apparently, I had gotten too much glue in the alignment
receptacles and it had softened the plastic. I filled those with putty and
sanded it smooth once it had dried. You can spot those areas on the
picture.
Next, I glued the oil radiator into the lower cowling bath
and glued that to the lower cowling. There is a small support rod that
needs to be glued in place and it is a bit fiddly to get into the slots. As
you can see, I sprayed the cooler bath area RLM 02 prior to attaching the
bath. That will be resprayed a bit later. I also glued on the cooler aft
door in the open position.
The supercharger intake was painted RLM 02 on the inside as
was the mounting area and then it was glued in place. I also painted the
inside of the engine cowlings RLM 02. For those that wish to have the
cowlings open, the mounting holes for the supercharger will have to be
filled as will several ejector pin indentations.
Moving to the landing gear, I put the springs in place and
then glued in the small plastic pins. These pins fit into slots in the
lower portion and allow the lower section to move up and down. The holes
for these pins will have to be enlarged as they are a touch too small.
There are holes on both sides, but one needs to use those that will be on
the same side as the oleo scissors. The other hole is to be used to mount
the gear doors.
Finally, I smoothed out the filler I placed on the leading
edge of the wing and had to put a second coat on the aft wing/fuselage join
as the wing in that area is lower than the fuselage. Though not shown, I
also glued the aft cowling breech covers onto the fuselage and painted the
spinner and backing plate black. Depending on the markings I'm going to
use, I may have to do some repainting on the spinner, but it came black
from the factory so at least I won't have too much extra to do!
October 15
 Today, things
really started coming together. I glued on the tailplanes. Fit is rather
good with each side tabbed to prevent getting things on the wrong side. I
also glued on the canopy. This is a touch small for the cockpit opening. I
feel that adding filler to try to blend things in will only make this even
more noticeable so will leave it as is until the first coat of paint. That
should show how nasty things may be.
Today, things
really started coming together. I glued on the tailplanes. Fit is rather
good with each side tabbed to prevent getting things on the wrong side. I
also glued on the canopy. This is a touch small for the cockpit opening. I
feel that adding filler to try to blend things in will only make this even
more noticeable so will leave it as is until the first coat of paint. That
should show how nasty things may be.
I also discovered that I left out the front wing radiator
actuator rods. I pulled out the forward ramps and glued in the rods.
Somehow, one of them got away from me and is now permanently hidden in the
bowels of the wing. I had to substitute a piece of stretched sprue. I also
glued on the slats in the open position. These don't open very far so make
sure you don't overdo it on yours.
In the paint department, I put another coat of paint on the
lower cowling to take care of the RLM 02 that was on there. I also finished
painting the prop by doing the prop hub in Alclad II aluminum. Likewise the
drop tank was finished by doing it in RLM 76.
Sanding the rear wing/fuselage join showed that still a bit
more filler was needed so that was applied. I also glued the upper aft wing
radiator coolant flap level with the wing. They are molded to be up
slightly higher than the wing, but rarely have I seen a p hoto of them in
that position. They are usually both drooped down or the upper is flat with
the lower one drooping. I also noted that there are no shell ejector tubes
for the upper guns. This means that there is a 'see-through' from the
ejector slots in the lower fuselage up through the engine. Most noticeable
when the cowling covers are off.
hoto of them in
that position. They are usually both drooped down or the upper is flat with
the lower one drooping. I also noted that there are no shell ejector tubes
for the upper guns. This means that there is a 'see-through' from the
ejector slots in the lower fuselage up through the engine. Most noticeable
when the cowling covers are off.
October 16
As much as I wanted to spend quality time working on the
model today, too many other things came up to occupy my time, including
having to get Friday's kit finished! However, not all was lost. I did
manage to sand off the third coat of filler on the lower wing/fuselage
join. Then I sprayed the windscreen and the back section RLM 66 and
finished the touch-up spraying of this color on the other canopy bits. I
also did some RLM 76 painting on the underside of the tailplanes and a few
other areas to check for gaps.
When all that was dry, I broke out my micro saw and pin
vice and spent some quality time trying to replace some lost panel lines
and rivet detail! The sharp-eyed will note that one of the cowl guns has
gone missing as I managed to have it come loose during all the handling!
On to page 4
If you would like your product reviewed fairly and fairly quickly, please contact the editor or see other details in the Note to
Contributors.
Back to the Main Page
Back to the Reviews Index
Page