 Thought that it would be easier to do this in several pages rather than
have to scroll down an endless distance to read the latest installment.
Thought that it would be easier to do this in several pages rather than
have to scroll down an endless distance to read the latest installment.
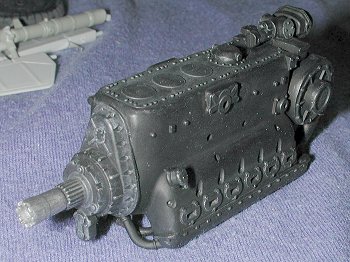
Well today was as much for painting as building. I painted the engine and
wheels flat black using Floquil Engine Black. The oil tanks were done in
aluminum using Alclad II on the bare plastic. The guns were painted with
Testors Metallizer Gunmetal. When these were dry, most of them got a
dry-brushing. Actually, a dry-scrubbing would be more accurate. To me, a
lot of what I see as dry-brushing is overdone. Folks grab the white or
aluminum and make every nut, bolt and line pop out. What I did on these was
to first dry-brush the entire engine and wheels with RLM 02 enamel. This is
not very bright and does break
 up
the dead black quite well. Then I lightly went over some parts with Steel
Metallizer and even fewer with Aluminum Metallizer. You can see the results
in the image. Same thing for the cockpit and the sidewalls. I wanted
to show some wear, but not as if it had been in constant use for 10 years!
For the guns, I used Steel as a dry-brushing contrast and it works quite
well.
up
the dead black quite well. Then I lightly went over some parts with Steel
Metallizer and even fewer with Aluminum Metallizer. You can see the results
in the image. Same thing for the cockpit and the sidewalls. I wanted
to show some wear, but not as if it had been in constant use for 10 years!
For the guns, I used Steel as a dry-brushing contrast and it works quite
well.
After the first application of dry-brushing on the engine, I installed the supercharger and the induction pipe, after making sure that I could put in the wires and exhaust when the time came with no problems. The supercharger intake is supposed to have a screen over it, but what is molded in the part isn't really that convincing. Those who want more detail should consider installing a piece of mesh.
In the cockpit, I added a box to the left side and then made some rudder pedal straps out of masking tape. These really should have been supplied in the kit. Same with seat belts, which I'll also do at a later time out of tape. Again, I want to keep the kit legal for OOB. The instrument panel was glued into the anti-glare shield piece and this was then glued to the rest of the cockpit. There is a small aluminum tank that was glued to one of the engine mounts.
I chose to install the rubber tires onto the wheels at this stage. These
needed a lot of sanding to try to remove the mold ridge and to cut down on
the shine. Even after a lot of sanding I was not able to get rid of all of
the ridge. Turning my attention to the lower wings, I glued in the
forward radiator screen and the two cannon magazines. These magazines are
only there to hold the shell ejector chute as they will not be seen once
the wings are glued together. I painted
the wheel wells and the aft part of the radiator exhaust area in RLM 02. I
used the same colors on the main landing gear.
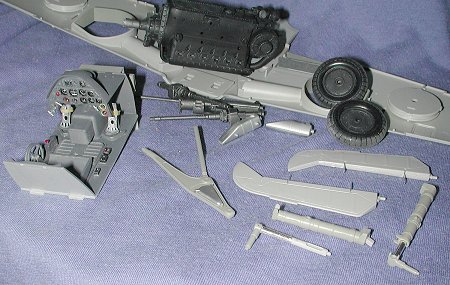
As you know, the main landing gear are to be sprung and small springs are supplied. However, I also know that the oleos are to be a bright chrome. I wrapped Bare Metal Foil onto the oleo part and there was more than enough room for the oleo to fit and move without tearing the foil! Continuing on, I installed the hinges into the elevators.
For final work, I did some cleanup (sanding) on the rudder, the upper wheel well where the wheel bump glue spots show, and the exhaust. I did about half of the exhaust when one went flying off into space during sanding. These are devilishly difficult to hold while working on them. Well my heart went 'THUMP' as to lose one of these would be a real disaster. Fortunately, I heard it hit something hard, and after some quality time crawling among the dust bunnies and bits of junk, I managed to find it. That is when I decided to call it quits for the day!
October 7
 Today was a day of
incorporation and filling. First I applied a couple of coats of filler to
the inside of the gear doors and the cooler flaps. One wasn't enough so
after a day of drying, I applied a second to areas that needed it. This is
quite typical of this kit and fortunately, these are easy to get to. Can't
say the same of other parts. For instance, the inside of the engine
cowlings. These parts have a small blanking plate to make a proper trough
for the guns. It seems as if it will take a touch of filler in the trough
area to seal it up properly even if you choose to have the engine cover
closed.
Today was a day of
incorporation and filling. First I applied a couple of coats of filler to
the inside of the gear doors and the cooler flaps. One wasn't enough so
after a day of drying, I applied a second to areas that needed it. This is
quite typical of this kit and fortunately, these are easy to get to. Can't
say the same of other parts. For instance, the inside of the engine
cowlings. These parts have a small blanking plate to make a proper trough
for the guns. It seems as if it will take a touch of filler in the trough
area to seal it up properly even if you choose to have the engine cover
closed.
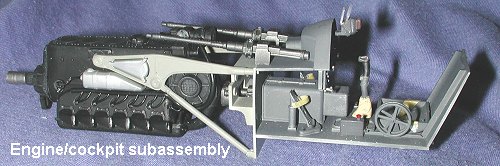
I then spent over an hour trying to get all the little soft rubber bits to fit on the engine. This includes the spark plug wires and the steam vents that go to small aluminum catch cans that were glued in place. The wire harness on the side of the supercharger was a real pain. This assembly is, if anything, too short as getting all the wires in place was proving to be a near impossible feat. Attaching these parts isn't easy, either. I ended up using superglue, which didn't help the neatness of the thing and won't guarantee that the bits will stay. Why Trumpeter decided on this material is beyond me as you can't clean it up (as in mold seams), you can't paint it (at least not with oil based paints and I doubt if acrylics will stick to it either), you can't really glue it due to its Teflon-like characteristics, and it is a real PITA to try to work with.
Well, I did finally get it to some semblance of ready to go and so attached
the engine mounts to it. I then tried to attach it to the front of the
cockpit assembly, but it just didn't seem to want to fit. I judged that the
cannon was too long and so clipped the longer of two bits off the back of
the cannon. It then fit without any problems! I'd managed to finish
painting the control stick so glued that in place. I also assembled the gun
sight (not shown) and set it aside to dry. The clear plastic in this kit is
not as good as one expects from the more mainstream companies. One can only
hope that Future will help transparency.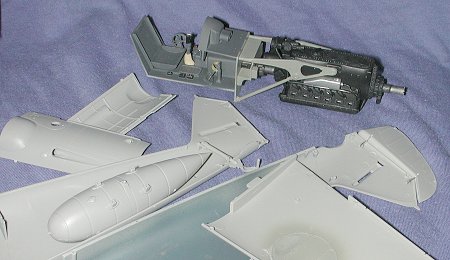
Moving on to other bits, I glued in the tail wheel and the blanking plate in the right side of the fuselage. I also painted the upper wheel wells RLM 02. The drop tank was glued together and finally, I installed the rudder. The small metal hinges need to be affixed using superglue, but it seems to work well. A final thing I did (not shown) was to paint the 12 exhaust stacks. I used Testors Metallizer Burnt Iron. To paint them I stuck a toothpick into the opening, which also gave me a nice handle. It is coming along nicely and I hope to finish up the cockpit/engine section tomorrow so that I can install it in the fuselage and glue the halves together. I don't know about you, but for me, that is a major achievement and is the time that I feel things are actually starting to come along. It is also the earliest one can do some 'test flying'.....vvrroooommm....!
October 8
 Today, I got one of the major
hurdles done. After much fussing and gluing, the engine was complete. The
exhaust are handed so if you are like me and did them all at the same time,
you have to be careful when gluing them in place to make sure they are in
the proper side. I glued on the gun sight and the upper cowl machine guns.
At this time, I also made some seat belts out of tape. They are not very
convincing so I may remove them at a later date. Fortunately, they are just
stuck in place.
Today, I got one of the major
hurdles done. After much fussing and gluing, the engine was complete. The
exhaust are handed so if you are like me and did them all at the same time,
you have to be careful when gluing them in place to make sure they are in
the proper side. I glued on the gun sight and the upper cowl machine guns.
At this time, I also made some seat belts out of tape. They are not very
convincing so I may remove them at a later date. Fortunately, they are just
stuck in place.
Now it was time to install it in the fuselage. I test fit it a bunch of
times to make sure that all would fit with no real hassles. The oil tank
will have to be installed over the front of the engine prior to fitting
things in. There is also a piece that fits over and behind the seat that
provides the blanking for that
 section.
It is here that there should be some sort of attachment for the canopy
lanyard, but it is not included. Chalk up another detail item missing that
should have been included. I glued the interior at the rear and pretty well
let the rest of it float around. The oil tank was glued to one side but
that was about it.
section.
It is here that there should be some sort of attachment for the canopy
lanyard, but it is not included. Chalk up another detail item missing that
should have been included. I glued the interior at the rear and pretty well
let the rest of it float around. The oil tank was glued to one side but
that was about it.
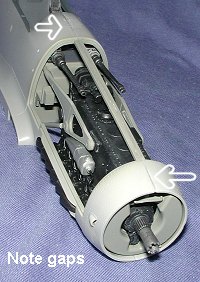
Next was the other fuselage half. Fit was quite good and though I expected
trouble, had none. I did notice a couple of things.
 First, the tail wheel well
blanking plate seemed too narrow as there was quite a gap. Secondly, it
seems as if I should have sanded down the mating surfaces a bit more as
there was a rather large gap all the way around. No choice but to fill it
for later sanding. It means destroying quite a bit of rivet detail,
especially on the bottom, but it can be restored when I'm done. I also
noted that the rudder moves quite easily. I fully expect this to be the
same for the elevators, flaps and ailerons. It may not be a bad idea to
consider some sort of 'sticky' for the ailerons or they will look quite odd
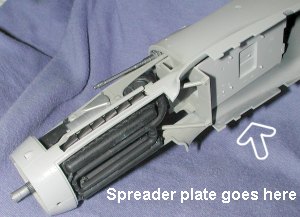
when both are deflected down! On the underside of the fuselage I placed a
part that looks very much like a spreader plate to ensure a good fit for
the wings. I only glued the little 'stands' that fit under the cockpit in
case I needed some fudge room with the wing roots later. The fuselage was
put aside to dry.
First, the tail wheel well
blanking plate seemed too narrow as there was quite a gap. Secondly, it
seems as if I should have sanded down the mating surfaces a bit more as
there was a rather large gap all the way around. No choice but to fill it
for later sanding. It means destroying quite a bit of rivet detail,
especially on the bottom, but it can be restored when I'm done. I also
noted that the rudder moves quite easily. I fully expect this to be the
same for the elevators, flaps and ailerons. It may not be a bad idea to
consider some sort of 'sticky' for the ailerons or they will look quite odd
when both are deflected down! On the underside of the fuselage I placed a
part that looks very much like a spreader plate to ensure a good fit for
the wings. I only glued the little 'stands' that fit under the cockpit in
case I needed some fudge room with the wing roots later. The fuselage was
put aside to dry.
I then focused on some of the other bits. I sanded smooth the drop tank (no
filler needed), and also sanded the second coat of filler on the ejector
pin marks on the cooler exhaust doors and gear doors. A small pipe was
glued in the lower cowling. I cleaned and painted the props with Model
Master RLM 70 enamel. I also painted
 the cooler exhaust doors, gear
doors and a few other bits with RLM 02 as they were going to need to have
that done anyway. The rest of the time I spent doing some wing work. The
shell feed chutes for the under wing cannon were glued atop the magazines.
Again, I did not paint these as they won't be seen when done. The aft
radiator bit was also glued to the wings. There is a panel for the cowl gun
ejector holes that fits on the other side. It is such a good fit and no
gluing is needed. Finally, I attached the hinges and glued together the
ailerons and the flaps. I'd say that in the next day or so, I'll have the
wing pretty well together as well as the tail planes. For those wondering,
I spend about 2 hours a day, perhaps a bit more on some days working on
this, so it isn't a marathon build every day. Besides, I have to take the
time to have things dry before moving on.
the cooler exhaust doors, gear
doors and a few other bits with RLM 02 as they were going to need to have
that done anyway. The rest of the time I spent doing some wing work. The
shell feed chutes for the under wing cannon were glued atop the magazines.
Again, I did not paint these as they won't be seen when done. The aft
radiator bit was also glued to the wings. There is a panel for the cowl gun
ejector holes that fits on the other side. It is such a good fit and no
gluing is needed. Finally, I attached the hinges and glued together the
ailerons and the flaps. I'd say that in the next day or so, I'll have the
wing pretty well together as well as the tail planes. For those wondering,
I spend about 2 hours a day, perhaps a bit more on some days working on
this, so it isn't a marathon build every day. Besides, I have to take the
time to have things dry before moving on.
October 9
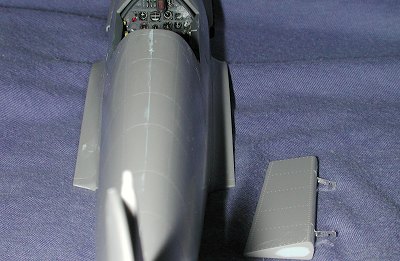 Not much new in the way of
actual building today as I had to take some time to prep parts. This
basically meant cleaning up the flaps, ailerons, and fuselage. All of these
components needed some filler help and as usually happens with filler, it
needed a second application to take care of sections that were missed. It
would have been nice if I didn't need to use putties, but for me, that
generally isn't an option when doing models! As you can see from the image,
the entire fuselage join area needed filler to some extent. Same for the
ends of the ailerons and flaps. This part could have been left untouched
were the control surfaces to be in the neutral or static position, but with
them being deployed, end cleanup is pretty well mandatory.
Not much new in the way of
actual building today as I had to take some time to prep parts. This
basically meant cleaning up the flaps, ailerons, and fuselage. All of these
components needed some filler help and as usually happens with filler, it
needed a second application to take care of sections that were missed. It
would have been nice if I didn't need to use putties, but for me, that
generally isn't an option when doing models! As you can see from the image,
the entire fuselage join area needed filler to some extent. Same for the
ends of the ailerons and flaps. This part could have been left untouched
were the control surfaces to be in the neutral or static position, but with
them being deployed, end cleanup is pretty well mandatory.
There is another issue that was brought up by a reader. Apparently, the
engine mounts are not perfect (though they look OK to me) and have the
engine mounted at the wrong angle. It was also noted that the cowl machine
guns are pointing at an upward angle, which doesn't match the centerline of
the fuselage. This is because the gun mounts themselves where the gun
attaches are angled. To
'flatten' them out would mean t hat they probably wouldn't fit through the upper engine cowling covers, not to mention the work involved in getting inside
those mounting brackets to do the sanding. It would also leave a rather
large gap. During construction of the cowl guns, I wondered at
the angle while building it, but figured it would all work in the end. I test fit both sides and found
that the guns are a real bear to thread through the engine cowlings. During
this evolution, they are slightly 'bent' to where they exit the cowling at,
what appears to me, to be the correct or nearly correct angle. Just thought
you'd like to know that.
hat they probably wouldn't fit through the upper engine cowling covers, not to mention the work involved in getting inside
those mounting brackets to do the sanding. It would also leave a rather
large gap. During construction of the cowl guns, I wondered at
the angle while building it, but figured it would all work in the end. I test fit both sides and found
that the guns are a real bear to thread through the engine cowlings. During
this evolution, they are slightly 'bent' to where they exit the cowling at,
what appears to me, to be the correct or nearly correct angle. Just thought
you'd like to know that.