Platz 1/144 F-8K Crusader
| KIT #: | PD 17 |
| PRICE: | 1500 yen at Hobby Link Japan. $25.00 MSRP in US |
| DECALS: | Three Options |
| REVIEWER: | Scott Van Aken |
| NOTES: | Two complete kits |
| HISTORY |
 or the United States Navy and the U.S. Marine Corps, replacing the Vought F7U Cutlass. The first F-8 prototype was ready for flight in February 1955, and was the last American fighter with guns as the primary weapon, principally serving in the Vietnam War. The RF-8 Crusader was a photo-reconnaissance development and operated longer in U.S. service than any of the fighter versions. RF-8s played a crucial role in the Cuban Missile Crisis, providing essential low-level photographs impossible to acquire by other means. US Naval Reserve units continued to operate the RF-8 until 1987.
| THE KIT |
To 1/144 fans, Platz needs no introduction. They are one of two companies that produce high quality 1/144 injection molded combat aircraft. Fortunately, there is no overlapping with Platz doing more jet types than the other guys.
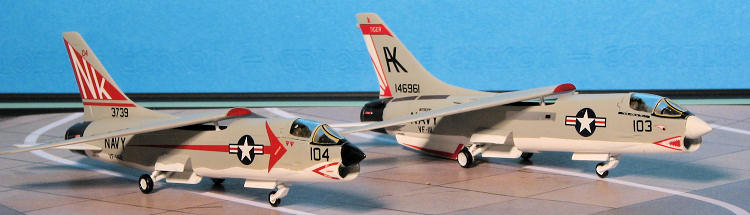
 One kit that sold out about as fast as one heard about it was their earlier F-8C Crusader. Well now we have it in the F-8K version that is pretty much the same plastic. Typical of Platz, you get two full kits and a superb sheet that, in this case, will do three different planes.
As one would expect, the engraved plastic is very detailed for this scale and totally free of any mold glitches. The cockpit consists of a fairly nice bang seat, generic control stick, and an instrument panel. The two piece wing is well done and can be displayed with the front of it raised. Landing gear and properly done with the gear doors in some cases molded onto parts so this is pretty much a gear down model unless you want to do some cutting. A clear, one-piece canopy tops the cockpit and there are options for a pair of Sidewinders and or a pair of Zuni missile pods. The mounting looks like the usual 'Y' mount one often sees. A set of smaller horizontal stabs are supplied as they are more appropriate to the earlier Crusaders. I should also mention that the nose for this kit is only early Crusader so those thinking they'll use this kit for an F-8E or F-8J will have to think again or be willing to use the wrong nose for it.
I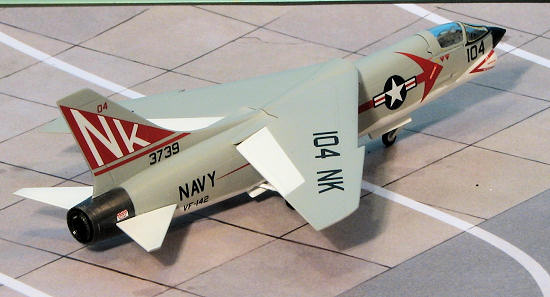 nstructions are well done, but seem to be somewhat generic. By this, I mean that they show bits and pieces that may not be applicable to your model. As an example, you are provided with the lower ventral strakes and the afterburner cooling scoops as well as the 'Y' shaped missile pylon. Yet not all the options use these items. It is up to the builder to closely investigate the markings options to see what is used on what.
| CONSTRUCTION |
 Anyway, the F-8A has no ventral strakes so those attachment holes had to be filled. The F-8A has no afterburner cooling scoops so those were sanded off. The F-8A had no upper fin antenna so that was also sanded off. I also removed the small pylon attachment points from the forward fuselage of both planes. On the F-8C, the ventral strakes and cooling scoops were glued in place. The attachment points for both these items is very small so one needs to be quite careful not to smear glue all over the place when doing this.
 | COLORS & MARKINGS |
Doing things a bit out of the normal sequence, I then painted the hot section of the tail with steel, sort of sloppily masked it (as I knew I'd be repainting much of it later) and then painted all the various white parts of the wings, fuselage and tailplanes. Since I used Boyd's gloss white, I knew it would be a few days between coats or sanding down where the paint was too thick. As you can imagine, there was much masking for the white control surfaces. The burner section was painted with Jet Exhaust, also from the Alclad II line. For the light gull grey, I used Model Master enamels.
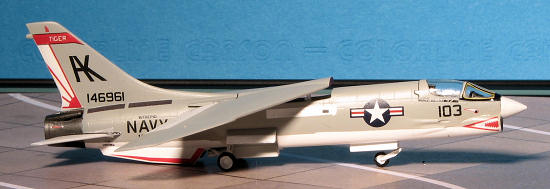
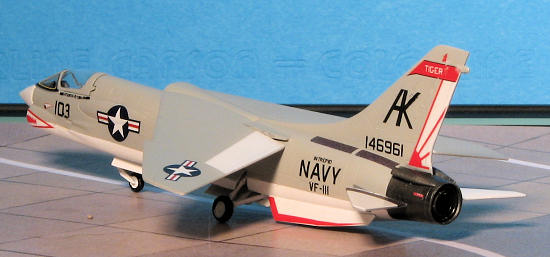
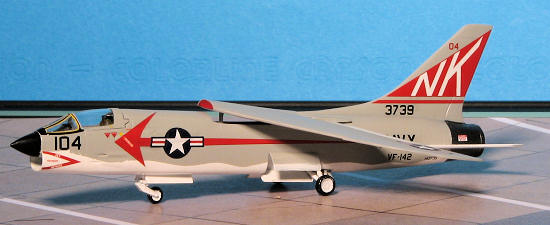
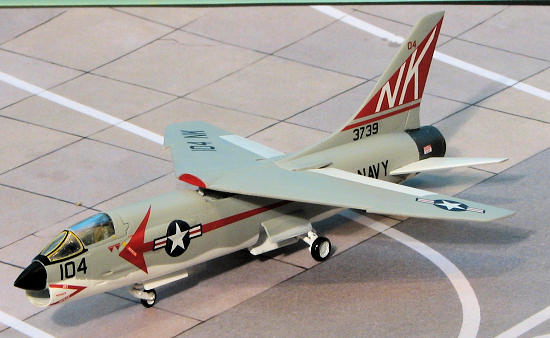 Once all the main painting was done, I glued on the landing gear. This gave me something to hold up the airframe while putting on decals. For markings, I used the kit decals for the F-8A and Starfighter Decals for the F-8C. The kit decals are superbly done as they are produced by Cartograf. They gave me no problems at all and went on fairly quickly. I say fairly quickly as I take my time with decals, so doing these took the better part of a week. The Starfighter markings are Alps printed so are uber-thin and quite prone to scratching and other damage. I managed to goober up two markings while applying them, but patched them up as best I could. The Starfighter markings give you the tail plane rub areas, side exhaust areas and the fuselage/tailplane walk areas as well. They don't provide the upper wing Air Wing markings that are so common on USN planes. I'm not sure if it is an omission or these planes didn't have them. Regardless, they are not provided. Assuming one doesn't glitch any decals, the Starfighter ones worked out very well and one can use Microsol on them without any worries. I picked the VF-111 scheme to go with theTomcat I did last week.
| FINAL CONSTRUCTION |
With the decals on, I gave the upper surface a coat of clear matte as the light gull grey wasn't glossy until 1972, many years after these particular planes were in fleet service. I then attached the upper main gear doors (which I knocked of several times), the wheels (which were a real pain to paint) and other bits. The radome pieces were installed as was the exhaust. I wanted the wings to be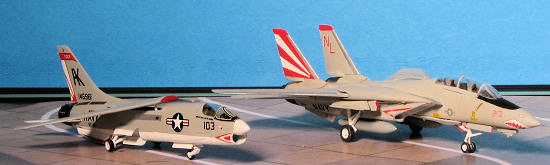 flat, but without some carving, they won't do so. In the end, I just stuck them in place with the little piston glued to the forward underside of the wing. The masking was removed and that was it.
| CONCLUSIONS |
These are really great little kits. The engineering is good and so are the kit decals. Thanks to Starfighter, we have options and I have to say that though their decals require more care, they went on without any real problems. Though these took me a while to build, paint and decal, I know of some folks who have managed to finish them in a weekend. The previous F-8 kits sold out very quickly and I anticipate this one doing the same so get them while you can.
| REFERENCES |
July 2010
Copyright ModelingMadness.com. All rights reserved. No reproduction in part or in whole without express permission.
Thanks to Hobby Link Japanfor the review kit.
If you would like your product reviewed fairly and fairly quickly, please contact the editor or see other details in the