Akkura 1/72 MiG-21PFV 'Thunderchief Killer'
|
KIT #: |
A0006 |
|
PRICE: |
9.99 Euros |
|
DECALS: |
Six options |
|
REVIEWER: |
Scott Van Aken |
|
NOTES: |
|
The Mikoyan-Gurevich MiG-21 (Russian: Микоян
и Гуревич МиГ-21)
(NATO reporting name "Fishbed")
is a supersonic jet fighter aircraft,
designed and built by the Mikoyan-Gurevich Design Bureau in the Soviet Union. It
was popularly nicknamed "balalaika", from the aircraft's planform-view
resemblance to the Russian stringed musical instrument or ołówek (English: pencil)
by Polish pilots due to the shape of its fuselage. Early versions
 are considered
second-generation jet fighters, while later versions are considered to be
third-generation jet fighters. Some 50 countries over four continents have flown
the MiG-21, and it still serves many nations a half-century after its maiden
flight. The fighter made aviation records. At least by name, it is the most
produced supersonic jet aircraft in aviation history, the most produced combat
aircraft since the Korean War, and it had the longest production run of a combat
aircraft (1959 to 1985 over all variants).
are considered
second-generation jet fighters, while later versions are considered to be
third-generation jet fighters. Some 50 countries over four continents have flown
the MiG-21, and it still serves many nations a half-century after its maiden
flight. The fighter made aviation records. At least by name, it is the most
produced supersonic jet aircraft in aviation history, the most produced combat
aircraft since the Korean War, and it had the longest production run of a combat
aircraft (1959 to 1985 over all variants).
Many consider the PF to be sort of a second
generation of these aircraft. It kept many of the same features of the earlier
F, but got a more powerful engine and eliminated the built in gun. This
made it less useful to those who flew it. During the Egyptian's use of MiG-21s,
most pilots preferred the older F over later versions just because of this gun
and the plane's lighter weight. The Soviet built Atoll (a copy of the US
Sidewinder) was generally considered to be a poor weapon and getting a hit with
it was often as much chance as anything else. No wonder that the later MiG-21M
series returned to having a gun, albeit one that was in a centerline pod.
Akkura
is a kit maker from Poland and has mostly dealt with detail stuff. From what I
gather, this MiG-21 kit is originally an INNEX mold. It is short run as one can
tell from the thick sprue attachment points and somewhat large and soft engraved
detailing. This latter is subjective as it is really not that much more than
what you get on current Airfix kits. There is some flash and some of the parts
suffer from mold shift.
 The cockpit is basically a flat floor with two flat sides into which a rear
bulkhead is inserted. A very generic looking bang seat is then glued to the rear
bulkhead and one butt joins an instrument panel and installs a control stick. To
say the interior is pretty basic would be about the truth and I'd recommend at
least a replacement seat.
The cockpit is basically a flat floor with two flat sides into which a rear
bulkhead is inserted. A very generic looking bang seat is then glued to the rear
bulkhead and one butt joins an instrument panel and installs a control stick. To
say the interior is pretty basic would be about the truth and I'd recommend at
least a replacement seat.
One needs 10 grams of nose weight before trapping the radar nose and cockpit in
the front and a plain blanking plate in the rear. No final engine compressor
stage here, just the flat plate. The nose has a separate cowl ring, like on a KP
MiG. There is a separate fin that needs installed so that the company can do
their MF version. To me, this means that perhaps the dorsal spine may be too
large, but I'll leave that to others to determine. All the various vents and
antennas are separate with no helpful guides on the plastic to show where they
attach.
Wings and tailplanes are a single piece with the holes for the wing pylons
already drilled out. Nose gear and wheel are a single piece. The main wheels
have a curious flat spot on the hub that is probaby an ejector molding. There is
no option for lowered speed brakes. You do get a centerline rack and fuel tank
as well as  wing racks for two Atoll missiles. The PF did not have a built in
gun, though some later had one added to the centerline. This kit does not
include that option. This is all topped by a single piece and somewhat thick
canopy.
wing racks for two Atoll missiles. The PF did not have a built in
gun, though some later had one added to the centerline. This kit does not
include that option. This is all topped by a single piece and somewhat thick
canopy.
Instructions
are nicely done though they show some of the parts (such as the seat) to be a
lot more detailed than they actually are. Color information is provided in a
number of paint lines so you should have no issues in this regard.
Markings are for six planes from four different
countries. There are two Polish AF planes, one from the mid 1960s and the other
from the mid-1980s. Two North Vietnamese aircraft are also provided. These are
from the 921st Fighter Regiment and both, like the two polish aircraft, are in
unpainted metal. Also in unpainted metal is a Czech plane from the mid 1980s,
and rounding things out is the lone camouflaged version from the East German Air
Force, again from the mid 1980s. Decals have some issues in that some of the
markings are off register. The yellow in the Vietnamese insignia seems to be too
dark and this is probably due to bleed-through of the background red.
Fortunately, there is no lack of aftermarket for the MiG-21PF, though it would
have been nice if the kit markings had been perfect.
First, one has to treat this as a short run kit. The mold seams are, in some
places, rather excessive so every part will need some sort of sanding treatment.
Secondly, there are some ejector marks that will have to be filled or removed,
such as the one on the underside of the wings. No big whoop for most of us, but
it is best to be prepared for a bit more work than your standard Tamiya kit.
The cockpit is simply a flat floor with flat side pieces. Into this fits the
back section into which a seat shape (as in slab bottom and back) fits. I glued
the side pieces at the lowest point (they are notched on the bottom),then tacked
on the back with the seat in place to get the right angle. Once dry, the seat
was removed and this assembly painted with Akan Emerald Green. This was my first
hint that the person who did the instructions was removed from reality. The seat
in the instructions is a beautiful and properly shaped MiG-21 seat, not two
sections of plywood screwed together at an angle with a small box attached to
the top.
There is no cockpit alignment markings in the fuselage. You simply glue it to
one of the large rectangles in there and prepare for the other side to have
about a 4mm gap. The rear bulkhead has to be removed for it to fit. There is no
detail at all on the instrument panel and no decal for it. Control stick is
about twice the width it should be and the hole into which it fits is a couple
of times too large. I put a large drop of super glue in it, let it set for a
few, and then stuck the stick in place, holding all this upside down while the
glue dried.
 The rear exhaust has but a blank circle to keep out light. In the front, there
is no placement for the shock cone as shown in the instructions. Fitting it at
the shown location has it way too far back (as in the original MiG-21). I had to
sand off the lip around it to have it jut out far enough. I then added nose
weight to make sure it did not tail sit. Fuselage halves are a
mediocre fit at best with some features such as the reverse scoop on the forward
nose, not lining up between the two halves. I had steps to deal with as well.
Fortunately, the plastic is fairly soft so that helped.
The rear exhaust has but a blank circle to keep out light. In the front, there
is no placement for the shock cone as shown in the instructions. Fitting it at
the shown location has it way too far back (as in the original MiG-21). I had to
sand off the lip around it to have it jut out far enough. I then added nose
weight to make sure it did not tail sit. Fuselage halves are a
mediocre fit at best with some features such as the reverse scoop on the forward
nose, not lining up between the two halves. I had steps to deal with as well.
Fortunately, the plastic is fairly soft so that helped.
Next the fin and ventral fin were attached. The ventral fin had some pretty
major mold shift, an issue I had to deal with in a few other parts. Filler was
needed to properly fair in the fin to the fuselage spine. The nose ring proved
to be smaller than the surrounding fuselage so some sanding and filling was
needed there as well. This was starting to remind me a lot of the
Mastercraft kit
I built several years back.
 Moving on to the wings and stabs, those were glued in place with no issues. I
then did touchup painting in the cockpit and masked the canopy. The clear is
very thick so spending any time in the cockpit is a bit of a waste. This item
fit fairly well but not perfectly. My least favorite step was cleaning up and
attaching the cooling scoops around the engine. There are no placement guides
and even the fuselage detail does not match the instruction drawings. Best guess
works well. I also glued on the nose gear doors and the wing pylons. The pins on
the pylons are about 1/3 the size of the huge mounting holes in the wings. This
was followed by the missile rails. The kit does not provide the rad alt antennas
(though it may be that this variant did not have that).
Moving on to the wings and stabs, those were glued in place with no issues. I
then did touchup painting in the cockpit and masked the canopy. The clear is
very thick so spending any time in the cockpit is a bit of a waste. This item
fit fairly well but not perfectly. My least favorite step was cleaning up and
attaching the cooling scoops around the engine. There are no placement guides
and even the fuselage detail does not match the instruction drawings. Best guess
works well. I also glued on the nose gear doors and the wing pylons. The pins on
the pylons are about 1/3 the size of the huge mounting holes in the wings. This
was followed by the missile rails. The kit does not provide the rad alt antennas
(though it may be that this variant did not have that).
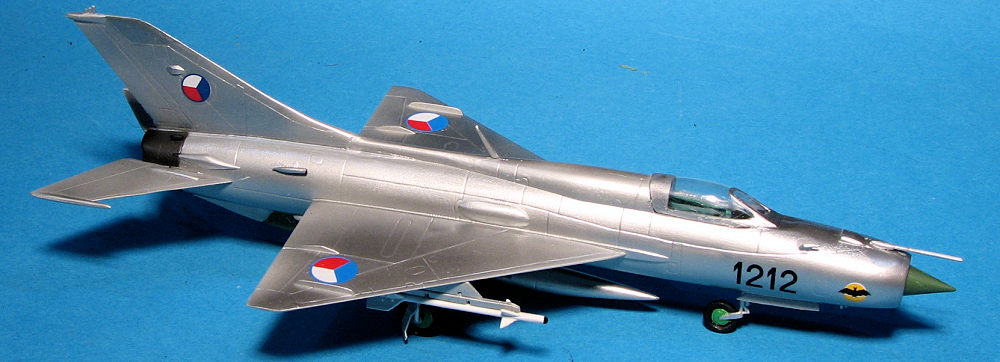
It was then time to hit the paint shop.
Due to my lack of aftermarket decals for the PF. I went with painting it overall
aluminum. As usual I sprayed Alclad II aluminum on bare plastic with no real
issues. It took a couple of sessions and I left it to dry several hours after
each application just to be sure. Actually Alclad II can be handled within about
15 minutes, unlike most other metallics. During this event, I also painted the
gear legs, gear doors and anything else that would be this shade, even though
some of them would still need to have the seams removed. One thing that showed
up after painting is that the surface of the plastic is not smooth. I think that
'pebbly' is the term often used.
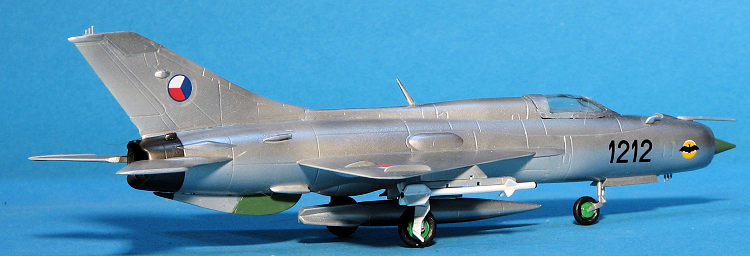
With that done, I attached the main landing gear. I had to widen the holes so
the gear legs would fit. I also widened the holes in the main wheels as they are
too small to fit on the axle stubs. The landing gear was
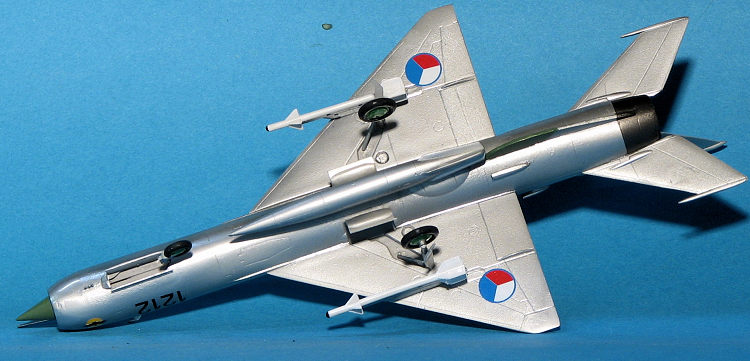 installed and after the
wheels were painted, they were attached as well. Then the retraction struts
which have no real attachment points. This was followed by the inner gear doors
and the centerline tank. Up next were the main gear doors, which have to be
bent. Missiles were a fairly poor fit as the fins are so thick that the only
place they touch the missile rails is at the crux of the fins. As usual, the
receptacles for the pins on the missiles are about three times too large.
installed and after the
wheels were painted, they were attached as well. Then the retraction struts
which have no real attachment points. This was followed by the inner gear doors
and the centerline tank. Up next were the main gear doors, which have to be
bent. Missiles were a fairly poor fit as the fins are so thick that the only
place they touch the missile rails is at the crux of the fins. As usual, the
receptacles for the pins on the missiles are about three times too large.
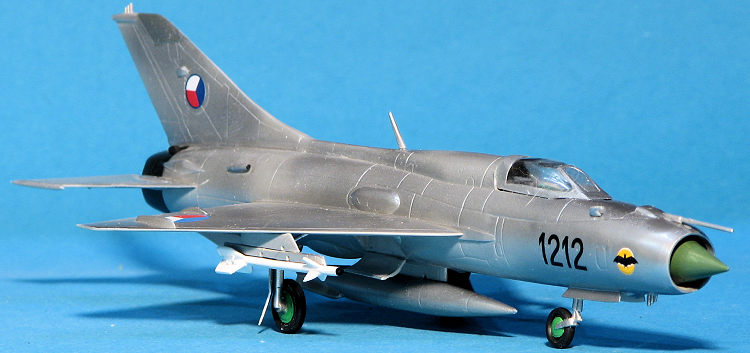
Though there are still a few bits to add, it seemed like a good time to attach
the decals. For this I really had but two choices, thanks to the rather poor
Vietnamese insignia. I chose the Czech ones. The decals come free of the backing
fairly quickly and the insignia are just slightly off register, leaving a tiny
white sliver between the red and blue. They also screwed up the fin insignia by
not handing them. I robbed a set from a MiG-23 sheet, but the blue on these is
darker. The MiG-23 wing insignia are too small for the -21.
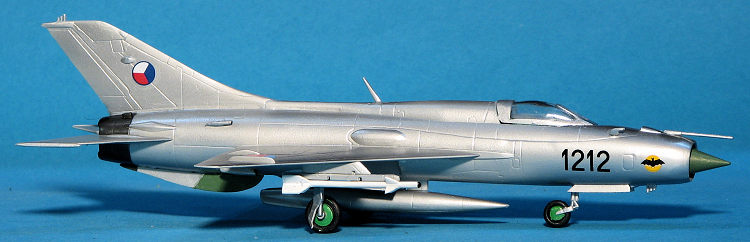
With the minimal markings in place, I added the final pieces. These were the
landing lights, spine antenna, nose probe and a smaller probe. The latter is the
wrong shape, but it is all that is provided. The nose cone and lower fin antenna
fairings were painted and the masking removed from the canopy.
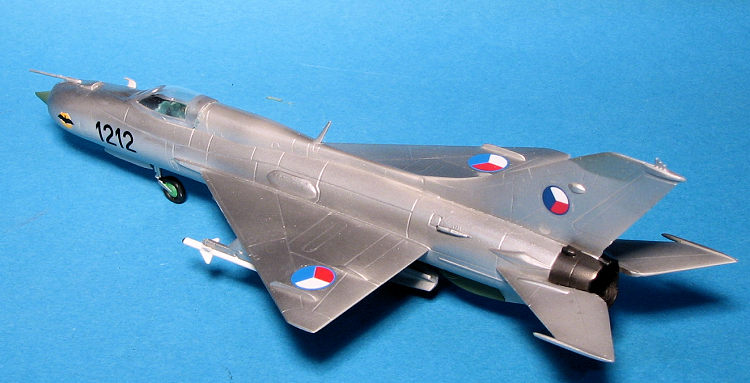
So what is the verdict on this one. Well, it does have
its issues. I would put this one near the bottom of the list of MiG-21F/PF kits.
It isn't impossible to build as you can see and really, anyone with any
abilities should be able to make a presentable model with it. Its biggest issue
is the too wide fuselage that results in the pinched area around the intake.
So why did I build what is obviously a mediocre kit?
Well, I had it on hand and I did not have an early PF. Guess that is a fairly
lame reason, but the end results are pleasing enough to add to the MiG-21 row on
my display shelf.
http://en.wikipedia.org/wiki/MiG-21
MiG-21 Walkaround, Part 1, Squadron/Signal, 2004
January 2020
Copyright ModelingMadness.com. All rights reserved
If you would like your product reviewed fairly and fairly quickly, please contact the editor
or see other details in the
Note to
Contributors.
Back to the Main Page
Back to the Review
Index Page
Back to the Previews Index Page