
Zhengdefu 1/72 F-14A+(B) Tomcat
| KIT # | 08m-m345 |
| PRICE: | $8.95 |
| DECALS: | One Aircraft: VF-74 |
| REVIEWER: | |
| NOTES: | Knock off of Italeri kit? |
| BACKGROUND |
For a look at what is in the box and a brief history of the type, please visit the preview.
| THE KIT |
 As many of you may know, Zhengdefu has been producing copies of a lot of different aircraft kits; mostly, from what I can see, Italeri and Academy kits. They do, however, have a large catalogue of other kits that are solely home grown, though they tend to be a bit inaccurate and are motorized and have other toy-like attributes. I decided to built this kit just to see what it would be like. I fully anticipated it being a real chore as often knock-off kits are not to the same quality level as the originals. We shall see.
| CONSTRUCTION |
Then it was time to glue the upper and lower fuselage sections together. The method or keeping the wings in place and together is well done and ensures no problems with them 'slipping' during construction. Just make sure that you don't use too much glue on the hold-down caps or the wings won't swing. As was feared, there were some rather large gaps on the side of the aft fuselage just behind the wing openings. These were filled with superglue and when dry, sanded. The small pits were then attacked with filler. Next step was the fins. These fit fairly well, but I'd hesitate to call them perfect. At least they didn't cause me grief! This gave me a pretty complete airframe so I figured it was time to do some painting. I painted the cockpit anti-glare shields black and glued on the windscreen. Then I tacked on the main canopy after sanding down all the ejector pin areas on the lower side. This was then masked. At the lower front, the IR/TV housing was glued in place. I flattened the pointed housing to make it look as if the TV camera was installed. CAMOUFLAGE I started this one by gluing together the wings, wheels, drop tanks and missiles. You know, the usual subassembly stuff. I had no real problems and the fit of the parts was good. The surface texture is a bit on the pebbly side, but should disappear under a coat of paint. Many of the parts has some flash on them that needed to be removed, especially the upper cockpit part around the anti-glare shields. There was no real positive locator for the upper instrument panels so they were placed where they seemed they should be. The bang seats are a total joke and I ended up getting a set of True Details GRU-7 seats (#72410) to replace them.
 The interior was painted dark gull grey with black consoles and instrument panels. A bit of clear green was put into the 'scopes' and the rest dry-brushed. The interior itself was glued atop the nose wheel well as per instructions and then the upper forward fuselage was glued in place. Fit is fair. The detailing near the joins on the lower section is very shallow and nearly gone in some places like the gun gas vents. I decided to attach the nose cone at this time. First, I put some weight in it just in case. As soon at I put the nose cone on it was obvious that this was the Italeri kit. The nose is a bit too flat on the top and too rounded on the bottom. This puts the center of the tip up too high. Other than filling the nose with superglue and lots of tedious sanding, there is no real fix. What I did do was to put some card in the upper section of the join and this lowered the tip of it a bit. Not exactly perfect, but it does help quite a bit. Just before painting, I'll install a metal pitot tube made from scrap.
 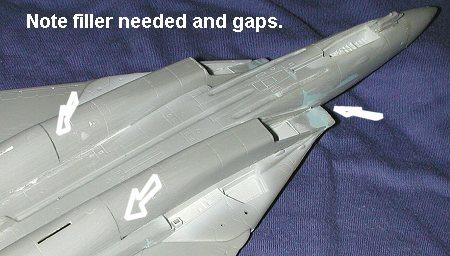 Turning to the nose, this section was then glued onto the aft fuselage section. Again, the fit was not good and so much use of heavy grit sandpaper and filler was needed for a smooth surface. After several days of filling and sanding and smoothing, it was time to attach the intakes. There are engine compressor fronts that are to fit into the lower fuselage. Then you place the intakes over them and that is it. WRONG! The semi-circular portions on the intake where these are to fit prevent the intake from even coming close. After these were cut out, that hurdle was overcome. The next is that the intakes do not fit well at all. In fact, it is damn poor. You will end up with gaps at the back that will need attention. There are also several 'steps' between the aft fuselage and the intake section that will need the killer sandpaper and filler treatment. My intakes were further suffering from poor molding on the skinny forward sections and I had to struggle with superglue and clamps to get even a close approximation of how they were to fit. If it seems as if this kit is becoming a paint to build, well, you wouldn't be far from wrong.
  It was then time to do something about the exhaust section. I had planned on building this as an F-14A, as I saw the A exhaust on the sprues. Well, I didn't realize that the conversion to the new engines meant a modification of the rear fuselage and no way would these exhaust fit. In fact, they are designed to fitinto the new B afterburner parts. In practice it is a Mickey Mouse way of doing things. This is further exacerbated by the really poor molding of the B exhaust parts. It is almost as if the parts were removed from the mold while the plastic was still semi-fluid. There are bumps and dips all over the plastic. And, of course, the fit against the rear fuselage is poor. Out with more sandpaper and filler. Frankly, this kit is getting very near the trash can. However, I don't want to be beaten by a kit so I slogged on by filling in all the gaps and then filling and sanding things down.
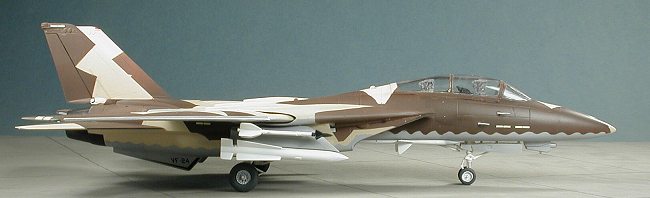
 Not wanting to trust the kit decals (as I had no aftermarket replacements for them), I decided that if the kit sucks, then perhaps I can improve things with a neat paint job. For that I chose Two Bobs 48-025 'Sandbox Tomcats' that also includes 1/72 markings (such as they are). Now I didn't always have the exact colors mentioned, so used what was available. For the underside, I painted it FS 36320 as recommended in the instructions. For the sand, I used some 15 year old Gunze Israeli Sand paint that I really needed to get rid of. This required some careful masking and some inventive cutting of tape for the transition line. No way was I going to be able to totally duplicate this wavy pattern as it was very fine in some areas, but I got it close enough. When all that was masked off, I used some Japanese WWII primer brown for the second upper surface color. The paint didn't work 100% because it was acrylics and so I had to patch a few spots where the masking had pulled up the paint. This was mostly on the underside with the grey color.Act
| CONSTRUCTION CONTINUES |
With it mostly painted I attached the tail planes and then landing gear. Fit on these was fairly good. I also glued the gear doors at this time and popped off the canopy to get the cockpit ready for the resin seats. I used a pair from True Details that are worlds better than the shapes offered in the kit. Unfortunately, they are too wide at the bottom. I ended up having to sand away  much of the bottom detail on the sides of the seat to get them to fit. Once I was sure they'd fit, they were removed and painted. Around this time, the swing wing attachment arm either broke or came adrift. Anyway the result was that the wings would flop around at will so I glued them in the full swept position. I'd have liked to have put them in oversweep as they would be when stored below decks, but it was physically impossible to do so.
Looking over the rest of the airframe, I noticed a lot more areas that needed touchup. This was even more obvious when I removed the masking from the engine afterburners. The grey paint had seeped under the tape and there were large lumps of dried paint on the Alclad II. I used some Polls S paint remover that took off the dried paint and didn't bother the Alclad II that much. It did take off some of the Alclad II, but I was able to touch that up. I also had to touch up a lot more of the other paint. This is not a kit that I'm going to be too proud of when it is finished.
At this time, I decided to get to work on the missiles. These are a real mess. The Sidewinders don't even have all the fins the same size and shape. The Sparrows have large ejector pin marks all over them and the Phoenix are the only missiles that are even half decent. By this stage, I was totally fed up with the kit and only wanted to get it done. The missiles were painted white with whatever nose colors were needed.
| DECALS |
Now that I'd taken care of the more egregious screw-ups on the kit, I coated it with Future to get it ready for the decals. Much to my dismay, the TwoBobs decals proved to be quite brittle. Fortunately, there are not many of them, but I found it impossible to get the wing tip slime lights to cover the curve so I used old Scalemaster ones. I also had the strake decals break into several sections when I FINAL BITS After applying the decals, I sprayed on a clear matte to seal them in. Then the various nose probes were glued on. The instructions are worthless in trying to figure out just where these go and there is no guide on the fuselage to help. Actually, it wouldn't matter as those would have been sanded and filled long ago. The missiles were just painted basic colors and glued in place. These are typically poor as mentioned earlier and all I wanted to do was finish this thing, so no missile markings. The tail hook was glued on and really, that was about it for parts. I used some dull aluminum Bare Metal Foil for the leading edges of the wings. Meanwhile, back in the cockpit, the seats, which had been painted (in probably the wrong colors, but I was past caring), were glued into the tub. Naturally, the front seat is just a touch too tall so the canopy doesn't fit all the way down. I took off the masking from the canopy and called it quits. slid them off the paper backing. As the lower fuselage false canopy decal was in one piece and there was no way to put the nose gear doors in the closed position so that I could apply it, I had to leave it off. When I applied setting solution to them, I had a problem with a permanent stain on the left side nose slime light. Guess the Gunze paint didn't like the Solvaset. I'll just chalk up one more screw-up to this kit for that one.
| CONCLUSIONS |
Well, you really have to be desperate to want to save a few dollars to buy this kit. I was initially impressed, but building is the real test of a kit and it was a nightmare. I've got a few other Zhengdefu kits, but after the experience with this one, I'm not so sure that I'll ever get around to building them. I cannot in all conscience recommend this kit to anyone unless you have no alternative at all. I think that the fact that it took me 9 months from start to finish says a lot by itself.
February 2003
# 1259 in a series
Copyright ModelingMadness.com. All rights reserved. No reproduction in part or in whole without express permission.
If you would like your product reviewed fairly and fairly quickly, please contact the editor or see other details in the
Back to Reviews Page 2021