Hobbycraft 1/72 DHC-8 'Dash 8'
| KIT #: | HC 1345 |
| PRICE: | $23.98 MSRP |
| DECALS: | Two options |
| REVIEWER: | Scott Van Aken |
| NOTES: |
| BACKGROUND |
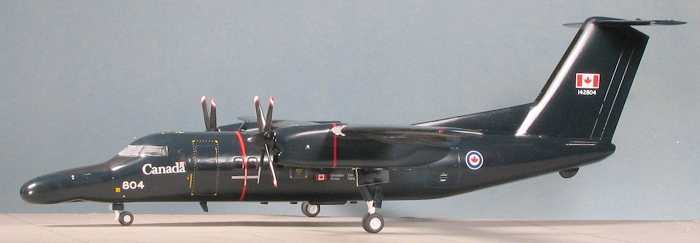
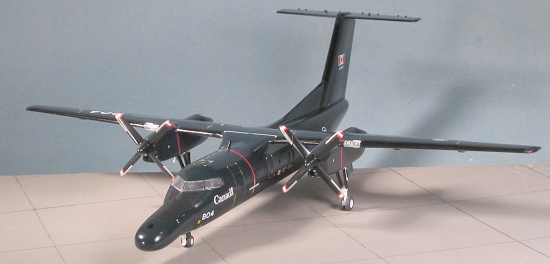
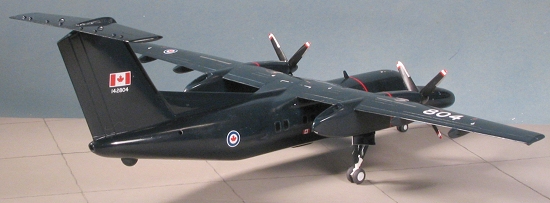 I've probably mentioned before that many of the kits I build are the result of a decal sheet. Well, you can chalk this one up to that odd quirk of mine. Leading Edge sent in a reallysuperb sheet for their CT-142 nav trainer. Now this is basically a Dehavilland Canada DHC-8 airliner with its sleek lines really disturbed by a radar nose that gives the aircraft the name 'Gonzo' in CAF circles. I've also not used a Leading Edge sheet in a very long time so it was a good opportunity to do so.
First situation I ran into is that the Hobbycraft Dash-8 kit isn't exactly something that is well stocked. My usual haunt that seems to carry most everything didn't have one. A quick phone call to his distributor showed that there were a couple in stock so he ordered one for me.
| THE KIT |
Once this kit arrived, I took it home and opened it up. Here is what I found.
| CONSTRUCTION |
 Though it seems like a simple kit, if you have built a Hobbycraft kit, you know that rarely does it fall together. It is just something that we have come to expect over the years so we are not really surprised when we have to do a bit of work. First thing was to build up the various sub assemblies. Basically, this meant the wings, nacelles and interior. Fit on all these parts is fair. The interior parts are basically invisible once you get the windscreen parts installed, so spending a lot of detail time on this part is a bit of a waste. Regardless, I painted the interior Dark Gull Grey with Voodoo Grey seats. The anti-glare panel was in Black as were the control stick handles. Again, you can't see it once it is in place; a good thing as the fit of the anti-glare panel is not good. It just sort of glues 'somewhere' atop the instrument panel.
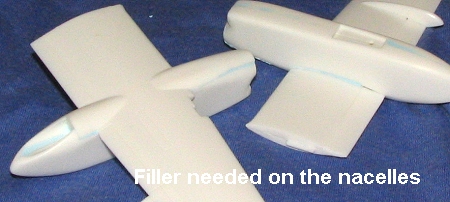
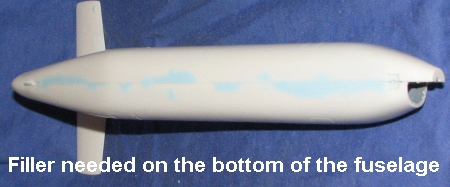 Fit of the engine nacelles to the wings is also not the best. You'll have to break out the filler on this as it will be a putty monster. In some places it required three applications to get all the parts filled. Back at the fuselage, I glued in the cabin windows with no problem. The cockpit windscreen isn't the greatest fit. This part should have been done in one piece and attached from the outside rather than a two-piece inside fit. The clear tabs on the inside are clearly visible once in place. I then glued the fuselage halves together. Fit is not that great. The entire fuselage seam needed filler. In hindsight, I'd have cut off all the alignment pins as I don't think they helped very much at all.
In order to have the nose conversion work, the kit nose has to be cut off. The decal instructions show you exactly where you have to make the cut. As I rarely get these things right the first time, I cut mine a tad shallower than what was shown. The theory being that I could sand back the nose until it matched the resin part. This part had 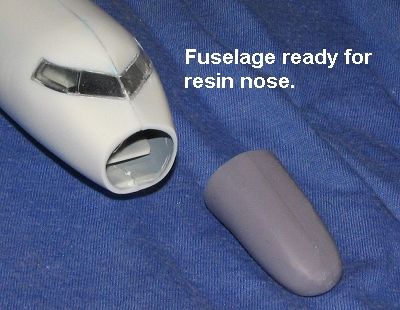 already been cleaned up and glued together.
Once the nose was cut off, it took a bit of care to sand back the nose until the opening was a pretty good match. Then I glued on the new resin nose. Fit wasn't bad, though I got it a bit off kilter so I had to do a bit of adjusting. Actually, I had to break it off as I forgot to put weight in the nose! Fortunately, it was a clean break so after inserting several large fishing weights, I reglued the nose into position. While that was drying, I glued on the wings. These needed a bit of trimming to the receptacle slots i n order to get a semi-decent fit. I still needed filler on this as I did on the nose areas to get a semi-decent blending. During this time, the old tail bumper was cut off and the new resin version (that is larger) was installed. I also glued on the lower large rectangular antenna and three smaller white ones. The two blade antennas were attached at this time as well. Be sure that you get these last two in the right place or you'll have trouble later with decals. Amazingly, these were not broken off during all the painting and decaling. I also found that the resin used for these parts was amazingly pliable. I was able to bend the long sprue stubs into an S shape without it breaking. I've never seen resin like this before. I masked the windscreen (which is a horrid fit) and the wheel wells. Off to the paint shop.
| COLORS & MARKINGS |
The recommended shade was FS 15044 (which I didn't have) so I decided to try an ancient tinlet of Humbrol HB6 (a dark sea blue). In hindsight, I'd probably have been better off with Blue Angel Blue (15050) or something in between as the HB 6 is rather dark; nearly black. Anyway, I had it, it looked as if it would work so I mixed up some using the usual Floquil lacquer 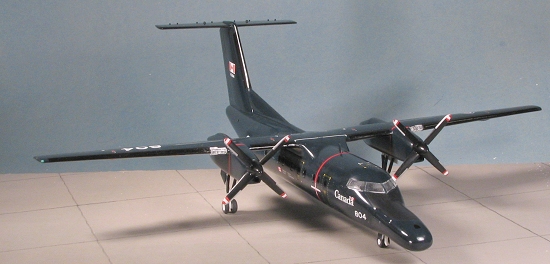 thinner and sprayed the underside of the wings, nearly all the airframe and tail section undersides. I quite when I ran out of paint (this is not a small airplane). Letting that dry, I mixed up another batch and started to spray the areas yet untouched. Much to my horror, it provided me with a crinkle finish. I haven't a clue what the cause was, though it had to be something to do with mixing the paint. After it dried (and it was about 3 hours), I applied Strip-A-Kit to all the screwed up paint areas. Letting it sit about 4 hours, I went in a scrubbed it off. A second application took care of any residual paint. The edges were lightly sanded and the area repainted. No problem. I haven't a clue as to just what happened there, but it set everything back a couple of days.
With all the paint on the plane, I then masked off the anti-glare panel in the front. It and the props/spinners were painted with black. A bit of a note on the props. There is no place in the instructions where it says a thing about assembling the props. I guess they were supposed to magically build themselves prior to painting. If they are handed, I couldn't tell you . I also couldn't tell you which way they spin as again, no guidance from Hobbycraft.
 I glued on the landing gear so that the kit would have something to stand on. The main gear look different from what is shown in the photos that accompany the decal sheet. Not a lot different, but just not the same. I also came to realize that it would have been a good idea to putty in the windows. With the natural shrinking of the filler, there would have been enough outline to show where to put the window decals, as it is important to get them right.
This was my first experience with Leading Edge decals. I know, I should have used them a LONG time ago, but there it is and I'm properly ashamed. These are not like Superscale or Cartograf, but more like Propagteam. They are very thin and there isn't a lot of clear carrier. For instance, in the number 804, there is no film inside the round parts of the 8 and 0. On the window decal, there are just thin slivers of clear film attaching them. If you are not used to these ultra-thin decals, beware. They also have a very short working time. You have about a minute to dunk them and slide them off the paper before the glue on the paper goes away and you'll have a real chore removing the decal. I recommend cutting the 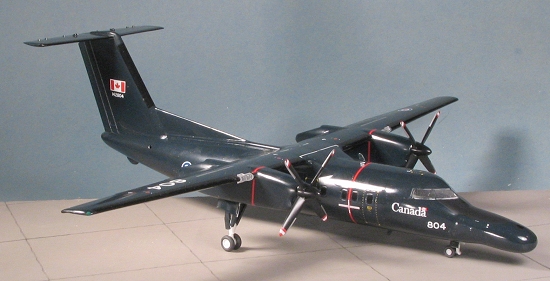 really convoluted ones. I did the window decals in about four sections and it worked well. There are decals for the props as well. However, the kit blades are not shaped the same at the tips as the decals, making the decals too small at the tip. I just put them on and then painted the areas that weren't covered. Not the smartest move as it really didn't make things any prettier. My advice is either reshape the tips to fit the decals or better yet, paint the tips white, mask the center and paint on the red. Testors Aluminum Metallizer can be brush painted on for the upper leading edges.
Leading Edge not only provides the de-icing boots, but all the teeny little stencils on the plane. These really help to break up that solid expanse of dark blue. The white is very opaque and there is no bleed-through of the background color at all. I'd have to put these decals right up there with the finest I've ever used. To help them stick a bit more I used Microset. Nothing stronger is needed.
| FINAL CONSTRUCTION |
With all the decals finally in place. I painted the wheels (which are not well defined between the wheels and tires for my tastes), glued on the gear doors, painted the wing tip formation lights, removed the masking from the canopy and glued on the wheels. Last things were tacking on the landing light covers (which do not fit well), the landing gear doors, and inserting the props.
| CONCLUSIONS |
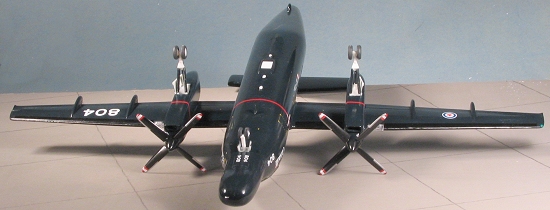
 Every kit I do that isn't straight from the box is an interesting experience. This one had its moments and there are still a few things I could do to spice up the kit a bit. But the real reason for the model was the decal sheet. It is a great sheet and a very good (and simple) conversion. It produces a most unusual aircraft using a kit that has room to make some improvement, but can still be built pretty much 'as is' and give a neat model. It is one I like and think that you will as well.
April 2005
#1359 in a series
Copyright ModelingMadness.com. All rights reserved.
Thanks to Leading Edge Decals for the decals and to me for buying the kit! Please note that this sheet may well be unavailable.
If you would like your product reviewed fairly and fairly quickly, please contact the editor or see other details in the Note to Contributors.