
Hasegawa 1/48 F-86E (conversion)
| KIT #: | 07082 |
| PRICE: | $29.95 MSRP |
| DECALS: | Two options |
| REVIEWER: | Scott Van Aken |
| NOTES: | Cutting Edge leading edge slats and Eduard zoom set used along with Pyn-up decals and True Details wheels |
| HISTORY |
The F-86 entered service with the United States Air Force in 1949, joining the 1st Fighter Wing's 94th Fighter Squadron "Hat-in-the-Ring" and became the primary air-to-air jet fighter used in the Korean War. With the introduction of the Soviet MiG-15 into air combat in November, 1950, in which it out-performed all aircraft then assigned to the United Nations, three squadrons of F-86s were rushed to the Far East in December. The F-86 could out turn and out dive the Mig-15, but the MiG-15 was slightly superior to the F-86 in ceiling, acceleration, rate of climb, and zoom (until the introduction of the F-86F in 1953); and flown from bases in  Manchuria by Soviet VVS pilots, was pitted against two squadrons of the 4th Fighter-Interceptor Wing forward-based at K-14, Kimpo, Korea. The first Mig-15 shot down by a Sabre was by a pilot of No. 335 Fighter Interception Squadron, Flight Lt John Nicholls RAF.
Superior US pilot training in comparison to that of North Koreans and the Chinese accounted for much of the F-86's success in achieving air superiority during nearly all of the hostilities. F-86 pilots also achieved a favorable kill ratio even over the Soviet piloted Mig-15s. Soviets piloted the majority of Mig-15s that fought in Korea, while inferior North Korean and Chinese pilots piloted the rest of the Mig-15s. The Soviets and their allies periodically contested air superiority in MiG Alley, a hotbed for air-to-air combat near the mouth of the Yalu River (the boundary between Korea and China). Some sources attributed the F-86E's all-moving tailplane to giving the Sabre a decisive advantage over the MiG-15. Far greater emphasis has been given to the training, aggressiveness and experience of the F-86 pilots. Despite rules-of-engagement to the contrary, F-86 units frequently initiated combat over MiG bases in the Manchurian "sanctuary".
Review of archived and previously classified documents released after the fall of the Soviet Union in 1991 disputes the numbers of claims by U.S. pilots, stating that the VVS lost only 345 MiGs. In turn the Soviets claimed to have shot down more than 1,300  U.N. aircraft including more than 650 Sabres. However, USAF records revealed that there were only about 660 Sabres deployed to the Korean theater in the entire war. This fact makes the Soviet claims highly dubious. USAF records also show 224 F-86s lost to all causes, including non-combat. Many air engagements are corroborated by both sides, but with conflicting claims of kills.
The needs of combat operations balanced against the need to maintain an adequate force structure in Western Europe led to the conversion of the 51st Fighter-Interceptor Wing from the F-80 to the F-86 in December, 1951. Two fighter-bomber wings, the 8th and 18th, converted to the F-86F in the spring of 1953. 2 Squadron SAAF also distinguished itself flying F-86s in Korea as part of the 18 FBW.
I also found it especially interesting that the F-86 had the same thrust to weight ratio as the P-59 Airacomet. Yet the F-86F was 300 mph faster and I know which I'd have rather taken into combat.
| THE KIT |
After years of having little more than the Monogram and later ESCI kit, 1/48 Sabre fans were blessed with two excellent kits in the Academy and Hasegawa F-86s. Both are worthy and many have difficulty choosing between the two of them. I've built the Academy kit and found it to be quite nice, though not without some areas of concern.
When Hasegawa first issued this kit, it was the extended wing F-86F-40 as used by the JASDF and it included markings for probably every Japanese unit that ever flew the plane. What most of us wanted was a shorter wing version as used in the Korean War and a bit later. Eventually, they came out with their 'US Air Force' boxing that had the shorter 6-3 wing (that is the one with the extended leading edges and no slats). This boxing is that kit, but with different decals.
 However, Hasegawa did not change anything else besides the wings. Just to start out, there were no F-86F-30s in 1950 so the title should read "Korean War 1953". With this in mind, there are some items in the kit that are either not to be used or are not correct. For one, you won't use the Sidewinders and their racks. These were not, as far as I can tell, ever fitted to USAF Sabres, though the Japanese and other users of the F-86F-40 version had this capability. The F-86F-30 was a fighter bomber so would have the option of inner pylons for bombs and those are not included. The last biggie is that the fuselage is for an F-86F-40. The biggest difference is the air scoop on the right fuselage behind the wing. This should be filled in. I'm thinking there are other small vents that are not appropriate, but I have no clear reference for them.
The molding is all that one expects from Hasegawa with crisply engraved panel lines. I did find that several parts suffered from mold faults in terms of sunken in areas. These are the gear doors and speed brakes, probably due to the thick detailing on the other side. The only part suffering from visible ejector pin marks is the seat bottom, where one is supposed to cover it with a pilot figure.
The cockpit is nicely detailed with raised instrument detail. A decal is provided for the main instrument panel and my experience with this fitting over the detail is quite positive. Side consoles will have to be painted as no decal is provided for them. Both intake and exhaust trunking is provided, along with a long seam on both sides that will be difficult to fill. Fortunately, Hasegawa also gives us intake and exhaust covers. I should also note that the speed brakes seem to have the proper droop, judging from the photos of the built kit on the instruction sheet. One thing you should note is that the fuel dump pipe should protrude down at about 45 degrees, not horizontal as shown on the kit build-up.
 Other things provided are both Korean War and post war drop tank fins, a separate canopy and windscreen so you can show off the interior, as well as engine intake compressor and exhaust compressor faces should you wish to not use the covers. There is also room for nose weight around the intake trunking.
As mentioned, this is a reissue with different decals. That being the case, you get the original boxing's instructions with an addendum sheet for the new decals. This sheet says nothing about not using the Sidewinders nor the early drop tank fins. The markings are for two 51 FIW aircraft. One is the box art aircraft of John Glenn's 'MiG Mad Marine', a very popular subject. The other is for the equally popular 'Mike's Bird'. Decals are very nicely done and appear to be quite thin. In addition to a full data suite, the yellow ID bands are also provided. My luck with these is not consistent, but perhaps these will work better than others I've tried.
One note is that the 6-3 wing was first factory installed on F-86F-30 52-4505 and so the kit wings are correct for both subjects (52-4584 and 52-4641). Some of the earlier F-86F-25s also had this wing factory installed starting with 51-13341. I'm not sure how many earlier Sabres, if any, were retrofitted before the war ended. Check your references to be sure.
| CONSTRUCTION |
You know, I have a ton of F-86E decal sheets, but except for perhaps the ESCI kit that has been reissued by Italeri, I don't think any of the 1/48 kit makes have bothered to do a slatted F-86A/E/F. Sure, you could kit-bash with the Revell F-86D, but there are times when you either don't have one or don't want to do it.
With that in mind, and because I'd not built a Hasegawa 1/48 Sabre, I started hunting around for a set of slats. Thanks to Ben Brown's info, I was able to score a nice Cutting Edge set so my problem was solved. I also picked up an Eduard color Zoom set to liven up the cockpit.
You have to deal with the fuselage addition to the accommodate the 6-3 wing. But that can be left until later in the build.
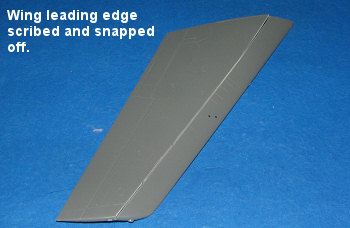 First thing I did was to read the instructions on how to modify the kit wings to accept the slats. It seemed pretty easy. Simply scribe like crazy on a panel line and remove the extension. OK, that I did. In fact, it was really easy to do as once scribed a half dozen times, it was a simple matter to simply snap off the leading edge. Things were going well, so I was starting to get nervous.
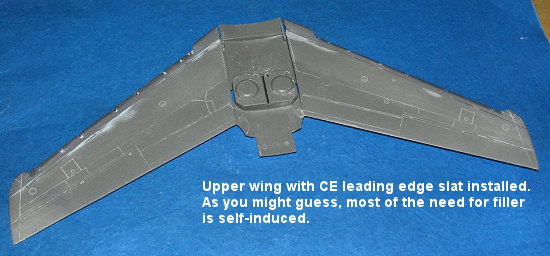 I then sanded the break area and glued the wing upper and lower halves together. When dry, I attached the leading edge parts by cementing them to the upper wing first. Then I attached the lower section. When putting on the slat conversion to the Hasegawa wing, I lined it up with the outer wing tip. This left what was a bit of a gap on the inside You can see this in the images. It seems that by sanding the fuselage first, I may have removed the additional space. This will have to be filled with card later. As I can never get a good fit on these
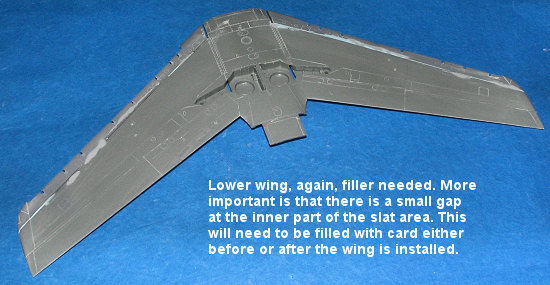 things the first time out, I have to commend Cutting Edge on superb quality resin. Though I sanded the heck out of it to get a smooth fit, I never came up with an air pocket or pin hole. CE resin may be a bit more expensive than the other guys, but it is well worth it.
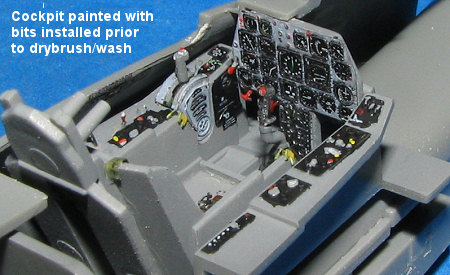 With the wings being worked on, I turned my attention to the cockpit. I bought an Eduard Zoom set to enhance things and I have to say that I'm rather pleased with the set as it does make quite a difference in detail. I do wish that side consoles had been included, but one does get a couple of instrument panels for the different versions and there are going to be parts left over so you could do much of a second kit with the remnants. One does have to grind off much of the inner fuselage detail to replace it with the etched parts. The most difficult part of the set was cutting the seat sides to let in the belts. I fear I overdid it a bit, but one does learn and I'll do better on the next one.
![]() With the cockpit finished it was glued atop the intake trunking. I then glued that and the exhaust into a fuselage half. There is plenty of room atop the intake trunk for weight and so some fishing sinkers were cut up and glued in. Terry Dean also makes a ready to go weight for this (I forgot I had one). Check the accessories page for TD Productions. The halves of the fuselage were then glued together. The next step was to sand off the large scoop on the right side, this was then filled and sanded flush. As it takes quite a bit of filler, you'll find that this will shrink over time so a good idea would be to fill this opening with plastic card first or to use epoxy filler. I didn't and wish I had.
With the cockpit finished it was glued atop the intake trunking. I then glued that and the exhaust into a fuselage half. There is plenty of room atop the intake trunk for weight and so some fishing sinkers were cut up and glued in. Terry Dean also makes a ready to go weight for this (I forgot I had one). Check the accessories page for TD Productions. The halves of the fuselage were then glued together. The next step was to sand off the large scoop on the right side, this was then filled and sanded flush. As it takes quite a bit of filler, you'll find that this will shrink over time so a good idea would be to fill this opening with plastic card first or to use epoxy filler. I didn't and wish I had.
With the fuselage together, I then attached the landing light area and the intake. If you attach the intake first, you'll not be able to easily get the landing light section in place. The intake fit is fairly good, but not perfect. I found I needed filler and sanding to get it to match the surrounding area.
 Next came the wing. It was a pretty good fit, though I did have the expected gaps at the forward root. I also had to use filler at the lower rear. Fixing the wing root gap wasn't the piece of cake I thought it would be and it took several applications and sanding. I used epoxy filler for this as there are some large holes to fill.
While that was going on, I assembled the drop tanks, using the smaller fins. Fit of these was less than sterling so more filler for the fin/tank junction.
With the base airframe done, I thought it would be a good idea to stick on the landing gear. It was to be painted the same shade as the rest of the aircraft so why not get it in early. Well, much to my surprise, I found that one of the main gear legs was short shot. No axle. Well, that is fixable, though I wish I didn't have to. I used a piece of tubing, drilling out the area where the axle would fit. Unfortunately, there is very little plastic left once the opening is drilled and as expected, it broke away when gluing on the tubing. I ended up getting all the bits in place then drenching the join in super glue. When it dried I cut and filed away at it to return it to as close to the original as I could. You know, if it isn't one thing then its another. I don't seem to ever build a kit without having some sort of mishap.
Meanwhile, I decided to move to something a bit easier. In this case, it was filling the sink areas in the speed brake exterior and painting the wells. The kit instructions recommended interior green and I used some that I'd darkened a bit with black. Then the various bits in there were painted according to kit instructions.
During this time, I painted the seat head rest and intake covers and fuel dump pipe white, then red. I also painted the inside of the gear doors and speed brakes with aluminum. I painted the outside of these as well and was less than thrilled when more sink areas showed up on the outside of some of the gear doors. Nothing to do but break out the filler and have at it.
 The seat then had its various bits added to it from the etched set. You need to cut slots in the lower seat to have the belts stick through. In retrospect, you could just as easily snip the belts short and glue them in place. Wish I'd thought of that earlier! I also managed to lose the head rest while placing it. I had it in the grip of tweezers when it went flying. I didn't hear it hit and after a long and fruitless search, I stole the one out of a True Details F-86 cockpit set. It was a perfect match. I then glued the upper instrument panel on the anti-glare panel, after trimming it per photo-etch instructions.
Then the kit sat with nothing being done for several weeks. This does happen as I'd become more interested in other projects
Returning back to the kit, I attached a few pieces of PE on the upper instrument panel and added the rest of the stuff to it. Then the windscreen was masked in preparation for attachment. The canopy has a seam running down the middle that has to be sanded away. Then the it was polished and masked. I glued on the windscreen and the seat, followed by the horizontal stabilizers. Then I masked the cockpit and got it ready to paint by masking the wells as well.
| COLORS & MARKINGS |
 For this one, it is aluminum as the base, as is the norm for Korean War Sabres. I used Alclad II for all the metallics on this one. Then I masked off panels and used some dark aluminum and stainless steel and airframe aluminum and steel for some of the panels. I should point out that the wing pylons and slats were not attached for this. The former because of decals and the latter to keep from breaking them.
With the painting done, all the masking was removed (including the wells) and I glued on the landing gear (which I'd painted aluminum as well). Next were the wheels. I'd already painted and drilled out the True Details wheels for this. The main wheels fit fine, though I had to shorten the axles. The nose wheel seemed to be too tall for the gear. Either TD or Hasegawa is in error on this.
 With it on its wheels, I was now able to concentrate on the decals. I started with Cutting Edge 48028: Sabre stencils as it had the yellow bands I needed. After starting out well, I ran into some major problems as the large bands started to break apart and tear while I was moving them into position. A second sheet did exactly the same thing. This was the cause of a hiatus in construction that lasted five years. Work stopped in late 2006.
Time moved on. It was now mid 2011
Deciding that enough was enough, I went back to finishing this one off. I coated the remaining band bits from the CE sheet and used them to patch up what I could. Looking back, I should have used the kit decals except that the kit didn't have the yellow fin band. Or better yet, I should have painted them on, using black stripe decals for the trim. I eventually had to use pieces of the kit bands and they are a slightly darker shade of yellow. For the rest of the common markings, I went to the kit sheet as I had seriously learned my lesson.
Meanwhile, I got the rest of the bits ready for use. This included the canopy assembly, gear doors, drop tanks, pitot tube and a few other bits. Mostly they had to be painted once removed from the sprues.
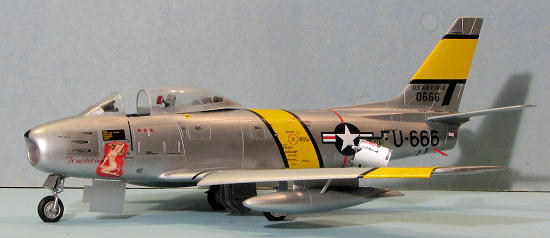
Despite not being very happy with even the kit decals, I finally got the myriad of stencils in place and then put on the Pyn-Up markings for Col Ben Preston, the Commander of the 4th FIG at Kimpo. Naturally, this one was chosen for the Marilyn Monroe nose art!
| FINAL CONSTRUCTION |
With the decals finally in place, it was time to finish up the build. This meant attaching the gear doors, drop tanks slats and a few other bits. The masking was removed from the clear bits and I was pleased to note that time had not caused the tape to stick. After knocking off and replacing several pieces, I was able to get it all to stay together without s hedding so was quite glad that finally, I was done. Sure, I could have touched up more bits but decided to consolidate my losses and leave it as it was. BTW, I used MV #29 lenses for the landing lights. I find these are perfect for a number of 1/48 applications and so stock up on them when I can get them.
| CONCLUSIONS |
Originally, I had started this to produce what I thought would be a very nice model. Thanks to major issues with what turned out to be some pretty poor decals (even the nose art markings chipped on me), it was kit that I initially blew off for years and then just finished it to get it out of the way. I can't really say I'm pleased with it, just happy to get it finished so I can move on. I should point out that none of the issues I had were with the kit itself. The Hasegawa version is a very nice kit, so no complaints there.
| REFERENCES |
Probably Wikipedia. It has been several years since I started this article!
August 2011 My thanks to Cutting Edge for the conversion set and for the decals. Cutting Edge is no longer, so finding any of their stuff will be difficult and probably expensive. If you would like your product reviewed fairly and fairly quickly, please contact the editor or see other details in the