| KIT #: | AA-4027 |
| PRICE: | $102.00 SRP |
| DECALS: | Two options |
| REVIEWER: | Scott Van Aken |
| NOTES: | Includes Fairey FD.1, Handley-Page HP.115, and Bristol T.188 experimental aircraft. |
Anigrand 1/144 Vickers Valiant B.1
| KIT #: | AA-4027 |
| PRICE: | $102.00 SRP |
| DECALS: | Two options |
| REVIEWER: | Scott Van Aken |
| NOTES: | Includes Fairey FD.1, Handley-Page HP.115, and Bristol T.188 experimental aircraft. |
| HISTORY |
In 1947, the British Air Ministry issued a request in the form of Specification B.35/46 for an advanced jet bomber capable of carrying nuclear bomb. Short and Vickers responed with S.A.4 Sperrin and T.660 Valiant. Sperrin was set as program backup 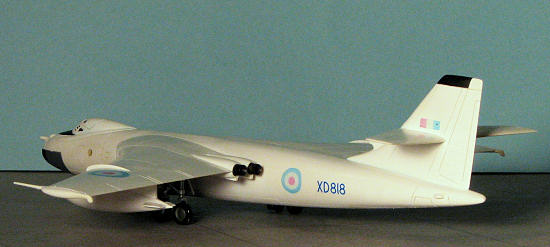 while Valiant was awarded for production order. Handley-Page and Avro came up with advanced designs for competition which would become the Victor and Vulcan. Due to the aggression in Europe from USSR, both the Victor and Vulcan were also awarded production contract. The first Valiant prototype made its first flight in 1951, and the first production aircraft flew in 1953. In October 1956, the Valiant performed British first atomic bomb test-drop. It led UK to become the world's third nuclear power. A month later, Valiant took first combat in Suez Crisis. In 1957, Valiant performed test-drop of the first British hydrogen bomb. When the Victors and Vulcans began to become operational, the Valiant was switched to low-level tactical operations in 1962, and the entire Valiant fleet was retired in 1965 due to structural problems caused by low level flying, something for which the aircraft was not designed.
Historical background from Anigrand website.
| THE KIT |
Anigrand's kit comes packaged in their usual compartmentalized poly bag with a separate compartment for the resin clear parts, each of the additional aircraft and three sections dedicated to the Valiant itself.
Those of us who have built and enjoyed Anigrand kits will come to recognize the nicely engraved detailing, the usual resin blobs and air bubbles that will need to be taken care of, and the generally good fit of the parts. Anigrand has added an interesting item  to this kit in that there are large tabs that run vertically in the fuselage sections to help keep things aligned as well as to add some stiffness to these parts. The one piece wings are nicely molded with slots to accept the landing gear and the fuel tanks. No real detail in any of the gear wells, but this is acceptable for 1/144. There is some cockpit detail in terms of seats and one will have to use acetate, Krystal Kleer or even clear paint to handle some of the small windows. Anigrand does not mention nose weight, but you'll need it for this to keep it from being a tail sitter.
Three smaller aircraft are included with this. You get a Handley Page HP-115 experimental aircraft that is made of very few parts. There is also a Fairey Delta FD.I and a Bristol T.188. All of these will be a challenge to get to sit on their nose gear as they have solid fuselages with no place to put weight. These may be best displayed in flight on a stand. Anigrand provided two identical decal sheets for markings. The Valiant can be done either in unpainted metal or in the white that it wore while doing high altitude work. The markings for the white scheme seem to be too too dark and should be a near pastel. No unit badges are provided, though if one wanted to do a low level camo'd plane, that should not be too difficult once one locates a camouflage diagram.
| CONSTRUCTION |
In the case of just about all short run resin kits, initial work involves cleaning up the various molding glitches. For this, a low speed motor tool with a variety of grinding attachments comes in very handy. I use a low torque one that operates on two AA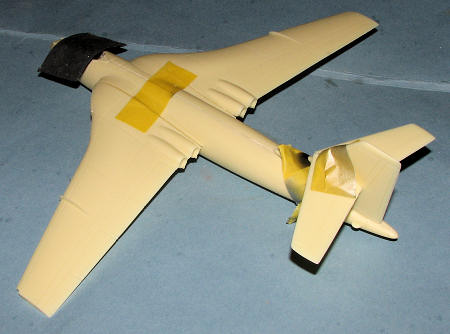 batteries. It is enough to grind away resin, yet I can grab the spinning tip and stop it with my fingers (no blood was lost in testing this). I started with the fuselage, grinding away the usual gunk from wheel wells and cockpit interior. The exterior required a bit of sanding as well, especially all the mating surfaces. This included the wings, where there was an overlap between top and bottom sections of the casting at the root. It is such that I'll probably have to insert plastic card when it comes time to glue the wings in place. Happens all the time and is just something that one gets used to.
Next step was to tape the fuselage halves, wings and tail bits together to determine how much weight will be needed. This is done by placing one's fingers where the landing gear legs would go and placing weight on the nose. One then removes or adds weight as one sees fit. It ended up that I had to use about 3/4 of the lead sheet you see in the photo. This was folded, squished 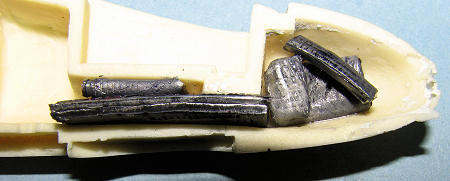 with pliers, and cut to fit into the nose. Superglue was added to keep it in place.
Next step was to glue the fuselage halves together. I always mess this part up and get one section right on and the other end has a step. This time was no exception.
Then there was the usual litanly of 'fill, sand, repeat' until I had all the joins smoothed out. I used super glue for this as it doesn't shrink and this is pretty much a super glue intensive kit anyway. While that was going on, I smoothed out the rest of the parts of the kit. The intakes were painted white and I glued the wing tips with the probes on them. I do hope that these do not get broken away during the rest of the build. The benefit of attaching these first is that the pour stub sections can more easily be sanded. I also found that some of the main wheels had the halves misaligned so need to be sure to put those on the same side when the gear is attached. Overall, the quality of the resin on this one is very good. The fuel tanks in particular were superbly cast with no air bubbles or other major casting glitches.
With the fuselage in pretty good shape, I then cemented in the fin, hoping to keep it properly aligned. The step in the fuselage and one in the fin meant a large gap on one side with the other fairing rather well. Several applications of super glue were used to take care of much of the gap. During this, the wings were glued into place, making sure they fit well on the top, where most would see t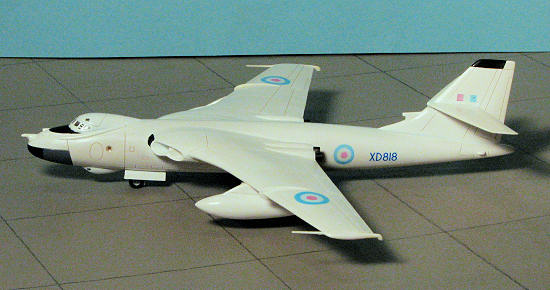 he fit. The underside had a gap as well, but once I put on the lower engine nacelle piece, much of this was covered up.
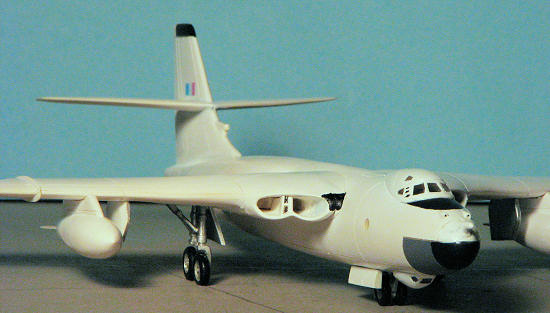
No matter what I did, it seems like the fin was cockeyed. Looking at it from the back it leaned one way and from the front it leaned the other. I just heated it up in near boiling water till it was somewhere in between. Then the tailplanes were installed. Meanwhile the intake seam had several applications of filler and was smoothed out best I could get it. I should have made intake covers. The interior was painted black with black seats. I had to grind out the seat openings to get the seats to fit, but you won't see them once the canopy is in place.
The canopy and bomb aimer's station both are made from clear resin. The bomb aimer's station is a tight fit and has the windows too small when comparing it with photos. The canopy needs to have the lower forward section carefully sanded to match the curvature of the instrument panel area. This will take work. It is also a bit narrower than the opening. Both items were masked and held in place with clear gloss paint.
| COLORS & MARKINGS |
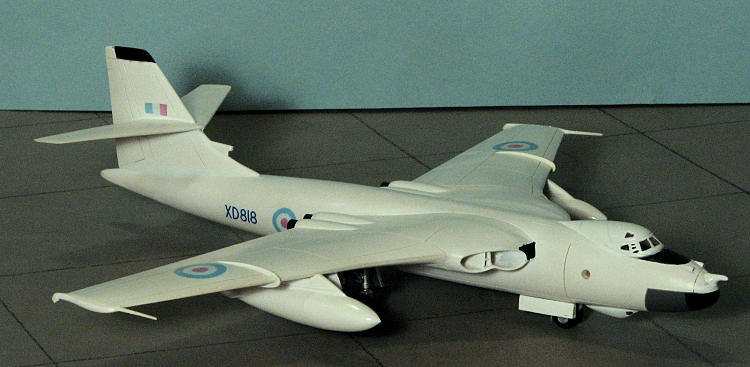
 Anigrand's instructions show that the aircraft is overall white with black and grey radomes and a black anti-glare panel. To make things easy (or so I thought), I glued in the main landing gear. Photos show the central strut link with the part nearest the wheel well pointing to the rear. This and the retraction strut were easy to install after a bit of trimming and reaming out the attachment slots. Several coats of Testors Boyd's Gloss White were applied. I then masked off the fin tip and radome, painting them both black. The nose radome was additionally masked and I used FS36118 Gunship Grey from the defunct Aeromaster Acrylic line to paint this area. The nose anti-glare panel was masked and painted as well. Typical for me, it isn't symmetrical. I painted the engine exhausts with Alclad II Jet Exhaust. Wheels were painted with Aluminum and then black.
Then to the decals. As mentioned in the preview there are two sets of decals. One for an early overall natural metal or high speed silver scheme with black codes and full color insignia. The other is for a white aircraft. Now these planes were marked in different stages according to my 'Profiles' on the Valiant. Early white planes had all the radomes painted white with full color roundels and black serials. Later, they went to the pale roundels and light blue serials, still with the radomes painted and even later, they realized that there wasn't that much of a heat flash problem regarding the radomes and so returned them to the original shade. Anigrand does not provide these later pale markings. Their 'pale' roundels and fuselage serial is barely lighter than standard. If you want to see photos of the pale roundels, visit thepreview. 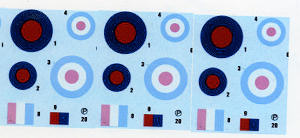
Now I wanted to do XD818 (the RAF hyrdogen bomb aircraft) later in its career with the pale markings, but compromises had to be made. For one, I couldn't get a good set of serials in the pale blue. Nothing I tried came close. I was able to copy and print out the roundels from the Victor kit, which are the correct pale shade. Downside when copying a decal sheet is that it the pale colors practically disappear and you still end up with the blue background of the donor sheet so no matter what, you have to carefully cut around them. I used a white decal sheet for these and the results are not as good as if I'd robbed from the Victor sheet, but at least they are the correct shade. No help for the serials so I used the ones provided in the kit. Seems like a lot of work, but it really is worth it to me.
| FINAL CONSTRUCTION |
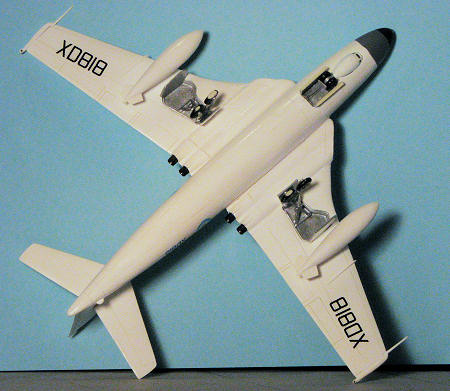
 Actually, not much to this step. Once the final clear was sprayed on the model, the masking was removed and for those tiny slit windows I didn't mask, some thinned black paint was applied. I also glued in the nose gear with wheels and put the wheels on the main gear legs. Here, there is a problem. Now I may have put these on wrong, but I thought I had them flush with the underside of the gear well. You see, with the wheels on, it sits on the aft wheel on one side and the fore wheel on the other. Means the gear piece is cocked to the left on both sides when looking at it from outboard. Only cure is to sand on the bottom of the wheels until they are flat. It also means one gets the doodie sanded out of it so it sits flat. Gear doors were then glued on, and a bit of final touch up painting and some scraping was done. Lastly the wing tanks were glued on. These are designed to properly fit one way only and the fit is very good. I installed no long wires, outlined no control surfaces and left the plane pretty well pristine. I also brushed on some clear matte to the black bits as they just looked a bit too shiny.
| CONCLUSIONS |
I've always liked the V bombers and though the least radical of the three, the Valiant is also the least kitted. It is nice that Anigrand has gone through the trouble to do this one and I do hope it sells well. I know I enjoyed it and if you have any skills with short run resin kits, then this should be one for you. 1/144 is the best scale for the big jets and I'd be hard pressed to find room for a 1/72 version on my shelves.
If you would like your product previewed fairly and
fairly quickly, please
contact the editor or see other details in the