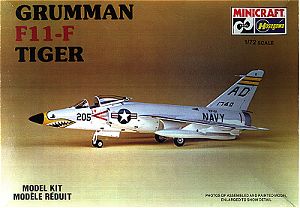
Minicraft/Hasegawa 1/72 F11F-1 Tiger
Kit Number: 1151
Price: $5.00 retail (way back when)
Decals: VF-21 and Blue Angels (same decals as in Hasegawa kit, but theseare produced by Microscale.)
Date of Review: 25 November 1998
Review and Photos by: Scott Van Aken
Grumman's F11F-1 Tiger was the Navy's first fighter that was capable ofsupersonic speeds in level flight. The follow-on F11F-1F (never orderedinto production) was the first Navy aircraft to exceed Mach 2 in level flight. Despite these impressive statistics, the Tiger only served for fouryears in a very few operational squadrons. Such was the pace of fighterdevelopment, that the F8U-1 Crusader quickly supplanted the Tiger. Thosesquadrons operating the F11F-1 were VX-3 (for development) with VA-156 beingthe first fleet squadron to get the Tiger. VA-156 was renamed VF-111in 1959 and VF-24 (redesignated VF-211 in 1959), VF-51, VF-121 and VF-191were the Pacific Fleet squadrons, with only VF-21 and VF-33 in the AtlanticFleet flying the Tiger. Non-operational units were; JTTU at Olathe,Kansas with ATU-203 and ATU-223 at Kingsville and Chase Field being trainingunits that operated the F11F-1. The last two units were redesignated VT-23and VT-26 and flew the Tiger (now designated F-11A until retired in 1967. Probably the best know use of the Tiger was with the Blue Angels wereit served for 12 years until replaced by the F-4J in 1969.

This is the Minicraft boxing of the excellent Hasegawa F11F-1 Tiger. Although this kit, with its raised panel lines and decals for instrumentpanels is nearing 20 years old, it is still the best F11F in any scale. Molded in Hasegawa's typical mid-grey plastic, it comes with few optionsother than a choice of either sidewinders or fuel tanks for the inboard pylons. A nice touch is the canopy which can be positioned either open or closed.The decals offered in this kit are the same as with the Hasegawa boxing ofthe same time period. The difference is that these are done by Microscaleso are thinner and less transparent than the Hasegawa offerings.
Looking to find something to bring the kit up to the 90's is a tough job. Other than one sheet of decals by Microscale and one by Scalemaster(both of whose availability is questionable), there is only an equally difficultto obtain Airwavesbrass set for the cockpit. This set includes enough goodies toreally add a lot to an otherwise bare cockpit. It also includes foreand aft speedbrakes, but frankly, I was not about to cut holes in my kitjust to add them so they were not included in the build.
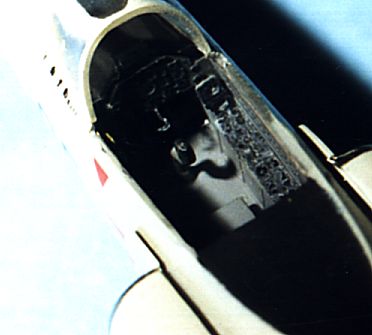 Naturally,the place to start with this kit is the cockpit. The Airwaves brassset was easy to bend and install. The rudder pedals are very fragileand can take only one bend before breaking; I know, I broke one!! Theside console pieces fit quite well. I did have problems getting the cockpittub to properly mate with the instrument panel and so my tub sits back abouta 1/8 inch from the panel instead of directly under it. Another area of concernwas fitting the seat. You are given a large number of brass enhancementsto the seat, including some side items. The seat in the stock configurationis a very tight fit. Adding brass side walls and things to the outsideof the seat means that something has to give. I sanded like crazy onmy seat to get it to fit. Unfortunately, I had already constructedthe seat and so made a bit of a mess of things. Were I to do it again,I'd thin down the seat prior to adding any brass to it and after the restof the cockpit had been made. This would prevent the problems I hadwith it and make for a better fit.
Some weight was added to the nose just to be sure and then the fuselage halvesglued together, trapping the interior. A rear arrestor hook well wasthen added and the seams cleaned up. A small amount of filler was neededin various places. It was at this time that I noticed that I'd forgottento add the shell ejector fairings to the fuselage. Holding the kitup to the light allowed me to see where the area was to be cut away for theseitems. Hasegawa does not mold them on as the Blue Angels aircraft didnot have these items. The intakes were next installed and fit quitewell, though again, a bit of filler was needed. All lost detail wasreplaced by lightly scribing with an Xacto knife. The wings are singlepiece and were then glued in place. At this time, the underside, uppercontrol surfaces, and wheel wells were given a shot of gloss whitepaint.
Next, the landing gear was installed. Actually not that easy to do. The instructions are vague and I eventually had to rely on a Detailand Scale book on the F11F to figure it out. While that was drying,it was time to figure out what to do about the underwing stores. Ihad been told that the Tiger rarely carried the long range tanks (thanksto Paul Boyer for that information). Looking at the photos in the Detailand Scale book verified that as there were few photos of them in there. Most showed four Sidewinders as a typical load. Not a problemas the kit had four of them. But wait!! The kit doesn't supply thelaunch rails and the 'winders are a bit on the short and vague side. Digging into my spares box rewarded me with four nice AIM-9Bs. Hasegawa'sweapons set #3 turned up a pair of Sidewinder racks designed for a Navy F-4. These were suitably cannibalized for the rails and the rails gluedonto the Tiger pylons. The assembly and missiles were then painted white.Problem solved and the world was happy again.
Next, the cockpit surrounds were painted flat black, the windscreen gluedin place and the canopy tacked on. Then the clear bits were maskedwith tape, as were the upper control surfaces in preparation for the upperGull Grey paint. Testor's Model Master paints were used for both the whiteand gloss gull grey. A real poser was with the tail was to be white or gullgrey. After much perusing of photos, I picked gull grey; even for the rudder. Next step was the installation of the nose gear and tail bumper. Thetailhook had the hook painted steel and black decal stripes were added beforebeing glued in place. Next the wheels were added and then the geardoors.
Next step was to apply the Matte Aluminum Bare Metal Foil to the leadingedges of the wings, tail and stabilizers. Not the simplest job, butone that is mandatory for '60's naval fighters. Finally the nose waspainted flat black and then it was on to the decals. TheMicro....errr...Superscale sheet (72-255)gives four great schemes for this aircraft. I chose the VF-51 scheme.
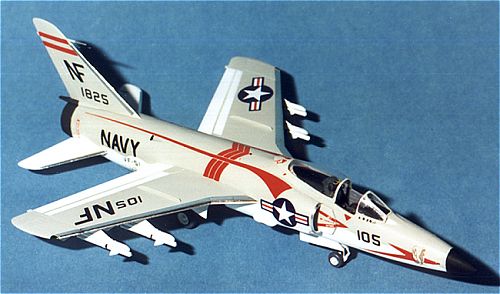
On to the decals. As expected from Superscale, they were quite useablewith illegible smaller decals. I left most of those off. They reacted wellto Champ setting solution. Once all were applied, the entire aircraftwas sprayed with Future to seal in the decals.
The kit Sidewinders are just shapes. I got a nice set of early AIM-9sfrom the spares box and applied some bands from Scalemaster decal stripesheets. The canopy was then detailed with handles and mirrors usingElmer's Glue. The mirrors seem a bit large for the scale and take upa lot of room. Final items like arrestor hook, tail bumper, gear doors andthe like were added and I had a great looking kit of the Tiger.
It builds well right from the box and with a bit of extra work and $$ canbe made into a very nice model. Highly recommended for all skill levels.
References
F11F Tiger in Detail and Scale