
ProModeler 1/48 F-86D Sabre Dog
| KIT # | 5960 |
| PRICE: | $22.65 |
| DECALS: | Two Aircraft |
| REVIEW : | |
| NOTES: | Includes tow-tractor |
| BACKGROUND |
To see a review of the buildups used for the box art and somehistory, follow this link.
To see what the kit looks like in the box, follow this link

| CONSTRUCTION |
As mentioned earlier, this kit builds only the earlier, pre modified F-86D. Undoubtedly, there are other versions of the F-86D coming out and if we are lucky, they will include the L and the K. Certainly the inserts for the fuselage lead me to believe that to be the case.
Like I do with other models, the first thing I seek is subassemblies. There are a few of them that are easy to do. In this case, it is the drop tanks, wheels, intake and the main gear wells on the underside of the wing. When doing the wing, it is a good idea to open up the holes for the drop tanks. F-86Ds were heavy and thirsty creatures that needed all the extra fuel they could carry. It was quite rare to see an operational Sabre Dog without them.
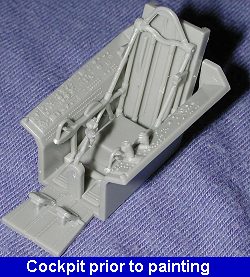 I then went to work on the interior. This is superbly done and while I don’t doubt that someone is going to come out with an aftermarket interior, to me it is like gilding the lily and better to save your money for, say, another kit! The seat frame is made up of four parts that glue together. It was while cleaning this up that I realized the plastic used for this kit is softer than usual. Be very careful with the sandpaper and hobby knives on this one as it is very easy to break or gouge the plastic! With the seat frame together, it was glued into the cockpit tub using the seat bucket to ensure it was in the right place. At this same time, the control stick, throttle, radar control and rudder pedals were glued in. These will all be painted the same color so I figured the best thing to do was to glue them together!
While that was drying, I looked for other things to do. This kit has inserts for the fuselage intake NACA scoops. Oddly, these scoops are molded almost flush with the outer surface when they should be rather deep. Why this happened, I’m not sure, but it is definitely a glitch.
Another thing you need to be on the lookout for is step 3. In this step they show three holes in the fuselage being opened up and don’t tell you why. The two front ones are for the rocket tray and the aft one for a clear support rod. Most of us will pack weight in the nose to prevent tail sitting so we don’t need to open the aft hole. F-86Ds were almost never seen on the ground with the rocket tray down unless it was being loaded or undergoing maintenance, so unless you are modeling your plane in an un-normal configuration, you can leave off opening those holes as well. While on the subject of non-standard configurations; the kit also offers separate flaps. You guessed it, finding a picture of an F-86D 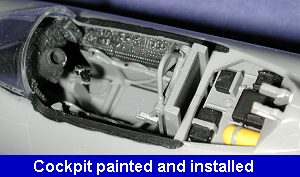 with those flaps down while parked will be a very time consuming process. Unless undergoing maintenance, it wasn’t something that was normally seen.
Then the interior and other bits that needed to be painted dark gull grey were taken to the paint shop and painted. I used Testors Model Master paints for this. The areas to be painted flat black, the instrument panel and area behind the pilot, were also painted. Then the cockpit was detailed with flat black side consoles and control stick, and drybrushed using light grey and aluminum. After that, the windscreen was masked and glued in place. Then the canopy was masked and tacked in place with a smidgen of superglue. The kit was then taken to the paint shop.
| PAINT & MARKINGS |
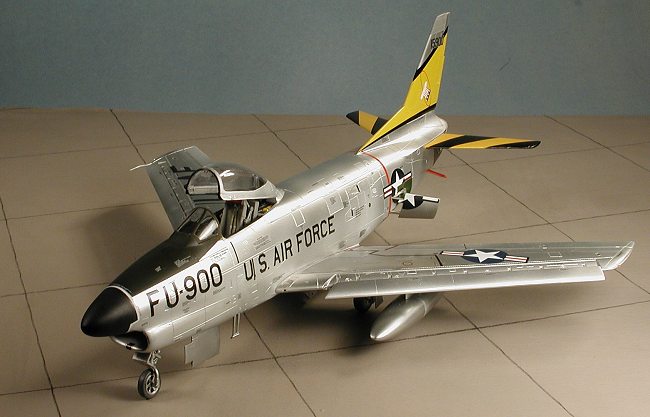
Several months pass............. One day, a package arrives from my saviour, Norris Graser, who has sent the latest releases from Superscale. In amongst those decals are two F-86D decal sheets!! Having a terrible choice to make, I chose sheet 48-729 that has markings for the 94th FIS. These decals were applied prior to putting on the myriad of stencil decals that are on the kit decal sheet. What I found was that the tail marking decal was just a touch too small, leaving a sliver of uncovered area on the leading edge of the fin. Additional research (after the kit was built, of course) shows that F-86Ds did not have the extended trim tab molded on the kit. This little glitch is due to Monogram using a test bird at the USAF Museum as the pattern aircraft. If you cut back the tab to be flush with the rest of the rudder, you'll have enough yellow slivers to cover the gap. Many days were then spent putting on the smaller decals. You will find during this time, that there are more decals than are what are called for in the instructions. You will also find that there are parts of the plane that have no data decals, such as the drop tanks. Trust me, there should be some. There should also be some on the gear doors, at least in the very front. You can put some of them there. A few of the decals are for the tractor, which, like many reviewers, I did not build. So don't toss those extras as you'll need some of them later.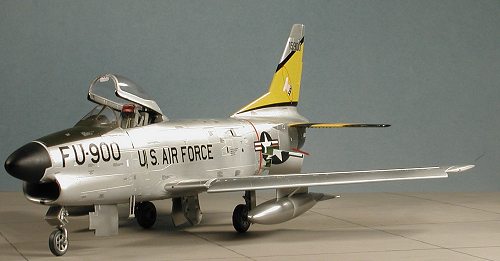 First thing I did was to paint the entire airframe with Model Master Aluminum. This was then polished with a rag and Alclad II in various shades was applied. Through masking, I was able to get a multitude of shades, though many of them are quite close to each other. The nose was masked, the radome painted black, and the anti-glare panel painted olive drab. The tip of the fin was painted dark gull grey as shown in the instructions. I then set it back to await some aftermarket decals for an early F-86D, as all of the ones in my decal collection were for either during or after the planes were modified. Without photographic proof, I was hesitant to use those sheets. So I did some work on the struts, wheels and drop tanks. The kit was then put in its box and put onto the 'hold' pile awaiting decals.
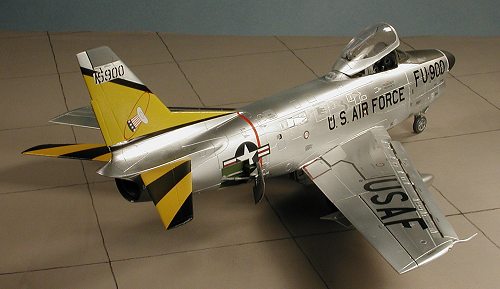 Too late for me, though. Conversely, the 'USAF', wing insignia and unit badge were a touch too large, compared to what was shown in the decal instruction sheet. (As a late note, I had a long discussion with Norris Graser who researched this sheet. It appears that the insignia and USAF are the right size, but are supposed to overlap onto the slats as it shows in the kit decals. I might recommend using the kit decals for the insignia and USAF markings as they are already separated to take care of the overlap. He also acknowledges that the 'hat in the ring' marking is too large.) The other markings went on without any trauma. I did have to go back and repaint the horizontal stabilizers insignia yellow. I used Model Master enamel for this and hoped it would lighten up a bit when it dried, but it did not. I'd suggest lightening it a bit to match the decal. You will also find that there will be some gaps with the black stripe on the horizontal stabs. A simple brush up with gloss black will easily take care of that.
| CONSTRUCTION CONTINUES |
With the decals in place and dry, the entire plane was given a couple of good wipe-downs to remove excess setting solution. The Solvaset worked quite well and I was most pleased with the results. The next items to be installed were the landing gear doors. Again, no real problems with them, though I found the little attachment struts that went around the landing gear to be a bit frustrating to put on as they tended to spring off rather easily. Fortunately, none were lost forever and I did get them on.
The canopy section takes a black backing plate and two interior bits. These all fit with no trouble. There is an ARN-6 antenna dome that fits into this back section. It is a press fit. If you want to be totally accurate, the inside of this dome should be painted either white or a dirty light brown (sort of like badly stained teeth from smoking). Then glue in the rear view mirror and glue the canopy to the back posts. If you want the canopy closed, you'll have to cut off those posts. The last thing I did was to attach the drop tanks, boarding step, and wing tip lights. The tankspylons fit quite well. I do recommend putting these on after you get done decaling, however, I should also point out that some of the underside decals need to be placed near these pylons as they are for them. The tanks glued on with no trauma, however the little braces are not a positive fit as the pins on them are too shallow to properly seat in the holes in the wings. You will need to fudge those into place as best you can. There is a small boarding step that you can have opened if you wish. If not, then you need to place in the small wedge into the opening. When displaying the ladder up, it is best to glue that in before you paint the fuselage. The last things were the wing tip lights. These are not mentioned in any way, shape or form in the instructions. However, after looking at a lot of photos, it is obvious that they should be there. Not sure how they should fit, but I put a dab of red or green on the small indentation and then glued in the lights with white glue. Don't forget the light behind the cockpit either or the one forward of the nose gear. That later one I forgot until nearly done and it was not fun getting it in. I basically had to trim off the mount on the lens and stuff it in there with a drop of glue. And that was it!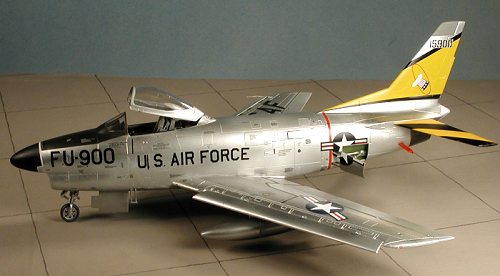 The nose gear doors were not a problem, even the very front one which is a two-piece affair. I highly recommend gluing the two pieces together first and then attaching them to the plane. It will be much easier. Speed brakes were another part that was simple to attach. The fuel dump tube fits into an oval slot so you can paint it red prior to gluing it in place.
| CONCLUSIONS |
Were I to offer any advice, it would be to use as many of the kit decals as you can. They are properly designed for the kit and will obviate the need to sweat out glitches in aftermarket decals. Yeah, the red is a bit too dark. Not a big deal. Use the unit marking from the aftermarket ones to make yours a bit different. Highly recommended.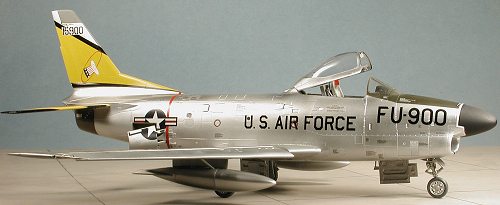 A really outstanding kit and ProModeler's finest to date. It would be a shame if this was their last as I'd love to see at least a K come out before calling it quits. With the prolifigation of decal sheets for this plane and the many different markings, I can't see why anyone who likes '50s USAF wouldn't have several in their collection. The kit is fairly easy to build and superbly engineered. It is also a super value for the money.
| REFERENCES |
The North American Sabre, Ray Wagner, Doubleday, 1963
October 2001
Copyright ModelingMadness.com. All rights reserved. No reproduction in part or in whole without express permission.
Review kit courtesy of me and my wallet! Aftermarket decals courtesy of Superscale International.
If you would like your product reviewed fairly and fairly quickly, please contact the editor or see other details in the Note to Contributors.