
Revell AG 1/48 F-86D Sabre
| KIT # | 04553 |
| PRICE: | $23.50 MSRP |
| DECALS: | Two options |
| REVIEWER: | |
| NOTES: |
| BACKGROUND |
 You are probably wondering why in the world I'm doing another F-86D kit. Two reasons; first because this one is the later version with the parabrake housing and the second because I happen to like the aircraft. Since my first build of the early version, a ton of aftermarket decals and stuff have come out for the kit and I wanted to use some of these things. I picked up a Black Box F-86D cockpit set on sale and while the kit cockpit is very nice, the BB set is just that much better. I should mention that from what I can see that BB did not provide the later instrument panel as it looks very much like the F-86D-1 version and not the F-86D-5 and later variants (which is what the vast majority of Sabre Dogs used). While the difference is not readily apparent at a glance, it is there. Those that want total accuracy will have to find an instrument panel from some other source. Revell AG did fix the trim tab glitch that was a problem with the ProModeler boxing.
 | THE KIT |
As mentioned above, this boxing (as well as the more recent Revell USA version) is a later F-86D with the parabrake housing, an item retrofitted to just about all the F-86Ds built. It does not have the tow tractor of the ProModeler kit, but it does have the correct rudder/trim tab. The decals are also different providing markings for a pair of very colorful aircraft; a Danish ESK 726 version from 1959 and a US 94 FIS aircraft also from 1959 when based at Selfridge AFB in Michigan. These 94 FIS markings are different that those on the earlier D that I modeled.
| CONSTRUCTION |
 First thing on this kit was to start removing bits from their resin pour stubs for the cockpit. No real problems and for once I didn't cut the stubs too short and put holes in the bottom of the seats or floor (though I came close). The resin rudder pedals were cut off and installed. Then I went to the control stick. This is a THREE PIECE construct of the main body, the 'S' bar to the grip and then the grip. Talk about a pain to get together. The instructions show the S bar and grip as one piece and I do wish it was molded that way as getting everything lined up was really a chore!
Meanwhile, I opened the holes in the bottom of the wing for the drop tanks and didn't open the holes in the fuselage for the rocket tray or clear support. The tray was almost never deployed on the ground unless it was being maintained. There is lots of room in the nose for weight so that wasn't needed. In fact, Terry Dean makes anose weight just for this kit. I also glued the intake trunking and the sidewalls for the nose gear well. The main gear well is three pieces that go together superbly well and after that the upper and lower wings were glued together.
 I then glued together the seat frame from the kit as that was going to be used. I returned to trying to get the miserable resin control stick together. They even gave me two of the darn things and it was hopeless. In frustration, I set the kit aside, allowing it to gather dust for well over a year.
Deciding to clean up some of the clutter of unbuilt kits, I picked up the box and after removing the pieces so I could blow out all the dust and spiders, resumed construction. I took the kit control stick and glued it in place and also glued in all the other bits of the cockpit until all was assembled. I have to say that I didn't know what many of the bits were as there is no guide so I guessed on a few of the various instruments and such. I also found that there were two 'stubs' protruding from the back of the left hand console where the instrument panel was to fit. I don't know if those are supposed to be there or not, but I cut them off before gluing on the panel.
I then glued the intake trunking into one side of the fuselage so I could see if I needed to do any more cutting/hacking to get the resin cockpit installed. While that was drying, I painted all the cockpit bits with Dark Gull Grey using Testors ModelMaster enamels and went over the parts that were to be black with Vallejo acrylics. After attaching a few bits and pieces, the cockpit was glued into the same fuselage side as the intake truking, making sure that it would fit by dry fitting the other fuselage side. The seat and frame were left out until near the end.
I then glued together the exhaust pieces. The aircraft I was going to model had the NACA scoops so those parts were glued from the inside of the fuselage. They are keyed so you can't put them on the wrong way. Getting the exhaust in place was a 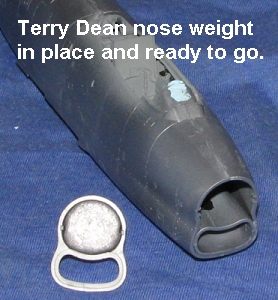 bit fussy. It just didn't really want to fit. Whenever I tried to close the fuselage halves, it would knock this assembly out of alignment. After getting properly frustrated, I pulled it out and did a bit of filler work on the sink areas in the rear area as to have the exhaust in there would have make sanding impossible. Once the filler work was done, I returned to the exhaust. Attaching it to the other half seemed to take care of it, but I still had to fiddle around a lot to get it in there right. The other fuselage half was glued in place and left to dry.
 Going back, I realized that I'd left out two things. One was the landing light (no problem as I'll replace it with an MV lens). The other was the 'stuff' that fits behind the cockpit. Fortunately, it wasn't a major problem to insert it from the wing opening and it clicked in place. Then I sanded down the fuselage seam and found only a few areas that needed filler; most of them where there were sprue gates. The Terry Dean weighted nose was then glued in place. Some sanding/filler is needed here as well for the nose is not precisely the same size as the opening.
The wings were then glued in place with only a teeny bit of filler needed in the front. I have not seen too many F-86Ds with the weapons tray down so that was not installed, neat though it looks. Once the wings were in place, then I sanded off the trademark from the flap and glued those in place. The tail planes are an easy fit and with that, I had a pretty complete airframe. The next step was to attach the main and nose gear. I glued on the windscreen, masked it and the canopy, filled in the cockpit and it was time to paint.
| CAMOUFLAGE & MARKINGS |
 Bare metal finishes take a really smooth surface or they'll show scratches. Thinking that I'd be smart, once I'd sanded things as smooth as I could, I sprayed Testors Metallizer sealer on it. Sort of a lacquer clear coat. I then sprayed the Alclad II Black Base to most of the airframe. Then the entire airframe was sprayed with Alclad II polished aluminum. When it dried, I repeated the process on the area that I had left unpainted. This was set aside for a day to cure. I then started masking areas off as usual and sprayed on some dark aluminum. Imagine my dismay when large swatches of paint came up with the tape! I can only assume it was the sealer than caused the problem by not providing enough bite for the Black Base. This meant some very careful masking was needed, though I continued to pull up paint and had to spend a lot of time going back over areas. T
 o make matters worse, it seems as if it wasn't very tough as if I held on too tightly, I'd take my hand away with paint on it, leaving the black base to show. I have to say that I was really dismayed at these events as they added about 5 days to the build.
I had decided to paint the inner main wing panels with Light Gull Grey. This was because the aircraft at the USAF Museum has this feature. If youfollow this link, you'll see a photo that shows what I mean. Even that paint pulled up when I masked over it to fix a glitch on the edge. I eventually had to severely 'de-tack' the tape by placing it on the palm of my hand several times to pick up some skin oils. This was helpful later on when over-handling had to be fixed by masking over the decals.
For decals, I used Superscale 48-884, an 86 FIS aircraft. I have to say that making a choice was tough as there are a lot of very nice options out there. I found it odd that the little piece that fits below the windscreen is black while the rest of the anti-glare panel is OD green. If it is a glitch on the sheet (which it probably is), I can fix it later. The decals fit very well, though I found the buzz numbers to be a bit large when compared to where they should fit according to the decal instructions. Same with the wing insignia.
| FINAL CONSTRUCTION |
Once the decals had been applied, I started putting on all the other bits and pieces. There were a lot of them. The canopy had to have three pieces glued inside, the wheels were painted and glued in place. Then came the gear doors, with the nose gear door being a bit on the tricky side to get just right. I did have to install my MV lens before putting on this door as it just made things easier. The brake parachute housing on the back was next, followed by the fuel vent. Interestingly, the instructions seem to completely overlook this part so one has to be careful to remember to install it and the clear bit that goes with it. Then the wing tanks and braces. The fit of the braces is not good as there seems to be no direct connection on the wing tank. The wing tip lights just fit into shallow depressions so I'm sure they will not last long with any handling. The light on the back of the canopy fits well and white glue was used to attach it. I then put on the boarding step and the slats. The seat was then pushed into place and the canopy glued in the open position. To do otherwise requires the mounting posts to be removed. The last parts to be installed were the speed brakes. This requires a bit of care during assembly. Alternately, you can glue these closed.
| CONCLUSIONS |
This build seemed more fraught with problems than when I did the ProModeler version a few years ago. However, despite all my screw-ups, the end result is quite pleasing and makes for a very nice looking model. As with all the kits I build, I learned something new and will hopefully remember it the next time I do a bare metal finish!
April 2005
#1361 in a series
If you would like your product reviewed fairly and fairly quickly, please contact the editor or see other details in the Note to Contributors.