|
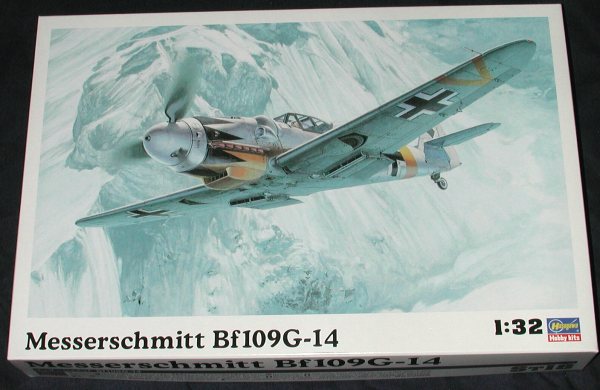
KIT: |
Hasegawa 1/32 Bf-109G-14 |
|
KIT # |
08068 |
|
PRICE: |
$39.95 MSRP |
|
DECALS: |
Two aircraft |
|
REVIEWER: |
|
|
NOTES: |
|
HISTORY |
The Bf-109G-14 was a continuation of the G-6 program and essentially standardized the myriad of improvements of the G-6. A result of this is that it is extremely difficult to visually tell the difference between a late G-6 and a G-14. In fact, unless you know the werke number, it is often impossible to tell.
One of the biggest differences was the change from the DB605A to the DB605AM engine. However, you can find early G-14s with the A engine and late G-6s with the AM engine. The MW 50 water injection system was another addition for this version. Also standardized in the G-14 was a radio direction finder and under fuselage tank.
Some versions of the G-14, the G-14/AS, had a smooth engine cowling as was found on the G-10, while very late production G-14s had the wider wheels of the G-10/K series and the accompanying wider wheel bumps on the upper wing. Almost all G-14s had the Erla Haube clear vision canopy and the taller fin and rudder. There were two types of fin/rudder produced with the later versions being made entirely of wood. These later ones will be especially smooth with few, if any, panel lines. Production of this version was terminated in late 1944 as the 109K-4 came on line.
|
THE KIT |
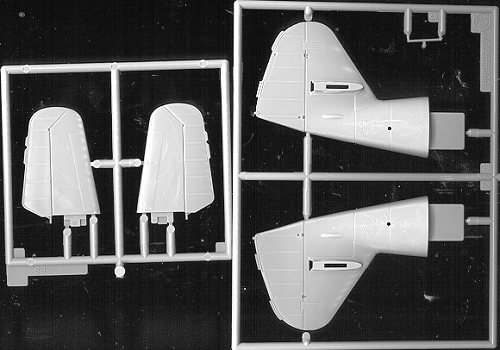
There is almost no difference between this kit and the earlier 109G-6. In fact, there are only three small sprues that are different. Two of them are shown above. The third is the Erla Haube canopy, which doesn't scan well. You do not get the alternate parts that were with the G-6 so you are pretty well stuck with doing a G-14 or late G-6 with this one. Parts not used are the under wing cannon, (few if any G-14s carried them) a radio mast, the earlier canopy head armor and a few other small bits.
You get the taller tail, though it is difficult to tell if it is an early or later version. There are certainly no panel lines in the fin, as the wooden one would be, but the rudder is definitely the metal one, so this is a bit of a mix. You could easily scribe in a panel line and rivets just under the rudder balance horn to make it an all-metal fin and rudder. To do an all wooden one, sand off the reinforcements on the rudder. It is just conjecture, but I'd be surprised if there wasn't a G-10 in the works sometime down the road as some of them used this form of rudder. The other type was more rounded on the bottom. There is a small trim tab actuating arm included on this sprue.
Also different from the G-6 is the horizontal stabilizer. These have a different pattern of trim tabs and a reinforcement plate on the leading edge that you can just make out in the scan. There is some mixture of opinion on this particular tail plane. Few references even mention the reinforcement so it is not certain just when this came into use. Fortunately, it is quite shallow so should your reading lead you to believe your plane didn't have it, you can simply sand it off.
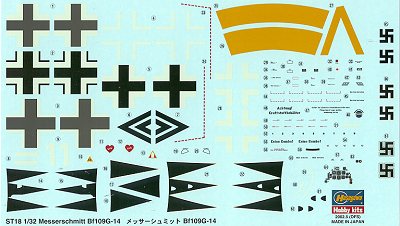 The other difference is the decal
sheet. It is quite large and has all sorts of data decals on it. you can do two
aircraft with this sheet, both of them for Erich Hartmann, the top scoring ace
of all time. Both have his famous 'tulip' nose decoration and both are for the
Eastern Front where he spent most of his war-time career. One is in all white as
shown on the box art. In actuality, this plane would have had the white painted
over the standard camo and unless freshly applied, would have washed off
somewhat. The other is in standard RLM 74/75/76 colors with another variation of
the 'tulip' decoration on the nose. The decals have even got little openings in
them for the engine cooling scoops. You will have to cut away the clear film
covering the openings and then paint the scoops black once the decal has been
applied.
The other difference is the decal
sheet. It is quite large and has all sorts of data decals on it. you can do two
aircraft with this sheet, both of them for Erich Hartmann, the top scoring ace
of all time. Both have his famous 'tulip' nose decoration and both are for the
Eastern Front where he spent most of his war-time career. One is in all white as
shown on the box art. In actuality, this plane would have had the white painted
over the standard camo and unless freshly applied, would have washed off
somewhat. The other is in standard RLM 74/75/76 colors with another variation of
the 'tulip' decoration on the nose. The decals have even got little openings in
them for the engine cooling scoops. You will have to cut away the clear film
covering the openings and then paint the scoops black once the decal has been
applied.
|
CONCLUSIONS |
Well, this kit has been out a month and I still haven't seen a built up version at a contest! :o) Seriously, I anticipate that this kit will be as well engineered and as easy to build as the previous one. The decal people already have sheets out and I'm sure that there are other things out there to use. Frankly, adding aftermarket to this kit is a bit of gilding the lily. Sure, you'll get some greater detail and finesse from resin bits, but they really are not needed to produce a quality model. If you have the interest in the type, buy this one and toss those old Revell ones!
|
REFERENCES |
Messerschmitt Bf-109G, by Robert Peczkowski, Mushroom Models Special Vol 1
Review kit brought to you by a dedicated 109 nut who spent his own Reichmarks on this one!
If you would like your product reviewed fairly and quickly by a site that has well over 150,000 visitors a month, please contact me or see other details in the Note to Contributors.