
Airfix 1/72 FW-190A-8
| KIT #: | A01020 |
| PRICE: | $6.99 SRP |
| DECALS: | One option |
| REVIEWER: | Scott Van Aken |
| NOTES: | NewTool |
| HISTORY |
The
Fw 190 A-8
entered production in February 1944, powered either by the standard BMW 801
D-2 or the 801Q (also known as 801TU). The 801Q/TU, with the "T" signifying
a Triebwerksanlage
unitized powerplant installation, was a standard 801D with improved, thicker
armour on the front annular cowling, which also incorporated the oil tank,
upgraded from 6 mm (.24 in) on earlier models to 10 mm (.39 in). Changes
introduced in the Fw 190 A-8 also included the C3-injection
Erhöhte Notleistung
emergency boost system to the fighter variant of the Fw 190 A (a similar
system with less power had been fitted to some earlier Jabo variants of the
190 A), raising power to 1,980 PS (1,953 hp, 1,456 kW) for a short time.
 The
Erhöhte Notleistung
system operated by spraying additional fuel into the fuel/air mix, cooling
it and allowing higher boost pressures to be run, but at the cost of much
higher fuel consumption. From the A-8 on, Fw 190s could be fitted with a new
paddle-bladed wooden propeller, easily identified by its wide blades with
curved tips. A new outwardly bulged main canopy glazing format, more in the
manner of a Malcolm hood rather than a bubble canopy, with greatly improved
vision sideways and forward, had been developed for the F-2 ground attack
model, but was often seen fitted at random on A-8s, F-8s and G-8s. The new
canopy included a larger piece of head armour which was supported by
reinforced bracing and a large fairing. A new internal fuel tank with a
capacity of 115 L (30 US gal) was fitted behind the cockpit, which meant
that the radio equipment had to be moved forward to just behind the pilot.
The
Erhöhte Notleistung
system operated by spraying additional fuel into the fuel/air mix, cooling
it and allowing higher boost pressures to be run, but at the cost of much
higher fuel consumption. From the A-8 on, Fw 190s could be fitted with a new
paddle-bladed wooden propeller, easily identified by its wide blades with
curved tips. A new outwardly bulged main canopy glazing format, more in the
manner of a Malcolm hood rather than a bubble canopy, with greatly improved
vision sideways and forward, had been developed for the F-2 ground attack
model, but was often seen fitted at random on A-8s, F-8s and G-8s. The new
canopy included a larger piece of head armour which was supported by
reinforced bracing and a large fairing. A new internal fuel tank with a
capacity of 115 L (30 US gal) was fitted behind the cockpit, which meant
that the radio equipment had to be moved forward to just behind the pilot.
Externally, a large round
hatch was incorporated into the lower fuselage to enable the new tank to be
installed, and the pilot's oxygen bottles were moved aft and positioned
around this hatch. A fuel filler was added to the port side, below the rear
canopy and a rectangular radio access hatch was added to starboard. Other
changes included an ETC 501 underfuselage rack which was mounted on a
lengthened carrier and moved 200 mm (8 in) further forward to help restore
the centre of gravity of the aircraft. This fuselage would form the basis
for all later variants of the Fw 190 and the Ta 152 series. The Morane
 "whip" aerial for the Y-Verfahren
was fitted as standard under the port wing, just aft of the wheelwell.
Nearly a dozen Rüstsätze
kits were made available for the A-8, including the famous A-8/R2 and A-8/R8
Sturmbock
models. The A-8/R2 replaced the outer wing 20 mm cannon with a 30 mm
(1.18 in) MK 108 cannon. The A-8/R8 was similar, but fitted with heavy
armour including 30 mm (1.18 in) canopy and windscreen armour and 5 mm
(.2 in) cockpit armour. The A-8 was the most numerous of the Fw 190 As, with
over 6,655 A-8 airframes produced from March 1944 to May 1945. A-8s were
produced by at least eight factories during its lifetime.
"whip" aerial for the Y-Verfahren
was fitted as standard under the port wing, just aft of the wheelwell.
Nearly a dozen Rüstsätze
kits were made available for the A-8, including the famous A-8/R2 and A-8/R8
Sturmbock
models. The A-8/R2 replaced the outer wing 20 mm cannon with a 30 mm
(1.18 in) MK 108 cannon. The A-8/R8 was similar, but fitted with heavy
armour including 30 mm (1.18 in) canopy and windscreen armour and 5 mm
(.2 in) cockpit armour. The A-8 was the most numerous of the Fw 190 As, with
over 6,655 A-8 airframes produced from March 1944 to May 1945. A-8s were
produced by at least eight factories during its lifetime.
| THE KIT |
Hornby
continues to go through their 'replacement' phase of providing new tool kits in
place of old favorites in the Airfix catalogue. In this case the older FW-190A/F
kits are being replaced by a dedicated FW-190A-8 variant. The older kits were
not bad as things go and made into presentable models when done. Here is a link
to your editor's
FW-190F.
However, it is great to have a new tool 190A, especially since the currently available kits from Hasegawa and Revell AG are getting more and more expensive as time goes on. The molding on this kit is pretty much the same as on any other current Airfix new tool kit. The engravings are larger than you would find on a Hasegawa kit for instance, but still well within acceptability for the vast majority of builders.
Airfix continues to offer kits with an in-flight option and I have to
say that I approve. Having a stand in the kit would be nice, but I can see why
they offer it as an additional item as the majority of modelers do not put them
in flight. To go with this, Airfix provides a pilot figure which is appreciated
by many. Since there
 is a pilot, there is no seat harness either molded in place
or as a decal. Frankly, I'd like to see kits offer a harness decal with their
kits as it very much improves the look of the cockpit. Sure, you can get photo
etch to install on the seat, but a decal would be much appreciated.
is a pilot, there is no seat harness either molded in place
or as a decal. Frankly, I'd like to see kits offer a harness decal with their
kits as it very much improves the look of the cockpit. Sure, you can get photo
etch to install on the seat, but a decal would be much appreciated.
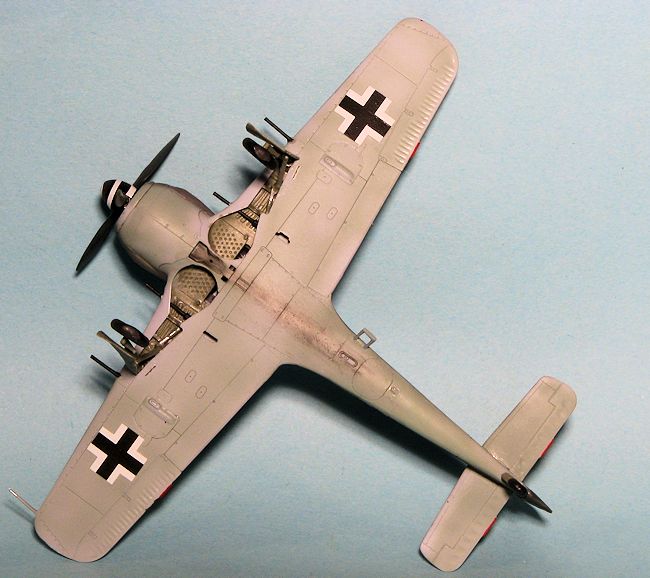
Backing up a bit, the cockpit tub looks like every 190 tub you have ever seen with the area behind the pilot attached. There is a seat, stick and rudder pedals included. There is also detail on the side consoles. Decals are provided for the main instrument panel as there is no other panel detail. A rather neat engineering detail is that the upper wings are molded as a single piece that includes the wheel well. One will have to open holes in the upper and lower wing for the fuselage rack and the gun bulges. There are inserts with the shell ejector openings for the lower wing. This leads me to believe that other variants may be kitted. Probably the 190D-9.
Exhaust stubs are provided that fit into the fuselage halves before assembly. Ther are also separate wing gun inserts. The upper cowling has two pieces one for the forward gun trough and the other the usual gun cover. I should mention that the barrels are molded in the gun cover and the pitot tube is molded into the upper wing. Good luck not breaking the pitot during construction.
Main gear looks like every other good 190 kit and it will be interesting
to see how well they lock into place as I see so many 190s built with the gear
too straight, some of mine included. Though the kit offers the 'blown' hood, it
only has the older head armor and so will be using the flat top canopy. The
bulged canopy was used starting in January 1945 construction which is after the
markings for this kit. The centerline rack is the long version and the kit comes
with a nicely done drop tank. A one-piece prop is trapped between the fan
assembly and the spinner. The instructions call for the fan assembly to be
 painted RLM 74 along with the inside of the cowling. Not sure if this is
accurate. I have always felt the cowling interior was RLM 02 and the fan
assembly was black.
painted RLM 74 along with the inside of the cowling. Not sure if this is
accurate. I have always felt the cowling interior was RLM 02 and the fan
assembly was black.
Instructions are well done with the usual pain of dealing with only Humbrol numbers during construction. The overall markings guide does provide proper paint names and this one is (surprise) RLM 74/75/76 in the standard and somewhat boring FW-190 paint scheme. The kit markings are for Jagdgruppe 10 with the snake along the fuselage in yellow and red. The lower cowling is in yellow. Lots of stencils and no swastika are on the nicely printed sheet. There are quite a few aftermarket sheets that have been done for the 190A-8 so finding a substitute will not be an issue if looking for something else.
| CONSTRUCTION |
First thing I did was to assemble most of the cockpit. Then it was painted RLM 66 as was the instrument panel. I also did the head rest bits at this time. While the paint was drying, I opened up the holes in the upper wing for the gun bulges. I decided not to install the lower rack and while not standard, was not uncommon.
The upper wing half was then cemented to the lower after the wheel wells in the upper wing were painted RLM 02. I also did the inner gear doors and the struts with this color at this time. During the wing assembly, the gun barrels have to be installed. I anticipated breaking at least one of these during construction and was proven to be right. I personally would have liked these to be able to be installed after the airframe is nearly complete. However, the design of the gun barrel pieces makes this difficult to do.
I used a set of Eduard color belts to dress up the cockpit. Darn little can be seen with the fuselage halves closed so no need to put a lot of work into it. I found that the butt join of the gun sight was an issue as it kept getting knocked off, and during the fuselage closing would not fit properly anyway.
 An interesting feature is that there are separate exhaust sections; one
for the lower fuselage and one that fits into the fuselage sides. This piece
should not be installed until you are ready to glue the fuselage halves
together. I cemented one side in place early and had difficulty aligning the
other side. In fact, the whole process of installing the cockpit and getting the
fuselage halves together was an exercise in frustration as the parts really do
not have any positive locators. Not sure who engineered this part of the build,
but in my mind, they should not be allowed to do another kit. There is a more
satisfying way to do this area and you will find it in just about every other
1/72 FW-190 kit on the market.
An interesting feature is that there are separate exhaust sections; one
for the lower fuselage and one that fits into the fuselage sides. This piece
should not be installed until you are ready to glue the fuselage halves
together. I cemented one side in place early and had difficulty aligning the
other side. In fact, the whole process of installing the cockpit and getting the
fuselage halves together was an exercise in frustration as the parts really do
not have any positive locators. Not sure who engineered this part of the build,
but in my mind, they should not be allowed to do another kit. There is a more
satisfying way to do this area and you will find it in just about every other
1/72 FW-190 kit on the market.
After a lot of fussing, tape, and super glue, the fuselage halves were together, though the fit leaves something to be desired. The wing was also a bit fussy, especially on the lower front. The upper wing/fuselage join is superb while the lower rear/sides is only fair. Any attempt to take care of the seams on the front/sides of the wing/fuselage join will guarantee the loss of the inner wing gun barrels. Had Airfix not decided to include the lower cowling section with the lower wing, this would not be an issue as there would not be a seam up next to the wing root. While Airfix's softish plastic is a plus in some ways, it is a minus in others.
I took care of the fuselage and wing seams using super glue, though
those at the wing root are in such an area as
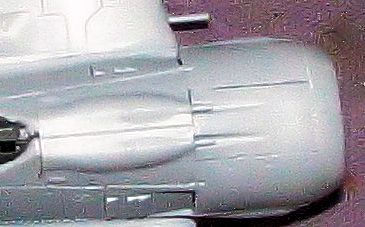 to elude proper repair. The
upper cowling piece is a rather loose fit, while the gun cover is very tight.
Both of those pieces could stand to be a tad wider. You can see the gaps in the
front piece and the small shelf around the gun cover in this image.
to elude proper repair. The
upper cowling piece is a rather loose fit, while the gun cover is very tight.
Both of those pieces could stand to be a tad wider. You can see the gaps in the
front piece and the small shelf around the gun cover in this image.
After sanding the filler on the fuselage and other areas, the tailplanes and rudder were installed. The tailplanes are a very tight fit, which will help in regards to alignment. The rudder fits fairly well, though any mis-alignment of the rear fuselage will cause issues when installing it. I then installed the armor head rest and the brace for it. There is no solid placement point so one just puts it in where it looks as if it will fit. I then glued on the windscreen after having an impossible time trying to get the gun sight to fit. When I trimmed it down, it went flying to who knows where so my 190 will be without one. The canopy section was then glued on and these were masked. I attached the forward section, just pressing it in place, then filled the inside of it with tissue and headed for the paint shop.
| COLORS & MARKINGS |
As nice as the kit marking option is, I wanted to use up some of my
myriad of aftermarket decals. After looking through what I had, I settled on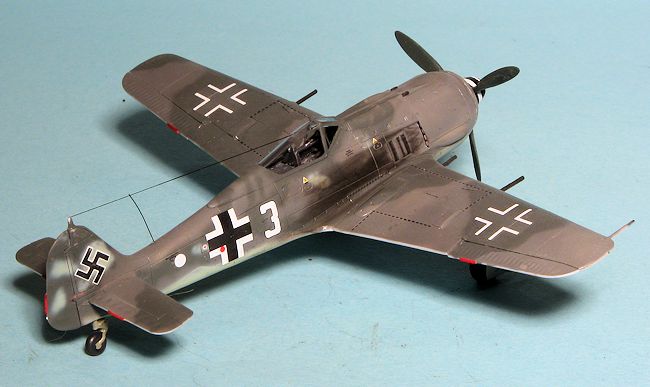 a
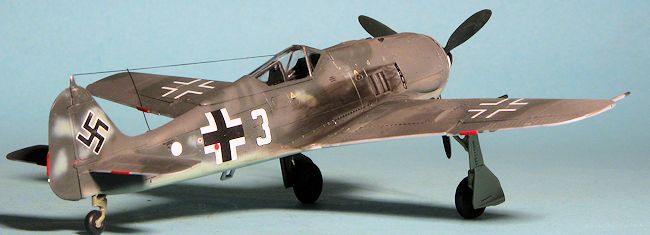
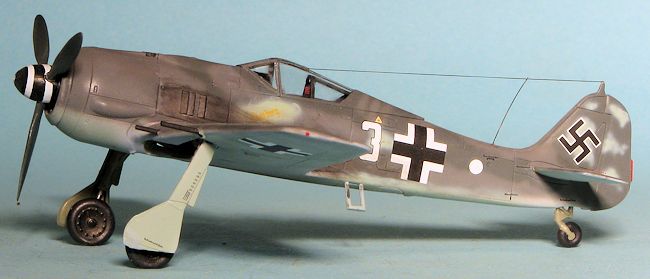
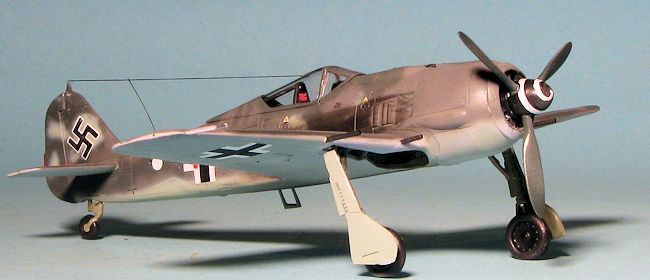
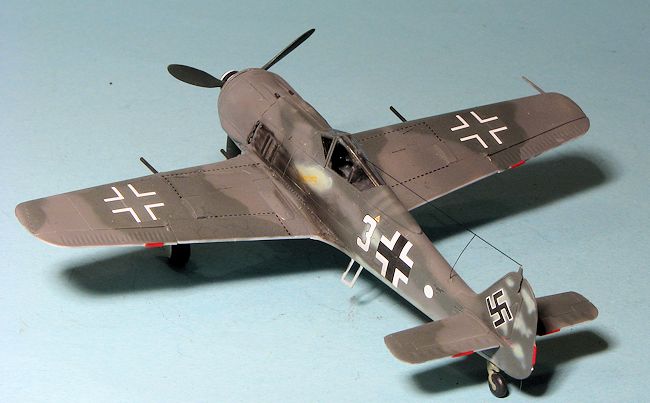
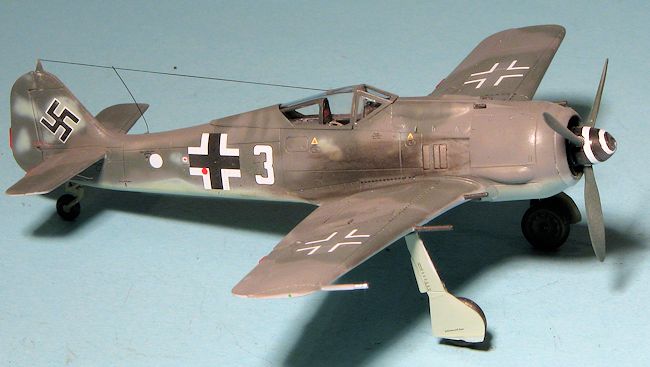
rather interestingly camouflaged plane from 9./JG 5 as flown by Feldwebel Martin Ullmann. This plane was based at Herdla in September 1944.
a
rather interestingly camouflaged plane from 9./JG 5 as flown by Feldwebel Martin Ullmann. This plane was based at Herdla in September 1944.
This and several other A-8 variants were on Aeromaster sheet #72-140; RammJaegers Pt. III from early 1997. Of course, this option is not a rammjaeger plane so I did not have to concern myself with making additional armor plating or sweat having to figure away to do the armored glass bits. What I did like about it is that the fuselage was not a mottled pattern, but an almost solid RLM 74/75 sprayed in varied pattern that left only a bit of RLM 76 on the fin/rudder and the fuselage side. The instructions stated that this pattern was also on the upper wings, but without a guide, I just left it as the standard pattern. I used Model Master Enamels for these colors and hand sprayed the patterns using my Iwata Revolution and very thin paint. I set the airflow at about 8-9 psi and it worked very well.
| FINAL BITS |
With the pattern sprayed on, I returned to the bench to clean up the landing gear bits, paint them and the wheels and attach them. I managed to break the two retraction struts while removing them from the sprues. This is despite the rather soft plastic. The issue with these and all the other parts is that the sprue attachment points are rather large and in several cases, such as the gear doors, flow onto the surface of the part itself. I also managed to break off the engine fan blades where those attached to the sprue. It seems that this issue with breaking parts comes up whether using a razor saw, scalpel or sprue nippers. I am sure I will get e-mails from Airfixistas questioning my abilities on this, but I'm simply reporting how the build went.
 Anyway,
the parts were repaired, again thanks to the soft plastic, and were painted the
various colors required prior to installation. I found the landing gear
attachment areas to be not as positive as I'd have liked. The main gear
attachment holes were a bit loose and the retraction struts did not fit as
nicely as I'd have hoped. I resorted to super glue to be sure that the parts
would dry at the proper angle. Once the plane was on its gear, it was returned
to the spray booth and given a coat of Future in preparation for decals. As a
bit of an aside, I wonder if we will ever stop calling the clear acrylic floor
polish by this name. It is obvious that Johnson's wax wants to remove it from
our lexicon by renaming it under the 'Pledge' brand.
Anyway,
the parts were repaired, again thanks to the soft plastic, and were painted the
various colors required prior to installation. I found the landing gear
attachment areas to be not as positive as I'd have liked. The main gear
attachment holes were a bit loose and the retraction struts did not fit as
nicely as I'd have hoped. I resorted to super glue to be sure that the parts
would dry at the proper angle. Once the plane was on its gear, it was returned
to the spray booth and given a coat of Future in preparation for decals. As a
bit of an aside, I wonder if we will ever stop calling the clear acrylic floor
polish by this name. It is obvious that Johnson's wax wants to remove it from
our lexicon by renaming it under the 'Pledge' brand.
For all the data and stencil markings, I used the kit decals and found that, like all modern Airfix decals, they worked very well. The insignia and unique markings came from the Aeromaster decal sheet. I used Mr Mark Softer setting solution to take care of silvering. Once on and dry, the aircraft was given a coat of clear matte before the final bits were attached.
These final bits were not much. Basically the prop assembly. I found that the spinner did not fit as well as I'd have liked. I also had to sand down the edges of the fan blades to get them to fit into the cowling. The boarding ladder and gear doors were installed and quite a bit of detail painting had to be done regarding the guns and formation lights as well as the red for the trim tabs. I used EZ line for the antenna. The clear bits were unmasked and large exhaust soot areas were dealt with using Tamiya weathering kits.
| CONCLUSIONS |
It is usual that Airfix misses some details and in this case it would be the lower fuselage ADF loop antenna. The kit includes the mount, but no antenna. It also misses the small bulge on the top of the canopy into which the radio antenna wire would go and the Morane antenna under the wing.
My overall impression of the kit is that it should have been better.
There are some rather questionable engineering steps taken in terms of how the
kit goes together that were mentioned in the article. Several
 other kit
makers seem to have gotten these things right and I'm quite surprised at what I
consider a step backwards. It does not mean that the kit is 'unbuildable' as it
obviously isn't, but my experiences with it do not vault it to the head of the
line in terms of 1/72 190s. I still consider the Hasegawa kit to be the top dog
despite its age and lack of cockpit detail (which is really a somewhat moot
point as little can be seen beyond the seat in a 1/72 190). I would put this one
on a par with the Revell kit with that kit being 'demoted' only due to the
canopy treatment.
other kit
makers seem to have gotten these things right and I'm quite surprised at what I
consider a step backwards. It does not mean that the kit is 'unbuildable' as it
obviously isn't, but my experiences with it do not vault it to the head of the
line in terms of 1/72 190s. I still consider the Hasegawa kit to be the top dog
despite its age and lack of cockpit detail (which is really a somewhat moot
point as little can be seen beyond the seat in a 1/72 190). I would put this one
on a par with the Revell kit with that kit being 'demoted' only due to the
canopy treatment.
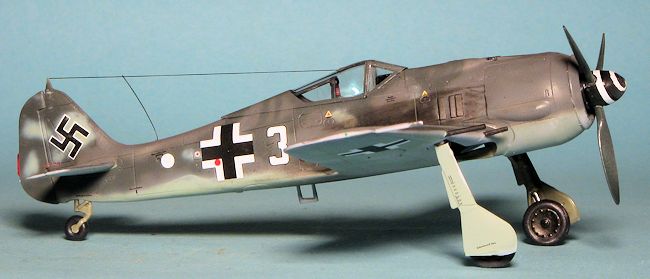
If you are willing to put up with some of the issues presented by the kit, I'm sure you will be quite pleased with it. In the end, it is the final presentation that matters, and the end result of all these efforts is a very nice looking 190A-8.
| REFERENCES |
http://en.wikipedia.org/wiki/FW-190
Review kit courtesy of your editor. Decals courtesy of the now defunct Aeromaster Corporation.
If you would like your product reviewed fairly and fairly quickly, please contact the editor or see other details in the Note to Contributors.