Hasegawa 1/72 P-47D Razorback
|
KIT # |
2507 (At7) |
|
PRICE: |
$14.98 |
|
DECALS: |
Two aircraft |
|
REVIEWER: |
|
|
NOTES: |
|
BACKGROUND |
For a peek in the box and the usual brief history on the type, visit the preview
|
CONSTRUCTION |
Anyway,
the interior was painted with Aeromaster US Interior Green and the various bits
and pieces picked out in black, silver, white, leather, etc. In the case of the
P-47, you are told to remove the resin
It is nice that the interior itself is
molded so that you can keep the two lower mounts as references. Makes it so much
easier. The installation of the the sidewalls is a snap as well as they slot in
nicely. Doing the instrument panel is a bit of a challenges as TD wants
you to keep the large resin block at the back. It fits into a mounting area, but
removing the excess resin without breaking any of the instrument panel while
doing so isn't easy. Take your time and work with a fine-toothed saw and you
should have no problems with it at all.
While all the painting and installation of the cockpit went on in fits and
starts, I went ahead and glued the
subassemblies. This was basically the wings and drop tanks as there really isn't
that much to this kit in terms of 'stuff'.
During this time, the engine was glued together and painted. I also cleaned up
the landing gear and removed the resin wheels from their blocks. The attachment
holes in the wheels were drilled as well. Back at the cockpit, the resin
gunsight was installed with superglue. This was followed by the armor screen and
the head rest. The canopy was then masked and the anti-glare shield painted
black. When the paint had dried, the canopy was glued into place.
The hole (and it is a pretty good sized one) was first filled with sheet plastic
as best I could. I then poured in some superglue and hit it with some
accelerator. This was then sanded down and regular filler used to take care of
the small pits and holes. This still left what to do with the missing ejector
chute. Options were to do nothing, open them back up, or use a small decal to
represent them. Option 2 would be difficult seeing as how they were filled with
superglue so I'll either do nothing or use a decal. I then tacked on the cowling
and it was time for some painting.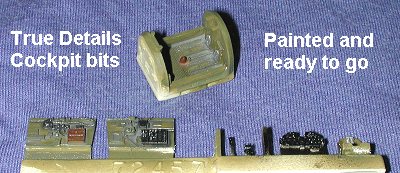 As they all say, 'Construction starts with the interior'. In
this case it starts with True Details #72457 at a whopping $4.00. There is
probably no optional bit that helps this and any other Hasegawa 1/72 kit more
than a good resin interior. Oddly, not that many are available, with most resin
makers preferring to do the more expensive and profitable 1/48 sets. Well,
thanks to TD and those other few who do cater to 1/72.
As they all say, 'Construction starts with the interior'. In
this case it starts with True Details #72457 at a whopping $4.00. There is
probably no optional bit that helps this and any other Hasegawa 1/72 kit more
than a good resin interior. Oddly, not that many are available, with most resin
makers preferring to do the more expensive and profitable 1/48 sets. Well,
thanks to TD and those other few who do cater to 1/72.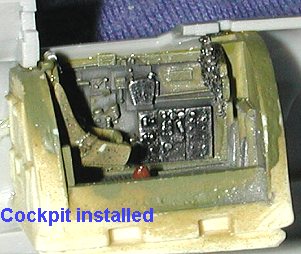 casting block from the tub, but frankly,
that really isn't needed as it fits just fine the way it is, thank you. You do
have to remove a few interior mounting posts to accept the resin parts. You also
need to trim the lower corner of the resin block to clear the wheel well section
that juts into the fuselage. It takes about 30 seconds with a sharp hobby knife
to get this clearance.
casting block from the tub, but frankly,
that really isn't needed as it fits just fine the way it is, thank you. You do
have to remove a few interior mounting posts to accept the resin parts. You also
need to trim the lower corner of the resin block to clear the wheel well section
that juts into the fuselage. It takes about 30 seconds with a sharp hobby knife
to get this clearance. 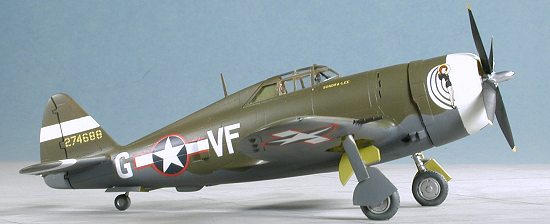 Once the cockpit was fully installed, the fuselage halves were glued together.
Had to do a bit of additional trimming on the resin to get a good fit.
Next, the wings were glued on. I used a bit of filler on the wing joins just to
cover up my sloppy gluing more than anything else. Naturally, I also used some
on the fuselage, especially on the bottom at the sprue attachment points by the
turbocharger exhaust. With the wings on, the tail planes were glued in place. A
touch of filler was used there as well.
Once the cockpit was fully installed, the fuselage halves were glued together.
Had to do a bit of additional trimming on the resin to get a good fit.
Next, the wings were glued on. I used a bit of filler on the wing joins just to
cover up my sloppy gluing more than anything else. Naturally, I also used some
on the fuselage, especially on the bottom at the sprue attachment points by the
turbocharger exhaust. With the wings on, the tail planes were glued in place. A
touch of filler was used there as well. I then looked over the decal sheet
I was going to use. It was then that I noticed that none of the planes on it had
any wing racks! This poses a bit of a problem as the Hasegawa kit has them
molded on the bottom of the wing. Two options present themselves. One is to
leave them there and the second to cut them off and fill the hole. I chose the
second. Downside of doing this is that you'll undoubtedly lose the shell ejector
chute right next to the rack. Try as I might, I ended up losing both sides.
I then looked over the decal sheet
I was going to use. It was then that I noticed that none of the planes on it had
any wing racks! This poses a bit of a problem as the Hasegawa kit has them
molded on the bottom of the wing. Two options present themselves. One is to
leave them there and the second to cut them off and fill the hole. I chose the
second. Downside of doing this is that you'll undoubtedly lose the shell ejector
chute right next to the rack. Try as I might, I ended up losing both sides.
|
PAINT & DECALS |
These early Jugs are a cinch to paint. First I used Floquil Reefer White on the
cowling, fin and horizontal stabs. When dry, these were masked off at the
appropriate places for the ID markings. I studied the instructions quite a bit
on this and it
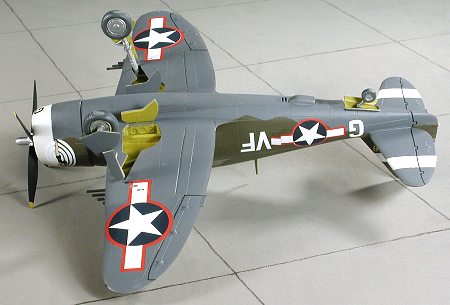
Next was the underside color of Neutral Grey. I used some of my steadily
dwindling supply of Aeromaster paints for this, using the Acrylics for this one
as there is no fine paint work needed. I also painted the prop black and the
wheels and struts aluminum at this time. When the grey had dried, it was masked
in the typical wavy pattern that was applied to these aircraft. The upper
surfaces were then painted in Olive Drab using a slightly lightened Tamiya
Acrylic. I also painted the inside of the gear doors with yellow zinc chromate
after finding out a few days ago that I've been using the wrong color for P-47s
in this area (I've been using the green chromate and apparently that is
incorrect).
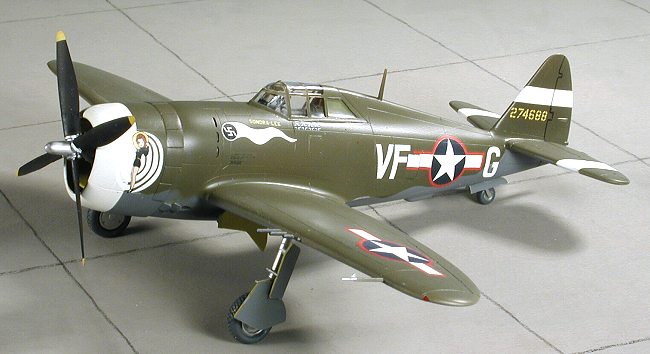
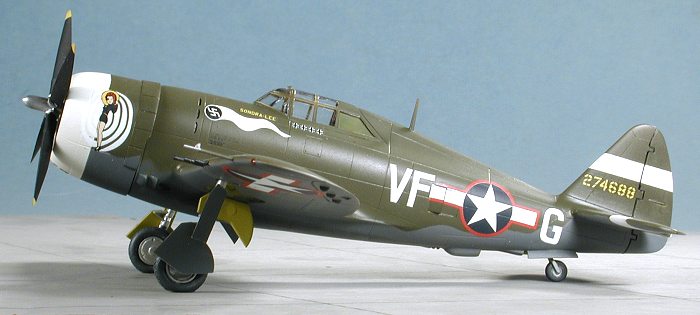
Then it came to the decals. I decided that I wanted an early P-47D so chose one
of the ones on Aeromaster 72-189, a
relatively new decal sheet. I chose the markings for Maj. Lee Grover, the
commander of the 336 FS and a plane named 'Sondra Lee'. As with the other planes
on this sheet, they all have the red surround national insignia and some nice
nose art. The first thing I noticed is that the Reefer White is not a pure white
as the white nose art markings can be discerned against it on the nose. On the
next one, I'll overspray the Reefer White with some real white. Actually, I said
that the last
The second was to kick myself from using Champ on these decals. I had a bit of a
problem with the underside insignia snuggling down properly so used just a touch
of it on a section. The red in the insignia bled rather badly so needed touched
up. I also had problems with the inserts to the insignia (the blue center
section is separate). The tolerances are very close, and it seems as if they all
shrank just a touch when they dried. This left a bit of white peeking through in
places. Most odd. You should also know that the small 'sliver' decals you
get for the turbo exhaust doors will NOT have the red vertical piece as shown on
the decal instruction sheet. That bit is hidden when the forward door is open.
The upper red bar is also either too short or the insignia needs to be pushed
farther forward as it does not fully cover the area of the forward door. Take
and look at the pictures and you'll see what I mean.
FINAL BITS I'd like to mention at this time that the cowling supplied with the kit is
not correct for the early D or any C model. The C model has fewer cowl flaps and
the early D has a more squared lower section instead of the slightly cut out
type of later versions. At least that is how it seems from the drawings. I
didn't change or alter this feature as I figured not that many would really be
able to tell. Just thought you'd like to know. 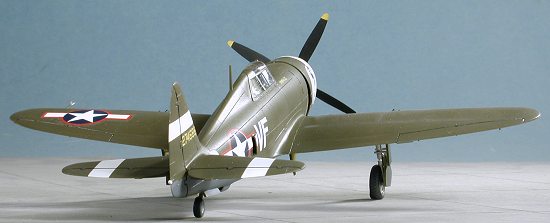 seemed to me that the fin stripe was narrower than the stab
stripes so I trimmed the tape to show that. Undoubtedly, I'll find out that they
are to be the same width after I finish the model, but I went with what
Aeromaster shows.
seemed to me that the fin stripe was narrower than the stab
stripes so I trimmed the tape to show that. Undoubtedly, I'll find out that they
are to be the same width after I finish the model, but I went with what
Aeromaster shows.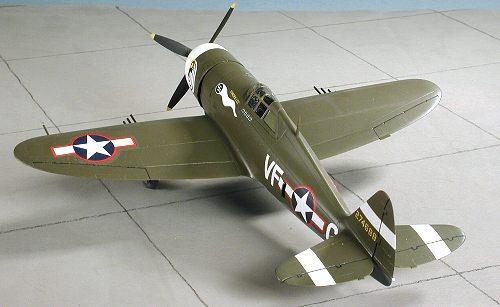 time I did a P-47 and cheerfully forgot!
 With the expected disaster now over, there really was little else to do. The
model was wiped down when the setting solutions had dried and sprayed with a
clear matte. Then the masking was removed from the canopy, the guns painted as
was any other touchup needed. The cowling was pried off and the prop/prop shaft
glued in place. The cowl was then glued back on and some pastels used for
exhaust. That was it.
With the expected disaster now over, there really was little else to do. The
model was wiped down when the setting solutions had dried and sprayed with a
clear matte. Then the masking was removed from the canopy, the guns painted as
was any other touchup needed. The cowling was pried off and the prop/prop shaft
glued in place. The cowl was then glued back on and some pastels used for
exhaust. That was it.
|
CONCLUSIONS |
This is about the fourth or fifth of these Hasegawa 1/72 P-47s that I have built. Each one has been a fun kit and offers minimal problems. Add the TD cockpit and wheels and you have a very nice model to put on your shelf.
November 2002
#1246 in a series
Copyright ModelingMadness.com. All rights reserved. No reproduction in part or in whole without express permission from the editor.
If you would like your product reviewed fairly and fairly quickly, please contact the editor or see other details in the Note to Contributors.