Tamiya 1/48 F4U-1A Corsair
|
KIT # |
61070 |
|
PRICE: |
$27.00 MSRP |
|
DECALS: |
three options |
|
REVIEWER: |
Scott Van Aken |
|
NOTES: |
|
HISTORY |
 The F4U-1A was an updated version of the original 'Birdcage' F4U-1
Corsair. The most notable addition was the taller canopy which allowed
the seat to be raised so that the pilot had a better view over the very
long nose of the Corsair. This was especially important for carrier
landings. Along with this addition, the aircraft was plumbed for a single
drop tank on the centerline and in later versions, a Brewster designed
bomb rack was added.
The F4U-1A was an updated version of the original 'Birdcage' F4U-1
Corsair. The most notable addition was the taller canopy which allowed
the seat to be raised so that the pilot had a better view over the very
long nose of the Corsair. This was especially important for carrier
landings. Along with this addition, the aircraft was plumbed for a single
drop tank on the centerline and in later versions, a Brewster designed
bomb rack was added.
Like its predecessor, the F4U-1A was initially operated from land bases, the Navy still not happy with the aircraft's tendency to 'bounce' once it hit the deck. Eventually a proper balance was obtained with the landing gear oleos and it was cleared for carrier operation, the type serving until the end of the war even after the improved F4U-1D and F4U-4 were in service. Most were scrapped at the end of the war with a few serving in the Reserves, though most of those were quickly withdrawn as the Navy settled on a few types and retired most of its war-time inventory to the scrap yards.
|
THE KIT |
Now that just about everyone and their dog has built this kit, it is my turn to give it a try. This boxing includes all the bits to do a -1D as well as there is an additional sprue with these bits added in the box. Each of the sprues is individually packaged to keep damage caused by scratching down to a minimum. Options include a drop tank or bomb rack with a single 500 lb bomb. The kit also includes two pilots; one seated and one getting ready to climb in. In addition, you had a choice of open or closed cowl flaps and folded or extended wings. I'm going to save some space by saying that many people consider it to be one of the best engineered kits on the market and basically fool-proof. We'll see.
|
CONSTRUCTION |
I looked over the plans and started into the subassembly
bits. This meant all of the separate flaps, the outer wing panels, the drop
tank and bomb, and, of course, the cockpit. Don't forget to open up the
small hole for the stall warning piece in the
 one wing. I did and it wasn't
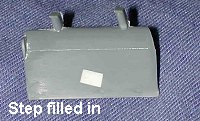
that easy to do at a later date. When doing the flaps, don't forget to fill
the step hole in one of the inner ones. Tamiya does great research and
finds actual planes to base their kits upon. Downside of this is that after
50 years, some folks have put on later bits or had their planes modified
(as in the Meteor I). The hole in the flap was a late/post-war addition
that nearly all extant Corsairs have to make it easier to get into the
plane. Anyway, I used epoxy putty to fill this by cramming the putty into
it and then smoothing out the surface. When dry it was carefully sanded and
after painting, you can't tell the step was ever there.
one wing. I did and it wasn't
that easy to do at a later date. When doing the flaps, don't forget to fill
the step hole in one of the inner ones. Tamiya does great research and
finds actual planes to base their kits upon. Downside of this is that after
50 years, some folks have put on later bits or had their planes modified
(as in the Meteor I). The hole in the flap was a late/post-war addition
that nearly all extant Corsairs have to make it easier to get into the
plane. Anyway, I used epoxy putty to fill this by cramming the putty into
it and then smoothing out the surface. When dry it was carefully sanded and
after painting, you can't tell the step was ever there.
 When all the bits were glued together, the interior was
given an overall coat of US Interior Green from the Testors ModelMaster
enamel range. I brushed on a few bits in matte black and applied the decals
over the instruments and the seat (seat belt decal). These went on with no
fuss and a dose of Solvaset made sure they would snuggle down properly. I
then painted all of the wheel wells and insides of the doors and cowling
withTestors Yellow Zinc Chromate. All my research shows that the door
and well interiors could be either in this color or in the underside color.
If you have proof otherwise, I'd be more than happy to entertain it. I like
camouflage information and read a lot about it, but I'm in no way pedantic
about it. While I was at it, I assembled the landing gear and painted it
and the wheels with Alclad II. Now all this sounds pretty quick, but it
actually took several days.
When all the bits were glued together, the interior was
given an overall coat of US Interior Green from the Testors ModelMaster
enamel range. I brushed on a few bits in matte black and applied the decals
over the instruments and the seat (seat belt decal). These went on with no
fuss and a dose of Solvaset made sure they would snuggle down properly. I
then painted all of the wheel wells and insides of the doors and cowling
withTestors Yellow Zinc Chromate. All my research shows that the door
and well interiors could be either in this color or in the underside color.
If you have proof otherwise, I'd be more than happy to entertain it. I like
camouflage information and read a lot about it, but I'm in no way pedantic
about it. While I was at it, I assembled the landing gear and painted it
and the wheels with Alclad II. Now all this sounds pretty quick, but it
actually took several days.
I also assembled the engine and painted it and the prop
with Floquil Engine Black lacquer. The engine was then heavily dry brushed
with Aluminum metallizer. Next step was to insert the interior into the
fuselage. A real no-brainer as it fit superbly. The other fuselage half was
glued in place. While that was drying, I assembled the center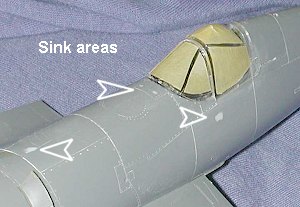 wing section.
This includes a brace and lower window so don't forget that part. I opened
up the hole for the drop tank or bomb rack during this time. The oil cooler
intakes fit fairly well, but needed some sanding and a bit of filling.
Returning to the fuselage, I installed the forward radio mast. When dry, it
was cut off (as per the instructions) and the small air scoop below it was
also removed. I had several sink areas that needed filled. One was on the
left outer fuselage and there were several just forward of the cockpit.
wing section.
This includes a brace and lower window so don't forget that part. I opened
up the hole for the drop tank or bomb rack during this time. The oil cooler
intakes fit fairly well, but needed some sanding and a bit of filling.
Returning to the fuselage, I installed the forward radio mast. When dry, it
was cut off (as per the instructions) and the small air scoop below it was
also removed. I had several sink areas that needed filled. One was on the
left outer fuselage and there were several just forward of the cockpit.
Next the tailplanes were glued in place. These didn't seem to fit quite as perfectly as I would have hoped. Not sure just what the glitch is, but they also needed some fine filler. The lower wing section was then glued in and fit was very good, but not perfect. There was a tiny step on the aft wing/fuselage join that needed sanded down. The engine was glued to the firewall and the open cowl flaps were glued in place. I next installed the gunsight and the armored glass before installing the clear bits. These are very thin and prone to cracking (as I did on my windscreen) so handle with care. They were glued in place in the closed position as they are very clear so you can see the interior with no problems. These were masked with Tamiya tape and the kit was off to have the camo painted on.
|
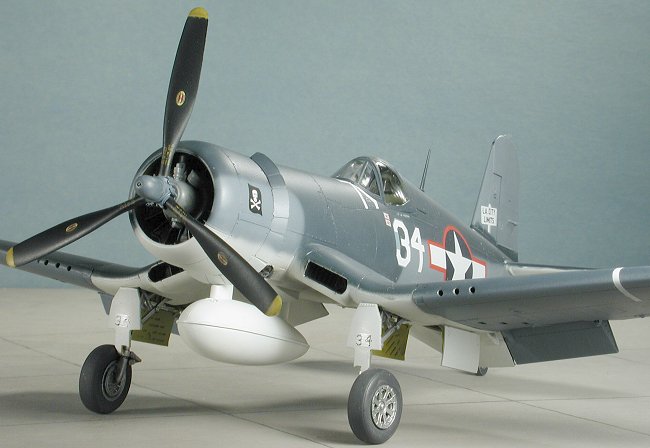
CAMOUFLAGE & MARKINGS |
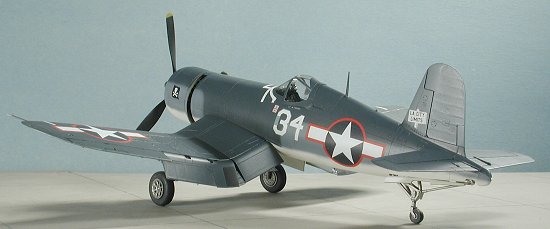 Most F4U-1As were painted in the
tricolor scheme of Sea Blue, Intermediate Blue and White. This isn't a
simple scheme as it was all hand sprayed. Masking this scheme will make
the aircraft look most odd. I first painted on the white on the underside
of the airframe and the inner flaps. The drop tank got the same
treatment. Next the intermediate blue sections were painted, and this
consisted of the lower outer wings and flap sections and the middle
fuselage and fin as well as the prop hub. I was doing a VF-17 aircraft
and they had the prop hub painted intermediate blue. Final color was Sea
Blue. This went on the upper wing and t
Most F4U-1As were painted in the
tricolor scheme of Sea Blue, Intermediate Blue and White. This isn't a
simple scheme as it was all hand sprayed. Masking this scheme will make
the aircraft look most odd. I first painted on the white on the underside
of the airframe and the inner flaps. The drop tank got the same
treatment. Next the intermediate blue sections were painted, and this
consisted of the lower outer wings and flap sections and the middle
fuselage and fin as well as the prop hub. I was doing a VF-17 aircraft
and they had the prop hub painted intermediate blue. Final color was Sea
Blue. This went on the upper wing and t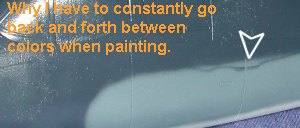 ailplane as well as the
upper center fuselage. Now all of this painting didn't go off 1-2-3, but
took several days of back and forth painting (top fix glitches such as
that on the left) as well as some masking
after an area was painted and dry so that overspray didn't affect areas
already done. I used the White Ensign paints that were still mixed up
from the Sweet F4F Wildcat I built a month or so
ago and they performed beautifully. The wheel hubs were masked off and
the wheels painted Floquil Weathered Black lacquer.
ailplane as well as the
upper center fuselage. Now all of this painting didn't go off 1-2-3, but
took several days of back and forth painting (top fix glitches such as
that on the left) as well as some masking
after an area was painted and dry so that overspray didn't affect areas
already done. I used the White Ensign paints that were still mixed up
from the Sweet F4F Wildcat I built a month or so
ago and they performed beautifully. The wheel hubs were masked off and
the wheels painted Floquil Weathered Black lacquer.
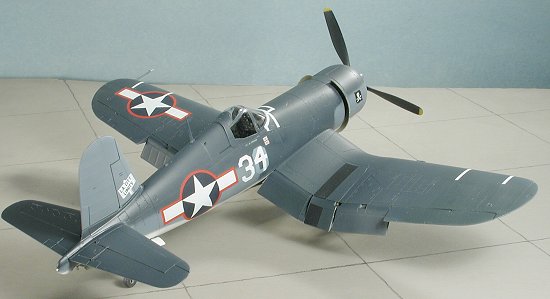
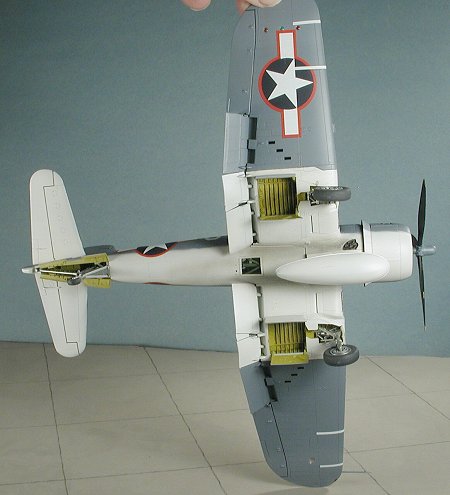
After doing all this painting, I was left with a bunch of prepainted parts and subassemblies that needed to be brought together. At this stage I should mention that I wanted my plane with wings extended. I've already got a folded wing Corsair when I did my Hasegawa F4U-5N and as neat as it is, I like my naval planes with the wings spread.
|
MORE CONSTRUCTION |
Well, installing the wings in the
spread position wasn't as easy as I'd have liked it to be. First of all,
one has to install the inboard wing mounting plate. On this plate goes a
brace for either folded or spread wings. This brace is handed so don't
get it in the wrong side! If one is doing the wings folded, one needs to
install the inboard flap pieces before putting in the end
 piece as there
is a bit that attaches to the outer inboard flap section. For my
purposes, it won't be seen so I just cut off the little attachment bit. I
had a lot of trouble getting the outboard wing panels to line up with the
rest of the wing. I'm not sure just what the situation was in this
regard, but fit they didn't. I did not want to remove the brace as that
would weaken the heck out of the wings, so I did the best I could and
when dry, sanded down the step and repainted the area.
piece as there
is a bit that attaches to the outer inboard flap section. For my
purposes, it won't be seen so I just cut off the little attachment bit. I
had a lot of trouble getting the outboard wing panels to line up with the
rest of the wing. I'm not sure just what the situation was in this
regard, but fit they didn't. I did not want to remove the brace as that
would weaken the heck out of the wings, so I did the best I could and
when dry, sanded down the step and repainted the area.
I then installed the landing gear and wheels. These went on with little problem. I also realized that I forgot to cut the hole for the radio mast! I carefully opened up a slot for the antenna and then realized I made it on the wrong side of the fuselage. Result is that my mast is not centered. Oh well. I also glued the crankcase face to the engine after removing all the masking material from it. The exhaust were also glued in place. One has to be VERY careful in removing these from the sprue as I managed to cut one a bit too much during that process. I also installed the front gear doors. Fit here was also less than good and one had to be trimmed at the top to fit at all. Musta screwed something up as this kit is supposed to be idiot-proof. The kit then had several fine coats of Future applied to it in preparation for decals.
|
DECALS |
This was the hard part. I have a ton of Corsair
decals that can be used on this kit. After much hemming and hawing, I
settled on a set of markings from
Eagle Strike 48-093. Specifically the markings for VF-17s 'L.A. City
Limits' flown by Lt.(jg) Doris 'Chico' Freeman. It has several things
going for it. First of all, VF-17 was a very successful (though land
based) unit 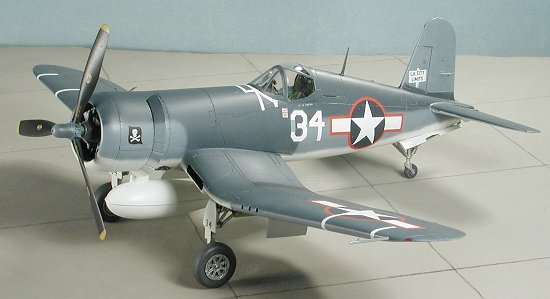 led by Tommy Blackburn and (correct me if I'm wrong) the
first of the Navy's Jolly Rogers squadrons (that honor now being
held by VFA-103). Secondly, it had the very colorful red surround
insignia that was used briefly during mid 1943. Third, it wasn't flown by
a famous ace. I'm with several readers in that I generally prefer to
model non-ace planes.
led by Tommy Blackburn and (correct me if I'm wrong) the
first of the Navy's Jolly Rogers squadrons (that honor now being
held by VFA-103). Secondly, it had the very colorful red surround
insignia that was used briefly during mid 1943. Third, it wasn't flown by
a famous ace. I'm with several readers in that I generally prefer to
model non-ace planes.
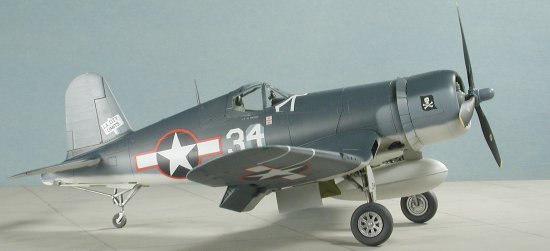
Anyway, the decals are very well printed and went down with no real problem. The sharp-eyed will note that the intermediate blue on the number decal doesn't exactly match the paint I used. I used Solvaset on them to make sure they snuggled down. I did have to use some of the kit decals as Eagle Strike didn't provide any of the tape or wing walk markings that these planes used. The Tamiya kit decals succumbed to Solvaset with no problems though one of the wing stripes somehow shifted while it dried and it is now out of line with the rest! Once they were on and dry, I wiped off the kit with warm water to remove any solution residue. I then returned to the paint shop for a Tamiya 'Smoke' exhaust treatment. I also gave the model a couple of light coats of matte clear to seal things in place.
|
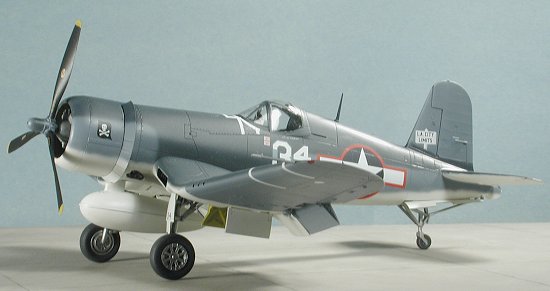
FINAL CONSTRUCTION |
 Back at the workbench,
the final things were added. Basically, this consisted of attaching the
gear doors and doing some additional fine painting of the wing lights and
ID lights. I found the tail wheel doors to be a bit of a hassle to glue
in place. The canopy was unmasked and the landing light was glued in
place using clear paint. I glued the drop tank to the lower wing (yeah,
it isn't dirty enough so I'll just say it was a brand new tank), the prop
was pushed onto the engine and that was it!
Back at the workbench,
the final things were added. Basically, this consisted of attaching the
gear doors and doing some additional fine painting of the wing lights and
ID lights. I found the tail wheel doors to be a bit of a hassle to glue
in place. The canopy was unmasked and the landing light was glued in
place using clear paint. I glued the drop tank to the lower wing (yeah,
it isn't dirty enough so I'll just say it was a brand new tank), the prop
was pushed onto the engine and that was it!
|
CONCLUSIONS |
Though I did not find it to be the easiest kit I've ever built, it did not provide any real difficulties other than the proper alignment of the outer wing panels. It has been well over 10 years since I did a 1/48 WWII Corsair (the Otaki kit) and I'll be looking at doing other ones sometime in the near future!
Kit courtesy of me and my ability to grab a bargain when I see one!
November 2003
#1290 in a series
Copyright ModelingMadness.com. All rights reserved. No reproduction in part or in whole without express permission from the editor.
If you would like your product reviewed fairly and fairly quickly, please contact the editor or see other details in the Note to Contributors.