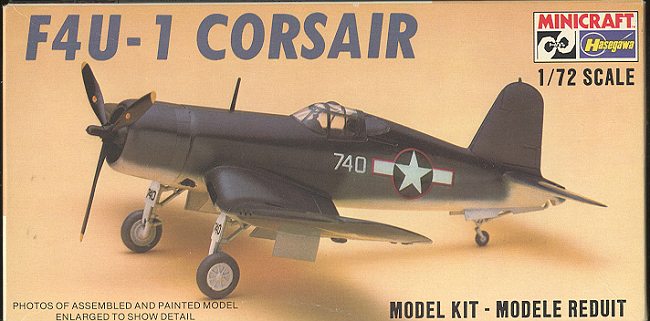
Minicraft/Hasegawa 1/72 F4U-1
|
KIT # |
1179 |
|
PRICE: |
$4.00 |
|
DECALS: |
One aircraft |
|
REVIEW : |
|
|
NOTES: |
|
HISTORY |
The F4U-1 was the first production version of 'old hog nose'. As such it was the aircraft that had to be molded into the very capable carrier-borne fighter that it was to become. Problem was that it did not start out to be a good carrier-borne aircraft. In fact, so troublesome were its deck handling and landing problems that the early 'birdcage' variants spent almost all their early combat career with the Marines as shore-based fighters. The real problem with the plane was that it tended to 'bounce' when it came in for a landing on the wooden decked carriers. This is not a good thing. Add to it the very long nose of the plane that made it difficult to see around when taxiing, and you have its troubles in a nutshell.
 Fortunately for the Marines, the Corsair was a super plane. It
was probably one of the first times that the Corps actually had an aircraft that
was superior to those flown by their Navy counterparts. Before, the Marines had
only gotten older aircraft that the Navy no longer wanted or needed. Now able to
get rid of its sturdy but slow Wildcats, Marine pilots at the many island bases
on which they were stationed , had a plane that was superior in many ways to the
Japanese aircraft they were facing. Armed with the Corsair they racked up a
considerable score against their foes. The Corsair was also very good at low
level close air support. Newer models went on to add bomb racks and rocket
rails, further enhancing the F4U's ground attack capabilities.
Fortunately for the Marines, the Corsair was a super plane. It
was probably one of the first times that the Corps actually had an aircraft that
was superior to those flown by their Navy counterparts. Before, the Marines had
only gotten older aircraft that the Navy no longer wanted or needed. Now able to
get rid of its sturdy but slow Wildcats, Marine pilots at the many island bases
on which they were stationed , had a plane that was superior in many ways to the
Japanese aircraft they were facing. Armed with the Corsair they racked up a
considerable score against their foes. The Corsair was also very good at low
level close air support. Newer models went on to add bomb racks and rocket
rails, further enhancing the F4U's ground attack capabilities.
|
THE KIT |
 This is one of the last kits that Hasegawa designed with raised panel lines.
However, despite that, it is a very nice model and up to Hasegawa's standards of
the time. The blue plastic is very well molded and detailed. Cockpit consists of
seat, stick and instrument panel with decal for the instrument panel.
There is good main wheel well detail and none in the back. Engine is both rows
of cylinders with the second row molded on a backing plate. The canopy is in
several sections, but cannot be displayed open. Ejector pin marks are the
biggest problem with these pesky things on the inside of all the gear doors and
on the landing gear struts themselves. The ones on the wheels are going to be
nearly impossible to fill so aftermarket wheels are recommended.
This is one of the last kits that Hasegawa designed with raised panel lines.
However, despite that, it is a very nice model and up to Hasegawa's standards of
the time. The blue plastic is very well molded and detailed. Cockpit consists of
seat, stick and instrument panel with decal for the instrument panel.
There is good main wheel well detail and none in the back. Engine is both rows
of cylinders with the second row molded on a backing plate. The canopy is in
several sections, but cannot be displayed open. Ejector pin marks are the
biggest problem with these pesky things on the inside of all the gear doors and
on the landing gear struts themselves. The ones on the wheels are going to be
nearly impossible to fill so aftermarket wheels are recommended.
The instructions are Minicraft's and are more than adequate to allow the kit to be built. Color callouts are generic for the construction steps but FS numbers are given for the camo scheme. The decal sheet is quite well done by Scalemaster and depicts a tri-colored camo aircraft from early-mid 1943. It will be a nice kit to build and it isn't my first as I did one several years ago as a British Corsair I.
|
CONSTRUCTION |
 First thing I did was to go out and spend the $3 for a True
Details Corsair resin cockpit. The kit one is OK, but this one is MUCH nicer. In
addition to the full cockpit tub, you get a new instrument panel, seat and some
small boxes for the sidewall. After cutting the seat and instrument panel off
the resin plug, the seat was glued in place.
First thing I did was to go out and spend the $3 for a True
Details Corsair resin cockpit. The kit one is OK, but this one is MUCH nicer. In
addition to the full cockpit tub, you get a new instrument panel, seat and some
small boxes for the sidewall. After cutting the seat and instrument panel off
the resin plug, the seat was glued in place.
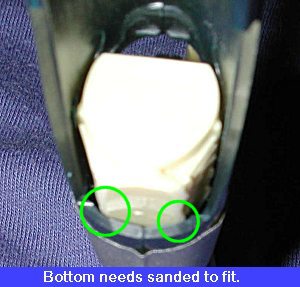 You have to use the kit control
stick, so the attachment point was drilled out and the stick glued in. Then the
interior was test fitted into the fuselage. You need to remove the old mounting
tabs and sand away at the plug on the bottom to get a proper fit.
You have to use the kit control
stick, so the attachment point was drilled out and the stick glued in. Then the
interior was test fitted into the fuselage. You need to remove the old mounting
tabs and sand away at the plug on the bottom to get a proper fit.
Once
that was done, the small radio boxes and throttle quadrant were glued to the
fuselage side and all the bits were given an Interior Green paint job! As a hint
for placing the boxes 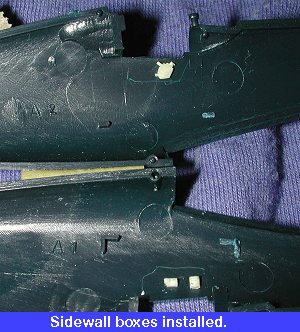 and
quadrant, while the interior is held in place, gently scribe the area where
there is blank wall. Then when you remove the cockpit, you will have some guide
as to where to place the boxes. You can see the scribe marks I made in the image
to the right. While
that was drying, the wings were glued together and then any gaps filled and
sanded smooth. The ejector pin marks on the gear doors were filled at this time
and those on the landing gear sanded off.
and
quadrant, while the interior is held in place, gently scribe the area where
there is blank wall. Then when you remove the cockpit, you will have some guide
as to where to place the boxes. You can see the scribe marks I made in the image
to the right. While
that was drying, the wings were glued together and then any gaps filled and
sanded smooth. The ejector pin marks on the gear doors were filled at this time
and those on the landing gear sanded off.
After the interior had dried, it was painted with the needed black and other colors, then dry brushed. It was then installed in one half of the fuselage and then glued in place. The instrument panel was then glued in and the other fuselage half glued on. I used clamps to keep everything in proper alignment. When dry, any holes and seams were filled and sanded smooth.
Once that was done, the wing was attached. You need to sand/carve away at the back of the inside of the wing to allow room for the resin interior to fit. The resin interior is deeper than the kit one so carving this away is necessary. I found, much to my dismay, that the plastic in this kit is a bit brittle and during my carving a chunk broke out of the underfuselage! It can be repaired with filler, but a warning to you to be careful.
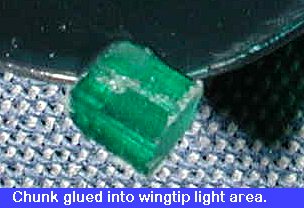 When all
the fuselage filling and sanding had been completed, I decided to add some red
and green wingtip lights. This is a very simple procedure and one that only
requires a razor saw, a red and green drink stirring rod, some glue and some
sandpaper. First, you cut away the kit light. This works best on those aircraft
with the lights built into the wing. Next, simply cut a square(ish) chunk out of
your plastic rod and glue it into the area you just cut from the wing tip. There
will be way more than you want, but no worries as you'll be sanding most of it
away. Give it plenty of glue to make sure it holds well.
When all
the fuselage filling and sanding had been completed, I decided to add some red
and green wingtip lights. This is a very simple procedure and one that only
requires a razor saw, a red and green drink stirring rod, some glue and some
sandpaper. First, you cut away the kit light. This works best on those aircraft
with the lights built into the wing. Next, simply cut a square(ish) chunk out of
your plastic rod and glue it into the area you just cut from the wing tip. There
will be way more than you want, but no worries as you'll be sanding most of it
away. Give it plenty of glue to make sure it holds well.
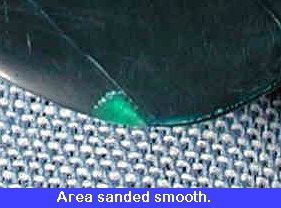 The next step is to start sanding. I
use sanding sticks for this kind of work. You can get them at most any hobby
shop; they come in multiple grades of coarseness. Starting with the coarsest
start sanding away until it gets down close to the wingtip. Then start using
finer and finer grades. Finally, you'll get it down to where it is flush with
the surrounding wing and has been properly shaped. Later on, using ultrafine
sandpaper and buffing it, you can get it very smooth. Then simply mask it over
in preparation for painting. It almost takes longer to explain it than it does
to do. It is a very simple operation and the required colored plastic can be
obtained from a number of sources, including old toothbrush handles!
The next step is to start sanding. I
use sanding sticks for this kind of work. You can get them at most any hobby
shop; they come in multiple grades of coarseness. Starting with the coarsest
start sanding away until it gets down close to the wingtip. Then start using
finer and finer grades. Finally, you'll get it down to where it is flush with
the surrounding wing and has been properly shaped. Later on, using ultrafine
sandpaper and buffing it, you can get it very smooth. Then simply mask it over
in preparation for painting. It almost takes longer to explain it than it does
to do. It is a very simple operation and the required colored plastic can be
obtained from a number of sources, including old toothbrush handles!
 Once the colored plastic is glued in
place and dry, it takes about 5 minutes per wingtip and adds a lot to your kit.
I don't do it as often as I'd like, but should.
Once the colored plastic is glued in
place and dry, it takes about 5 minutes per wingtip and adds a lot to your kit.
I don't do it as often as I'd like, but should.
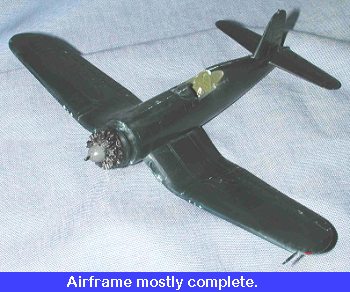
With that little addition was out of the way, the tailplanes were glued in place. Then the engine was painted and drybrushed and glued onto the front of the fuselage. I now had a pretty complete airframe. Then some touchup was done in the cockpit area in preparation for having the canopy attached. Now I must confess that I didn't fully believe the kit painting instructions when they told me that the wheel wells, inside of gear doors, and the area inside the small quarter windows was interior/chromate green. Having no reference books on the subject, I figured the best thing to do was to start some internet inquiries.
What I found was that most Corsairs had the wheel wells and the gear door interiors in whatever the underside color of that area might be. In this case it would be light gull grey. I also found out that the engine cowling and accessory compartment were in a grey color as well. On the -1s, often the chromate primer had some Indian Red mixed in with it giving it a sort of salmon color. This was used everywhere on the interior except the cockpit. Same for the inside of wings and tails, so if you are doing a -1 with open panels, you'll need this pinkish hue.
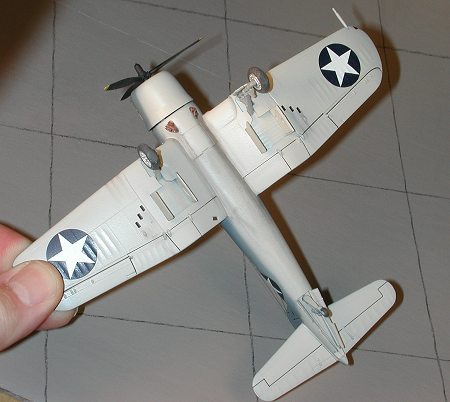
The canopy was masked and glued in place and the cowling was pressed into place. Damp tissue was used to cover the engine, and it was off to have some paint applied.
|
PAINT & DECALS |
 The underside of this plane is light gull grey. I had a bottle
of Aeromaster paints that I mixed up and then sprayed not only the underside,
but also both sides of the gear doors. At this time, the landing gear was
painted dark gull grey. I must have applied too much thinner when I mixed the
light gull grey paint as, despite being matte, it took a very long time to dry.
After the underside was masked, it was time for the upper color. This is
supposed to be FS 36189, a blue-grey. Looking around my large collection of
paints, I couldn't find any of that shade. Not wanting to add yet another bottle
to the mess, I started looking around for a substitute. It was found in the form
of French blue-grey from the now sadly defunct Aeromaster line. It is a bit
lighter than what is needed, but that isn't really so noticeable.
The underside of this plane is light gull grey. I had a bottle
of Aeromaster paints that I mixed up and then sprayed not only the underside,
but also both sides of the gear doors. At this time, the landing gear was
painted dark gull grey. I must have applied too much thinner when I mixed the
light gull grey paint as, despite being matte, it took a very long time to dry.
After the underside was masked, it was time for the upper color. This is
supposed to be FS 36189, a blue-grey. Looking around my large collection of
paints, I couldn't find any of that shade. Not wanting to add yet another bottle
to the mess, I started looking around for a substitute. It was found in the form
of French blue-grey from the now sadly defunct Aeromaster line. It is a bit
lighter than what is needed, but that isn't really so noticeable.
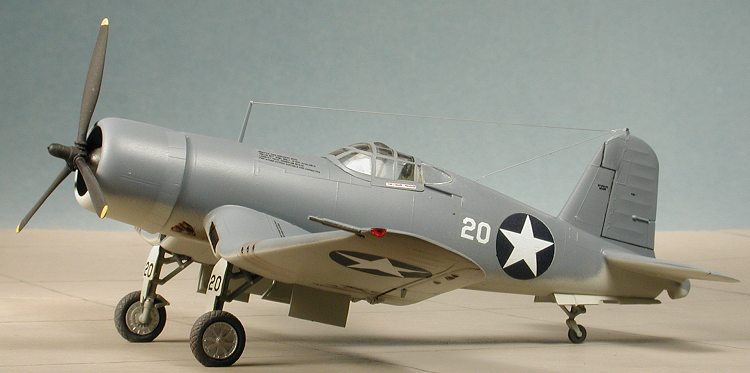
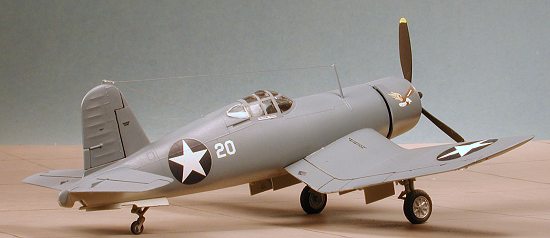
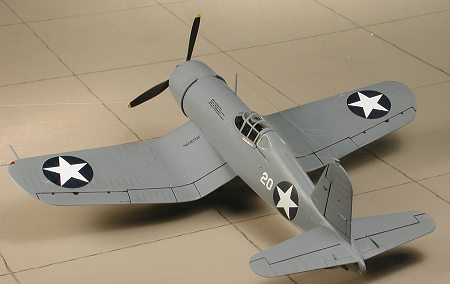
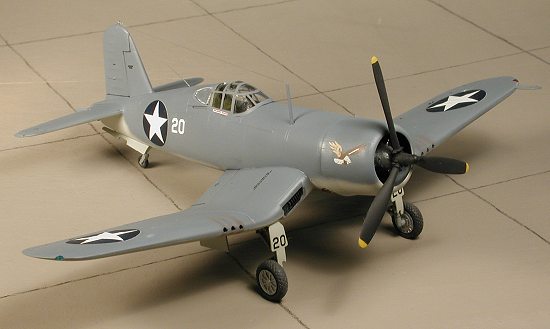
Once the main colors were applied, it was time to have the landing gear glued on . The gear were painted in dark gull grey in accordance with some correspondence I had with fellow enthusiasts via the 'net. The tail hook was cut off as they were not used by shore-based Marine squadrons. Now on some legs, the plane was taken back to the paint shop to have the gloss clear coat applied.
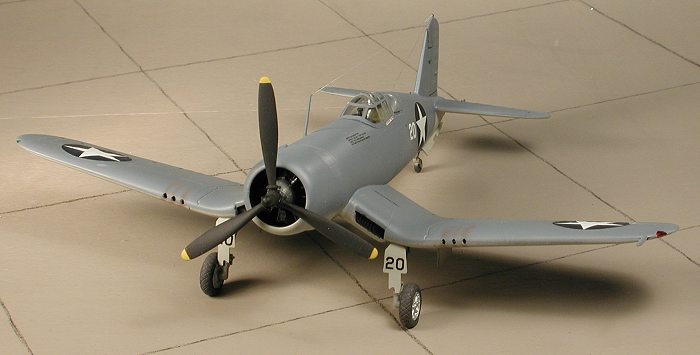
I
used Superscale 72-738 for VMF-213 Corsairs
based on Guadalcanal in 1943. These were some of the first Corsairs in combat.
It offers four very similar aircraft. I was going to use #10 because of the kill
markings, but found that these were not supplied on the sheet! So I used the
decals for aircraft #20 with a nice eagle on the cowling. The decals went on
well. One small glitch was that the white backing for the insignia was a bit off
register. It doesn't show on the decal sheet but does when they are put on the
plane's blue camouflage. Once the decals were put on, the kit was sprayed with a
clear flat and returned to the workbench to have some other bits added on.
|
CONSTRUCTION CONTINUES |
 Final construction consisted of putting on the landing gear
doors and installing the smaller clear quarter windows. I had a bit of trouble
with one of the tail wheel doors. This kit is molded in blue and it seems that
the blue plastic is much more brittle than the regular grey plastic. I managed
to snap an aft gear door and also snap off a prop blade, both while sanding
them, so be careful about this if you are doing a kit molded in blue.
Final construction consisted of putting on the landing gear
doors and installing the smaller clear quarter windows. I had a bit of trouble
with one of the tail wheel doors. This kit is molded in blue and it seems that
the blue plastic is much more brittle than the regular grey plastic. I managed
to snap an aft gear door and also snap off a prop blade, both while sanding
them, so be careful about this if you are doing a kit molded in blue.
Once the gear doors were on, some additional painting was done on the exhaust as well as some touch up on parts that had been missed or scuffed during construction. The radiator inlets were painted flat black. I used a set of True Details resin wheels to replace the kit ones. The kit wheels had very large ejector pin marks on the tires and wheel rims, so fixing them would have been an exercise in frustration. Much easier to spend a couple of bucks on resin ones. The excessive bulge was sanded down once the wheels were cut from the block. The wheels themselves were painted aluminum, again resulting from conversations on the 'net. The tires were painted RLM 66 dark grey and glued on the struts using superglue. The attachment points on the struts had to be sanded down a touch to get a good fit. I recommend using a slow curing superglue for these so you can get them properly positioned.
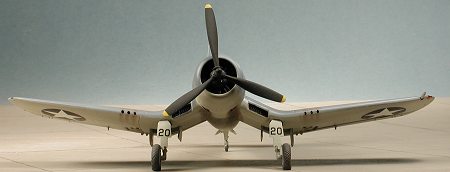 The prop was painted flat
black with yellow tips and press fit onto the prop shaft. Then the masking was
removed from the canopy and wing position lights. The last construction step was
to make a radio antenna. This was done using stretched clear sprue. If you get
it thin enough it is nearly invisible and looks a lot more realistic. If you
look at photos of the real planes, often you cannot see the antenna. The flight
controls were accentuated using a Rapidograph drafting pen and some pastels were
used for exhaust. The plane itself should probably be pretty grungy and beat up,
but I prefer to have mine pretty clean.
The prop was painted flat
black with yellow tips and press fit onto the prop shaft. Then the masking was
removed from the canopy and wing position lights. The last construction step was
to make a radio antenna. This was done using stretched clear sprue. If you get
it thin enough it is nearly invisible and looks a lot more realistic. If you
look at photos of the real planes, often you cannot see the antenna. The flight
controls were accentuated using a Rapidograph drafting pen and some pastels were
used for exhaust. The plane itself should probably be pretty grungy and beat up,
but I prefer to have mine pretty clean.
|
CONCLUSIONS |
This is a neat kit that really deserves to be built. The addition of the inexpensive True Details interior and wheels improves the kit substantially; and you still haven't spent $10! Were I to do another (and I probably will), I'd add a vacuformed canopy so you can see that neat interior. If you are a near beginner or someone who has built hundreds of models, you'll like this trouble-free kit.
Review kit courtesy of me and my wallet!
May 2001
Copyright ModelingMadness.com. All rights reserved. No reproduction in part or in whole without express permission from the editor.
If you would like your product reviewed fairly and fairly, pleasecontact the editor or see other details in the Note to Contributors.