Tamiya 1/72 Mosquito B.XX
| KIT #: | 60753 |
| PRICE: | $26.00 SRP when new |
| DECALS: | Three Options |
| REVIEWER: | Scott Van Aken |
| NOTES: |
| HISTORY |
Name four exceptional British WWII aircraft and one of those will be the Mosquito. Developed to make the most of non-strategic resources, the airframe is mostly made of wood. Thanks to the high level of construction and the smoothness of the wood, the Mossie proved to be an exceptionally fast aircraft. So much so that it was decided not to fit it with any defensive armament. It soon went on to prove itself capable of excelling in any role that it was given, and those roles were many. It was a day fighter, night fighter, ground attack , reconnaissance, bomber, target tug, high speed airliner, and was also developed for aircraft carrier usage.
 Despite its wooden construction, it was widely exported after
the war to many countries around the world. Even today, there are several
airframes still flying in the hands of warbird owners.
Despite its wooden construction, it was widely exported after
the war to many countries around the world. Even today, there are several
airframes still flying in the hands of warbird owners.
The Mosquito B.XX was simply a Canadian built B.IV with Packard Merlin engines and a few other upgrades.
Guy Gibson after the Dam Busters raid:
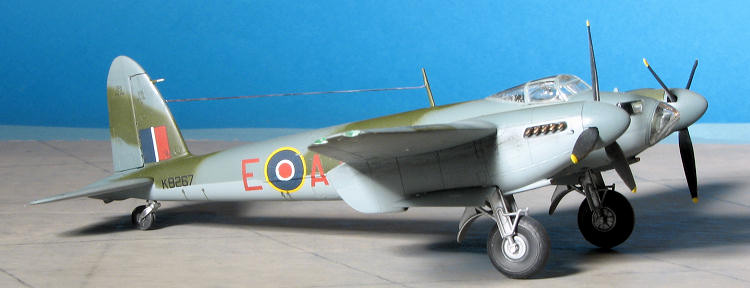
Gibson returned to operational duties in 1944 after pestering Bomber Command. After attending Staff College, he was first posted to understudy the Base Air Staff Office (BASO) at 55 Base, RAF East Kirkby before taking up his posting as BASO at 54 Base, RAF Coningsby. On 19 September 1944 he appointed himself as a Master Bomber on that night's raid on Rheydt (nowadays a borough of Mönchengladbach). He did not have a regular navigator and Sqn Ldr Jim Warwick DFC flew with him as his navigator on this raid. They flew from RAF Woodhall Spa, a satellite airfield of RAF Coningsby, in a de Havilland Mosquito XX, KB267, of 627 Squadron. Gibson helped to control the raid, but on their return, they crashed near Steenbergen, the Netherlands. He was 26 years old. On the morning of Gibson's fatal crash, he had been allocated a plane with the serial numbers ending in `13`. He was unhappy believing it to be unlucky, so he commandeered another Squadron aircraft. The aircraft's normal Navigator was Brian Harris.
| THE KIT |
This is the second Mosquito variant boxed by
Tamiya in this scale. The others are the FB.VI and later
NF.XIII/XVII. All share most sprues, varying only in the nose section and
some other small bits . This is a great series allowing many of the earlier
Merlin powered variants to be built.
Instructions are typically Tamiya and superb.
They also continue the trend of offering only Tamiya paints in the color
reference. Fortunately, Tamiya makes all the RAF colors so no paint mixing and
guessing are required for this kit (well, sorta as they suggest using USN
Intermediate Blue in place of the PRU blue really used on the PR Mossie). Decals
are offered for three planes. The first is a B.IV of 105 squadron in Ocean Grey
and Dark Green over Medium Sea Grey. Next is another B.IV from 109 Squadron in
the same upper colors, but with a black underside. Finally, a PR.IV from 540
squadron in overall PRU Blue. Though a trifle thick, the decals are well printed
and have all the required stencils. This particular kit does the bomber
and photo recon versions, the B.IV and PR.IV. The biggest change from the Mk VI
is the bomber nose and a new set of bomb bay doors with camera holes in it. The
lower right hand sprue and clear bits are all that are different from the
earlier variant. Tamiya provides two different props, shrouds for the exhaust
and different wheel inserts for the different versions. For this kit there are
underwing rocket and bombs that are not used. The same can be said for the
underwing long-range tanks that are not used on this kit, but were used on other
versions of the Mosquito. To my knowledge, these underwing tanks are not even
offered as options with the Hasegawa kit.
This particular kit does the bomber
and photo recon versions, the B.IV and PR.IV. The biggest change from the Mk VI
is the bomber nose and a new set of bomb bay doors with camera holes in it. The
lower right hand sprue and clear bits are all that are different from the
earlier variant. Tamiya provides two different props, shrouds for the exhaust
and different wheel inserts for the different versions. For this kit there are
underwing rocket and bombs that are not used. The same can be said for the
underwing long-range tanks that are not used on this kit, but were used on other
versions of the Mosquito. To my knowledge, these underwing tanks are not even
offered as options with the Hasegawa kit.
| CONSTRUCTION |
I started building this one about the same time that I started on the FB.VI kit. That kit was getting some resin bits, so construction was considerably slowed while adding the modifications needed. This one got underway about a week or so after the other one and doing so allowed me to prepare for whatever construction issues the other one had.
 As this one was not going to be modified in any way, it was a pretty standard
build. Tamiya kits are great, but at least in my hands, need filler. I have
often wondered about these folks who blithely state "I did not use any filler in
building this kit.". I mark them down as either deluding themselves or being
clever photographers and providing images that do not show the unfilled seams.
As this one was not going to be modified in any way, it was a pretty standard
build. Tamiya kits are great, but at least in my hands, need filler. I have
often wondered about these folks who blithely state "I did not use any filler in
building this kit.". I mark them down as either deluding themselves or being
clever photographers and providing images that do not show the unfilled seams.
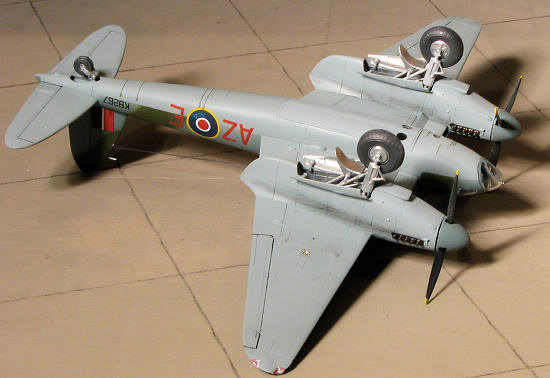
Oddly, this is one kit that does not start with the cockpit. Instead, it wants you to build up the engine nacelles first, followed by the wings, landing gear and stores. It is only after half way that it gets into the nose section and finally, the fuselage and attachment of all the various bits.
So I started with the nacelles and once those were together, I moved to the wings, later gluing the nacelles in place and trying to get as good a fit as possible at the rear. The rear wing to rear nacelle fit is probably the worst on the kit and will need filler. The B.IV also seems to have had two wing tip formation lights, unlike the FB.VI that had but one. Separate tips are provided to take care of this. These are keyed so you cannot install them on the wrong wing. While on the subject of wings, one has to install the landing lights prior to cementing the wings together. I have never been fond of this method as it makes masking the lights difficult. On this kit, I left the lights out as my intention is to replace them with MV Productions lenses at the end of painting.
 With the wings done, I returned to the nose, gluing that
together and installing the lower door with window. Now Tamiya wants you to
build up the interior then glue the nose halves to each fuselage half and join
it like a standard kit. You can do that. However, I do not. I built the nose,
taking care of the seams along the way and building the interior while the nose
was being dealt with. This time, I had the radio so did not have to dig for a
substitute as I did on the FB.VI. I do wish that Tamiya would have designed this
so that all the clear bits installed from the outside as masking these small,
circular windows is a bit of a pain. But they did not and we have to deal with
it.
With the wings done, I returned to the nose, gluing that
together and installing the lower door with window. Now Tamiya wants you to
build up the interior then glue the nose halves to each fuselage half and join
it like a standard kit. You can do that. However, I do not. I built the nose,
taking care of the seams along the way and building the interior while the nose
was being dealt with. This time, I had the radio so did not have to dig for a
substitute as I did on the FB.VI. I do wish that Tamiya would have designed this
so that all the clear bits installed from the outside as masking these small,
circular windows is a bit of a pain. But they did not and we have to deal with
it.
I then glued the fuselage halves together, trapping the interior in between them. Having built up the nose first, installing the interior takes a bit of grunt to get in place. Even more fussing is needed to get the little 'ears' on the interior to snap over the pegs on the fuselage. But once that is done, it is a pretty tight fit. Next, I glued on the tail planes, followed by the wings. On this one the wings were a better fit, for some reason. The canopy was then masked. Unlike the FB.VI, there are no interior decals for the canopy, which is really just as well. Not all the frames you see from the outside are on the outside so one needs a bit of care when masking. The side bubbles are very difficult to mask around. The canopy was glued in place and the various openings were stuffed with tissue in preparation for painting.
| COLORS & MARKINGS |
 Pretty standard stuff for this one. Medium sea grey on the
underside with ocean grey and dark green on the upper. I first painted the
underside then masked heavily before painting on the ocean grey for the upper
surface. Then I hand sprayed the dark green. I often am torn between hand
spraying and masking WWII British camouflage in this scale. Sometimes I do it
and sometimes I do not. Once the colors were on, it was back to the bench for
landing gear.
Pretty standard stuff for this one. Medium sea grey on the
underside with ocean grey and dark green on the upper. I first painted the
underside then masked heavily before painting on the ocean grey for the upper
surface. Then I hand sprayed the dark green. I often am torn between hand
spraying and masking WWII British camouflage in this scale. Sometimes I do it
and sometimes I do not. Once the colors were on, it was back to the bench for
landing gear.
| FINAL BITS |
The landing gear is quite fiddly. It is almost one of those
deals where one wishes for three hands (and small ones at that). The main thing
to remember is that the additional strut and the hub insert go on the inside.
Once together, this all fits quite nicely into the wheel well and is a pretty
positive seat. However, getting it in place takes a bit of fiddling as one
cannot see the slots once the
 gear is inserted. I should also mention that the
small cross bracing is very fragile and easily broken during removal from the
sprue. There is no real alternative other than repairing the break the best one
can.
gear is inserted. I should also mention that the
small cross bracing is very fragile and easily broken during removal from the
sprue. There is no real alternative other than repairing the break the best one
can.
With the gear in place, it was time for some touchup spraying and then the clear coat in anticipation of the markings. As you may surmise from the historical background, this kit is being marked as the Mosquito B.XX in which Guy Gibson died in 1944.
For this, I used ADS decals Mosquito part 1, a 1999 sheet. I had used this sheet to do my B.XVI several years ago and so wanted to do another scheme from it. I was not sure how well the sheet had survived these last 12 years, so started with a fin flash. It promptly fell to pieces. The entire sheet was then sprayed with several coats of Testors Metallizer Sealer, a material with which I have had much success over the years. Unfortunately, it was not enough and I had to go back and apply even more. That did the trick. The ADS sheet only supplies insignia and unique markings so all the rest came from the kit sheet. When the last decals were applied, a coat of clear matte was applied to seal in the markings.
After that was done, it was time to add the rest of the parts. The exhaust were glued in place and while not as positive as I would have liked, it was adequate. One has to take care to have them at the same level. Gear doors were next and thankfully, Tamiya has made those very easy to install. There is a gizmo that fits into the nose and once the tissue was removed this part was glued in place. I have to assume it is a bomb sight or something like that.
 Next were the little upper forward windows. The left side fit
fairly well, but the right gave me fits. It was not helped when the part went
'zing' into the air. I heard nothing to help in figuring out where it went and
after considerable searching, gave up. To replace the window, I took some
Vallejo gloss clear, let it thicken up a tad on a toothpick, then swiped it over
the opening until a window was formed. Yeah, it is not properly curved, but at
least it is there. Some attention with matte clear got rid of the pesky gloss.
Next were the little upper forward windows. The left side fit
fairly well, but the right gave me fits. It was not helped when the part went
'zing' into the air. I heard nothing to help in figuring out where it went and
after considerable searching, gave up. To replace the window, I took some
Vallejo gloss clear, let it thicken up a tad on a toothpick, then swiped it over
the opening until a window was formed. Yeah, it is not properly curved, but at
least it is there. Some attention with matte clear got rid of the pesky gloss.
The bomb bay was installed as were the wing tip clear lenses. I attached these with clear gloss paint after painting the back area in red or blue. Using EZ-Line, I attached a radio antenna. One of these days I will figure a way to get this to look neat. The masking on the nose transparency and cockpit transparency were removed, any overspray cleaned up and the nose piece glued in place.
One the underside of the wings, I measured the size of the openings for the landing lights. I came up with 2.4mm. MV Productions lenses #LS29 are 2.6mm and fit superbly. I installed them using clear paint. When dry, I did a bit of pastel work using Tamiya Weathering Kit B that includes rust and soot for the exhaust. The props were pushed in place and I was done.
| CONCLUSIONS |
| REFERENCE |
http://en.wikipedia.org/wiki/Guy_Gibson
Squadron/Signal #1127: Mosquito in Action Part 1, Jerry Scutts, 1992
December 2011
Copyright ModelingMadness.com. All rights reserved. No reproduction in part or in whole without express permission from the editor.
If you would like your product reviewed fairly and
fairly quickly , please
contact
the editor or see other details in the
Note to
Contributors.