
Matchbox 1/72 Mosquito B.XVI
| KIT #: | PK-116 |
| PRICE: | I paid $6.00 for it from a store, but you can do better |
| DECALS: | Two options |
| REVIEWER: | Scott Van Aken |
| NOTES: |
| HISTORY |
During WWII, there were very few successful aircraft built from non-strategic materials. One that stands out is the De Havilland Mosquito. With the airframe of wood, it not only allowed aluminum to be used for other aircraft, but also was exceptionally fast. One wonders how much quicker it would have been if made from lighter materials.
Thanks to this speed, the success of the bonding agent for the wood, and the very clean design, the Mosquito went on to be a 'jack of all trades', operating as a fighter, bomber, recce aircraft and night fighter. Later war aircraft were equipped with two stage Merlin engines, allowing greater speed and carrying capabilities. Few survived the war, as much due to the wood construction as anything. These planes were not meant to last more than a few years and it is thanks to the unyielding efforts of enthusiasts that a few are still flying.
 Now the aircraft I want to build from this kit is the
B. XVI. I chose this for several reasons, two of them being that I had the bits
to do the mod from the kit and I have a great set of
ADS decals that includes several
options. One has to have a kit with the later Merlin 72 engines. I think that
pretty well limits one to the British kits by Airfix and Matchbox as I don't
think the Tamiya or Hasegawa kits have these later engines in any of their
boxings.
Now the aircraft I want to build from this kit is the
B. XVI. I chose this for several reasons, two of them being that I had the bits
to do the mod from the kit and I have a great set of
ADS decals that includes several
options. One has to have a kit with the later Merlin 72 engines. I think that
pretty well limits one to the British kits by Airfix and Matchbox as I don't
think the Tamiya or Hasegawa kits have these later engines in any of their
boxings.
The B. XVI was a pressurized development of the B.IX and allowed the aircraft to fly at 35,000 feet or even higher. The aircraft was the peak of wartime Mosquito development with all the updated electronics used in the latter half of the war.
The prototype was a converted B.IV and flew in July 1943 with the first planes entering squadron service in December with 109 Squadron. The initial dozen planes were very much like the B.IX, however after that the planes were given a bulged bomb bay door. This allowed the rest of the 400 plus aircraft production to carry the large 4,000 lb 'Cookie' bomb or six 500 lb bombs on a special rack.
Many of these planes were used for target marking so
had both Gee-H and H2S radar which was usually carried behind the glass nose.
Some had these in a ventral radome, but it was very few as it affected speed. It
also carried various electronic systems such as Album Leaf, Boozer, Fishpond and
Monica, depending on the mission.
The B.XVI was the most important wartime Mossie bomber version, serving with eight squadrons in the Lightning Night Strike force. It served with 139, 105, 109, 692, 128, 571 and 608 Squadrons. None of these units are, to my knowledge, still extant within the modern RAF.
Some planes were used by the Royal Navy on meterological flights and others were produced as photo recon planes as the PR.XVI. These had additional blisters on the top and/or rear of the canopy and included cameras in a flush bomb bay. A number were used by the USAAF during February 1944.
| THE KIT |
You
have to love Matchbox kits. They were originally designed for kid's pocket
money, but many older model builders have fallen under their charms as
well. Two things set these kits apart from others. One is the use of
multi-colored plastic sprues.  Undoubtedly this is so that the kiddies don't
have to paint them, but probably just to add to the kid-appeal of the kits.
The other is that most Matchbox kits I've built, have fit very well. Well,
let me broaden that a bit. For a kid, they fit well. The joins are a bit on
the large side and the older modeler will break out the filler for these
and perhaps for the panel lines as well. These are engraved, but rather
large in comparison to today's kits. Besides, the Mossie was a wooden airframe
and had little in the way of panel lines anyway.
Undoubtedly this is so that the kiddies don't
have to paint them, but probably just to add to the kid-appeal of the kits.
The other is that most Matchbox kits I've built, have fit very well. Well,
let me broaden that a bit. For a kid, they fit well. The joins are a bit on
the large side and the older modeler will break out the filler for these
and perhaps for the panel lines as well. These are engraved, but rather
large in comparison to today's kits. Besides, the Mossie was a wooden airframe
and had little in the way of panel lines anyway.
Overall detail is not bad, but not very extensive. You won't find such amenities as a fully detailed cockpit or boxed in wheel wells. This is a 1970's kit, you know. In fact, the cockpit really consists of nothing more than a seat shape, control column and some figures to stick in the seats. An aftermarket etched set is mandatory for those wanting any detail level at all in the front office. Transparencies are rather thick, so perhaps any work done on the cockpit will be wasted without a replacement vac canopy.
The kit can be built as either a bomber variant or a
late war night fighter with the centimetric radar. To accommodate those
differences, there are two separate noses and since the bomber and fighter
versions had different canopies, those are also provided. Another option is the
addition of wing fuel tanks or pylons with bombs. Naturally, the night fighter
will have the fuel tanks.
Instructions are very much as we all remember with 12 nicely done construction drawings and all painting information at the very end. Color reference are the old Humbrol line so it is good that generic color names are also provided. Markings are for a B.IX from 105 Sq in mid 1943 with green/grey uppers and black undersides. The night fighter is from 85 Sq in late 1944 in overall grey with green upper camo sections. The color painting guide is on the back of the box. I also found the box art to be a bit amusing as I doubt if any night fighters would be dropping bombs during a daylight raid! Nor would they have unshrouded exhaust.
| CONSTRUCTION |
 Step one was to assemble the complex interior.
The highly accurate seats and control column were glued in place and the whole
thing was painted RAF interior green along with a number of other components.
The interior was glued into the cockpit and the tail wheel trapped between the
fuselage halves while they were glued together. Trapped but not cemented as I
wanted to do all I could from breaking the tail wheel during assembly. I
installed the forward windows into the bomber nose (fit is what you'd call
'casual') and glued the nose halves together. While the glue on this was still
not totally set, I glued the nose to the fuselage halves, using the canopy to be
sure of proper alignment. Don't want any nasty surprise gaps!
Step one was to assemble the complex interior.
The highly accurate seats and control column were glued in place and the whole
thing was painted RAF interior green along with a number of other components.
The interior was glued into the cockpit and the tail wheel trapped between the
fuselage halves while they were glued together. Trapped but not cemented as I
wanted to do all I could from breaking the tail wheel during assembly. I
installed the forward windows into the bomber nose (fit is what you'd call
'casual') and glued the nose halves together. While the glue on this was still
not totally set, I glued the nose to the fuselage halves, using the canopy to be
sure of proper alignment. Don't want any nasty surprise gaps!
I also slathered filler on all the seams, especially the rather large one where the fin meets the fuselage. Meanwhile, the lower outer wings were glued in place while I started rummaging around the various boxes to see what I could add onto this thing. Yeah, I should have found a replacement interior, but with the thick transparency, you won't see much anyway. A second application of filler was needed to take care of some gaps. I'm using Tamiya filler on this kit for two reasons. One is that I have it laying about and can't stand to see it go to waste. Secondly, though it seems to be pretty poor on resin, it has several plusses when it comes to plastic. One is that it is the consistency of warm toothpaste. Secondly, it can be slathered on for a good two minutes before it becomes too stiff to use properly. Sort of like a really thick Mr. Surfacer. It is even the same color.
 With
the second filler job sanded smooth, I glued on the inner lower wing sections
and then glued the wings in place. The fit is also casual with a goodly gap all
the way around. This had a filler application done to it when the wings had set.
The tailplanes were the next thing to be glued on.
With
the second filler job sanded smooth, I glued on the inner lower wing sections
and then glued the wings in place. The fit is also casual with a goodly gap all
the way around. This had a filler application done to it when the wings had set.
The tailplanes were the next thing to be glued on.
 Meanwhile, I'd located some aftermarket to use on it,
specifically a Paragon bulged bomb bay (#7235), Paragon external wing tanks (#
7227) (the kit
ones seem skinny and too pointy by comparison), and True Details wheels (the kit
ones are like toys). I also found some Paragon vac canopies, but with the bare
bones interior, felt the kit one would be more appropriate. Most of these bits had been around for years and here was
an excuse to use them!
Meanwhile, I'd located some aftermarket to use on it,
specifically a Paragon bulged bomb bay (#7235), Paragon external wing tanks (#
7227) (the kit
ones seem skinny and too pointy by comparison), and True Details wheels (the kit
ones are like toys). I also found some Paragon vac canopies, but with the bare
bones interior, felt the kit one would be more appropriate. Most of these bits had been around for years and here was
an excuse to use them!
 I
then started prepping the wheels. To do this, the centers need to be drilled out
with a #52 drill bit as that most closely matches the axle stubs. The two gear
halves were then cleaned up and cemented together. Since the plastic cement
won't stick to resin, you can glue the axle halves as well. Kit gear isn't very
detailed, but it is not bad either. Using these wheels really adds detail and
every photo I've seen of the B. XVI had this style of tire.
I
then started prepping the wheels. To do this, the centers need to be drilled out
with a #52 drill bit as that most closely matches the axle stubs. The two gear
halves were then cleaned up and cemented together. Since the plastic cement
won't stick to resin, you can glue the axle halves as well. Kit gear isn't very
detailed, but it is not bad either. Using these wheels really adds detail and
every photo I've seen of the B. XVI had this style of tire.
I then glued the front portion of the engine nacelles. I did this so that I could slide the gear in from the top after I'd cleaned up the seams on the lower part of the forward nacelle. I could also probably paint those parts ahead of time so that I wouldn't have to mask as meticulously. The gear was assembled (including the mud guards) and then painted steel as suggested in the instructions.
Back at the filler situation, I needed to apply more to
the engine nacelles as I located several sink areas along the sides. This kit
has the later Merlin engines that can be distinguished by two nacelle intakes.
One right behind the prop and the other in the 'normal' position. Of course,
Matchbox was never really known for crispness in detail, but they aren't bad. In
order to make things just look nicer, I drilled out the forward intakes, first
using a motor 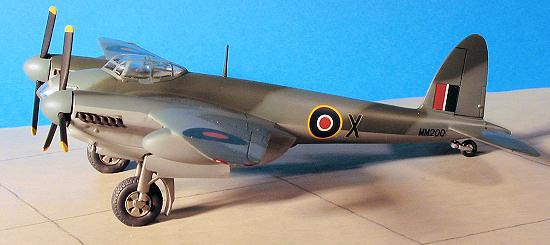 tool to create the groove and then
 a file to get the shape correct. Later, I'll use some liquid cement to smooth
out the rough edges.
a file to get the shape correct. Later, I'll use some liquid cement to smooth
out the rough edges.
I also took this opportunity to attached Paragon bulged bomb bay. It has a large resin pour stub on the front of it that requires quite a bit of cleanup to get right. I wrapped a piece of rough grit sandpaper around the fuselage in order to get the final shape about right. I'm not really sure just how tight a fit this bomb bay was as none of my references are detailed in that area. I couple of applications of Mr. Surfacer 500 was made to fill in most of the gap.
At this time, I decided to paint the underside and the engine nacelles. This would be in Medium Sea Grey and I used the last of my Aeromaster enamels for this task. I know I'll have to respray areas, but I wanted to get the forward section of the nacelles done prior to installing the landing gear and figured I'd do the rest of the airframe, even though I've not put on the wing tanks as of yet.
With the paint dry, I spread apart the aft section of the nacelles and installed the landing gear. Fit is fairly good, but not quite a snug as one would hope. In fact, when I looked down at the gear in its slots, is seemed as if they were about to fall out! However, all was not as it seemed and while things were still a bit pliable, I glued the nacelles onto the underside of the wing. Fit is relaxed as I'd have expected. Oddly, one nacelle fit perfectly while the other left me with some gaps and a step. The seams were filled with filler and set aside to dry for a day.
 I
then sanded down the filler and as I'd thought, there were a few areas that
needed a second application (and perhaps a third). This is especially true of
the rear wing/nacelle join as the gap is large. Should have filled it with super
glue. At this time, I glued on the Paragon wing tanks. Fit is OK, but it is
obvious these were not designed for the Matchbox kit as there is quite a gap at
the front. Either the Matchbox wings are too thin (probably) or the tanks are
designed for a thicker wing leading edge. Still, it is all beginning to look a
lot better as the building goes along.
I
then sanded down the filler and as I'd thought, there were a few areas that
needed a second application (and perhaps a third). This is especially true of
the rear wing/nacelle join as the gap is large. Should have filled it with super
glue. At this time, I glued on the Paragon wing tanks. Fit is OK, but it is
obvious these were not designed for the Matchbox kit as there is quite a gap at
the front. Either the Matchbox wings are too thin (probably) or the tanks are
designed for a thicker wing leading edge. Still, it is all beginning to look a
lot better as the building goes along.
 With
the tanks in place I started masking off the landing gear in preparation for
painting. Same with the small forward windows. During masking, one popped out.
After several attempts at getting in back in place, the muttering was getting
ever louder. The final attempt saw the part go zinging off into the distance. A
search was made with no luck finding the offending part. So I cut off a piece of
clear sprue, stuffed it into the opening and sanded it down. It wasn't a 100%
perfect fit, but was no worse than the part it replaced. It was masked.
With
the tanks in place I started masking off the landing gear in preparation for
painting. Same with the small forward windows. During masking, one popped out.
After several attempts at getting in back in place, the muttering was getting
ever louder. The final attempt saw the part go zinging off into the distance. A
search was made with no luck finding the offending part. So I cut off a piece of
clear sprue, stuffed it into the opening and sanded it down. It wasn't a 100%
perfect fit, but was no worse than the part it replaced. It was masked.
At this time I wanted to be sure that the canopy was correct. It wasn't. The B.XVI had a canopy with no teardrops on the side and no upper astrodome. In fact, the forward side windows were bulged. Fortunately I'd also bought a pack of three canopies when I bought all that other Paragon stuff. These vac canopies aren't bad, but are also not the best. I mean that the framework was somewhat indistinct so masking was not an easy task. I can only hope it looks ok when I take off the tape. White glue was used to attach it and I held the canopy down with a section of tape while it dried and I filled in a few holes along the edges.
| COLORS & MARKINGS |
I resprayed those areas that needed it on the underside
with Medium Sea Grey. All the paints I used were Testors Model Master enamels,
thinned with lacquer thinner to water-like consistency and sprayed at 7-10 PSI.
With the underside done areas were masked off and the upper surface sprayed with
Ocean Grey.  After that dried,
and with the lacquer thinner it was dry enough to handle in about 8 hours, the
upper surface Dark Green was sprayed using my
Skybow AB-100 fine detail airbrush
at about 5-7 PSI to keep it from spattering at the higher pressure. With all the
area to do, I had to fill the tiny cup several times. Once done to my liking, I
let everything dry a day.
After that dried,
and with the lacquer thinner it was dry enough to handle in about 8 hours, the
upper surface Dark Green was sprayed using my
Skybow AB-100 fine detail airbrush
at about 5-7 PSI to keep it from spattering at the higher pressure. With all the
area to do, I had to fill the tiny cup several times. Once done to my liking, I
let everything dry a day.
Next day, the tape was removed and the model given a coat of Future clear acrylic gloss to prepare for the decals. For this scheme I was using a sheet of ADS decals I'd had for several years. The three B.XVIs on the sheet are all from 128 Sq. The first decals I applied were the fuselage roundels that were on a separate sheet. Those are quite thin and succumbed to Solvaset with no problem. I then started to put on the codes. These disintegrated as soon as I started to slide them off the sheet. I went to the next set of codes and applied some Microscale decal film to them. When dry, I cut those and started to apply them. They also broke apart, but into bigger chunks! Fortunately there were three options for this aircraft type and after two coats of decal film on the markings for the third option, I had no further trouble. An application of Vallejo clear matte sealed all in place.
| FINAL CONSTRUCTION |
Still some stuff to put on the model. First were the
exhaust, which I painted Burnt Iron. I then cut the rounded exhaust ends flat in
preparation for drilling them out. In the end I didn't bother as the exhaust on
these are half rounds. The tail wheel was glued down
 and that area had the paint
touched up. I then glued on the main gear doors. I don't know if the shape is
accurate or not, but that's what came with the kit. I also attached the radio
mast. The props had been painted black with yellow tips. The decal instructions
led me to believe that the spinners were Dark Green. However, all the photos I
saw of these late Mosquitos indicated that either Black or Ocean Grey would be
the shade to use, so I chose the Ocean Grey.
and that area had the paint
touched up. I then glued on the main gear doors. I don't know if the shape is
accurate or not, but that's what came with the kit. I also attached the radio
mast. The props had been painted black with yellow tips. The decal instructions
led me to believe that the spinners were Dark Green. However, all the photos I
saw of these late Mosquitos indicated that either Black or Ocean Grey would be
the shade to use, so I chose the Ocean Grey.
Before the props were installed, I glued on the exhaust and did the usual pastels for exhaust stains. I also had to do something about the carb intake pieces. These are just black ovals and I wanted to make them look better. I had some fine screen so glued these pieces to the screen and when dry, cut around them. Looks a bit better, but not as nice as a dedicated piece of photo-etch. Those were glued on and then the props. Another coat of clear matte to seal in the pastels and then the masking was removed. I painted the formation lights (I know they are supposed to be clear). Last addition was the clear nose piece and that was it.
| CONCLUSIONS |
 OK,
so it's not cutting edge. However, it was fun to do and that is what really
counts. Many of us have these older kits and possibly a bunch of 'fix it' stuff
to go along with them. Sure, I could have done a Tamiya kit and done the mods
with that, but to me, that sort of defeats the fun part. Many of us have these
kits in our stashes and I think that some of them deserve to be finished.
Nothing in this conversion is hard. The bits are out there and it would make for
an excellent introduction into using resin.
OK,
so it's not cutting edge. However, it was fun to do and that is what really
counts. Many of us have these older kits and possibly a bunch of 'fix it' stuff
to go along with them. Sure, I could have done a Tamiya kit and done the mods
with that, but to me, that sort of defeats the fun part. Many of us have these
kits in our stashes and I think that some of them deserve to be finished.
Nothing in this conversion is hard. The bits are out there and it would make for
an excellent introduction into using resin.
| REFERENCES |
Wikipedia
Mosquito in Action, part 1, by Jerry Scutts, 1992
October 2006 Copyright ModelingMadness.com. All
rights Reserved. No reproduction in part or in whole without express permission
from the editor. Thanks to me and what amounts to pocket change nowadays for
buying this kit. If you would like your product reviewed fairly and fairly quickly, please
contact
the editor or see other details in the
Note to
Contributors.
#1437 in a series