Azur 1/48 Arsenal VG-33/39
|
KIT # |
018 |
|
PRICE: |
$ |
|
DECALS: |
See review |
|
REVIEW : |
|
|
NOTES: |
Multimedia short run kit |
|
HISTORY & KIT |
For background and a look at what comes in the box, please go here.
|
CONSTRUCTION |
Normally, in a regular model kit, one starts with the cockpit. However, with a short run kit that has resin bits, the first step is to remove all the parts from the resin blocks. This can be both a tedious and a dangerous job. Dangerous in that it is quite easy to saw into body parts (like fingers). I am now sporting several very fashionable Band-Aids thanks to over-zealous sawing.
 Anyway, this kit
has resin for wheel wells, interior, exhaust and a few other bits. After careful
sawing, the interior parts were all set free from their blocks. The resin is
actually very nicely detailed, much better than what one could get from plastic.
Getting The interior to fit into the fuselage will take some additional work.
The inside portion of the wheel well intrudes into the cockpit area quite a bit,
so you need to make sure that there is room at the front of the floor section to
clear this part. Some coarse grit sandpaper will do quite well in this area.
Anyway, this kit
has resin for wheel wells, interior, exhaust and a few other bits. After careful
sawing, the interior parts were all set free from their blocks. The resin is
actually very nicely detailed, much better than what one could get from plastic.
Getting The interior to fit into the fuselage will take some additional work.
The inside portion of the wheel well intrudes into the cockpit area quite a bit,
so you need to make sure that there is room at the front of the floor section to
clear this part. Some coarse grit sandpaper will do quite well in this area.
Once all the interior bits were cleaned up, the major components (sides and back) were tacked down to check fit. There showed a need for some sanding to gain the proper clearance. There are no indications of exactly where the interior is to fit. This makes fitting it a bit of a challenge. It may be that I'll need to build something up to hold the interior in place. Before that happens, it needs to be painted. The first thing I did was to affix one sidewall to give it some strength. Then the interior was taken to the paint shop and painted a light grey. The instructions are not very helpful with FS numbers, only generic colors. I have a selection of Aeromaster paints and chose Dark Blue to do the interior.
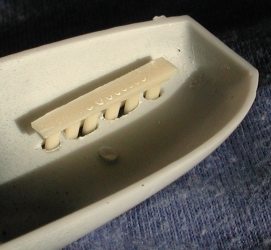
 While that was
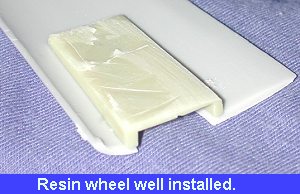
drying, It was time to tackle some of the other resin bits. The wheel wells are
resin and are very well done as are all the resin bits. As with the other resin
bits, there are no guides to help fit them in place. First of all, you need to
remove any ejector pin stubs in the area. Just sand them down flush with the
wing. Then the well openings in the wing need cleaned up. There was quite a bit
of flash on one wing that filled about 10% of the well. That needs to be cleaned
up. Then the insert was tacked in place to see how it would align with the
fuselage. The bad news here is that the well in the fuselage is deeper than the
resin one that goes in the wing. Also the wings are broader than the fuselage
root, but not by more than an 1/8 inch or so. Shouldn't be too tough to
fix.
While that was
drying, It was time to tackle some of the other resin bits. The wheel wells are
resin and are very well done as are all the resin bits. As with the other resin
bits, there are no guides to help fit them in place. First of all, you need to
remove any ejector pin stubs in the area. Just sand them down flush with the
wing. Then the well openings in the wing need cleaned up. There was quite a bit
of flash on one wing that filled about 10% of the well. That needs to be cleaned
up. Then the insert was tacked in place to see how it would align with the
fuselage. The bad news here is that the well in the fuselage is deeper than the
resin one that goes in the wing. Also the wings are broader than the fuselage
root, but not by more than an 1/8 inch or so. Shouldn't be too tough to
fix.
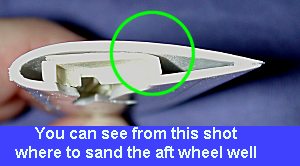 Placing the resin root as well as can be, it is glued in with
superglue. Next, I tried to fit the top of the wing. No go. The insert needs to
be shaved at the rear to allow the upper wing to fit. Take care so that you
don't sand through. The wells are also supposed to be painted light grey.
Placing the resin root as well as can be, it is glued in with
superglue. Next, I tried to fit the top of the wing. No go. The insert needs to
be shaved at the rear to allow the upper wing to fit. Take care so that you
don't sand through. The wells are also supposed to be painted light grey.
 While the wing was
drying, I looked for other trouble spots. Not to tough to find was the exhaust
openings in the side of the nose. These are way too small for the resin exhaust
stubs. They need to be opened up considerably. Taking a small round file, I
worked on these openings until the resin exhaust would fit through them. This
required a lot of test fitting to make sure they would fit OK. Once they were
opened up, the exhausts were glued in place. Looking at photos of the real
aircraft, the exhaust do not jut out very far. If installed as is, the kit
exhaust will stick out a great deal. In order to have them fit properly, you'll
have to be very careful about gluing them in place. The result will be that most
of the exhaust will stick back into the fuselage. The other option is to cut
each set of separate stacks off, put a backing plate behind the cutouts and glue
the stacks in one at a time. For me, this would end up just feeding the carpet
gnomes who steal small resin and photo etched bits. I'll suffer with having them
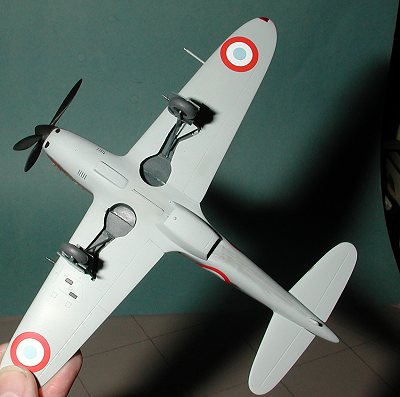
jut into the fuselage! Take a look at the images below to see what I mean
by all this.
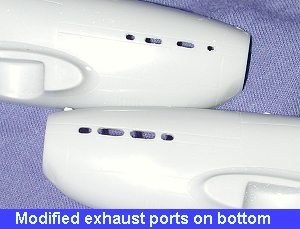
While the wing was
drying, I looked for other trouble spots. Not to tough to find was the exhaust
openings in the side of the nose. These are way too small for the resin exhaust
stubs. They need to be opened up considerably. Taking a small round file, I
worked on these openings until the resin exhaust would fit through them. This
required a lot of test fitting to make sure they would fit OK. Once they were
opened up, the exhausts were glued in place. Looking at photos of the real
aircraft, the exhaust do not jut out very far. If installed as is, the kit
exhaust will stick out a great deal. In order to have them fit properly, you'll
have to be very careful about gluing them in place. The result will be that most
of the exhaust will stick back into the fuselage. The other option is to cut
each set of separate stacks off, put a backing plate behind the cutouts and glue
the stacks in one at a time. For me, this would end up just feeding the carpet
gnomes who steal small resin and photo etched bits. I'll suffer with having them
jut into the fuselage! Take a look at the images below to see what I mean
by all this.
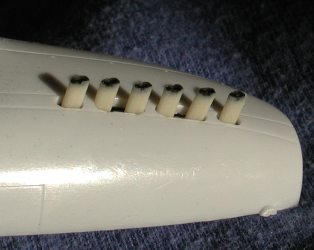 Stacks installed as given |
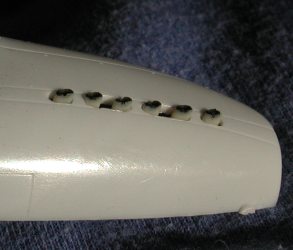 Stacks installed as on real plane |
 Note amount pulled back in. |
It was at this time that I painted the interior parts as well as the struts and wheel wells. According to my reference, there are two colors that are used for French-built aircraft regarding primers. One is a very dark blue grey and the other is a buff color. The instructions call for a blue grey so I used the darker color. This was offered as an Aeromaster acrylic color so that is what I used. The interior then had some of the various boxes and knobs picked out in various colors, and when dry they were drybrushed with RLM O2 grey. I find this gives a nice effect on dark surfaces if you don't want the aircraft to look too worn or used. After all, these were pretty new planes so shouldn't have a lot of bare metal showing.
 Installing the cockpit was a real challenge. There are no guides
or mounting posts. I also came to realize that the cockpit was a bit too wide.
Naturally, this was discovered after I had superglued the cockpit in the
right fuselage half! I brought out the heavy duty sandpaper and proceeded to
sand and test fit, sand and test fit for about a half hour or so until I got a
decent fit. Then the fuselage halves were glued together and clamped to make
sure they didn't slip. Then the seam was attended to with fillers and sanding.
Installing the cockpit was a real challenge. There are no guides
or mounting posts. I also came to realize that the cockpit was a bit too wide.
Naturally, this was discovered after I had superglued the cockpit in the
right fuselage half! I brought out the heavy duty sandpaper and proceeded to
sand and test fit, sand and test fit for about a half hour or so until I got a
decent fit. Then the fuselage halves were glued together and clamped to make
sure they didn't slip. Then the seam was attended to with fillers and sanding.
Next was the installation of the tailplanes. These are butt joins, but I decided to drill holes in each and the root to accept a piece of paper clip. This offers some positive alignment and will help prevent the tailplanes from accidentally being knocked off. The fuselage roots were thicker than the tailplanes so you can either spend a lot of time trying to correct it or live with it.
Installing the wings was next. These were first cleaned up and holes drilled in the leading edges to accept the resin gun barrels. These are also butt joined, but unlike the tailplanes, I felt no need for additional reinforcement. I did have to sand away at the wheel well inserts to make sure they would fit well. Once cleaned up, the joins had liberal applications of liquid cement to make sure there was a good bond. Fit wasn't too bad. When done, you will notice that the fuselage part of the wheel well is much deeper than the wing portion. Again, you'll just have to live with it as fixing it won't be easy.
 Now it was time to install the underfuselage radiator. This
consists of the tub, a resin radiator, and a splitter plate. The resin radiator
fits well. The splitter plate will need a lot of trimming to fit properly. You
will also have to sand or cut away at the top of the radiator in order to get
the tub to fit anywhere near properly in the indentation proffered in the bottom
of the fuselage. Once it was in place, it was solidly glued in. There were a
number of gaps that needed filler to smooth out. Same problems with the oil
cooler intake. Careful sanding and test fitting will give you a decent fit. Then
the tail skid was glued on. Yep, this plane has no tail wheel, but a skid. Guess
most French airfields were not paved!
Now it was time to install the underfuselage radiator. This
consists of the tub, a resin radiator, and a splitter plate. The resin radiator
fits well. The splitter plate will need a lot of trimming to fit properly. You
will also have to sand or cut away at the top of the radiator in order to get
the tub to fit anywhere near properly in the indentation proffered in the bottom
of the fuselage. Once it was in place, it was solidly glued in. There were a
number of gaps that needed filler to smooth out. Same problems with the oil
cooler intake. Careful sanding and test fitting will give you a decent fit. Then
the tail skid was glued on. Yep, this plane has no tail wheel, but a skid. Guess
most French airfields were not paved!
Vacuform canopies. My bane. Fortunately, Azure gives you two of them. I trimmed the canopy around the edges by scribing a number of times with a new Xacto blade and then snapping it free from the carrier. The edges were then trimmed a bit and the canopy test fit. It actually fit quite well. Well enough for me to attach using non-fogging superglue. It was then masked and the kit was pretty well ready for an initial painting.
|
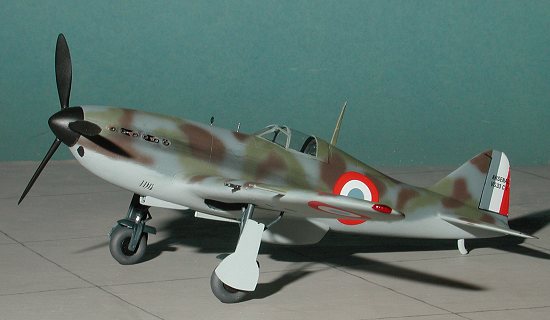
PAINTING |
 When I heard of Aeromaster's demise as a paint maker, I went out
and bought quite a bit of it, including all the French colors. I prefer enamels
so stocked up on those. The entire aircraft was painted overall with the light
blue-grey color. This showed a few areas that needed attention. Those were fixed
and the plane repainted. The next color is a darker blue-grey that goes over the
upper surfaces. Aeromaster calls this dark blue grey, but the kit instructions
say it is medium blue grey. No matter, it is the same color and a distinctly
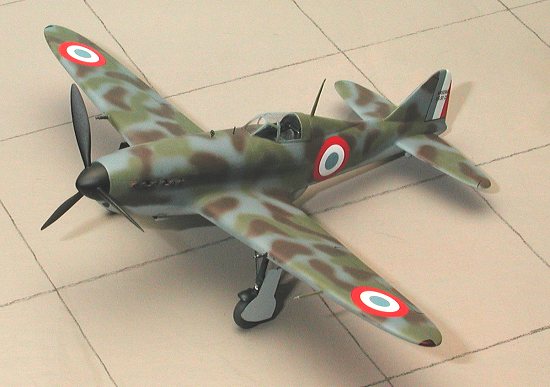
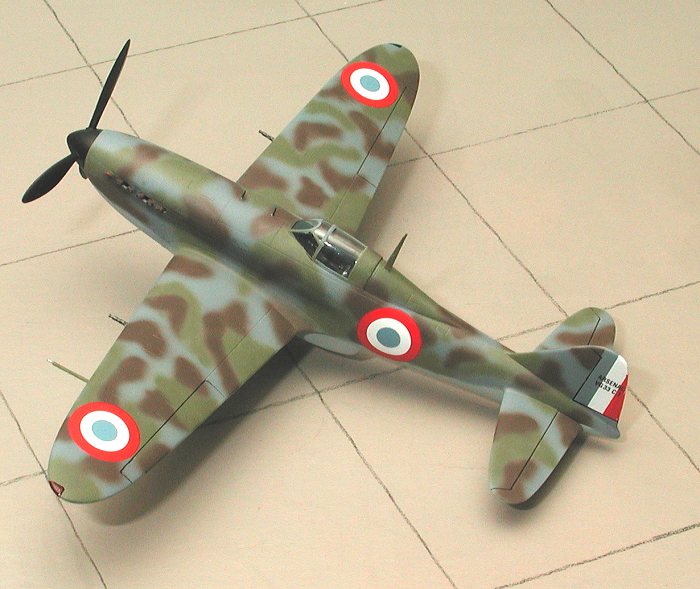
darker shade than the underside. Once that was dry, brown and khaki (actually a
green) were used to paint a random pattern on all upper surfaces. When that was
dry, the upper surfaces were masked off and any overspray on the undersides were
repainted.
When I heard of Aeromaster's demise as a paint maker, I went out
and bought quite a bit of it, including all the French colors. I prefer enamels
so stocked up on those. The entire aircraft was painted overall with the light
blue-grey color. This showed a few areas that needed attention. Those were fixed
and the plane repainted. The next color is a darker blue-grey that goes over the
upper surfaces. Aeromaster calls this dark blue grey, but the kit instructions
say it is medium blue grey. No matter, it is the same color and a distinctly
darker shade than the underside. Once that was dry, brown and khaki (actually a
green) were used to paint a random pattern on all upper surfaces. When that was
dry, the upper surfaces were masked off and any overspray on the undersides were
repainted.
|
CONSTRUCTION CONTINUES |
Then the model was returned to the work room so that I
could install the undercarriage. The landing gear legs were cleaned up, the fore
and aft mud guards glued in place and then the legs were painted very dark blue.
The wheels were painted black with RLM 66 dark grey tires. Installing them on
the struts was a bit of fun. The actual wheels themselves are sunken well below
the width of the tires. In order to get even a semblance of them fitting into
the strut forks, an axle needs to be made. This was fashioned out of stretched
sprue, a hole drilled in the wheel and the axle installed. Then it was glued to
the strut fork. Not the prettiest installation, but a lot better than gluing the
top of the tire to the fork in the gear!
The
next step was to add the gear doors. These had previously been painted light
blue-grey on one side and dark blue on the other. When it came time to put them
on, I noticed that I had painted the wrong sides. The part with the extra gear
door molded on isn't the outside, but the inside. Back to the paint shop they
went. After drying, they were then attached to the gear. The final gear bit were
the two hockey stick shaped struts. The instructions are not clear on where they
attach; it is either the gear itself, or the gear doors. I attached them to the
gear itself. 50/50 chance of being right!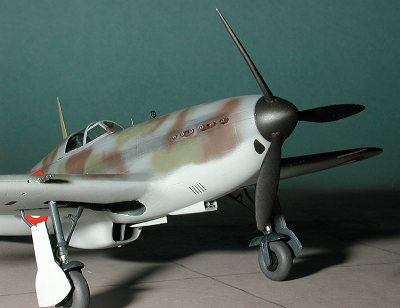 Holes were then
drilled into the gear wells (none are provided) and the gear glued in
place. The small resin oleo struts were then glued in place. When dry, the
main retraction struts were attached. There are two small rectangles that fit on
the side opposite the attachment points for the main retraction struts. These
are to hold the upper part of the gear doors. Fitting these things on was quite
nerve-wracking due to their small size, but a fair fit was finally reached.
Holes were then
drilled into the gear wells (none are provided) and the gear glued in
place. The small resin oleo struts were then glued in place. When dry, the
main retraction struts were attached. There are two small rectangles that fit on
the side opposite the attachment points for the main retraction struts. These
are to hold the upper part of the gear doors. Fitting these things on was quite
nerve-wracking due to their small size, but a fair fit was finally reached.
|
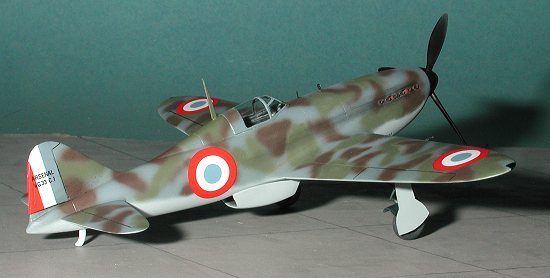
DECALS |
 The decals for this kit are made by Propagteam and are superbly
done. The one problem with them is that the blue used is really too light a
color. According to all the references I have, which include period color
images, shows a lighter color. It is much closer to the upper surface blue-grey
camouflage that Aeromaster has. So, what to do about it. Well, there are several
options. One is to find a set of aftermarket decals for a D.520 and then rob the
roundels from it. Or, If you have the Hobbycraft French Bearcat kit, you can use
the lighter of the two roundel centers. This is what I did. Fortunately, I had
two sets of decals as there are only two centers the right size. Unfortunately,
I only had two sets and needed a third, so the under wing ones are still too
light.
The decals for this kit are made by Propagteam and are superbly
done. The one problem with them is that the blue used is really too light a
color. According to all the references I have, which include period color
images, shows a lighter color. It is much closer to the upper surface blue-grey
camouflage that Aeromaster has. So, what to do about it. Well, there are several
options. One is to find a set of aftermarket decals for a D.520 and then rob the
roundels from it. Or, If you have the Hobbycraft French Bearcat kit, you can use
the lighter of the two roundel centers. This is what I did. Fortunately, I had
two sets of decals as there are only two centers the right size. Unfortunately,
I only had two sets and needed a third, so the under wing ones are still too
light.
This also meant that I had to paint the rudder in that color as the stripes provided also were too light. I used the Aeromaster upper surface blue-grey and it looks pretty good. The rest of the decals went on with no trouble at all. Propagteam decals seem to be getting a touch thicker so that really helps in applying them.
Final steps were to do a bit
of touch-up painting, apply the pastel exhaust stains, and then spray a light
coat of semi-matte over the plane to seal everything. The masking was taken off
the canopy, the prop was glued onto the front and a ring and bead gun sight
was taken from a Reheat Luftwaffe details etched set. A hole was drilled and a
piece of stretched sprue was glued in place for the bead part. Finally the kit was
finished! Ten minutes after taking pictures of it, I bumped the kit and
broke off one prop blades!
|
CONCLUSIONS |
Overall, I found this kit to be no more difficult than the 'standard' short run kit and a lot easier than many of them. I really appreciated the second vac canopy for a backup and wonder why this isn't standard on all MPM lines. Sure, it takes more work than a regular kit, but the subject is one that will only be found in this medium. I can recommend this kit to all intermediate level modelers who are looking for an interesting aircraft to add to the collection.
|
REFERENCES |
Review copy courtesy MPM
January, 2001
Copyright ModelingMadness.com. All rights reserved.
If you would like your product reviewed fairly and fairly quickly, please contact the editor or see other details in the Note to Contributors.
Back to Reviews Page 2017