
Eduard 1/48 Fokker Dr.I
| KIT #: | 8161 |
| PRICE: | $39.95 SRP |
| DECALS: | Six options |
| REVIEWER: | Tom Cleaver |
| NOTES: | Dual Combo kit with two aircraft. |
| HISTORY |
The Triplane is also easily the first “celebutante” airplane, being
mostly famous for being famous. The
airplane was the result of Idflieg - the German Air Force high command -
being bowled over by the performance of the Sopwith Triplane, which had appeared
over the Western Front in March 1917 and proven itself one of the best Allied
fighters during “Bloody April.”
This was not unlike the hoorah in German air Force circles the year before after
the appearance of the Nieuport sesquiplane fighter, which resulted in the
Albatros series losing their excellent biplane design for replacement by the
aerodynamically-weak sesquiplane layout.
 By the summer of 1917, when Idflieg was actively soliciting detailed
project submissions from the German aircraft industry, the “Tripehound” was
already leaving British service, since the tactics of the air war were changing
so that a relatively slow - even if highly-maneuverable - fighter was now
outclassed by contemporary designs like the SPAD series, the S.E.5 or the
Sopwith Camel.
By the summer of 1917, when Idflieg was actively soliciting detailed
project submissions from the German aircraft industry, the “Tripehound” was
already leaving British service, since the tactics of the air war were changing
so that a relatively slow - even if highly-maneuverable - fighter was now
outclassed by contemporary designs like the SPAD series, the S.E.5 or the
Sopwith Camel.
Even so, the war in the air was still such that a lightly-loaded triplane
fighter like the Sopwith could have been a solid performer as late as the fall
of 1917.
Unfortunately for the Dr.I, the airplanes were all grounded at that time
due to Fokker’s notoriously shoddy quality control in the factory.
By the time the Fokker Triplane was finally cleared for unlimited service
in January 1918, the day of such a dogfighter was past.
The Triplane could outmaneuver its enemies, but it could neither catch
them nor outrun them, the new tactic for fighters, nor could it fly well at the
altitudes where air combat was now taking place.
The Triplane is primarily famous for being flown by famous German pilots.
During the first six months of 1918, it was nearly the only German
fighter not completely outclassed by their opponents, which is not much of a
recommendation. This is why so much effort was expended on the First Fighter
Competition and in getting the Fokker D.
Interestingly enough, aeronautical experts have now shown that the Dr.I
was an inferior triplane design to the Sopwith.
Unlike the British fighter, which had small ailerons on each wing, the
Dr.I had large ailerons on the upper wing only.
Thus, aerodynamically, the Sopwith’s wings were all working together
while the Dr.I was dragging two wings that wanted to fly straight and level
while fighting increased adverse aileron yaw from the larger ailerons.
 Nevertheless, despite its failings, the fact is that the Dr.I is the most
famous airplane of the First World War.
It is an interesting, distinctive-looking airplane, and all those famous
pilots made sure each flew one that looked different from everyone else, so
there is a plethora of marking possibilities.
Nevertheless, despite its failings, the fact is that the Dr.I is the most
famous airplane of the First World War.
It is an interesting, distinctive-looking airplane, and all those famous
pilots made sure each flew one that looked different from everyone else, so
there is a plethora of marking possibilities.
Following the success of JagdGeschwader 1, formed from Jastas
4, 6, 10, and 11 in June 1917 under the command of Manfred von Richtofen, two
additional JagdGeschwadern - II and
| THE KIT |
The Fokker Triplane was an early candidate for production as plastic
models began, and was - if I remember correctly - the first or second release by
 enough to
command collector’s prices that keep it from being built that often.
enough to
command collector’s prices that keep it from being built that often.
The new Eduard kit is truly state of the art.
Eduard has decided to do kits of airplanes that have previously been
released by other manufacturers, but to produce something that is “definitive.”
This kit meets that standard.
All plastic detail parts are extremely petite.
The airframe itself is nicely done with a realistic fabric
representation. Trailing edges of
wings are nice and sharp. The
cockpit is well-detailed and those plastic parts are set off by great photoetch
parts. The kit includes the correct
horizontal stabilizer and early-production ailerons to allow a modeler to do the
F.1 production prototypes.
Decals are provided for no less than six different famous airplanes, most
of which have never been done before by anyone (other than the famous “Kempf”
triplane) with a separate sheet of stencils.
Aftermarket Decals:
One of the great stumbling blocks to successful Fokker Triplane modeling
for many modelers has been to get an acceptable “streaky” camouflage; even for
people who have done this scheme many times, it’s always something of a
hit-and-miss affair, and I have yet to run across any WW1 modeler who has been
completely satisfied with their re-creation of this scheme.
This past spring, two aftermarket decal suppliers - Gunsight Graphics and
Microsculpt Decals both came out with decal sheets that allow a modeler to
create the streaky camo w ithout
having to paint it. The two sheets
are very different in look as well as underlying philosophy.
ithout
having to paint it. The two sheets
are very different in look as well as underlying philosophy.
The Gunsight Graphics sheet provides two large strips of decal, with the
modeler required to bring to the project knowledge of the differing “streak
angles” associated with the wings, ailerons, fuselage top and sides, horizontal
stabilizer and elevators - all of which were painted at different angles prior
to final assembly. This method of
printing allows a modeler to end up creating as many as three and possibly four
triplanes, depending on how much streaky camo is applied to each.
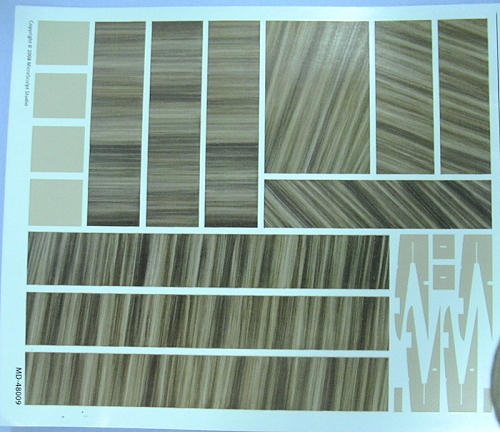
The Microsculpt Decal sheet
 differs
by providing sheets of decal for each different sub-assembly; with the streaks
printed at the appropriate angle for each part. This considerably eases things
for someone who is new to the Triplane.
Again, depending on how much of the model has streaky camo applied, one
could do as many as three different airplanes with this sheet.
differs
by providing sheets of decal for each different sub-assembly; with the streaks
printed at the appropriate angle for each part. This considerably eases things
for someone who is new to the Triplane.
Again, depending on how much of the model has streaky camo applied, one
could do as many as three different airplanes with this sheet.
Artistically, the two sheets differ in that the Gunsight Graphics sheet
is more dense in terms of color, while the Microsculpt sheet is less dense.
As to which is more accurate, there is photographic evidence to support
both. As regards the color on a
model, “scale effect” does work to the advantage of the Microsculpt sheet if one
is doing a model with the majority of the surfaces in this pattern.
There is additional good news that Microsculpt Decals is going to release
this sheet in 1/72 and 1/32 (as is Gunsight Graphics. Ed).
Given the availability of the very nice Eduard 1/72 Triplane and the
awesome Roden 1/32 kit, this is welcome news
 indeed.
As regards markings, the kit decals are very complete and accurate, and
provide six well-known aircraft.
While there have been other aftermarket sheets for the Dr.I produced over the
years, notably by MicroScale, SuperScale and Aeromaster, these are now all out
of production and available only from collectors and dealers.
There is however a new decal maker that has come along to fill the void.
Pheon Decals has just released “Fokker Dr.Is of JG II” (48-003), which
provides markings for an astounding 30 airplanes, nearly every identified
Dr.I ever flown by a Jasta of JagdGeschwader II.
If you as a modeler are tired of models in markings that have been “done
to death,” this is the sheet for you.
The research is top-notch, with a booklet explaining the particulars of
each airplane, and full-color side and top profiles.
The decals are superbly printed with perfect register and in my
experience go on the model without the slightest difficulty.
The good news here is that Pheon has also released this sheet in 1/72 and
in 1/32 scale.
With all these decals, I decided to do both kits simultaneously, using the different camo sheets, for a direct comparison. I chose to do one as an airplane of Jasta 13 of JG II, and one as the triplane flown by Herman Becker of Jasta 12, the last German pilot to win the Blue Max (which he never received due to the abdication of the Kaiser two days before the ceremony was scheduled)
| CONSTRUCTION |
If you’re going to camouflage your model, there is a very specific
construction sequence you have to follow.
The wings are assembled and set aside, then the fuselage is assembled and
set aside. None of the
sub-assemblies go together until after the model has been painted and decaled.
 Assembly of the wings of this kit present no problem.
Unlike the inaccurate wings of the old Dragon kit, the fabric effect on
the lower wings is shown right, so there is no worrying about sanding things
down before assembly.
Assembly of the wings of this kit present no problem.
Unlike the inaccurate wings of the old Dragon kit, the fabric effect on
the lower wings is shown right, so there is no worrying about sanding things
down before assembly.
The cockpit is beautifully detailed with delicate plastic parts and very
useful photoetch details. I painted
the triangular wooden formers in each fuselage side with a light brown, over
which I drybrushed some dark brown for a “wood grain” effect.
This isn’t all that noticeable when the model is assembled, so if you
just paint those light brown and the rest of the fuselage sides with Tamiya
“Buff” for fabric, you’ll be fine. The floorboard was done similarly to the side
formers. The metal fuselage
structure was painted with Xtracrylix RLM 62 Green.
There is a lot of debate about what color “Fokker Green” was; some say it
was really just the standard RLM02 Grey-Green, a color in use by the German
military since the late 18th Century, others say it was more green.
Looking at the green in the color profiles from Pheon, I decided that RLM
62 Green looked good (and no one can conclusively prove me wrong!).
Once all was painted, I assembled the cockpit, attached the photo-etch
seatbelts, and glued the fuselage together without problem.
I used a little cyanoacrylate glue to be sure I didn’t have a seam on the
turtleback, and glued in the separate lacing on the lower fuselage.
| COLORS & MARKINGS |
Painting:
Since I was doing both kits at once, so that I could test out the
differing streak camo decals, the two models were painted as follows:
 elevators.
The upper surfaces of the wings of both kits and the fuselage of the
Becker airplane painted with Tamiya “Buff” to simulate fabric.
The fuselage of the Jasta 13 airplane and its horizontal stabilizer and
elevators were painted a mixture of “Prussian Blue” that matched the color on
the Pheon color profile. The
cowling of this airplane was painted Tamiya “Park Green.”
The metal fairing pieces that go over the center wing were painted RLM 62
Green for both models. The axle
wing of the Becker airplane was painted overall RLM 62 Green, while the other
was painted RLM 62 on the upper surface and RLM 65 on the lower.
The wheels of both were painted RLM 62 Green.
elevators.
The upper surfaces of the wings of both kits and the fuselage of the
Becker airplane painted with Tamiya “Buff” to simulate fabric.
The fuselage of the Jasta 13 airplane and its horizontal stabilizer and
elevators were painted a mixture of “Prussian Blue” that matched the color on
the Pheon color profile. The
cowling of this airplane was painted Tamiya “Park Green.”
The metal fairing pieces that go over the center wing were painted RLM 62
Green for both models. The axle
wing of the Becker airplane was painted overall RLM 62 Green, while the other
was painted RLM 62 on the upper surface and RLM 65 on the lower.
The wheels of both were painted RLM 62 Green.
When everything was dry, all parts were given a coat of Xtracrylix Satin varnish
| FINAL CONSTRUCTION |
| CONCLUSIONS |

Thanks to Eduard for the review kits.
Thanks to www.microsculpt.com for their streaked camo sheet
Thanks to Gunsight Graphics via your editor for their Streaked Camo sheet.
September 2009
If you would like your product reviewed fairly and quickly , please contact me or see other details in the Note to Contributors.