Eduard 1/48 Fokker Dr.I Dual Combo
| KIT #: | 8161 |
| PRICE: | $39.95 MSRP |
| DECALS: | Six options |
| REVIEWER: | Paul Mahoney |
| NOTES: |
2 full kits;
photoetch included (some colored) |
| HISTORY |
Rather than repeat what has already been written, and in deference to those of you who know much more than me about these things, I will refer you to Tom Cleaver’s excellent historical summary on his build of this kit: http://www.modelingmadness.com/reviews/w1/tc/tmcdr1.htm
| THE KIT |
This is one of the
more recent Eduard releases, so that means it includes lots of photo-etch
(colored and non-colored), beautiful cartograf decals, and a comprehensive
instruction sheet.
The parts are all nicely molded, little to no flash, and
just a bit of
 molding-line
clean up necessary on some of the stuts, control stick and other similar pieces.
There really is nothing to add to this kit in terms of
aftermarket – it’s all in the box except for the minimal rigging that will be
necessary.
As with other ‘Dual Combo’ kits, you have enough parts for 2
complete models to be built.
molding-line
clean up necessary on some of the stuts, control stick and other similar pieces.
There really is nothing to add to this kit in terms of
aftermarket – it’s all in the box except for the minimal rigging that will be
necessary.
As with other ‘Dual Combo’ kits, you have enough parts for 2
complete models to be built.
Recently I have been turning to the Eduard WW1 kits when I want a quick and easy build, and that was my reasoning for building this one. Luckily, so far, the kits I have chosen all have minimal rigging so that keeps with the ‘nice and easy’ theme! As I am primarily a WW2 aircraft modeler, I find I am able to do these WW1 kits with a minimum of obsession over accuracy (which is something that often slows down my building considerably). Nothing against the guys that do that sort of thing on their WW1 kits – in fact, more power to any of you that can sift through the references and research on this era - there is considerably less of it (and less clarity within it) than any of the WW2 stuff. And even more power to those of you able to take on those heavy rigging jobs – I am completely intimidated by them! That being said, I did do a bit of research on the web about both this kit and the actual aircraft, including the few builds here on MM.
| CONSTRUCTION |
I followed along on
Eduard’s build sequence for the most part, only deviating in areas where I knew
it would complicate my paintjob.
I assembled the cockpit per instructions, only to later
find out that the Bosch starting magneto (PE 4) is not accurate for the Dr.I and
should be left off.
The cockpit was painted using Eduard’s suggestions, and
looked really nice straight out of the box.
 I
assembled the fuselage, attached the lower wings (one piece), and then ran into
my first issue.
The midwing (again one piece, and molded with the top piece of
the fuselage).
This top piece did not fit squarely onto the fuselage, and it
appears the ammo boxes (assembled during the cockpit construction) interfere
with the fit.
A little filing down of their corners resulted in a better fit,
but it still wasn’t perfect by a long shot.
I used a bit of wood glue to fill the small gap around
this piece and blend it into the fuselage.
This top portion of the fuselage is metal I believe, and
needs to have a clear line differentiating it from the rest of the fuselage so I
wanted to avoid sanding it in order to keep the crisp ‘corner’ where the sides
meet the top.
I have yet to build an Eduard FW 190, but from my reading this
almost sounds like a similar problem on those kits with the fit of the
firewall/gun covers/etc.
Still, not a major issue by any means.
A nice little plastic strip representing the stitching
fits along the lower fuselage, very effectively covering the parts seam.
At this point I test-fitted the other major components,
but did not attach the horizontal stabilizer, rudder, wing and cabane struts,
cowling/engine, top wing or landing gear.
Basically about ½ the airframe!
Eduard provides some nice one piece wing struts that
slide through the mid-wing and set firmly in place in the lower wing.
I was able to slide these in, then successfully fit the
upper wing on top of them with a snug fit.
This would be easy to re-assemble after the paint job.
I
assembled the fuselage, attached the lower wings (one piece), and then ran into
my first issue.
The midwing (again one piece, and molded with the top piece of
the fuselage).
This top piece did not fit squarely onto the fuselage, and it
appears the ammo boxes (assembled during the cockpit construction) interfere
with the fit.
A little filing down of their corners resulted in a better fit,
but it still wasn’t perfect by a long shot.
I used a bit of wood glue to fill the small gap around
this piece and blend it into the fuselage.
This top portion of the fuselage is metal I believe, and
needs to have a clear line differentiating it from the rest of the fuselage so I
wanted to avoid sanding it in order to keep the crisp ‘corner’ where the sides
meet the top.
I have yet to build an Eduard FW 190, but from my reading this
almost sounds like a similar problem on those kits with the fit of the
firewall/gun covers/etc.
Still, not a major issue by any means.
A nice little plastic strip representing the stitching
fits along the lower fuselage, very effectively covering the parts seam.
At this point I test-fitted the other major components,
but did not attach the horizontal stabilizer, rudder, wing and cabane struts,
cowling/engine, top wing or landing gear.
Basically about ½ the airframe!
Eduard provides some nice one piece wing struts that
slide through the mid-wing and set firmly in place in the lower wing.
I was able to slide these in, then successfully fit the
upper wing on top of them with a snug fit.
This would be easy to re-assemble after the paint job.
| COLORS & MARKINGS |
Since I was going
for a simple build, and since Eduard provides some gorgeous decals, it was an
easy decision to go with the kit markings.
The question was, which one?
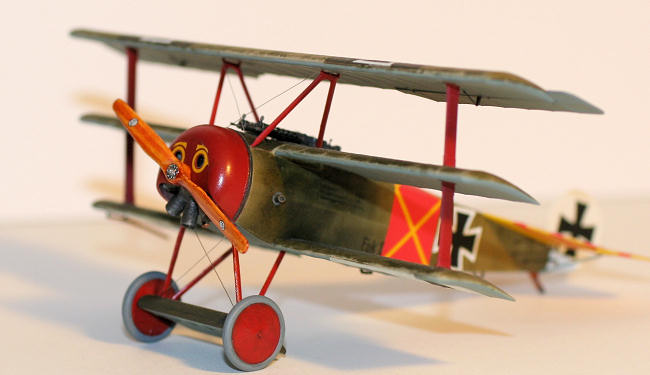
After consulting someone with an eye towards colorful
things (my 4-year old son, whose favorite color is red), it was decided to build
Ltn. Werner Steinhauser’s aircraft from Jasta 11.
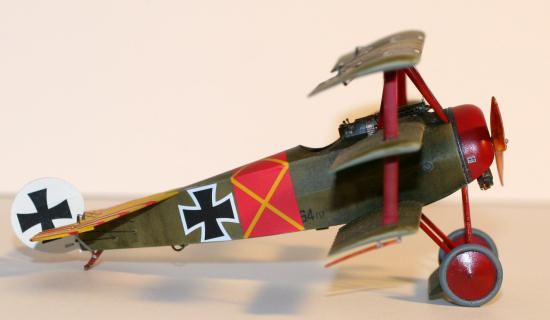
The decals were
lovely and colorful, but the challenge was in replicating that Fokker streaked
camouflage.
After trolling around on the web quite a bit, the method of using
artist’s oils over an acrylic base coat seemed to me to be the way to go.
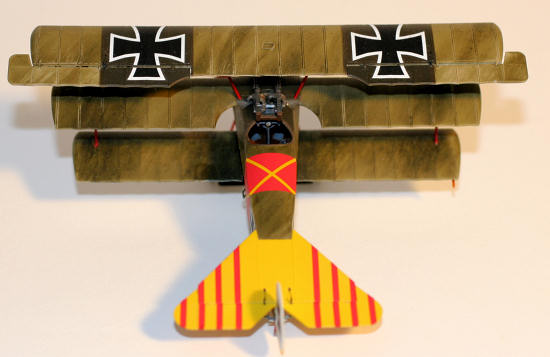
I used Gunze Aqueous RLM 65 for the undersides, Tamiya
Flat White for the rudder, the markings bands on the lower wings, and as and
undercoat for the yellow stabilizer.
I masked off all the undersides using Tamiya paint (the
Gunze held up well to this), then I used a light tan color (I forget the exact
one) from Gunze Aqueous and sprayed on all the upper surfaces and sides.
 After
letting everything dry for a few days, the oil painting adventure began.
I used Grumbacher ‘Olive’ for my ‘streaks.’
Squeezing a dollop of it out onto some matboard
(cardboard works equally well) was a trick I learned ages ago that will leech
off the carrier, and with it a lot of the shine associated with oils.
I then used brush that has the bristles spread out and
looks similar to a rake or a fan (surprisingly called a ‘rake’ or ‘fan’ brush!).
With just a bit of paint on the ends, and with the
bristles spread far apart, I was able to get some nice, somewhat parallel,
streaks of green on the model.
I went back over it in areas, using a conventional
paintbrush, to build up the darker areas.
If I got on too much, I could easily wipe it away with a
tissue.
These oils take a long time to dry, so you have plenty of time to work
with them.
Finally, I did another pass along the entire surface with the
rake brush to blend it all in.
The blended look seems more in scale to me than the very
crisp separations of the some of the decal sheets that are available to
replicate this camouflage.
After
letting everything dry for a few days, the oil painting adventure began.
I used Grumbacher ‘Olive’ for my ‘streaks.’
Squeezing a dollop of it out onto some matboard
(cardboard works equally well) was a trick I learned ages ago that will leech
off the carrier, and with it a lot of the shine associated with oils.
I then used brush that has the bristles spread out and
looks similar to a rake or a fan (surprisingly called a ‘rake’ or ‘fan’ brush!).
With just a bit of paint on the ends, and with the
bristles spread far apart, I was able to get some nice, somewhat parallel,
streaks of green on the model.
I went back over it in areas, using a conventional
paintbrush, to build up the darker areas.
If I got on too much, I could easily wipe it away with a
tissue.
These oils take a long time to dry, so you have plenty of time to work
with them.
Finally, I did another pass along the entire surface with the
rake brush to blend it all in.
The blended look seems more in scale to me than the very
crisp separations of the some of the decal sheets that are available to
replicate this camouflage.
I let all this dry
for several weeks (I’m a slow builder anyway, so that wasn’t a problem), and
then hand brushed 3 coats of Future to protect the paint job and get ready for
decals.
After the Future dried, I very gingerly masked off the upper fuselage
area in front of the cockpit, and the upper wing markings area, in order to
apply some Tamiya Olive Drab.
I also sprayed the landing gear ‘wing’ topsides with the
Olive Drab. Finally,
while this was drying I sprayed Tamiya Flat Yellow on the horizontal tail, and
Gunze ‘Thunderbirds Red’ on all the struts and cowl.
I thought this was a good match for the decals’ red
color, but in retrospect it was less than perfect.
I am justifying this in my mind by saying that the
fuselage was canvas, so the paint might look different on there as compared to
the wood and metal of the struts and cowling.
That’s my story, and
I’m sticking to it!
Eduard also provides a neat little mask for the wheels
which made it easy for me to paint the hubs, mask, and paint the tires.
Finally, the decals were all applied. I’m trusting Eduard on the authenticity of everything, as I don’t have any reference volumes (other than the internet) to look into, and frankly I did not want to be too nit-picky for this build. They all went on smoothly – but do be aware the fuselage crosses are not perfectly symmetrical, and each only fits properly on one side. I really liked having all the little data stencils and markings – adds a nice extra bit of detail.
| FINAL CONSTRUCTION |
Now came the time to
assemble everything.
Having previously test-fit most of it, I knew there
would be minimal issues.
In fact, there were none.
The interplane struts fit solidly in the mid and lower
wings, so I put the cabane struts in the top wing using tube glue.
Since the tube glue takes some time to set, I was able
to mount the top wing easily on the main struts and then maneuver the cabanes
into place.
The landing gear looks flimsy but actually is quite solid once it
is all in place.
After everything was together I added rigging – I used stretched
sprue for the control lines to the ailerons and tail, and stainless steel
surgical wire for
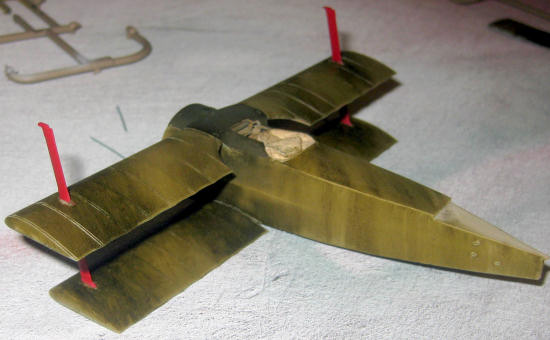 the
cross bracing above the cowl and on the landing gear.
After the build I realized I also needed the lines just
behind the rear-most cabane struts that represent the aileron controls going
from the cockpit into the upper wing.
They are there now, but weren’t when I took the
pictures.
At this point I sprayed a light coat of Tamiya flat clearcoat
from a rattlecan on the entire a/c to give it a light sheen, since I didn’t want
dead flat.
the
cross bracing above the cowl and on the landing gear.
After the build I realized I also needed the lines just
behind the rear-most cabane struts that represent the aileron controls going
from the cockpit into the upper wing.
They are there now, but weren’t when I took the
pictures.
At this point I sprayed a light coat of Tamiya flat clearcoat
from a rattlecan on the entire a/c to give it a light sheen, since I didn’t want
dead flat.
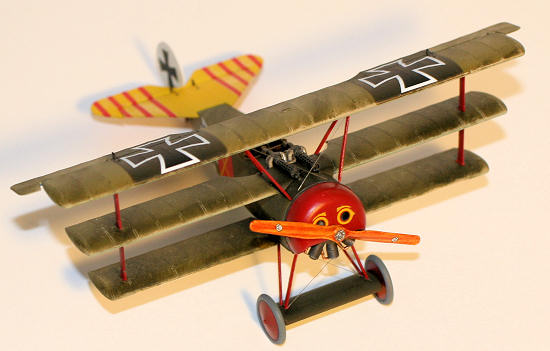
The prop was
done by spraying the whole thing an acrylic tan color, then I applied small
strips of tape the length of the prop to represent the laminated strips, and
used the same oil paint technique as with the camouflage streaks.
I used Grumbacher Burnt Sienna and streaked it along the
exposed part of the prop until a wood grain effect appeared that I was happy
with.
Once dry (again several days), I removed the tape strips exposing the
unadorned tan portion.
Several coats of Tamiya Clear Orange and Clear Yellow
were applied until I got a nice wood effect.
I have seen people do much better ‘wood’ jobs, but I’m
pleased with the results.
Finally, the twin
| CONCLUSIONS |
A
fun little (and it is little) aircraft to build.
Thank you Eduard for producing these high-quality kits
with everything in the box.
I’m sure there are some things that could be refined for
the purists, but for an enjoyable build that looks the part, this is indeed a
good kit.
The (uncorrected) errors that I know about are the magneto switch
mentioned earlier, and the location of the clear inspection panel in the top
wing (it should be over a wing spar).
The landing gear also appears to be a bit too long
according to the website listed below.
But for me it looks the part.
And did I mention I had fun building it?
In fact, I just picked up Eduard’s 1/48 Eindecker which
will be a whole new challenge for me.
It isn’t a biplane, but there is a lot of rigging to be
done…..
Kit purchased courtesy of my wallet.
| REFERENCES |
www.aeroscale.co.uk
(some seriously dedicated WW1 people here – a great resource)
In particular this site lists omissions/additions that
should be made to the cockpit of this kit, as well as further information on the
markings options available in the kit.
Just do a search on the site for Eduard Dr.I and
you will find a great deal of info.
www.theaerodrome.com
Another great source of info on all aviation things in
WW1.
July 2010
If you would like your product reviewed fairly and quickly , please contact me or see other details in the Note to Contributors.