Revell-Monogram 1/48 F-105D Thunderchief
| KIT #: | 5480 |
| PRICE: | £10.00 |
| DECALS: | Two options |
| REVIEWER: | Frank Spahr |
| NOTES: | 1999 boxing. Eduard P.E. Superscale 48-815 |
| HISTORY |
Worthier people have written about this impressive fighter-bomber, so visit this link.
| THE KIT |
This kit has been previewed here and here.
| CONSTRUCTION |
I rediscovered this kit per coincidence, in fact I had actually forgotten I had had it in my stash for 20+ years. Whilst looking for something different, there it was. With Eduard PE and a Superscale aftermarket decal sheet. More coincidence wanted it that my modeling friend Spiros from Greece had the same kit, so on a whim we decided to build our kits in parallel, as the smallest possible group build.
I started by reading up on earlier builds of the kit on this site, and soon realized I was in for some extra work. As my decal sheet was for planes very early into the deployment to South East Asia, still uncamouflaged, I would need to backdate the numerous late-production features from the kit. I would have happily done it all from the box, but once I knew how things were, the issue niggled me and could not be un-realized.
The PE fret had some nice, some iffy and some positively ludicrous parts in it, with not always utterly clear instructions.
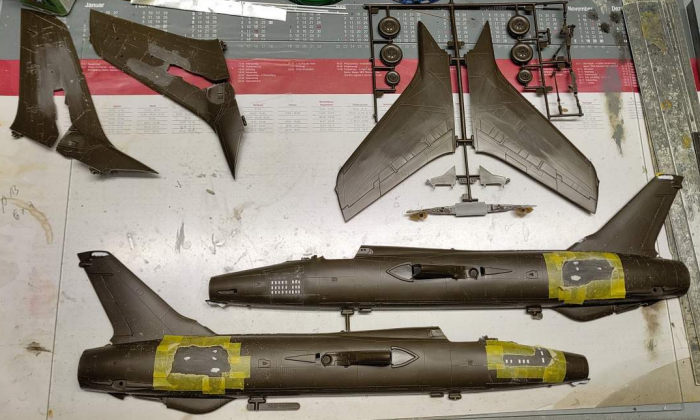 So I
read and printed the pertinent M2 reviews and then started marking the problem
areas on the fuselage and wings with white paint, to more easily know what I
would have to fill or remove. All the while with the spectre of possibly having
to rescribe the entire model hanging over me. A feat I had never done before.
Gulp.
So I
read and printed the pertinent M2 reviews and then started marking the problem
areas on the fuselage and wings with white paint, to more easily know what I
would have to fill or remove. All the while with the spectre of possibly having
to rescribe the entire model hanging over me. A feat I had never done before.
Gulp.
So I masked around the raised areas to be removed and then started with carbide burrs and continued with sanding sticks. The recessed areas to be filled (gun gas exhaust vents) were filled with Apoxie Sculp and then sanded. That done, I tried restoring the lost raised panel lines using stretched sprue.
Parallel
to that, I started with the PE. As usual, I identified the scariest subassembly
and tried my hands on it. If I failed, I would not remove any plastic from the
kit and just skip this item. I found the exhaust area the scariest, and spent
several hours working on bending and rolling and gluing. In the end, I somehow
got there, but not without some twitching of eyes and gnashing of teeth, if you
take 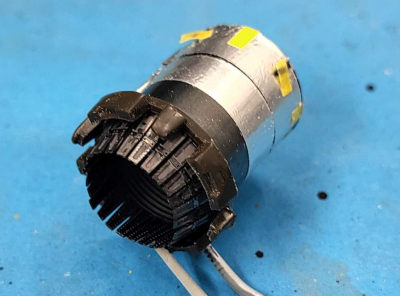 my
meaning. If I were asked whether the effort was worth it, I firmly declined it
already at this stage.
my
meaning. If I were asked whether the effort was worth it, I firmly declined it
already at this stage.
Work now branched out. I continued on restoring the panel lines, which needed checking with primer, and some rework. I also removed molded-on detail on the parts connected with the cockpit tub. Already one short look into the PE instructions let me decide not to attempt using the more ludicrous and molecule-sized items, but the basic ones were demanding enough.
After some more hours of work, I had painted and assembled the cockpit tub and instrument panel with PE and had added a wash. The seat took quite several more hours, until it had been stripped of molded-on detail and said detail had been replaced with PE, plus painting and a wash. Quite a lot more was to follow.
I also identified external PE, and added a neat surround to the gun opening, and some filtery thingy below the left wingroot. The fine PE plates for the air intakes were set aside for after the wings were attached.
I then tackled the multi-part subassemblies as in wings, bombs and fuel tanks, plus wheels and landing gear. All needed cleanup and sanding, until I got a sizable number of parts for priming.
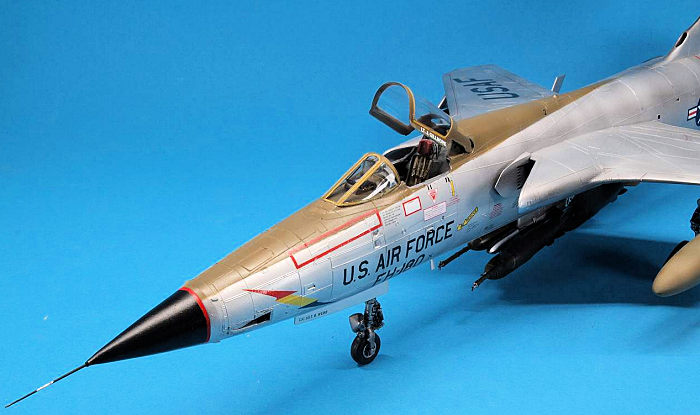
I then test fit the seat to the cockpit tub prior to adding the iffy seatbelts, and also fit the cockpit tub to the fuselage. Moreover, I rather erred on the side of caution and added some weight to the fuselage and the nose cone. There, I had already done some work on the pitot tube. I sawed off the actual tube part of the kit part, and drilled through its base so I could run a thin piece of brass tubing through it. Into which I fitted a piece of conically machined brass from my dwindling supplies, which I kept removable. The idea behind all this work was to have a neat pitot tube which I could attach only at the very end of the building process, without much risk of collateral damage. I also realized that the removal of the gun camera from below the nose left me with a gap in the nose cone. So I draped tape over it and filled said gap with Apoxie Sculp.
Having primed all the previous subassemblies, I sprayed them in their appropriate colours, using yellow first on the bombs. The undercarriage was sprayed aluminium, same as the wheels. Having masked the wheels with the Eduard masks (and masked the canopy at the same time), I sprayed the tyres black with some OD misted over it. The yellow bands on the bombs were masked with thin masking tape, and then the bombs were sprayed dark green with OD misted over it until I was happy with the shade. The yellow bands are a bit on the aneamic side, but the narrow tape was much easier to apply than the wider. There you have it.
On the big fuel tanks, I added thin „reinforcing strips“ where raised marking indicated something of the kind just about might have been. They added visual interest anyway, regardless of being correct ultimately. I also sprayed OD on the fuselage around the cockpit, to ease my later work there.
Having
added the numerous seatbelts to the bang seat, but refrained from adding the
more ludicrous items, it was time to face the music and start assembly in
earnest. I glued the cockpit tub into the left fuselage half, and let that cure
for a while. The wing spar needed a bit of trial and error until I had it where
I assumed it needed to go. No glue needed here. After some dryfitting, I then
glued the 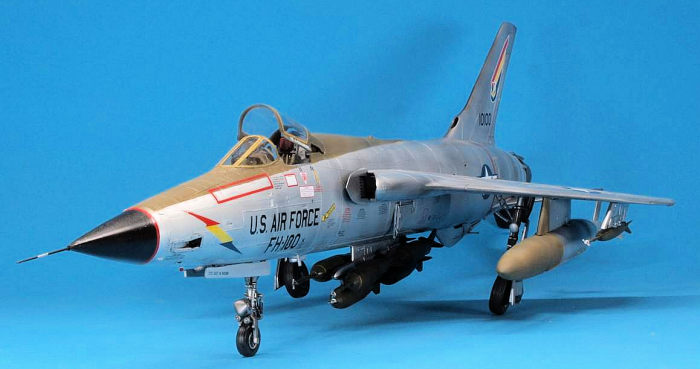 fuselage
halves, to a mostly good fit save around the nose wheel well. After curing, I
checked for steps and flaws and gaps and applied CA glue where needed. The gaps
around the cockpit tub were filled with PVA glue, to be overpainted later.
fuselage
halves, to a mostly good fit save around the nose wheel well. After curing, I
checked for steps and flaws and gaps and applied CA glue where needed. The gaps
around the cockpit tub were filled with PVA glue, to be overpainted later.
I also did some weathering on the bombs, using a small piece of sponge and artist´s oils, to hint at the rough cast surface. The front bits of the fuel tanks, where they protrude from below the wings, were masked and sprayed OD at that stage. I also addressed the wheel well doors. By now I had the complete underwing stores plus the undercarriage and what belonged to it ready for adding to the model.
With my CA cured, I returned to the fuselage. The more serious step near the nose wheel well was reduced with a carbide burr before sanding began. I needed to remove a bit of material from the left fuselage half to fit the nose cone, but on the whole the fit wasn´t too bad. Flattening the fuselage spine took some time, and I should have done more there, but didn´t realize it at the time. I had had some trepidation about the fit of the exhaust subassembly, but it fit well and could be set aside on the growing pile of subassemblies ready for adding to the model.
At that point, I shared some of my in-progress images with our forum here at M2. Ben Brown, who is rather interested and knowledgeable re the Thud, told me I needed to remove yet more molded-on details relating to the G-model, as in the wingtip bulges and the larger fairing on the tail fin which protrudes behind the trailing edge. Thank you, Ben! Remove the bulges I did, the same morning I sprayed the masked canopy parts first primer grey, then yellow on the uppersides, for the insulation/seal (?) surrounding each pane. Next came quite some time of attending to the fuselage seams, and with the remainder of the subassemblies mostly done, there was no use procrastinating or diverting from this tedious task anymore.
Which took me several hours, until I felt ready to restore the lost raised panel lines with stretched sprue. Parallel to seam work, I continued on the canopies, spraying them yellow after priming and then masking the sealant strips with .4 mm masking tape. After spraying that over with OD, I removed the thin strips to check I could leave things as they were. That done, I was almost ready to mount the canopies on the fuselage. Before that, I had to fold, paint and add the clear film to the PE gunsight, and remove molded on detail where it should go to. I found it sat too low for my liking, so had to add some styrene and paint it before I could really add the gunsight.
Having glued the front part of the canopy with PVA and secured the opening part with Maskol, I primed the fuselage and checked for flaws. Having passed my admittedly lax quality control, I added the wings one at a time. The small remaining gaps at the wing roots were closed with PVA. That cured, I added the PE parts for the intakes and then primed the entire model. The wheel wells were now sprayed bronze green, as I found Vallejo´s Interior Green a bit too garish for my personal taste. A black wash enhanced the molded-on details. I made foam covers for the wheel wells to protect them later on.
| COLORS & MARKINGS |
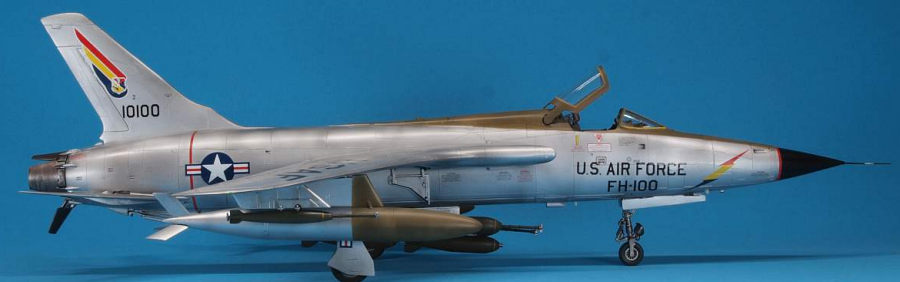
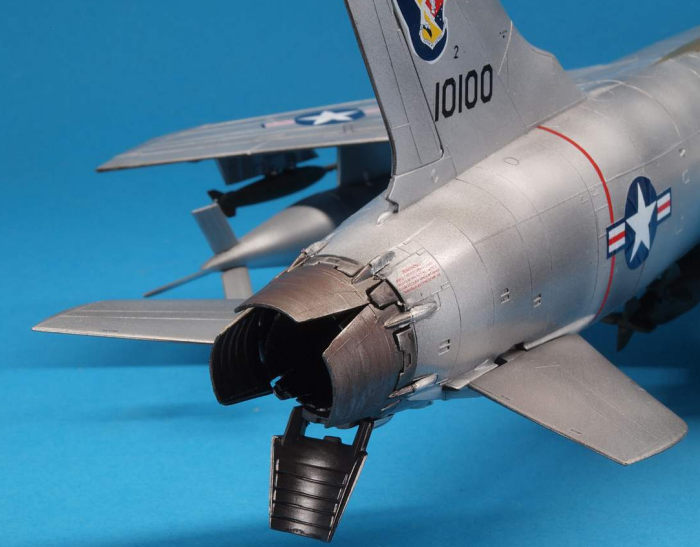 I had
decided to use the second of the two schemes on my sheet, as I did not really
trust the decals for the green/white/black nose band. This is an F-105D from the
49th TFW, # 10100.
I had
decided to use the second of the two schemes on my sheet, as I did not really
trust the decals for the green/white/black nose band. This is an F-105D from the
49th TFW, # 10100.
So I sprayed the areas for the two narrow red stripes first white, then red, and after drying masked them. Having shot another bit of red over the masking tape to minimize the risk of bleed through, I then sprayed the nose cone black and did a bit of preshading. I know, the aircraft wasn´t in natural metal, but sprayed aluminium, but I wanted to avoid the toylike aspect a too uniform shade would have in my eye.
That cured, I masked off the nose cone and then sprayed the aircraft in Vallejo White Aluminium metalizer, avoiding a too dense coat and leaving some variations in tonality. That cured, I used a paper kitchen towel to do some limited „polishing“ and then masked off the OD area. That also sprayed, I removed all the masks and was relieved they had worked, and that there was no paint liftoff either. There was one niggle, though. I should have shaved off more material when redoing the spine, the edges were more visible now after applying the aluminium paint. I had a good think about resanding, reshaping, repriming and repainting. In the end, I chickened out. Might have improved the model if I hadn´t, but I also might have ruined it. You never know. Anyway: I could now spray the model with Future and let cure. As all the other subassemblies had already been completed, I could (and had to) wait.
Decaling went pretty well, all told, even though some of the stencils were a bit hard to identify, and there were a few leftovers. But the old decals worked well, and after a bit of setting solution, some waiting and more Future, it all looked quite nice.
| FINAL CONSTRUCTION |
Now was the time to complete things. I started with the landing gear, where the actuators were a bit hard to align, and then added the (slightly flattened) wheels. The eight gear doors worked reasonably well and I hope they will hold up to the test of time. I later found that the wheels had a serious inclination, and tried to straighten them. But I don´t trust that landing gear that much, especially the attachment of the wheels to it. Others here have had good results over many years, so I´m optimistic. But for storage and transport, I will surely devise some cradle that takes the load off the wheels.
 Next came
the payload and the tanks, starting with the large ventral bomb rack which I had
assembled previously. Next came the fuel tanks, and then the smaller bombs on
the outboard pylons. That cured, I toyed with the smaller blade antennae in the
front, which I glued with PVA, and then tackled the three items around the
ventral fin. Reference images showed me what I could see in no review images
here. Which was where the „Y-vent“ was actually supposed to end up, and how to
install the fuel dump pipe. In the end, I sawed off part of the Y-vent part in
order to mount it without compromising the aerodynamical integrity and looks of
the ventral fin.
Next came
the payload and the tanks, starting with the large ventral bomb rack which I had
assembled previously. Next came the fuel tanks, and then the smaller bombs on
the outboard pylons. That cured, I toyed with the smaller blade antennae in the
front, which I glued with PVA, and then tackled the three items around the
ventral fin. Reference images showed me what I could see in no review images
here. Which was where the „Y-vent“ was actually supposed to end up, and how to
install the fuel dump pipe. In the end, I sawed off part of the Y-vent part in
order to mount it without compromising the aerodynamical integrity and looks of
the ventral fin.
I also added the very tricky and flimsy exhaust assembly, and was glad it fit so well. But once I had added the four speed brakes, I realized all that effort had been for nought. You can´t see any of it unless you intrude upon the model with a penlight and malice. Lesson learned. A) I was able to just about assemble this, um, nice assortment of PE. B) I shouldn´t have bothered with it.
I added small blobs of colored PVA to the wingtips for navlights, and later covered them with more white glue to hint at a transparent cover.
I then proceeded to the cockpit and demasked it, only to realize not all of my very iffy yellow sealant lines had survived. Inside the cockpit, I added the prepared and PE´ed bang seat and the stick. I then tried my best to restore the very thin missing yellow line. In the end, I sprayed some white decal material yellow, sealed it with Liquid Decal Film, cut it to size and tried to apply it with held breath. Not entirely successfully. As my various attempts showed, a piece of decal that narrow will rather disintegrate than stay together. So I had to apply some corrections, and this section looks rather ragged. Kudos to all those among you who can paint these seals as neatly as I have seen it so often.
I then added the canopy without glue, and called things quits.
| CONCLUSIONS |
I learned quite a bit during and from this project. For starters, it was fun exchanging views and discussing issues with Spiros, a nice guy if ever there was one. As he was committed to two other projects at the same time and has kids to take care of, and I had little else to do at this time of year, I completed this project ahead of him.
Moreover, I learned a bit about the Vietnam War and its bloody air battles. And I very much enjoyed the help and support I received on our Forum from so many nice folks.
On top, it was another Monogram classic which built well enough for me, and made an impressive and really large model. To think that this aircraft could deliver more payload at several times the speed and with just one pilot, compared with the B-17 designed a mere twenty years before is outright impressive. And a testament to the innovations made in military aviation at a staggering pace in the middle of the 20th century. And last but not least – I´m now quite happy with building just what can later be noticed and actually improves the model.
| REFERENCES |
https://www.modelingmadness.com/scott/decals/super/ss48815.htm
https://modelingmadness.com/review/viet/us/usaf/brown105.htm
16 February 2026 Copyright ModelingMadness.com.
All rights reserved. No reproduction in part or in whole without express
permission. If you would like your product reviewed fairly and
fairly quickly, please
contact
the editor or see other details in the
Note to
Contributors.