AMT 1/48 S-3A Viking
| KIT #: | 8634 |
| PRICE: | $ |
| DECALS: | One option |
| REVIEWER: | Frank Spahr |
| NOTES: |
|
| HISTORY |
The Lockheed S-3 Viking was a twin jet-engined carrier-based plane designed to hunt and kill submarines. It replaced the piston-engined Grumman S-2 Tracker and was introduced into the Fleet in 1974. A compact yet roomy airframe contained then state-of-the-art equipment to detect and destroy submarines. An extendable boom to detect the magnetic anomalies caused by a submarine, 59 sonobuoys to be deployed from chutes at the bottom of the fuselage, a Forward-looking Infrared sighting system, and modern computers enabled the four-strong crew to fulfill their task. The weapons bay could house up to four torpedoes or mines or depth charges or nuclear depth charges. Two additional underwing hardpoints were mostly used for fuel tanks, but could also be used for a growing array of offensive weapons and also for aerial refueling.
The
cockpit was quite roomy and offered good visibility for the two pilots, whilst
the other two crew members sat right behind them in a small compartment in front
of their computers, having only a small window on each side. In case of an
emergency, all four could be ejected with their ESCAPAC seats, in a seque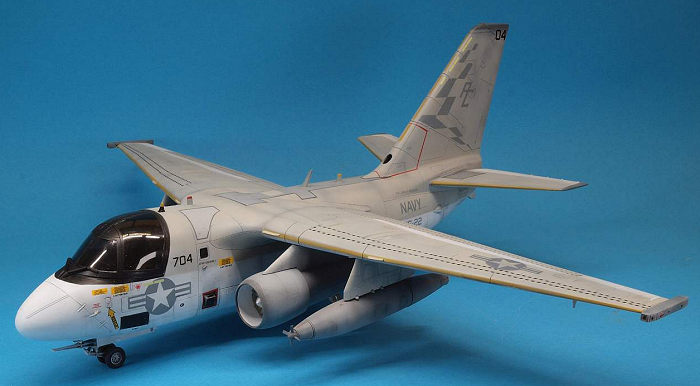 nce
designed to minimize the risk of one crew member hurting another in the process.
nce
designed to minimize the risk of one crew member hurting another in the process.
The two GE TF-34-GE-2 engines in underwing pods were designed for fuel efficiency and were also used in the legendary A-10 Thunderbolt II ground attack aircraft.
The type was developed into the S-3 B production variant by retrofitting upgraded AN/APS-137 radar, JTIDS tactical information system and AGM-84 Harpoon launch capability to 119 of the 187 aircraft built. The S-3B was also equipped to use „Buddy stores“ for inflight-refueling other aircraft.
16 aircraft were modified into dedicated ELINT platforms under the designation ES-3A. Other modifications included 6 aircraft converted for the COD role as US-3A, and various others proposed or converted in small numbers. That included one extensively modified aircraft for use by NASA as research aircraft.
The Viking´s role shifted away from ASW to anti-shipping, ground attack and the aerial refueling role after the dissolution of the Warsaw Pact. Now mostly only two crewmen were required. More upgrades enabled the aircraft to fire AGM-65 and AGM-84H/K missiles, and introduced an upgraded inertial navigation system.
Vikings were used extensively during the 1991 Irag war, the Balkan Wars of the 1990s, and Operation Enduring Freedom. They served in a variety of roles, with the focus on aerial refueling in the latter conflict.
The S-3 Viking fleet was gradually retired over the 2000s, and the last remaining aircraft used for special roles were retired in the 2010s. Proposal to revive some of the aircraft still in storage have been made, but have come to nought.
| THE KIT |
This kit has been previewed here:
https://modelingmadness.com/scott/mod/us/48s3preview.htm
I got mine around the millennium, bought the then current Eduard PE set and an aftermarket decal sheet for it – and then let it sit in my modest stash.
| CONSTRUCTION |
 You
can easily purchase something on an impulse, even on a whim. Supermarket designs
bear witness to that. I started building this kit on a whim. Having thought
quite carefully about the next project for a while, and made my firm decision on
the
topic, I passed my sorry excuse for a stash one morning. I saw the dusty box of
the Viking, it somehow clicked and we connected. The kit originally slated to be
built next will have to wait a while yet.
You
can easily purchase something on an impulse, even on a whim. Supermarket designs
bear witness to that. I started building this kit on a whim. Having thought
quite carefully about the next project for a while, and made my firm decision on
the
topic, I passed my sorry excuse for a stash one morning. I saw the dusty box of
the Viking, it somehow clicked and we connected. The kit originally slated to be
built next will have to wait a while yet.
I unpacked the kit. It all looked quite nicely molded, despite some flash here and there. I next looked into the aftermarket decals I had bought at the time I got the kit. The kit decals hadn´t looked all that trustworthy even back then, hence the Superscale sheet with Desert Storm aircraft.
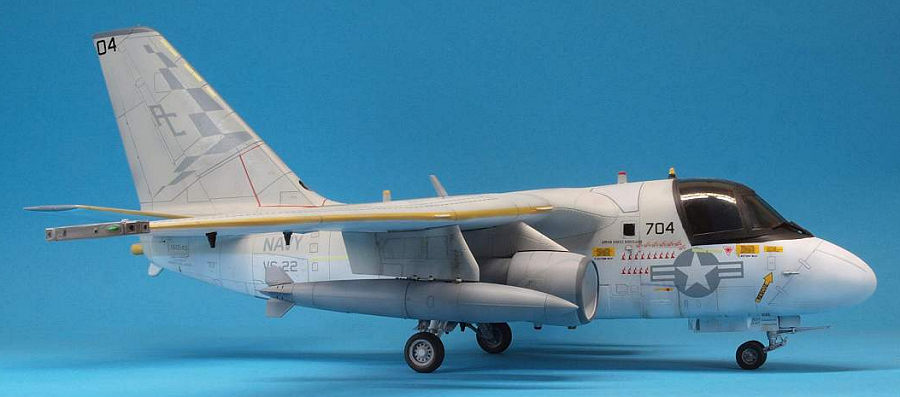
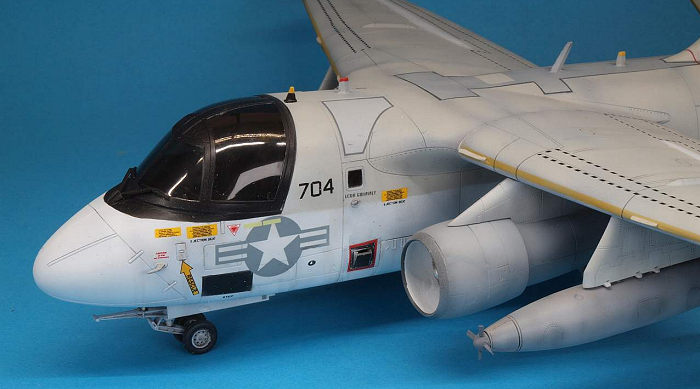
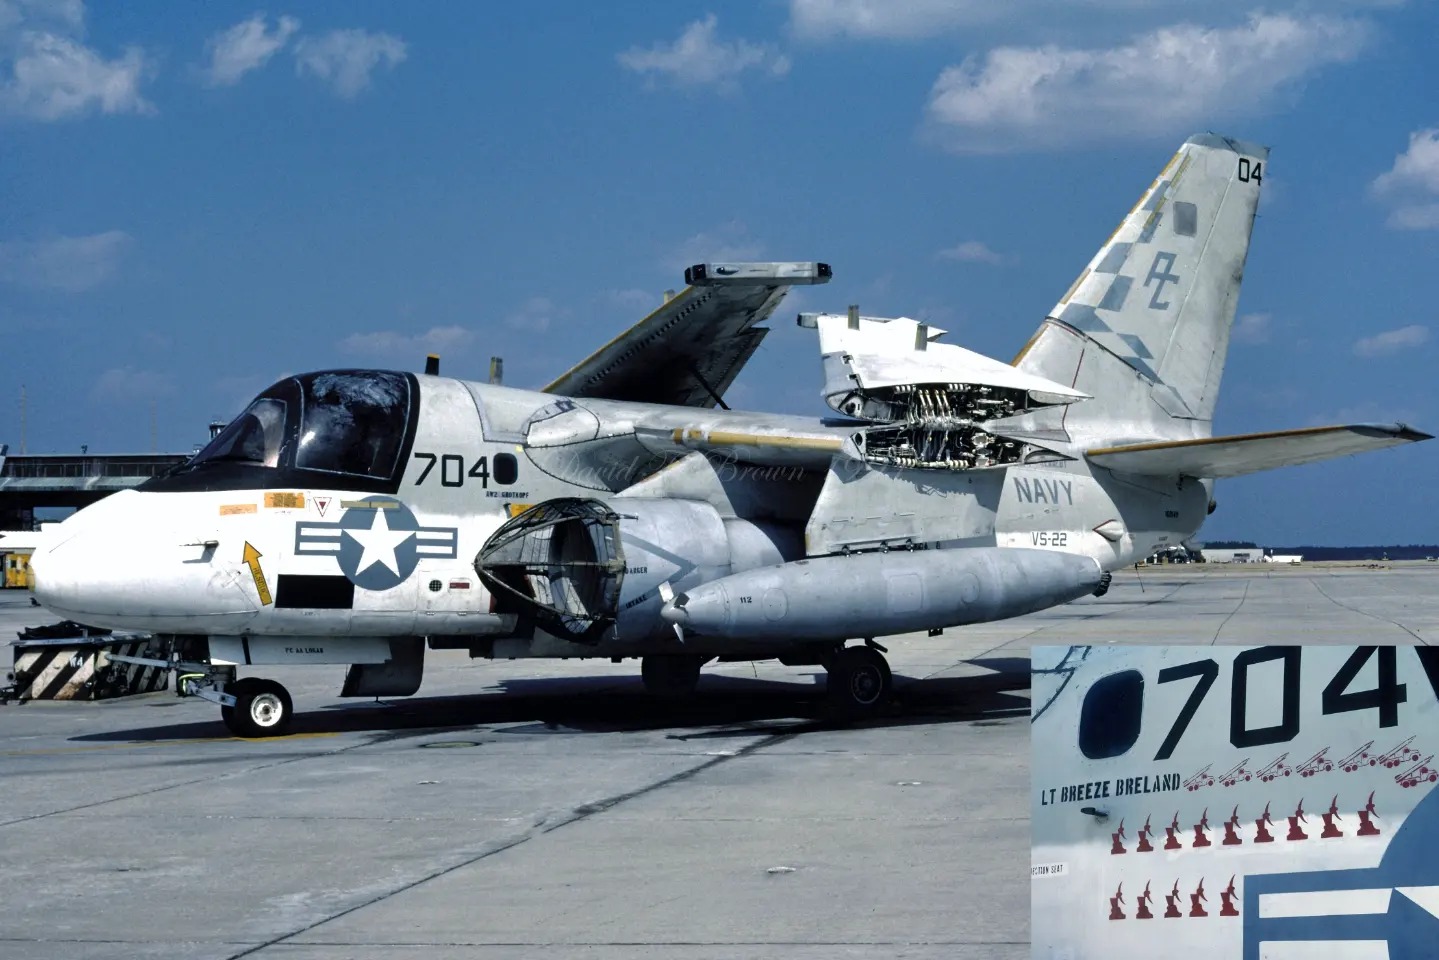
I found the first aircraft interesting, as it combined the classic high-vis paint scheme (or most of it), with the more recent low-vis markings. I found several photos online of this actual aircraft in these markings, which helped.
I soon realized I needed additional 35-inch national insignia, as the sheet only had two where four were needed. Luckily I was able to copy the sheet insignia and print them on clear decal sheet, four of them to make them look similar. I had found reference images of the aircraft in this particular scheme, and wanted to replicate it. The images showed a „Buddy“ refueling pod under the port wing, and I figured this would go along nicely with a 300 gallon fuel tank under the right wing. Moreover I assumed that the aircraft would not have other ordnance, and as my photos showed a closed bomb bay, closed mine would be, too. Reskit of Ukraine makes a very nice Buddy store and fuel tank, and I decided I would purchase those.
But only if the model ended up nice enough to warrant the extra and not trifling expense. I also determined then what of the PE set I would use, and virtually all of that would end up in the cockpit. I also made sure I had the relevant colour shades in my possession, and off I went.
Construction of this kit does not start with the cockpit, but the tailhook well and MAD boom, plus the front wheel well. The cockpit well is inserted later on in the project, and leaves good access to the inside of the nose, and ample space for ballast. I soon started tackling virtually all subassemblies, including wings, stabilizers and engines. Some cleanup and some fitting was needed until it all fit well enough for me, and after a while I had most of the parts mounted for priming.
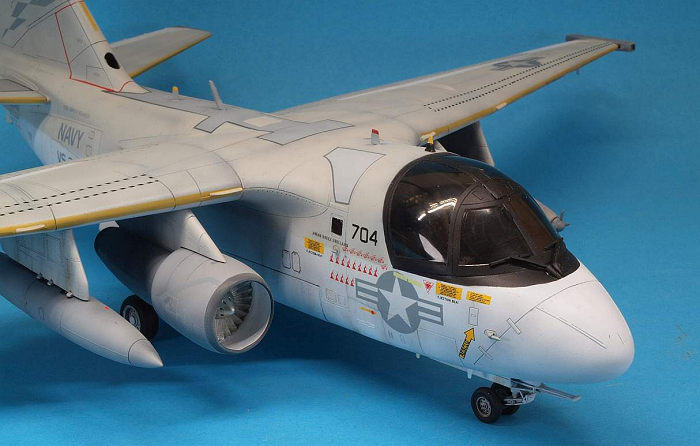
I had sawed off the front end of the MAD boom, so I could add it later on in construction, and it would not be extended anyway, so I could leave it off for the time being. The heavily tinted canopy was masked for once without Eduard´s help, but I soon took a vow to use die-cut masks on every project from now on.
 The fuselage halves were
glued together after first adding the tailhook well and front wheel well to one
side. It all fit quite well, but nonetheless there remained a gap on one side of
the front wheel well, and a step in height. I didn´t fancy reopening the seams,
so I cut styrene sheet to close the gap and the step.
The fuselage halves were
glued together after first adding the tailhook well and front wheel well to one
side. It all fit quite well, but nonetheless there remained a gap on one side of
the front wheel well, and a step in height. I didn´t fancy reopening the seams,
so I cut styrene sheet to close the gap and the step.
Two issues were found with the Sonobuoy chute part. It looked short shot at the front end, and would leave a gap, and there was a hole in the fuselage below part of it. So some chutes would be only 1 mm deep, but a few were just holes into the fuselage. So I remedied that by gluing a blanking plate over the hole, cut off the misshapen front end of the part, and closed the gap with sheet.
I had glued the bomb bay doors closed already, and also the crew access door and the cover over the FLIR dome. The access door leads into nothing anyway.
Having closed the fuselage, I marked the centers of the various raised disc-shaped items on the lower centerline, to later replaces them with punched-out styrene discs. The instructions asked for a ball of modeling clay the size of a Quarter to be placed into the nose for proper ballasting. I used Patafix (similar to Blu Tac) remains from my last project, and added some lead weights embedded into PVA glue for good measure.
I had some work with the centerline seam, but on a rather limited scale. To ease my later work, I then made sure the cockpit assembly would fit well. Some trimming and fiddling was needed, but now I was reasonably sure I would not have to fiddle around with the painted and PE-festooned cockpit upon assembly. I made a building jig from foam board, and once all was dry, primed the parts with Stynylrez.
| COLORS & MARKINGS |
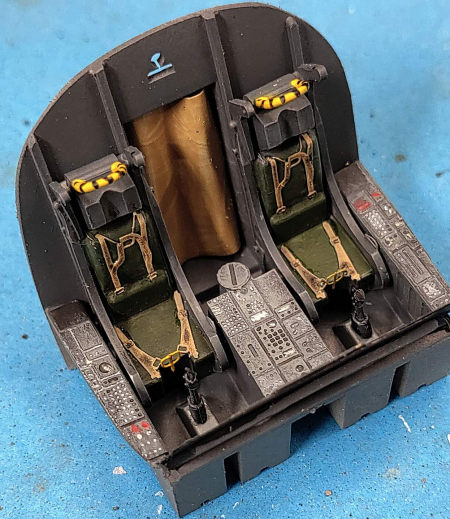 That cured, I checked for
flaws and did my corrections. These included adding PE to the ESM pods and the
fuselage, and the wheel wells (a mere 12 pieces all told). I preshaded the
primed parts with a darker grey, and sprayed the cockpit the required FS shade
of 36275. The PE instrument panels were sprayed black, and then drybrushed in
grey and washed in white, with some detail picked out in silver and (entirely
spuriously) in red. The two screens were given a bit of a green hue.
That cured, I checked for
flaws and did my corrections. These included adding PE to the ESM pods and the
fuselage, and the wheel wells (a mere 12 pieces all told). I preshaded the
primed parts with a darker grey, and sprayed the cockpit the required FS shade
of 36275. The PE instrument panels were sprayed black, and then drybrushed in
grey and washed in white, with some detail picked out in silver and (entirely
spuriously) in red. The two screens were given a bit of a green hue.
The seats were painted as per instructions, and PE seatbelts added. I made a bit of a curtain to shield the (non-existent) ASW compartment from the cockpit using lead(ish) foil.
Having assembled all of that, I added a flat coat and then picked out the instrument dials in clear gloss. As if anyone would see them afterwards …
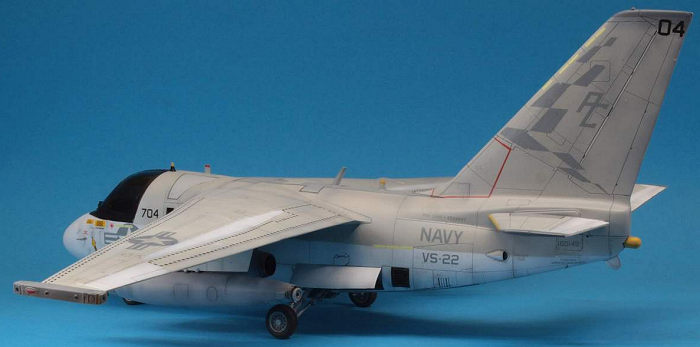
Next I started painting the required areas of the model white, and man - there are some. I fiddled around a while with the thinning and air pressure, and in the end found out that both Stynylrez White as Vallejo Premium White would work best with me undiluted. After some back-and-forthing I let things cure. Some, actually quite a lot of masking followed. I let my kabuki tape „fly“ a bit for the demarcation between white and Light Gull Grey. I used pieces of thin solder to keep the edge a bit away from the plastic surface. The black antiglare areas were masked hard. The darker dorsal area with its thin black surround necessitated several masking sessions, including corrections for the too wide surround. Then came the red stripes on the root of the fin. A lot of work, but I think it paid off.
| FINAL CONSTRUCTION |
At that point, I got the impression that so far the model had come along nicely enough to justify the expense for the resin buddy store and drop tank. Plus I needed some markings from the kit sheet, but that proved to be so iffy that I wouldn´t want to ruin things by attempting to use it.
So I ordered the resin items, and a sheet with full Viking stencils and markings, including those on the wings. Sadly I made a mistake in ordering the buddy store not from Reskit, but Brengun. The latter is a very nice resin item, but not on the same level as the Reskit drop tank. That one is flawlessly designed and printed and detailed, with superb fit, and has a full set of decals to boot. I assembled and painted both items before going on holiday, and returned to the bench a week later.
I had to work from two decal sheets, and all the while match with the reference images. I soon found out that the Superscale sheet was now on the brittle side. I might have alleviated that with Liquid Decal Film, but when I realized it exactly when the two largest decals had been wetted already, so no chance. I made it somehow, and then proceeded with a few decals at a time to reduce the risk of collateral damage.
 Once all decals from both
sheets were applied, I switched to preparing the various remaining fiddly bits,
as in antennae, windscreeen wipers and acuators. I then added the wings, which
fit very well on the upper sides, but left a small gap at the undersides. I
filled that with a mix of thin PVA glue and the appropriate shade of paint. It
took two or three applications due to shrinking, but did the job.
Once all decals from both
sheets were applied, I switched to preparing the various remaining fiddly bits,
as in antennae, windscreeen wipers and acuators. I then added the wings, which
fit very well on the upper sides, but left a small gap at the undersides. I
filled that with a mix of thin PVA glue and the appropriate shade of paint. It
took two or three applications due to shrinking, but did the job.
Now came the real home stretch. I added the gear and gear doors, with the wheels slightly sanded to flatten them a bit. Next came the underwing stores and engines, followed by the fiddly small probes and dorsal blade antenna. After another gloss and then flat coat I did a very small amount of weathering with artist´s oils, sealing that off with another flat coat. I wasn´t spared my usual goofs, one of them accidentally loosening the upper half of the port „704“ decal and finding it on my stoopid thumb. I actually managed to return it to where it should be. My wife was surprised there had been no primal screams from the modeling when I told her afterwards.
The final goof came after the canipy masks had been removed and the windscreen wipers added. I belatedly realized I needed to unmask the crew windows. In doing that the model slipped from my grubby mitts and I broke off one blade antenna and two out of four wheels. They are now fixed with steel pins for extra stability.
I have customized a transport/storage box with foam board inserts, and sadly this is where the model will spend most of its time.
| CONCLUSIONS |
o for it! Tackle that stash! I found this build strangely liberating and fun, and am quite happy with the end result. It sure has oodles of goofs, glitches and blunders any expert will bemoan, but it is what suits me best in modeling, and made the past six weeks quite a happy time. Rather build it now than have one more unbuilt kit dumped when I pop my clogs ...
| REFERENCES |
https://www.geaerospace.com/news/articles/people/sundown-viking-s-3
https://www.scalemates.com/kits/superscale-international-48-421-s-3-vikings-low-vis--1379757
Frank Spahr
7 November 2025 Copyright ModelingMadness.com. All rights reserved. No
reproduction in part or in whole without express permission. If you would like your product reviewed fairly and fairly quickly, please
contact the editor or see other details in the
Note to
Contributors.