| KIT # | 8216 |
| PRICE | $23.50 (approx.) |
| DECALS | VS-29 aboard U.S.S. Ranger |
| REVIEW BY | Drew Nix |
| NOTES: | OVERALL IMPRESSION: Excellent |
HISTORY
Meeting a Request For Proposal issued by the U.S. Navy in 1968, the Lockheed S-3A Viking has filled the anti-submarine hunter/killer role since 1972. A four-place, twin-engined design; the Viking uses turbofan power for long loiter time in its designed role. The S-3A could carry either bombs or depth charges as well as anti-submarine torpedoes. The updated S-3B is wired to use the Harpoon anti-shipping missile. As with many Navy aircraft, the Viking can fulfill a multitude of roles including tanker, electronic warfare, and COD (Carrier Onboard Delivery).
THE KIT
When this kit was first released in the 80's, it was considered "Kit of the Year" by many modeling publications. It is still a good model, molded in light gray plastic with finely engraved panel lines. On the down side, as with many ESCI kits, it lacks detail in the cockpit and wheel wells.
CONSTRUCTION
Unusually for models of that time, construction doesn't begin with the cockpit. Instead the arrestor hook bay and the MAD boom are constructed. The MAD boom is designed to move in and out while the tailhook raises and lowers, but I opted to cement both in the retracted position after painting the end of the MAD boom Radome Tan. This assembly is added to the right fuselage half. The nose wheel well is added to the left fuselage half. The windows for the SENSO and the TACCO are added to the fuselage halves before they are glued together. Since there is no interior detail in this area, the INSIDES of the windows were painted the interior color of light gull gray. The fit of the fuselage halves was very good, surprising on a model of this size.
The FLIR radome can be added next, but I waited until after all painting was done. ESCI has a clever way of allowing the modeler to show the radome either retracted or extended. If shown retracted, then the radome is molded into its bay in the left fuselage half. To show it extended, a piece fits over the retracted radome to represent the extended version. Since the bottom of the FLIR was to be painted Radome Tan, I chose to show it extended to keep from having to do some tricky masking in the small bay area.
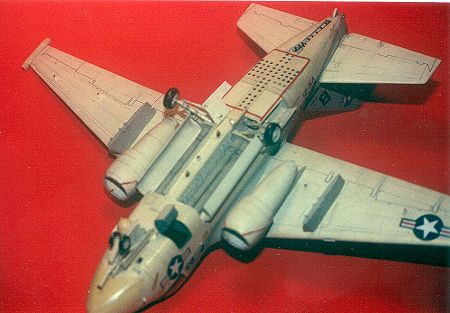
The instructions would have you do the gear and weapons bay next. I painted both areas Floquil White (IMHO the best white for airbrushing, usually covering in one coat), then tacked the gear doors and weapon bay doors in their closed positions using white glue. As mentioned earlier, this is an area where, IMHO, all ESCI kits fall short. The detailing in the various bays is rudimentary at best. This doesn't pose that much of a problem for the nose gear well and the weapons bay since both areas are crowded with equipment hiding this lack of detail. It really shows in the wide-open main gear wells and the boarding ladder/hatch. Regarding the latter, the steps are nicely done, but the passage to the interior is blanked off giving a somewhat unsatisfactory "incomplete" feel to this area. The complex nose wheel struts are molded in one piece, a nice touch. The main gear struts are molded in two pieces each. This turned out to be a weak area of the model, as the gear has broken off on more than one occasion!
The area depicting the sonobouy ejection tubes was next. The fit here was not as good as this piece is flat and is meant to be added to a curved surface. The tail planes come in two halves. Again fit was good, as was the mating to the empennage area. The tailplanes have some dihedral to them so check the drawings at the end of the instruction sheet before gluing them in place. The main wings also come in two halves and again fit was excellent all along the leading and trailing edges.
The construction of the turbofan pods was next. Here the kit took an unexpected turn for the worst! The fan blades and the turbine exhaust pieces are supposed to fit between the engine pod halves. The problem is that the fan blade disc at the front is too wide to allow the pod halves to come together. This required careful sanding of the offending discs until they would fit and allow the pod halves to close. After that was done, a nasty seam shows up on the inside of the engine pods in the area leading up to the turbine fans! I filled this seam by successively applying white glue to the seams, letting it dry, and then applying white acrylic paint. This process was repeated until both top and bottom seams were filled.
The instructions next have you add the completed engine pods, the wing pylons, and the ECM wingtip pods to the completed wings. In order to better facilitate final painting, I left these off until later. All parts mentioned fit VERY well to the wings, so have no fear.
The cockpit area is next. Again, as with most ESCI kits, this area is a problem. The cockpit fixtures are nicely done—you get two decent ejection seats, two control sticks, the overhead piece that contains the refueling boom, and a rear bulkhead with a depression built into it showing the curtained-off area that leads from the cockpit to the rear compartment. The problem is that ALL instruments are represented by, flat, black and white, inaccurate decals! I spiffed this area up by adding a throttle quadrant to the center console, and making switches and knobs from microfine solder, Grandt Line nuts and bolts, and stretched sprue. Even though this area would be mostly hidden when the canopy is added, I wanted SOME detail to appear to be there in the areas one could see.
The completed cockpit is then slid into the fuselage. I really had to force mine, but eventually it snapped into place. Next the canopy was added. Once cemented into place, the glass areas were masked off using frisket paper. The wings are added to the fuselage, a little putty being necessary for a good fit. The wings actually have a little anhedral to them so check the drawings carefully when adding them to the fuselage.
PAINTING AND DECALS
 The model
was now painted with Floquil Primer to check the seams in preparation for
final painting. Any mistakes were corrected. The whole model was then sanded
lightly with 600-grit sandpaper. This assures that the paint coats to follow
will stand a better chance of being smooth. The Viking I chose to depict
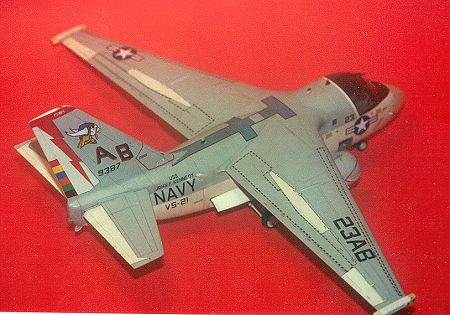
was painted in the then standard Navy scheme of Light Gull Gray over White.
The model
was now painted with Floquil Primer to check the seams in preparation for
final painting. Any mistakes were corrected. The whole model was then sanded
lightly with 600-grit sandpaper. This assures that the paint coats to follow
will stand a better chance of being smooth. The Viking I chose to depict
was painted in the then standard Navy scheme of Light Gull Gray over White.
First Floquil White was sprayed over the entire model and the engine pods. Next, the bottom of the fuselage was masked with masking tape creating a hard edge between the two colors. Also masked, with frisket paper, were all of the moveable control surfaces. Control surfaced were painted white on aircraft of that era. There was a white strip between the back of the cockpit and the top of the fuselage. The instruction sheet drawings were enlarged to 48th scale, the white strip was measured, and a strip of making tape of the same width was cut and applied to the model. The engine pods were also masked with a strip of masking tape along their centerline. Model Master Light Gull Gray, FS 36440, was sprayed on the parts not masked and on the wing pylons.
Next, the area of the cockpit was masked off and the frames were painted Model Master Flat Black. The anti-glare panel in front of the cockpit was also masked off and painted black at the same time. Next, the nose radome was masked off and painted Model Master Radome Tan. The model was then sprayed with several coats of Future Floor Wax in preparation for the decals. The kit decals depict a Viking with VS-29 aboard U.S.S. Ranger. They are O.K., but I wanted to do the more colorful markings of VS-21. Luckily, Microscale (now Superscale) made a set of decals (#48-98) depicting the CAG's aircraft from this squadron. These went on without a hitch. Unfortunately, the same can't be said of the kit decals that had to be used for the common markings! They shattered when placed in water. Lucky for me, a friend had a spare set that he let me have. These were very useable. Studying pictures of the real aircraft, I noticed where some markings were not shown on the decal sheets. I made these myself, mainly using red stripes from another decal sheet.
Another coat of Future sealed the whole shebang. Poly S Flat Coat was used to make the decals matte. The refueling boom was carefully slid into place above the cockpit and cemented into place. The engine pods, wing pylons, FLIR pod, landing gear, boarding steps, and all gear door covers were added to the completed model.
CONCLUSIONS
The ESCI kit builds into an impressive model. It does have its weak areas, but they don't detract from the overall effect. Recommended.
Copyright ModelingMadness.com. All rights reserved. No reproduction in any form without express permission from the editor.
Back to Reviews Page 2017