| KIT #: | 04298 |
| PRICE: | €17,95 at the LHS |
| DECALS: | Two options |
| REVIEWER: | Jeroen Koen |
| NOTES: |
DXM decals 72-005 used. |
| HISTORY |
Like it or not, the Super Hornet is about to be the only jet to be deployed on
modern US carriers. Faced with the limitations of the F/A-18A/C, mostly limited
payload and range, McDonnell-Douglas proposed a 30% bigg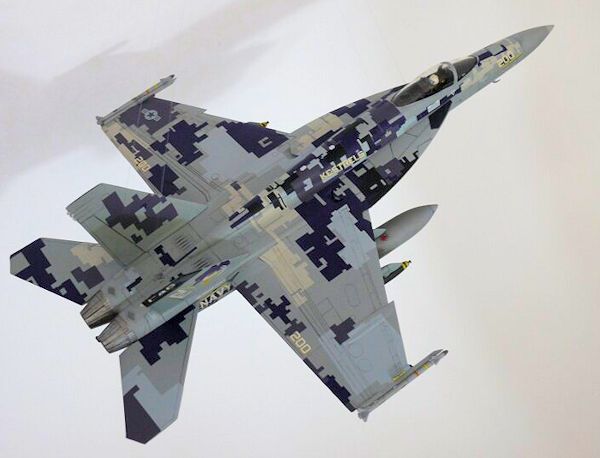 er
version of that aircraft to replace, after the A-12 Avenger II mess, the A-6 and
F-14. The F-14 was then in the process of being upgraded to the B/D versions,
but it was still an older maintenance intensive airframe that was being misused
as a bomber, not to mention the price. McDonnell-Douglas advertised the Super
Hornet as having a lot of parts commonality with it's smaller brother, while
addressing the limitations of that aircraft. Both apparently aren't entirely
true, and apart from the designation, it is very much a different aircraft.
er
version of that aircraft to replace, after the A-12 Avenger II mess, the A-6 and
F-14. The F-14 was then in the process of being upgraded to the B/D versions,
but it was still an older maintenance intensive airframe that was being misused
as a bomber, not to mention the price. McDonnell-Douglas advertised the Super
Hornet as having a lot of parts commonality with it's smaller brother, while
addressing the limitations of that aircraft. Both apparently aren't entirely
true, and apart from the designation, it is very much a different aircraft.
The first units started getting the Super Hornet at around the year 2000, and
were a mix of former F-14 and A-6 units. There does not appear to be a standard
regarding who gets either single- or twoseaters: a lot of former F-14 units got
the two-seater, but, for example, VFA-31 got single seaters. Currently F/A-18C
units also convert to the Super Hornet, and the EA-18G is currently also
replacing the ageing EA-6B Prowler, so in the not so far future, Super Hornets
will be all you see on carriers, as far as fast jets go.
Personally, and honestly, I find the Super Hornet rather uninteresting... it is
the paint schemes that make it a neat modelling subject!
| THE KIT |
So, there it is. Revell's Super Hornet landed on my workbench. Copyrighted 2009,
this kit is supposed to be a direct scale-down of their much maligned 1/48th
offering.
After opening up the typical end-opening blue Revell box, with a very nice
box-art of the VFA-137 full colour version landing back on the carrier, you're
greeted by a few grey sprues, some of which are marked “Super Hornet”, while the
smaller sprue marked “Single Seater” holds the parts specific for the E model,
such as the decking to cover up the hole for the backseater. This makes it
obvious an F model is to be released, too, which they only recently did, in
December 2012. Obviously also specific to the E model is the single seater
canopy. Revell ch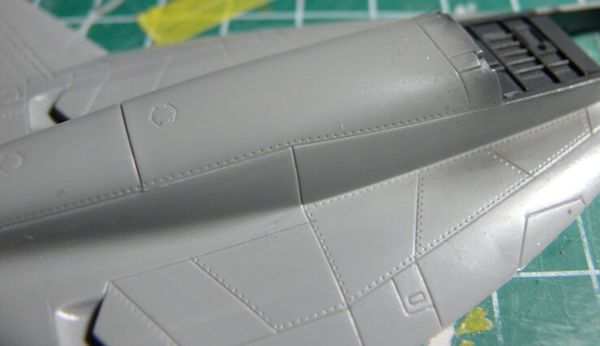 ose
ease of use, no mould line in the middle, over accuracy here, since it it does
not have the omega-shape of the real thing. The clear parts are bagged
separately to prevent damage. Unlike Hasegawa, Revell provides a decent cockpit
and weapons. These include 2 each of Mk83s, AIM-9Xs, AIM-120s and GBU-31s. Also
provided are three fuel tanks, and an AN/ASQ-228 pod with an adapter pylon.
ose
ease of use, no mould line in the middle, over accuracy here, since it it does
not have the omega-shape of the real thing. The clear parts are bagged
separately to prevent damage. Unlike Hasegawa, Revell provides a decent cockpit
and weapons. These include 2 each of Mk83s, AIM-9Xs, AIM-120s and GBU-31s. Also
provided are three fuel tanks, and an AN/ASQ-228 pod with an adapter pylon.
Due to the rather odd shapes of the Super Hornet, apparently there is no “easy”
way to mould one. So, you get a four part nose, a rear canopy decking, and two
side panels that extend into the intakes and a top and bottom part to make up
the main fuselage. The wings are moulded on the top and bottom halves and have
separate wing-tips, but no provision to show them folded. Slats and flaps are
also moulded into the wings and can't be shown differently without cutting.
The panel lines are obviously recessed, but in a more heavy-handed Revell way,
meaning they are a bit deeper and wider than e.g. Hasegawa, though they are
better than say Airfix's 1/72 Bf110 or Spitfire IX. I must say the older Revell
Ju290 and He177 have better surface detail, though.
The remaining stuff in the box is a very comprehensive decal sheet, that
includes all the blue bits for the VFA-137 version, as well as free decals for
HARMs that aren't included in plastic (the Italeri A-6 Intruder is happy with
those decals, though!), and the typical Revell instructions. So far, so good!
| CONSTRUCTION |
 roll of
sandpaper around a paintbrush-handle. On the internet I read that people pour
white latex paint into them to make them smooth and white at the same time. I
tried that, but I must have done something not quite right, as I was left with
an even worse looking intake than before! I could not get it out either, so I
took my loss and assembled the rest. Like Carmel Attard indicated in his review
of this same kit here on MM, the completed intake assembly will not fit though
the hole in the fuselage. Unlike Carmel, who removed a bit of the fuselage side
(that will be hidden by the side inserts), I first added the ducting parts, then
left them to dry overnight. Then I built up the supports in the lower fuselage
for the aluminium tubing that would hold the acrylic rod stands through the
exhausts, added the cockpit (minus seat, stick, pilot and instrument panel),
epoxied the tubing and exhaust pipes in place and when that had settled after a
day or so, I joined the top and bottom halves. Apart from the tail end, the fit
is quite good. I had already assembled the four part forward fuselage earlier,
and glued that in place.
roll of
sandpaper around a paintbrush-handle. On the internet I read that people pour
white latex paint into them to make them smooth and white at the same time. I
tried that, but I must have done something not quite right, as I was left with
an even worse looking intake than before! I could not get it out either, so I
took my loss and assembled the rest. Like Carmel Attard indicated in his review
of this same kit here on MM, the completed intake assembly will not fit though
the hole in the fuselage. Unlike Carmel, who removed a bit of the fuselage side
(that will be hidden by the side inserts), I first added the ducting parts, then
left them to dry overnight. Then I built up the supports in the lower fuselage
for the aluminium tubing that would hold the acrylic rod stands through the
exhausts, added the cockpit (minus seat, stick, pilot and instrument panel),
epoxied the tubing and exhaust pipes in place and when that had settled after a
day or so, I joined the top and bottom halves. Apart from the tail end, the fit
is quite good. I had already assembled the four part forward fuselage earlier,
and glued that in place.
 finger
to cover up the worst of it, and left it that way. Still not pretty, but there
wasn't much I could do about it at this stage. I'd really recommend Carmel's way
of assembling the intakes, which he described in his review. That will ensure
the intake trunks are aligned properly, and since they are not glued to the
fuselage yet, it'll be easier to clean them up too.
finger
to cover up the worst of it, and left it that way. Still not pretty, but there
wasn't much I could do about it at this stage. I'd really recommend Carmel's way
of assembling the intakes, which he described in his review. That will ensure
the intake trunks are aligned properly, and since they are not glued to the
fuselage yet, it'll be easier to clean them up too.
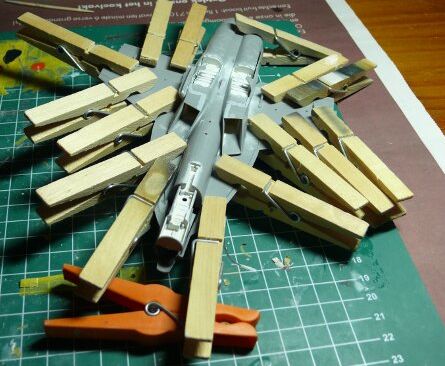
I only glued the forward parts of the fuselage side inserts, where they meet the
intakes, and when that had set up, I glued the rear parts in with a bit of
bending and fiddling. There are some gaps at the ends that needed filling in a
place with a lot of scribed detail, so it had to be done rather carefully. I
used masking tape to protect the scribing. Some of it had, obviously, to be
re-scribed anyway. Another area needing sanding was the nose, though no filler
was needed on it's four pieces, a bit of filler was needed where it meets up
with the fuselage halves. Common to both the nose and the rear side insert, is
an anomaly where on the 2-tone colour scheme the colour demarcation is. From the
windshield to about the box on the nose, there is a recessed dent on the nose,
and on the rear insert between the flap and horizontal stabilizers (where the
NAVY text goes) there is a raised oval section, also shaped like the demarcation
of top and bottom colours. Very odd, and due to all the details in that area, a
curious error I wasn't prepared to fill (nose) or sand flat (rear).
A bit of filler was also needed on the windshield, and some sanding on the width
of the main canopy. Doing my model gear-up, the gear doors were also added.
These are one-part, requiring you to cut them apart when doing it gear down, and
fit quite well. Only a bit of sanding was required on those.
 had their decals
added. I omitted the second GBU-31 in favour of a tank, and left off the
AIM-120s and their rails entirely, but did add their pylons. The two tanks I
would use were painted in Humbrol 127 as well at that time as a primer to check
for flaws, and after that I pre-shaded them with dark grey and brown to give
some contrast with the otherwise clean aircraft. Their final colour would be
done at the same time as the rest of the airframe. The AN/ASQ-228 pod, though
one piece, had a serious mould seam/mismatch that required clean up and
rescribing. Since I wanted mine “as in use” I drilled two holes on the front,
painted the big one silver inside, and the second smaller one black. After the
whole thing was brush painted Hu127 as well, I put a blob of Clearfix in them to
act as glass. Google turned up more than a few pictures of the pod. Without the
sensors (the head can rotate to protect them) the pod looks rather bland. The
pylon that it mounts to does not have any indication of where to fit it, so I
used some pictures to get it approximately in position.
had their decals
added. I omitted the second GBU-31 in favour of a tank, and left off the
AIM-120s and their rails entirely, but did add their pylons. The two tanks I
would use were painted in Humbrol 127 as well at that time as a primer to check
for flaws, and after that I pre-shaded them with dark grey and brown to give
some contrast with the otherwise clean aircraft. Their final colour would be
done at the same time as the rest of the airframe. The AN/ASQ-228 pod, though
one piece, had a serious mould seam/mismatch that required clean up and
rescribing. Since I wanted mine “as in use” I drilled two holes on the front,
painted the big one silver inside, and the second smaller one black. After the
whole thing was brush painted Hu127 as well, I put a blob of Clearfix in them to
act as glass. Google turned up more than a few pictures of the pod. Without the
sensors (the head can rotate to protect them) the pod looks rather bland. The
pylon that it mounts to does not have any indication of where to fit it, so I
used some pictures to get it approximately in position.
I then shot a new coat of my proven tin of Humbrol 127, to act as primer, using
the same method and it went on really beautiful and smooth. A few area's
required some more sanding and a bit of filling, and I noticed the top and
bottom sides of the flaps had big sunken areas in them that I filled with
Surfacer and sanded smooth. Then it was off to...
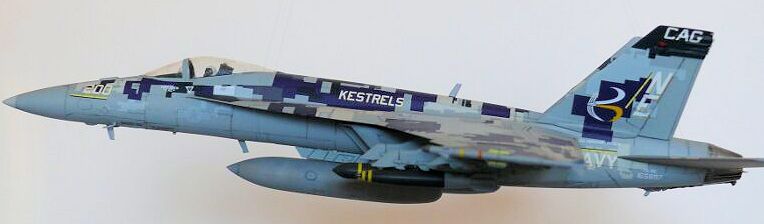
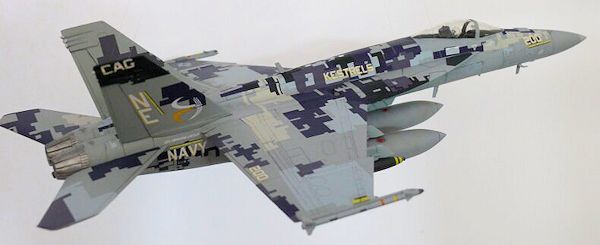
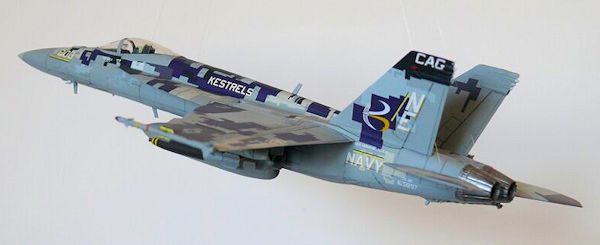
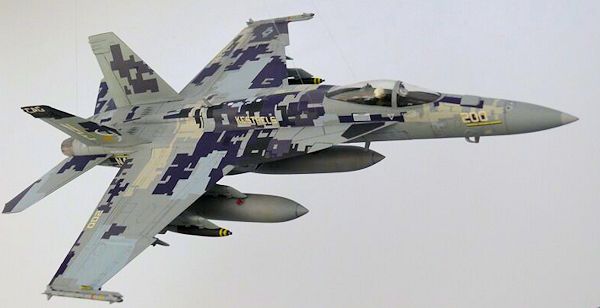
| COLORS & MARKINGS |
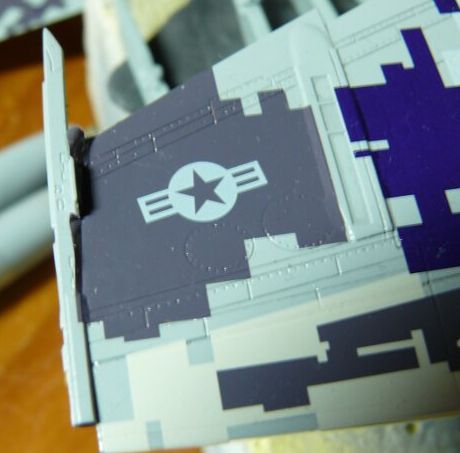 thinness.
Unfolding them is, thanks to their durability, not a problem. A dab of Daco
Medium decal setting made them draw into the panel lines really well as you can
see on the picture. The only drawback is that there are so many of them, and
that it is really a giant puzzle to get them both back-to-back without gaps, and
conform them to areas like the spine hump and cockpit surround, but I knew that
beforehand, didn't I, so quit complaining! While no kit is indicated, they might
be scaled for the Hasegawa, as they don't fit well around the cockpit and nose,
and I had to trim some off and overlap a bit on the spine, both of which are
bigger on the Hasegawa kit. I also had to cut some away where they end on a
panel (such as the flaps) but don't line up entirely. Fortunately I suppose the
canopy got exchanged on the real aircraft and was not repainted, so I could get
away with not doing the canopy, and could use the minuscule bits of extra
provided to help patch up the nose. All of this, including the best sequence to
apply the camouflage decals, is indicated in the instructions. Except the
patching up, that is... As it is, covering up about 80% of a model with decals
will always be a lot of work and require some fiddling and cutting here and
there. Those who have built WWI Fokker D.VIIs entirely covered in Lozenge decals
will know what I mean!
thinness.
Unfolding them is, thanks to their durability, not a problem. A dab of Daco
Medium decal setting made them draw into the panel lines really well as you can
see on the picture. The only drawback is that there are so many of them, and
that it is really a giant puzzle to get them both back-to-back without gaps, and
conform them to areas like the spine hump and cockpit surround, but I knew that
beforehand, didn't I, so quit complaining! While no kit is indicated, they might
be scaled for the Hasegawa, as they don't fit well around the cockpit and nose,
and I had to trim some off and overlap a bit on the spine, both of which are
bigger on the Hasegawa kit. I also had to cut some away where they end on a
panel (such as the flaps) but don't line up entirely. Fortunately I suppose the
canopy got exchanged on the real aircraft and was not repainted, so I could get
away with not doing the canopy, and could use the minuscule bits of extra
provided to help patch up the nose. All of this, including the best sequence to
apply the camouflage decals, is indicated in the instructions. Except the
patching up, that is... As it is, covering up about 80% of a model with decals
will always be a lot of work and require some fiddling and cutting here and
there. Those who have built WWI Fokker D.VIIs entirely covered in Lozenge decals
will know what I mean!
If I may offer some constructive critique, it would be that colour of the
lightest grey seems a bit too pale/cream, and that there is very little contrast
between the recommended Hu127 base colour and the provided insignia and intake
warning stripes. A little bit more of each colour decal would also be welcomed
in case you mess something up and have to patch up an overlap or flaked off bit.
There are some small 5x2mm rectangles provided for that, I think, as they are
not numbered nor mentioned anywhere in the instructions. All in all, I spent
about 20 hours, over the course of a few weeks, applying just the decals on the
model, but the results speak for themselves. The reason for the spread out
period is not just my six month old son, but also that I didn't want to damage
previously applied decals by handling the model too soon.

Then it was time for a panel line wash and some weathering. I normally try to
vary the colours of the wash with the camouflage colour onto which it flows, but
on this complex scheme that is nearly impossible. Also, in spite of the fact
that they settle really well into the panel lines, there is still a small ridge
that I had trouble getting the wash to flow into. I tried acrylic artist paints,
as well as enamel, but wasn't really satisfied. In the past I tried using a lead
pencil in cases like this, so that's what I used. It does require an addition
flat coat for the pencil to grip into. The metallic shine the pencil leaves is
taken care of with an additional flat coat. I used Revell Aqua acrylic flat for
this, which is really dead flat -perhaps a bit too flat for this particular
aircraft? I could not think of a proper way to weather this thing, with all
those colours. With those complex shapes, post shading did not seem to be a good
idea with my, ehhhmm, airbrushing skills, so I left it at the pencil lines and
some light pastels. The real thing, while not exactly shiny-new, did not look
like a flying wreck either.
Since I did not want to flat-coat the metal parts, these were done last. They
required some creative masking! Normally I would have attached the exhausts
last, but since I had installed the tubing for the stand, that wasn't really an
option. I painted them Revell Aqua Iron (91) and washed them with Tamiya Smoke
-only to have the Aqua peel off.. forcing me to repaint.
After that it was just a matter of assembling all remaining parts. Since I was
doing this gear up, that meant only pylons, missiles, bombs, tanks, tail hook,
and a few antennae. I then unmasked the canopy so that the poor pilot could
finally see something again, and called her done. Well, nearly. I still have to
do the stand, but that will have to wait until my wife isn't around, as I'll
need her oven for that!
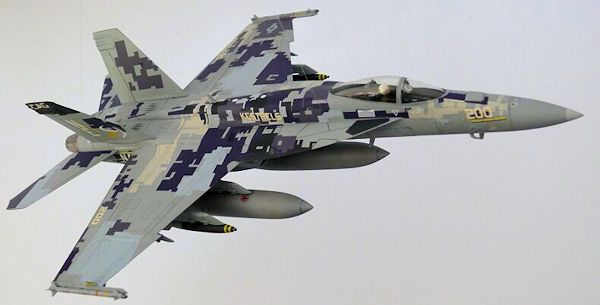
| CONCLUSIONS |
Seen as a model kit, the Revell Super Hornet is
a pretty good kit, that builds quite well and has few trouble spots. It
comes with a good selection of weapons, a decent cockpit, and a very large decal
sheet, for a decent price, too. However, in the accuracy department, there
appear to be some lesser points. There are those dents and humps on the nose and
rear part between the wing and horizontal tails; where on the normal 2-grey
scheme the colour demarcation is. Kind of reminds me of those really old kits,
where you get lines in or on the plastic to paint the markings on. The nose
looks too pointy to me, the cockpit proportions and ejection seat appear to be
off, and the spine looks too skinny as well. These things aren't easy to fix. A
bit harsh? Perhaps, but after their 1/48 F-15E and Rafale, I perhaps expected
more of them. The Hasegawa
 kit may be
more spartan and not have the latest ECS exhausts between the tails, but it has
better shapes and panel lines. If accuracy is more important to you, I'd suggest
getting the Hasegawa kit. The basic boxing isn't a lot more expensive than this
Revell kit, though you still need to get some weapons and perhaps do some work
on the bare cockpit and intakes. If you want a nicely detailed model that looks
like a Super Hornet for a good price, like I do, get the Revell. Due to it's
relative ease of construction, it would also be a good choice for
“fleet-owners”. Posing it with open canopy makes the shape issues less obvious,
and just don't try to install a resin seat of proper proportions, or fit a
pilot, like I did! :-)
kit may be
more spartan and not have the latest ECS exhausts between the tails, but it has
better shapes and panel lines. If accuracy is more important to you, I'd suggest
getting the Hasegawa kit. The basic boxing isn't a lot more expensive than this
Revell kit, though you still need to get some weapons and perhaps do some work
on the bare cockpit and intakes. If you want a nicely detailed model that looks
like a Super Hornet for a good price, like I do, get the Revell. Due to it's
relative ease of construction, it would also be a good choice for
“fleet-owners”. Posing it with open canopy makes the shape issues less obvious,
and just don't try to install a resin seat of proper proportions, or fit a
pilot, like I did! :-)
The DXM decals were very nice to work with -well thought-out instructions, good
quality Cartograf printing, and mostly proper scaling, even on a kit I suspect
they were not designed for. If you like the scheme, get them and have fun -if I
can do it (and like it!), I'm sure you can do as well... :-) Just be sure to
adjust your base coat a bit so the insignia and intake triangles show up a bit
better, or use those from the kit sheet. The model, even when it was only half-decalled,
attracted a lot of attention in my display case, even from people who have zero
interest in models and/or aircraft.
Finally, thanks to Scott for giving me the opportunity to use these
nice decals
for my build.
| REFERENCES |
Google only this time -many pictures of this aircraft are on the internet, and the scheme looks different on all of them!
April 2013
If you would like your product reviewed fairly and quickly, please contact the editor or see other details in the Note to Contributors.