
| KIT #: | 07019 |
| PRICE: | ~$50.00 in 2005 |
| DECALS: | Four options |
| REVIEWER: | Spiros Pendedekas |
| NOTES: | "Jolly Rogers" release |
| HISTORY |
During the 60s, the USN sought a long range high performance interceptor to defend its fleet. For this Fleet Air Defense (FAD) aircraft and in favor of versatility, the Navy was directed by Secretary of Defense Robert McNamara to participate with the USAF in the so called Tactical Fighter Experimental (TFX) program. Though the TFX (which would become the F-111) was fast with long range and high payload, it lacked the much needed by the Navy maneuverability and overall performance. Still, the Navaized TFX went ahead (as the F-111B), only to be canceled soon after, with Grumman being awarded a contract by the Navy to finally build their FAD aircraft. The F-14 was born, with the name “Tomcat” partially being attributed to Admiral Thomas F. Connolly, as the nickname "Tom's Cat" had already been widely used within the program during development.
The plane was essentially designed around the TF30 engine, the AWG-9 radar and the AIM-54 Phoenix missile, with plans to replace the engines with F401-400 then in development. Interestingly and on par with the F-15, no prototypes were built, with the first flight taking place on 21 December 1970 and operational status being reached in less than three years afterwards. The type went through significant upgrades in armament and electronics, including the implementation of the Tactical Airborne Reconnaissance Pod System (TARPS).
 During the
mid 1980s it was decided to replace the existing TF30 engine with the
F110-GE-400. A few years later, the F-14D was introduced, which, apart from the
F-110s, featured digital avionics, a glass cockpit and, equally importantly, a
Digital Flight Control System (DFCS) which significantly improved its handling
qualities.
During the
mid 1980s it was decided to replace the existing TF30 engine with the
F110-GE-400. A few years later, the F-14D was introduced, which, apart from the
F-110s, featured digital avionics, a glass cockpit and, equally importantly, a
Digital Flight Control System (DFCS) which significantly improved its handling
qualities.
The Tomcat served as the U.S. Navy's primary maritime air superiority fighter, fleet defense interceptor and tactical aerial reconnaissance platform well into the 2000s. It was retired by the U.S. Navy on 22 September 2006, supplanted by the Super Hornet. Having been exported to Pahlavi Iran under the Western-aligned Shah Mohammad Reza Pahlavi in 1976, a number of examples still (2024) remain in service with the Iranian Air Force.
Nicknamed “Jolly Rogers” and based at NAS Oceana, VF-84 Squadron was originally established as VA-86 on 1 July 1955 and was immediately redesignated as VF-84. Upon its transition to the F-14, the Squadron embarked on its first cruise on Nimitz in December 1977 and by 1979 it became the first TARPS capable Squadron of the fleet. In 1988 it was deployed with Theodore Roosevelt, while in late 1989 it started Shakedown and initial carrier qualifications for the USS Lincoln.
Throughout the Gulf War, the Squadron members flew 468 combat sorties, with an additional 111 post war in support of Operation Provide Comfort before Roosevelt was relieved by Forrestal in June 1991. In March 1993 the Squadron redeployed on Theodore Roosevelt, flying critical TARPS reconnaissance missions during Operation Deny Flight, providing information about Bosnian Serb positions around Sarajevo. It also flew in support of Operation Southern Watch, enforcing the no-fly zone over southern Iraq. VF-84 returned to NAS Oceana in September 1993, being disestablished on 1 October 1995, due to the downsizing.
| THE KIT |
 Hasegawa
came in 1988 with their very nice 1/48 F-14A, reboxing it more than 40 times
ever since and practically covering (with the occasional addition of some extra
parts) all Tomcat versions. Though being 35 years old (as of 2024) and despite
the presence of newer kits that might offer more in terms of detail and
buildability, these are still very nice offerings and can produce really
accurate Tomcats.
Hasegawa
came in 1988 with their very nice 1/48 F-14A, reboxing it more than 40 times
ever since and practically covering (with the occasional addition of some extra
parts) all Tomcat versions. Though being 35 years old (as of 2024) and despite
the presence of newer kits that might offer more in terms of detail and
buildability, these are still very nice offerings and can produce really
accurate Tomcats.
The specific kit is the second (1989) reboxing, bought in 2005 from one of my then de rigeur/sadly now closed Athens hobby shops at what seemed a logical price and for a more in-depth look at its contents, you may read its preview found at the ever growing MM archives.
| CONSTRUCTION |
 Being a
complex build, I first performed the radical act of reading the instructions, in
order to figure out a sort of building sequence. I started by assembling the
cockpit, attaching the 5-piece nose bay with the rear structural plate
underneath and trapping the whole subassembly between the front fuselage halves.
The gun port panel and entry steps were all attached “shut”, followed by the
nose and IRIST sensor underneath. While instructions stated 12g weight, I
trapped 20g in the nose just to be safe.
Being a
complex build, I first performed the radical act of reading the instructions, in
order to figure out a sort of building sequence. I started by assembling the
cockpit, attaching the 5-piece nose bay with the rear structural plate
underneath and trapping the whole subassembly between the front fuselage halves.
The gun port panel and entry steps were all attached “shut”, followed by the
nose and IRIST sensor underneath. While instructions stated 12g weight, I
trapped 20g in the nose just to be safe.
Basic cockpit color was Hu140 Gull Gray. Instrument panels and consoles were painted black then dry brushed with silver and had some switches “pinned” with red, yellow and white paint. RIO’s prominent radar screen received a blob of clear green for realistic looks. All top anti-glare cockpit areas were painted black, with the exception of the front and rear panel shrouds, which were painted khaki.
Moving to the rear fuselage
section, after building-up the main wheel wells’ sidewalls to the lower fuselage
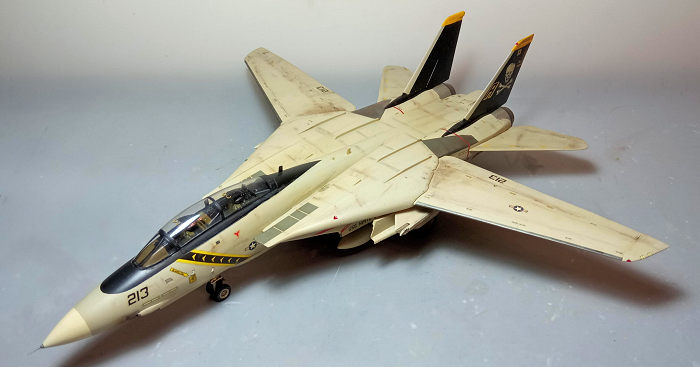
half, I attached the upper half. Having decided to go for extended main wings, I
attached the correct wing glove seals. The complex intakes were then assembled
and attached, followed by the extra main sidewalls and what I believe are the
top located air conditioning louvers. Intake innards were painted white, while
the compressor faces were painted steel.
The tail was then assembled and attached in position (I went with retracted air
brakes). The two afterburner outer sealing plates were then attached, followed
by the hook base and the two ventral fins, with the front and rear fuselage next
mated together.
The wings, each a 6-piece
affair, were assembled with flaps and slats in neutral and attached. The 2-piece
vertical stabilizers were also attached at this time, as were the front
underside fuselage missile pallets. The wing tanks, the TARPS pod and the wing
glove pylons were also assembled, but not attached.
This concluded basic assembly. Overall fit presented a number of challenges here
and there (the complex intakes immediately spring into mind), but with some care
during construction all came together in the end. After a filling and sanding
session, it was time to take the bird to the paint shop!
| COLORS & MARKINGS |
 I started by
painting the nose white, then masked it off and gave the complete model,
including the gear doors, external tanks and TARPS pod, a coat of Hu129 US Gull
Gray. The front anti glare area, the ventral strakes’ external sides and the
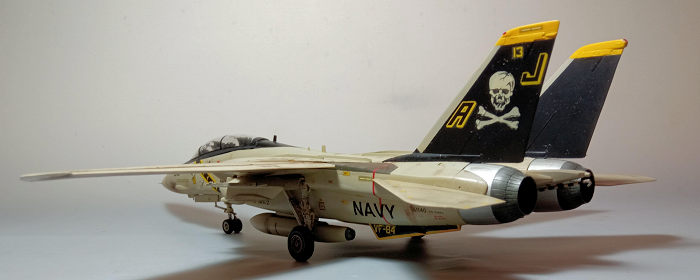
complete fins were next painted black, the latter having their tops painted Hu69
Yellow. The wing and lower intake lips leading edges were next carefully masked
and painted gunmetal, to represent the distinctive “Corroguard” coating, while
the gun exit area was painted steel. The wing seal gloves were painted Hu123
Extra Dark Sea Gray, with a coat of Future preparing the bird for decals.
I started by
painting the nose white, then masked it off and gave the complete model,
including the gear doors, external tanks and TARPS pod, a coat of Hu129 US Gull
Gray. The front anti glare area, the ventral strakes’ external sides and the
complete fins were next painted black, the latter having their tops painted Hu69
Yellow. The wing and lower intake lips leading edges were next carefully masked
and painted gunmetal, to represent the distinctive “Corroguard” coating, while
the gun exit area was painted steel. The wing seal gloves were painted Hu123
Extra Dark Sea Gray, with a coat of Future preparing the bird for decals.
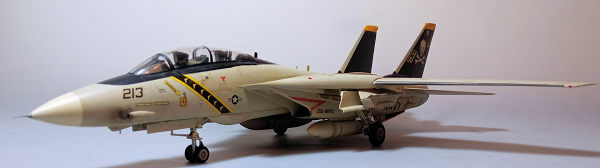
I used the kit decals, to represent the classic VF-84 Jolly Rogers scheme, depicting 161140/AJ 213 bird, as it stood on USS Nimitz. Despite their age and apart from taking ages to come off their backing sheet (soaked in hot water), decals behaved well, following all surface contours. Some slight silvering was noticed at black painted areas only, indicating an operator error. The fair amount of stencils offered a more realistic look to the model. A coat of Future sealed the decals.
| FINAL CONSTRUCTION |
The quite good looking seats were assembled and attached. Seat frames were painted black, the cushions khaki, seat belts light gray and the ejection handles black/yellow striped.
The landing gear was assembled and attached, with the bird proudly standing on its feet. Though relatively complex, assembly of the legs was easy due to the very helpful drawings provided at the instructions. I then chose the correct white metal main rims for my version and attached the vinyl tires, then glued the assembled wheels to the legs with cyano. Since the model is quite heavy, the vinyl tires acquired a quite realistic, weighted look. Also, since the rims are made of white metal, no danger of being eaten by the vinyl tires exists. All landing gear parts, door innards and bays were painted white, while oleos were highlighted with a fine tip silver pen. I was too lazy to paint the door edges red…
 The 5-piece
exhausts were next assembled and attached (I went for fully open nozzles). Their
front was painted steel, whereas their rear and innards were painted gunmetal.
The arresting hook was attached at this time, as well, requiring some twerking
to fit in (it was supposed to be trapped between its two housing halves, but I
elected to build and attach the housing at early stages, so it could be painted
together with the airframe). The hook was painted white with steel end and had
the black striped decal attached, which, to my satisfaction, succumbed nicely
around it. The wing tanks and TARPS pod were finally attached.
The 5-piece
exhausts were next assembled and attached (I went for fully open nozzles). Their
front was painted steel, whereas their rear and innards were painted gunmetal.
The arresting hook was attached at this time, as well, requiring some twerking
to fit in (it was supposed to be trapped between its two housing halves, but I
elected to build and attach the housing at early stages, so it could be painted
together with the airframe). The hook was painted white with steel end and had
the black striped decal attached, which, to my satisfaction, succumbed nicely
around it. The wing tanks and TARPS pod were finally attached.
I decided to give the bird some weathering, starting with a black wash at the landing gear area, then applying dark brown and black dry pastels at all areas where dirt, grime and the like would reside. An almost matt coat gave the bird its final hue.
The canopy was assembled and attached (I was a bit worried about the delicate inner PE frames, but all went well), as was the windscreen. Both had their well defined frames hand painted and, though fit was good at the front, the main canopy sat tad high at the rear. Since some considerable nerve wracking sanding would be required at the sensitive transparency, I decided to live with it.
The teeny tiny wing tip and anti collision lights were attached and accordingly painted with clear colors. The pitot and the various fuselage probes were painted steel and attached, before calling the Tomcat done!
| CONCLUSIONS |
Despite being superseded by newer toolings that offer more in terms of detail and buildability, this is still a very good kit of the Tomcat: overall shape looks spot on, molding is good, panel lines are finely recessed and at the right places, detail is good, transparencies are nice and clear, instructions are superb and decals are nice. Even out of the box, a really accurate Tomcat will come up, while with some extras and talent, real masterpieces can emerge, such as the wonderful builds from Dan Lee and Andrew Garcia.
True, Hasegawa 1/48 F-14s are
not easy builds, aiming at the average modeler and above, who has to take his
time during assembly, in order to make sure everything fits. Regularly reboxed
at competitive prices and with interesting schemes, if you have a few kits under
your belt and fancy building an impressive quarter scale Tomcat, this is
definitely a kit worth tackling.
Happy Modeling!
Spiros Pendedekas
7 October 2024
Copyright ModelingMadness.com. All rights reserved. No
reproduction in part or in whole without express permission.
If you would like your product reviewed fairly and
fairly quickly, please
contact
the editor or see other details in the
Note to
Contributors.