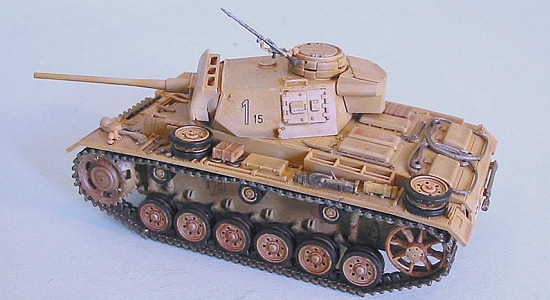
Tamiya 1/48 Panzer III ausf L
| KIT #: | ? |
| PRICE: | 1700 Yen at www.hlj.com |
| DECALS: | Two options |
| REVIEWER: | Tom Cleaver |
| NOTES: |
| HISTORY |
The Panzerkampfwagen III, which was known more commonly as the Panzer III, was developed during the 1930s and used extensively in the first half of World War II. It was originally designed to fight other armored fighting vehicles, fighting beside the infantry-support Pzkw IV as the Wehrmacht’s main battle tank. By 1942, it was largely obsolete in this role and was replaced that year by the up-gunned Panzer IV, though some would continue to be used for infantry support until late in the war.
The Panzer III saw action against Poland, France, the Soviet Union and in North
Africa, and some were still in use in Normandy and Arnhem in 1944. In the early
campaigns against Poland and France they outclassed opponents such as the Polish
7TP, 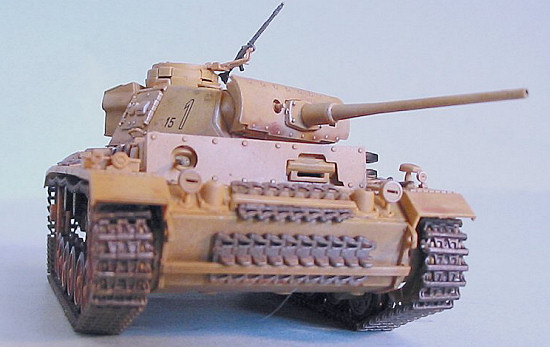 French R-35 and H-35 light tanks, and the Somua S-35 cavalry tank. In part
this was due to the German use of a 3-man turret crew with the commander
responsible for maintaining situational awareness. The Somua was completely
outclassed though on paper it seemed the more heavily-armed tank, due to its
one-man turret crew.
French R-35 and H-35 light tanks, and the Somua S-35 cavalry tank. In part
this was due to the German use of a 3-man turret crew with the commander
responsible for maintaining situational awareness. The Somua was completely
outclassed though on paper it seemed the more heavily-armed tank, due to its
one-man turret crew.
The Battle of Kasserine Pass:
The Battle of Kasserine Pass, which was actually several battles around the pass, marked the first time the American Army went head-to-head with the Wehrmacht, and was the last major battle in which the Panzer III tank played a major role.
Following the success of Operation Torch on November 8, 1942, the Allies hoped the days of Rommel’s Afrika Korps were now numbered. After the British breakthrough in the Battle of El Alamein fought the week before the North African invasion, Rommel - contrary to Hitler’s orders - was in full retreat, headed towards Tunisia. This had happened before, and the hope that the Afrika Korps was in its death-throes was premature. Rommel was simply consolidating his force.
As 8th Army’s “Desert Rats” chased Rommel across Libya towards Tunisia, the disorganized and inexperienced American Army made a slow advance on Tripoli. General Eisenhower would later say this was a violation of “every recognized principle of war.”
Quite often, battles are decided long before the troops meet on the field, and thus it was at Kasserine Pass. Theoretically, the Afrika Korps was at a disadvantage due to the German inability to provide adequate supplies. However, everyone in the Afrika Korps knew who was running the show, and he was on the scene. The same could not be said for the Allies. The Supreme Allied Commander, Eisenhower, was 400 miles away in Algiers. His field representative, Major General Lucien Truscott Jr., was 200 miles from the front in Constantine. Field command was in the hands of Lt. Gen. Sir Kenneth Anderson, commanding the British First Army. Unfortunately, the 19th French Corps would only take orders from General Alphonse Juin, commander of French ground forces, who only took his orders from General Henri Giraud, since the French still resented the British for the 1940 attack on Mers el Kébir. Additionally, Anderson did not get on with the senior Americans, who saw him as cold and aloof. Major-General Lloyd Fredendall, commanding the US 2nd Corps, had a personal dislike for Anderson and little confidence in the French. As ever, divided command in the face of unified command was a recipe for disaster.
 The fighting commenced in January 1943, when the German commander in Tunisia,
Jürgen von Arnim, commanding V Panzer Army, attacked in an effort to link up
with the Afrika Korps, which was withdrawing into southern Tunisia. Arnim wanted
to control the Eastern Dorsale, the mountain range extending south from Tunis,
which would give him control of the mountain passes that controlled most
movement through the Eastern Dorsale, pushing the Allies into using passes like
Kasserine, which were further south. The Allies would be further away from their
supply lines while von Arnim and Rommel would combine their forces.
The fighting commenced in January 1943, when the German commander in Tunisia,
Jürgen von Arnim, commanding V Panzer Army, attacked in an effort to link up
with the Afrika Korps, which was withdrawing into southern Tunisia. Arnim wanted
to control the Eastern Dorsale, the mountain range extending south from Tunis,
which would give him control of the mountain passes that controlled most
movement through the Eastern Dorsale, pushing the Allies into using passes like
Kasserine, which were further south. The Allies would be further away from their
supply lines while von Arnim and Rommel would combine their forces.
On January 3, 1943, Arnim successfully attacked the French, leading Eisenhower to replace them with newly arrived American troops. Before this replacement could take place, Arnim’s second successful attack against the French on January 30 secured the German bridgehead in Tunisia and gave Rommel a safe enclave. Arnim’s 100,000 troops and Rommel’s 70,000, standing together, faced a total Allied force of 150,000 scattered in the region.
During the first half of February, the Allies had no idea what the Germans were planning. Suddenly, on February 12, Allied intelligence told General Anderson that Arnim and Rommel were planning a major attack against the French, followed by an attack on the British. Anderson ordered the French to withdraw, which further damaged Anglo-French military relations.
On
February 14, the Germans attacked out of a sandstorm into the advanced American
positions around Faid Pass in the eastern Dorsale, destroying 44 American tanks,
26 artillery pieces and 22 trucks. The M3 Grant tanks that were then the
backbone of the American armored formations were no match for the Panzer IVs and
Tiger Is, and were outfought by the Panzer IIIs. The
 green, untested Americans
suffered heavy casualties and were pushed back over fifty miles from their
original positions west of Faid Pass in a humiliating rout. Unfortunately,
General Anderson believed this was a diversion to disguise an attack further
north and did not send reinforcements until it was too late.
green, untested Americans
suffered heavy casualties and were pushed back over fifty miles from their
original positions west of Faid Pass in a humiliating rout. Unfortunately,
General Anderson believed this was a diversion to disguise an attack further
north and did not send reinforcements until it was too late.
On February 15, the US 2nd Corps counterattacked, but were beaten back. With no defensive terrain left, the Americans withdrew in poor order, destroying supplies, but the Germans managed to get hold of a vital 5,000 gallons of aviation gas, which could fuel the panzers. The 1st Infantry and 1st Armored divisions retreated and established new lines at the more easily defended Kasserine Pass on the western arm of the Dorsale. By this point, they had lost 2,546 men, 103 tanks, 280 vehicles, 18 field guns, 3 anti-tank guns, and an entire anti-aircraft battery.
General Sir Harold Alexander, who was given the command of Anderson's First Army and Montgomery's Eighth Army as a result of this, was staggered by the confusion he saw and ordered there would be no withdrawal from any position.
On February 18th, the artillery of the 9th Infantry Division, which had travelled 735 miles in four days, arrived on the scene. This would prove to be crucial.
On February 19, Rommel launched several probes, and decided to attack Kasserine Pass, which he did on February 20, personally leading the 10th Panzer Division while the 21st Panzer Division continued to attack northward.
Within minutes of making contact with the Germans in the pass, the US lines were broken. Their light guns and tanks had no chance against the heavier German equipment, and they were too inexperienced in armored warfare, trying for tank versus tank fights while the Germans gathered overwhelming multi-tank firepower against weak points. Morale among the Americans fell precipitously - by evening, the infantry and armor had been routed, leaving their equipment on the field in scenes reminiscent of the First Battle of Bull Run.
 Kasserine Pass was now completely open, and it appeared the ammo and fuel dump
at Tébessa was within Rommel’s grasp. Desperate defenses mounted by isolated
groups left behind in the pass seriously slowed the German advance while General
George S. Patton Jr. was sent to replace General Fredendall in command of the
American troops, with orders to hold regardless.
Kasserine Pass was now completely open, and it appeared the ammo and fuel dump
at Tébessa was within Rommel’s grasp. Desperate defenses mounted by isolated
groups left behind in the pass seriously slowed the German advance while General
George S. Patton Jr. was sent to replace General Fredendall in command of the
American troops, with orders to hold regardless.
By nightfall of February 21, the 10th Panzer Division was outside Thala, which controlled two road links to Tébessa. If Thala fell and the Germans moved on the southern road, the 9th Infantry Division would be cut off from their supplies, and Combat Command B of the 1st Armored Division would be trapped between the 10th Panzer Division and their supporting units. The Allies were staring at defeat.
That night, British, French and American infantry were sent into the lines at Thala piecemeal. The entire divisional artillery of the 9th Infantry - 48 guns - were emplaced behind the line. When the battle reopened the next day, the frontline was held largely by British infantry with exceptionally strong backing by 9th Division artillery. Unable to break through and lacking fuel supplies and ammunition, Rommel called off the attack at the end of the day and withdrew back through the pass that night.
Over the next three days, the Allies failed to realize Rommel had withdrawn, and did not follow up his retreat, though the allied air force did make a belated - and largely useless - attack on Kasserine Pass on the 23rd. By February 25th, the Germans had returned to the Eastern Dorsale and then moved into the Mareth Line, where they would hold until they surrendered in Africa in May 1943.
The action in the Kasserine Pass battles cost the Germans 2,000 casualties and the Allies about 10,000, of which 6,500 were American.
 In
the aftermath of battle, Rommel concluded that both American equipment and
fighting ability were lacking, and considered them a non-threat. The pragmatic
Americans immediately started a thorough house-cleaning, based on their analysis
of the events. Commanders who had failed the test of combat were sacked, and
their replacements were henceforth given permission to make on-the-spot
decisions without having to ask higher command, communications were unified, and
the air force was reorganized for ground support on the lines of the British
Desert Air Force. The M4 Sherman replaced the M3 Grant throughout the armored
units.
In
the aftermath of battle, Rommel concluded that both American equipment and
fighting ability were lacking, and considered them a non-threat. The pragmatic
Americans immediately started a thorough house-cleaning, based on their analysis
of the events. Commanders who had failed the test of combat were sacked, and
their replacements were henceforth given permission to make on-the-spot
decisions without having to ask higher command, communications were unified, and
the air force was reorganized for ground support on the lines of the British
Desert Air Force. The M4 Sherman replaced the M3 Grant throughout the armored
units.
Sixteen months later in Normandy, Rommel would find he had drawn entirely the wrong conclusion about the US Army from the battle of Kasserine Pass. As General Omar Bradley put it: “In Africa we learned to crawl, then walk, then run."
| THE KIT |
Check the preview to see what’s in the box.
| CONSTRUCTION |
Having now built six of these Tamiya armor kits, I have found a good system for
construction: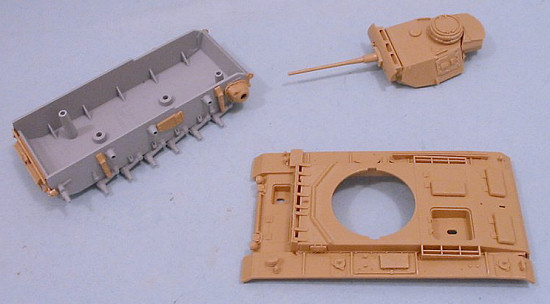
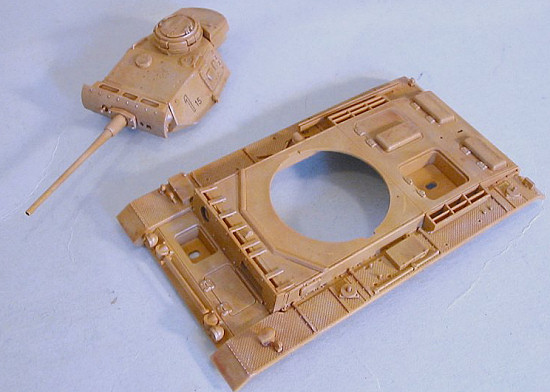
1. Initial Assembly: assemble the turret and attach all the “permanent” parts to the upper hull.
2. Paint the model, including paint fading, washes, etc.
3. Apply decals.
4. Detail hand-painting of the tools, the rubber on road wheels, etc. Apply “mud” wash.
5. Apply final flat coat.
6. Assemble lower hull: attach wheels and tracks
7. Attach upper and lower hull.
8. Final detail assembly: attach tools, weapons, cables, etc., place turret in position.
| COLORS & MARKINGS |
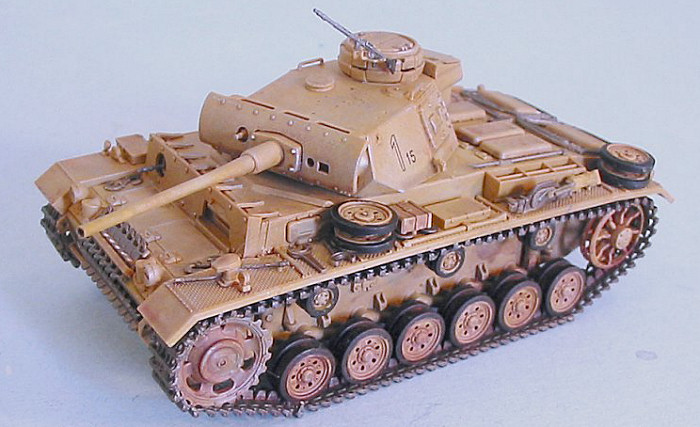
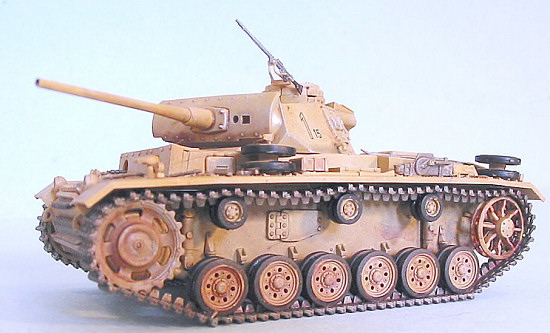
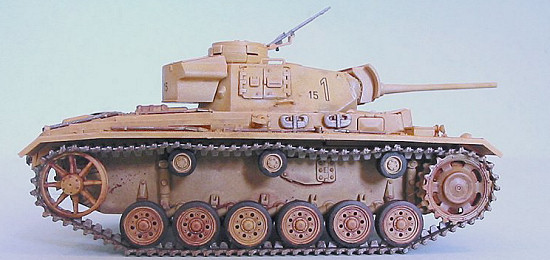
With an armor model, painting and detail finish is the main area of work. A modeler should “choose the story” they want to tell, and tell it in the finish of the model. In this case, I wanted to do a Panzer III serving in the Afrika Korps around the time of the Battle of Kasserine Pass.
Since any tank in the Afrika Korps by that point would have been “well-used” in
at least the retreat across the North African
 desert after Alamein, I was going
to give the model severe “sun-fading.” This was good, since it was in an
overall monochromatic camouflage of “Desert Yellow,” for which I used the Tamiya
color. After giving all parts a good coat of this, I put some Tamiya Flat
Yellow in, and went back over things, fading the color. This was followed by
adding in Flat White and going over things, finishing off by adding in some
Light Grey and thinning the paint 60-40, and going over the upper surfaces to
give a really faded-out, sun baked look to things.
desert after Alamein, I was going
to give the model severe “sun-fading.” This was good, since it was in an
overall monochromatic camouflage of “Desert Yellow,” for which I used the Tamiya
color. After giving all parts a good coat of this, I put some Tamiya Flat
Yellow in, and went back over things, fading the color. This was followed by
adding in Flat White and going over things, finishing off by adding in some
Light Grey and thinning the paint 60-40, and going over the upper surfaces to
give a really faded-out, sun baked look to things.
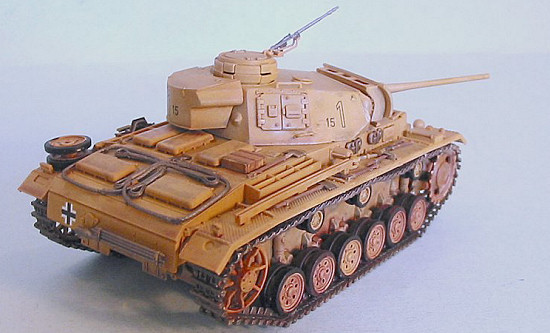
Once this was done, I gave the parts a coat of Tamiya Smoke thinned with Future. When this was dry, I applied the decals. While they were setting up, I hand-painted the rubber on the road wheels. I also dry brushed some ModelMaster Stainless Steel over the upper surfaces and around sharp edges to simulate wear. This was then followed-up with a thinned wash of Tamiya Red Brown over the wheels, tracks, and hull - more on the lower hull than the upper - for mud simulation. One might not think of the desert as muddy, but accounts of the fighting in North Africa in early 1943 make a point of it having been the rainy period, with the result that deep mud was an ever-present problem.
When everything was finished, the model was given two coats of thinned Testor’s Dullcote to get an absolutely dead-flat sun baked finish.
| FINAL CONSTRUCTION |
 It
was time to assemble the road wheels, idler wheels and drive wheels to the lower
hull. I then attached the tracks. I particularly liked how Tamiya molded the
upper tracks to “sag” over the carrier wheels.
It
was time to assemble the road wheels, idler wheels and drive wheels to the lower
hull. I then attached the tracks. I particularly liked how Tamiya molded the
upper tracks to “sag” over the carrier wheels.
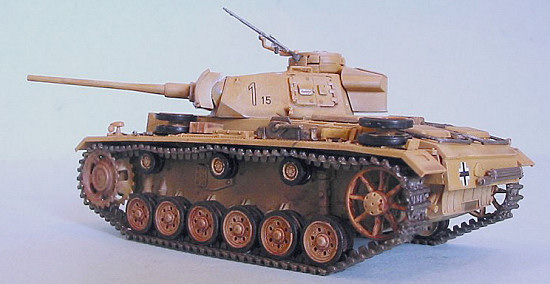
After this was done, I screwed the upper and lower hull assembles together. I then proceeded to attach all the little detail pieces, the tools and such. There were more of these on the sprues than were shown in place in the instructions, but photos I had showed that the Panzer IIIs did not have some “standard” fitment of all these, so I put them all on at various locations. While the kit does not call for use of the cupola machine gun - which is included - I had seen a photo of an Afrika Korps Panzer III that was so armed. To me it made sense that an enterprising tank commander would drive past a shot-up Panzer IV, see that MG34 and decide to salvage it, which is what I did here. I finished by attaching the turret.
| CONCLUSIONS |
The Panzer III is a very “German-looking” tank, that looks very good next to the rest of the growing TC Armored Corps on the shelf. These kits are quite easy to assemble once you get the work pattern down - I did this in something around 7-8 hours over the course of three days taking breaks from the computer on a new script assignment I’ve been hired on (run out of thoughts, go work on the model for an hour and get new thoughts, go back to work). They’re not “child’s play” - particularly not the assembly of the tracks - but they’re a nice “small project” with a good payoff of a sharp-looking model.
March 2006
Thanks to HobbyLink Japan for the review kit. Get yours at “Japanese prices” at www.hlj.com
If you would like your product reviewed fairly and quickly by a site that has over 300,000 visitors a month, please contact me or see other details in the Note to Contributors.