| KIT #: | 32569 |
| PRICE: | $25.00 |
| DECALS: | Three options |
| REVIEWER: | Blair Stewart |
| NOTES: | Good detail and simple construction |
| HISTORY |
From Wikipedia: The Panzerjäger Tiger Aus B Jagdtiger ("Hunting Tiger) is a German casemate-type World War II heavy tank destroyer. It was constructed on a lengthened chassis of a Tiger II. Its ordnance inventory designation was Sd.Kfz. 186.
The 72-ton Jagdtiger was the heaviest armored fighting vehicle (AFV) used operationally by any nation in WWII and the heaviest combat vehicle of any type to be produced during the conflict. It was armed with a 12.8 cm Pak 44 L/55 main gun that could out-range and defeat any AFV fielded by the Allied forces.
It saw brief service in small numbers from late 1944 until the end of the war on both the Western and Eastern Fronts. Although 150 were ordered, only around 80 were produced. Due to an excessive weight and an underpowered drivetrain system, the Jagdtiger was plagued with mobility and mechanical problems. Three Jagdtigers survive in museums.
With the success of the StuG III, Marder I, Marder II, and Marder III Panzerjägers, the military leadership of Nazi Germany decided to use the chassis of existing armored fighting vehicles as the basis for self-propelled guns (serving as assault guns and tank destroyers). German World War II tank destroyers used fixed casemates instead of fully rotatable turrets to significantly reduce the cost, weight, and materials necessary for mounting large-caliber guns.
 In early
1942, the German Army General Staff requested to mount a 128 mm gun on a
self-propelled armored chassis. Firing tests of the 128 mm gun showed it to have
a high percentage of hits; smaller caliber guns, such as the 88 mm and the
slightly larger 105 mm were also tested.
In early
1942, the German Army General Staff requested to mount a 128 mm gun on a
self-propelled armored chassis. Firing tests of the 128 mm gun showed it to have
a high percentage of hits; smaller caliber guns, such as the 88 mm and the
slightly larger 105 mm were also tested.
By early 1943, German designers decided to install a 128 mm gun on either a Panther or Tiger I chassis as a heavy assault gun. The Panther chassis was considered unsuitable after a wooden mockup of the design was constructed. On 20 October 1943, another wooden mockup was constructed on a Tiger II heavy tank chassis and presented to Hitler in East Prussia. Two prototypes were produced: One was a version fitted with the eight-roadwheel Porsche suspension system (serial number 305001) and another equipped with the Henschel nine-overlapping roadwheel suspension system (serial number 305002) as used on the main-production Henschel Tiger IIs. They were completed in February 1944.
Only two heavy anti-tank battalions, numbered the 512th and 653rd, were equipped with Jagdtigers, with the first vehicles reaching the units in September 1944. About 20% were lost in combat, with most destroyed by their crews when abandoned because of breakdowns or lack of fuel. The first Jagdtiger lost in combat was during the 1945 failed Operation Nordwind Offensive in France. Despite its heavy armor, this Jagdtiger was lost to American infantry using a bazooka, which at the time was considered ineffective against such a massive vehicle.
Tiger I tank ace Otto Carius commanded the second of three companies of Jagdtigers in Heavy Anti-tank Battalion 512. His postwar memoir “Tigers in the Mud” provides a history of the 10 Jagdtigers under his command. He states the Jagdtigers were not used to their potential due to factors including Allied air supremacy, which made it difficult to maneuver and the heavy gun needing to be re-calibrated after travelling off-road even short distances. The vehicle was slow, having the same engine as the already-underpowered Tiger I and Tiger II. The vehicles' transmissions and differentials broke down easily because the whole 72-ton vehicle needed to rotate for the gun's traverse. The enormous 128 mm main gun had to be locked down during the vehicle's maneuvers; otherwise, its mounting brackets would wear out too much and decrease the gun’s firing accuracy. This meant a crew member had to exit the vehicle in combat and unlock the gun from its frontally mounted gun travel-lock before firing. Carius recorded that, in combat, a 128 mm projectile went through the walls of a house and destroyed an American tank behind it.
| THE KIT |
 Other than
some of Revell’s 1/40th scale armor kits of the fifties, all the armor kits I
have assembled to date are 1/35th scale. I have been watching Tamiya release a
number of 1/48 armor kits over the last several years, and, looking for
something new, I decided to try one. Accordingly, I chose their 1/48 kit of the
Jagdtiger.
Other than
some of Revell’s 1/40th scale armor kits of the fifties, all the armor kits I
have assembled to date are 1/35th scale. I have been watching Tamiya release a
number of 1/48 armor kits over the last several years, and, looking for
something new, I decided to try one. Accordingly, I chose their 1/48 kit of the
Jagdtiger.
For a detailed description of what’s in the box, you can check out Da Boss' preview. Given this is my first 1/48 armor kit, I was curious to see if it was an entirely new kit, or perhaps a “down-size” of an existing 1/35 kit. Fortunately, I have a Tamiya 1/35 Jagdtiger in my stash, so I could readily compare the two kits. One obvious difference is the upper hull: the 1/35 kit has a separate roof for the fighting compartment while the roof is molded into the upper hull in the 1/48 kit. A major difference is the main gun of the 1/35 kit, which has more interior detail than the gun in the 1/48 kit. Also, the 1/35 kit provides both vinyl and link and length plastic tracks.
Other than those differences, the molding in the 1/48 kit is very detailed with absolutely no flash visible on any of the parts.
| CONSTRUCTION |
Assembly begins with the lower hull. The instructions call for punching a few small holes in the rear hull, so one needs to pay attention here (I can’t tell you how many times I have missed one of these “hole-punching” steps, only to discover my mistake when it is too late, then having to drill holes from the outside of a model by guessing the hole locations).
The next step is the tedious one for German armor kits: assembly of the 18 road wheels, two idler wheels, and two drive sprockets. At this point, I installed the weights – deemed “essential” by Tamiya - in the lower hull and then attached all the wheels and sprockets.
 At this
point, the instructions call for attaching the link and length tracks. Normally,
I would leave these off until after painting the overall vehicle, but I decided
that I would hand-paint the tracks after painting the vehicle, so I attached the
tracks (I planned on being able to remove the upper hull to facilitate the track
painting process). I generally hate link and length tracks (I am an old
modeler!), but I admit Tamiya’s tracks fit better than any other armor kit
tracks I have assembled (this is my second Tamiya kit with these tracks, my
previous kit being their
1/35 M-18 Hellcat). I assembled the four-part jack
and attached it to the rear hull. After attaching the exhausts and rear fenders
to the model, I set the lower hull assembly aside.
At this
point, the instructions call for attaching the link and length tracks. Normally,
I would leave these off until after painting the overall vehicle, but I decided
that I would hand-paint the tracks after painting the vehicle, so I attached the
tracks (I planned on being able to remove the upper hull to facilitate the track
painting process). I generally hate link and length tracks (I am an old
modeler!), but I admit Tamiya’s tracks fit better than any other armor kit
tracks I have assembled (this is my second Tamiya kit with these tracks, my
previous kit being their
1/35 M-18 Hellcat). I assembled the four-part jack
and attached it to the rear hull. After attaching the exhausts and rear fenders
to the model, I set the lower hull assembly aside.
Assembly then moves to the upper hull. I attached the doors to the rear of the fighting compartment and the machine gun mount to the front of the upper hull. I then attached the front and rear fighting compartment parts to the upper hull assembly. Next, I glued the two halves of the 128 mm main gun together and attached it to its mounting plate. Here, Tamiya calls for using its “poly caps” to allow the gun to elevate and traverse. I then installed the main gun assembly into the upper hull.
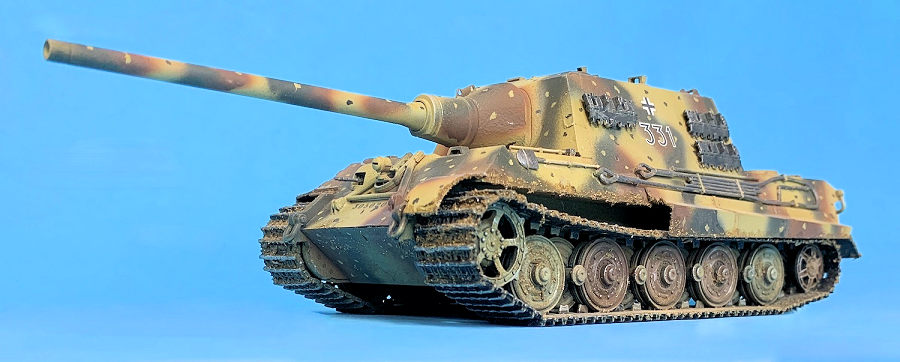
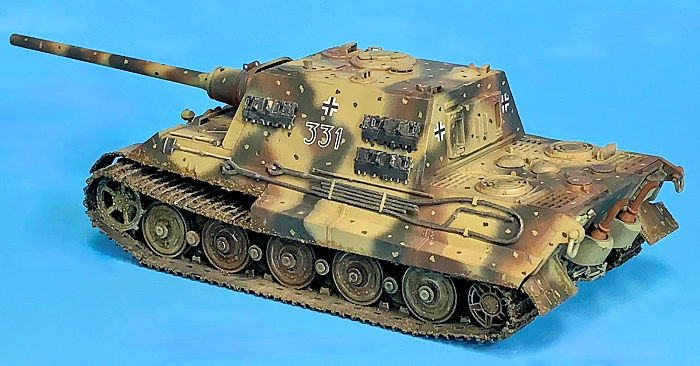
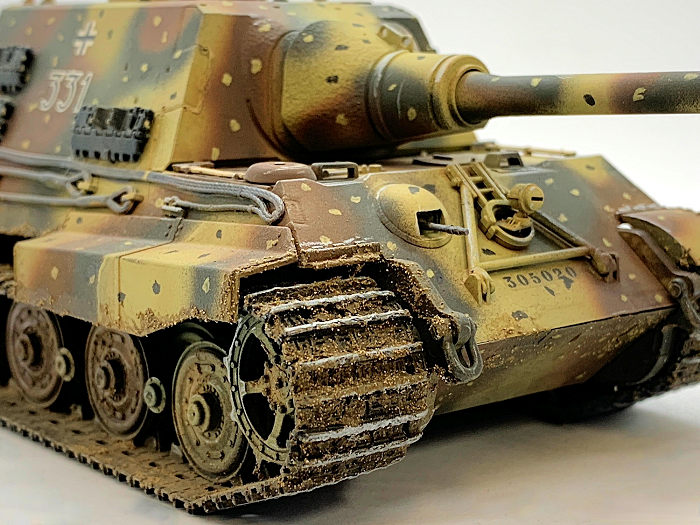
After viewing numerous photos of Jagdtigers in action during World War II, I decided to leave off parts of the fender skirts and the front fenders. I did this by carefully cutting apart the fenders where I wanted to remove a part of the fender and then sanding down the cut edges to give the fender skirt a more scale look.
The final steps involve attaching the main gun mantlet, the gun travel lock, the engine access and crew hatches, and the various tools to the upper hull. The tools are nicely molded and somewhat delicate in this scale, so one needs to pay attention when gluing these to the vehicle. The tow cables are particularly “petite” as well as some of the track maintenance tools. As always, I attach these tools to the vehicle prior to painting and then hand-paint the tools after I paint the overall vehicle.
| COLORS & MARKINGS |
 I first
airbrushed the entire model with Tamiya flat black. Next, I sprayed the overall
vehicle with Tamiya XF-60 Dark Yellow. Once dried, I free-hand sprayed
camouflage patterns of Tamiya XF-64 Red Brown and XF-61 Dark Green. I had chosen
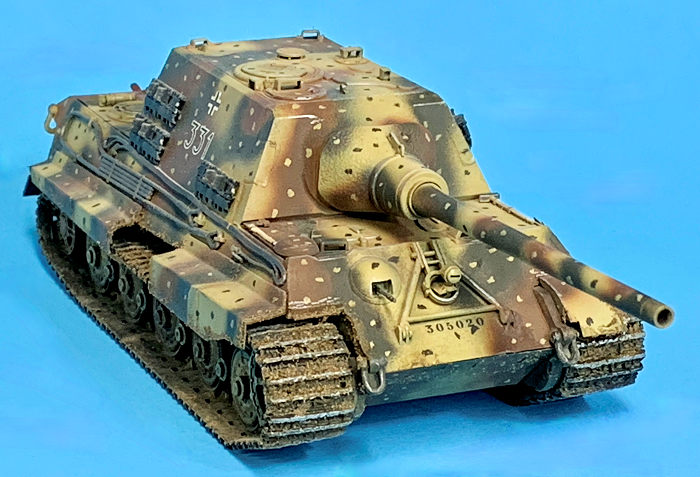
the German “ambush” camouflage pattern, so I hand-painted “random” yellow dots
on the brown areas and green dots on the dark yellow areas of the camo pattern.
I then decided to leave the tracks flat black and to highlight them using a
Prismacolor silver pencil.
I first
airbrushed the entire model with Tamiya flat black. Next, I sprayed the overall
vehicle with Tamiya XF-60 Dark Yellow. Once dried, I free-hand sprayed
camouflage patterns of Tamiya XF-64 Red Brown and XF-61 Dark Green. I had chosen
the German “ambush” camouflage pattern, so I hand-painted “random” yellow dots
on the brown areas and green dots on the dark yellow areas of the camo pattern.
I then decided to leave the tracks flat black and to highlight them using a
Prismacolor silver pencil.
The decals were thin and very good to work with. I brushed on some Future for the areas that would receive decals, thereby avoiding having to gloss-coat the entire model prior to attaching the decals.
Once the decals dried, I began to lightly weather the vehicle. I dabbed Vallejo Diorama FX Thick Mud onto the tracks, road wheels, fenders, and lower hull assembly. For the upper hull, I dabbed on various shades of ground-up chalk to simulate road dust and other dirt. I then sprayed the overall tank with Testors Dullcote to fix the chalk to the vehicle’s surfaces.
| CONCLUSIONS |
This is a highly detailed, easily assembled armor kit. One advantage besides cost is armor kits in 1/48 scale take up less shelf space than their 1/35 counterparts. As a result of my Jagdtiger experience, I plan to build more of these kits. If you haven’t tried one of these kits, I recommend you pick one up and give it a go. You might be pleasantly surprised with the results!
Blair Stewart
7 March 2025
Copyright ModelingMadness.com. All rights reserved. No reproduction in part or in whole without express permission from the editor.
If you would like your product reviewed fairly and fairly quickly, please contact the editor or see other details in the Note to Contributors.