
Tamiya 1/35 M18 Hellcat
| KIT #: | 35376 |
| PRICE: | $40.00 |
| DECALS: | Two options |
| REVIEWER: | Blair Stewart |
| NOTES: | Detailed suspension |

| HISTORY |
The M18 Hellcat was a tank destroyer used by the United States Army in World War Iain the Korean War. The origin of the M18 dates to the first few weeks before the United States’ entry into World War II, when on 27 November, Lieutenant Colonel Andrew D. Bruce assumed command of the Tank Destroyer Tactical and Firing Center at Fort Meade, Maryland. Bruce, a respected planner from the War Department’s G-3 section, immediately set out to develop a vehicle fast enough to maneuver around the flanks of enemy columns to attack from the rear, and with enough killing power to distinguish it from the infantry support-oriented tanks like the M4 Sherman. By keeping its armor to a minimum, and using the innovative Torqmatic automatic transmission, the M18 attained a top speed of up to 55 mph (89 km/h). The M18 Hellcat was the culmination of the development of various prototypes of fast tank destroyers dating back to 1941. Entering production in summer 1943, the M18 first saw combat service in the spring of 1944. The M18 served primarily in Western Europe but was also served in smaller numbers in Italy and the Pacific. M18 production continued until October 1944, with 2,507 built.
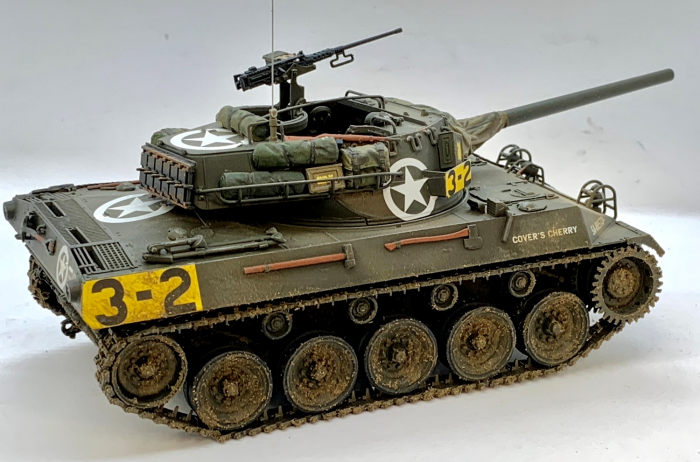 The
Hellcat’s speed and ability to get into firing position were admired by M18
crews, but the lack of killing power of the 76mm gun and minimal protection
offered to the crew made commanders tread carefully in converting whole
battalions over from the M10. With only thirteen millimeters on the front hull,
the M18’s armor was less than that of the M8 armored car, and much less than the
two inches of frontal armor on the M4A1 Sherman or 1.5-inch armor plate on the
M10. Likewise, the awkward interior layout of the M18’s turret made
reloading the main gun cumbersome and slow in combat situations. The
introduction of heavier German tanks, such as the Mk V Panther and Mk VI Tiger,
presented additional problems.
Despite these drawbacks, the Hellcat was the most effective U.S. tank destroyer of World War II. It had a higher kill-to-loss ratio than any other tank or tank destroyer that US forces fielded in World War II. M18s claimed 526 total tank kills: 498 in Europe, 17 in Italy, and 11 in the Pacific. The kills-to-losses ratio for Europe was 2.3 to 1, and the overall kill to loss ratio was 2.4 to 1. Although the M18 was retired from U.S. service immediately after the end of World War II, a variant, the M39 armored utility vehicle, served in the Korean War, and M18s continued in service with some countries until 1995. During the Battle of the Bulge, the Hellcat’s speed proved vital on several occasions and its firepower contributed significantly to repelling the German invasion.
The M18 Hellcat was an example of the balancing act among firepower, armor, and mobility in armored fighting vehicle design. Despite its excellent mobility and reasonably powerful main gun, the M18 Hellcat also had drawbacks, including thin armor and a poor high explosive shell for its main gun. Some historians attribute the Hellcat's combat record to the training and dedication of its crews, not to its ill-conceived design.
| THE KIT |
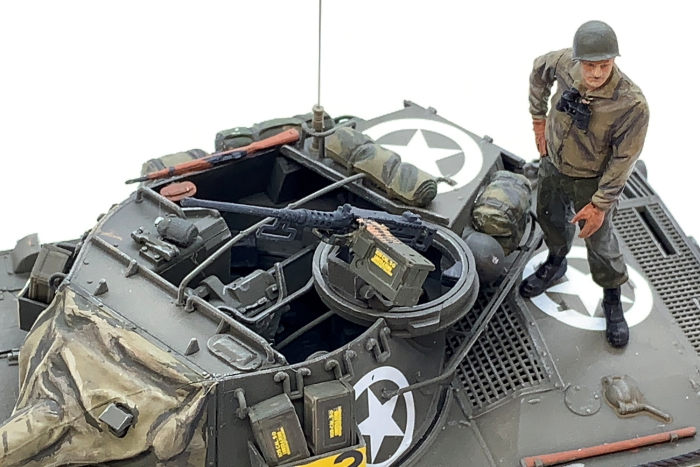 After a
long string of aircraft modeling, I decided to try an armor kit again. Having
seen ads for Tamiya’s new M18 Hellcat, I bit the bullet and purchased the kit.
The kit contains 7 sprues in an olive drab color and one clear sprue. Two of the
sprues – sprue A - are identical and contain all the wheels, several suspension
parts, Tamiya’s “link ‘n link” tracks and the two-part headlight guards. There
is also a nylon string to use as a tow cable and Tamiya poly caps for securing
the drive sprockets. Upon examining the sprues, one can see Tamiya has included
many small, intricate parts that some kits might model in photo-etch. The kit
also includes a very nicely molded standing figure. The 16-page instruction
booklet is Typical Tamiya, and there is a separate color background pamphlet.
The nicely printed decals include two Italian-front M18s from B and C company of
the 805th Tank Destroyer Battalion in 1944.
| CONSTRUCTION |
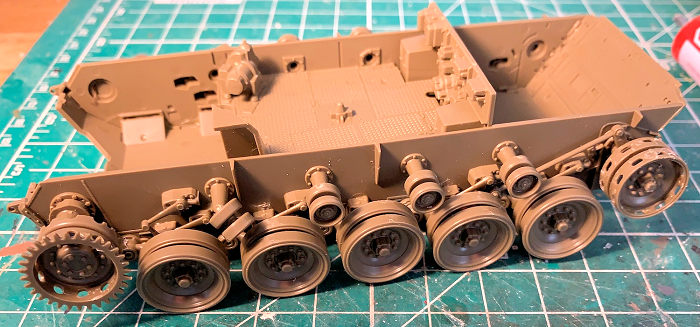 Construction
begins with the hull and interior floor. After this, I assembled the rather
intricate suspension system. Tamiya provides insertion “stops” to help align
the suspension arms. I then assembled the two drive sprockets, the two idler
wheels, the 8 return rollers and the 8 road wheels. At this stage, I left
off the tracks so I could paint the road wheel and return roller rims before
attaching the tracks to the lower hull. I also did not join the upper hull
to the lower hull to facilitate this painting.
I then moved to assembly of the upper hull, starting with the sponsons and front fenders, which I then attached to the underside of the upper hull. Turning over the upper hull, I attached the engine and air intake covers and the typical tools carried on armored vehicles. I also assembled the delicate headlight guards and attached them to the front hull.
Having set aside the upper hull, I then started assembling the tracks. I admit I am not a fan of separate-link tracks, primarily because I never seem to be able to use the exact number of links called for in the instructions. Tamiya and other companies have at least minimized this process by included large continuous runs of track links where possible, and then joining them with individual links. I used Super Glue to attach the track sections to the return rollers and the road wheels. Tamiya at least includes in its instructions an actual size drawing of the Hull sides to assist in the assembly process. Despite my careful adhesion to these drawings and the associated instructions, I still managed to come out with ONE less link on both sides. Fortunately, the tracks mated up, but I still had to shave some plastic off the final track link to get a good fit. Maybe someday I can complete this task without having to cut, sand and fiddle to make the tracks fit!
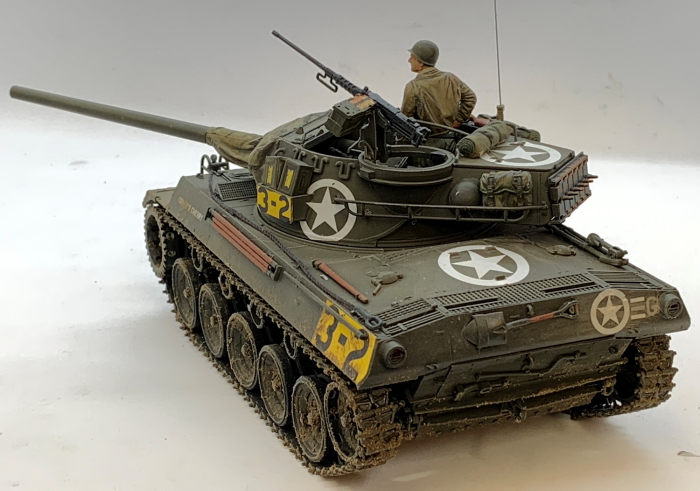 The next
subassembly was the turret. This starts with the lower turret ring and pieces of
equipment attached to it. After attaching various parts to the insides of the
turret halves, I glued these to the lower turret ring. I first thought alignment
of the two turret halves would be difficult, but they went together with
relatively little effort to align them.
I then moved to steps 24, 25, and 26, which involve assembly of the detailed main gun. Note: the gun is canted to the right, as was the gun on the real tank (I assume this was done to ease the ammo-loading process in the rather cramped turret). Given that virtually every gun I have ever assembled on an armor kit has sat with its breach perpendicular to the floor, I had to think about this before gluing the assembled gun to the front of the turret. I then glued to completed gun to the turret front and glued that assembly to the turret.
Step 27 involves assembling the nicely detailed, three-part canvas cover for the gun barrel. Tamiya has molded this so that the parts join at logical seams. Once attached to the front of the turret, I inserted the gun barrel and glued it in place.
Steps 28-30 involve assembly of the turret interior. This includes the gunner and loader seats as well as the turret rotation equipment. I then inserted the completed interior into the turret.
I then attached various grab handles to the turret. These are finely molded and delicate, so I was careful both with removing them from the sprues and gluing them to the turret. I assembled the nicely detailed, nine-part .50 caliber M2 machine gun and its four spare ammo boxes. A nice touch is the included decals that replicate the yellow lettering on these ammo boxes.
My last assembly was the tow cable. I had reservations about this, given it is a nylon thread that one attaches to two plastic cable ends. Once assembled, however, I was pleased at how nicely this replicated the typical steel tow cables used on armored and other military vehicles. I attached the tow cable to the hull using white glue and then painted it Testors gunmetal.
| COLORS & MARKINGS |
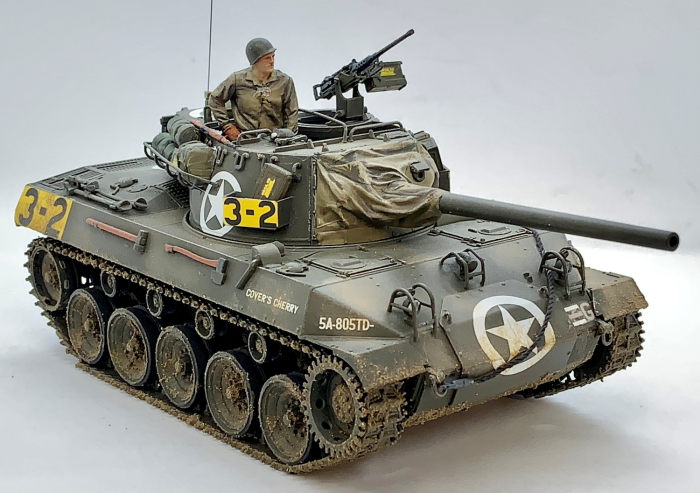 I started
the painting process by spraying the entire model Testors flat black. Once dry,
I used Tamiya’s Olive Drab to complete the exterior color. At this stage, I
hand-painted the road wheel rims flat black. After the model dried, I then used
a wide modeling brush to paint areas of the model’s exterior surfaces with
“Quick Shine,” a new, readily available substitute for Future (I bought mine at
Wal-mart) to provide a glossy surface for the decals. To minimize adding thick
clear coats to the model’s exterior, I only painted the areas where the decals
would attach. I opted for the C company M18 and attached all the decals
associated with this option. After the decals dried, I dulled the model’s shiny
exterior with Rustoleum clear flat out of a spray can.
I used Vallejo Diorama FX to simulate mud on the tracks and fenders, and then dabbed sand-colored chalk on the hull’s upper surfaces. As a final weathering touch, I touched a brush with a burnt umber oil paint wash to the fuel caps to simulate fuel stains.
| CONCLUSIONS |
This is a very detailed kit with a lot of small parts – some of which presented a little problem for this old modeler. Nevertheless, the built-up model faithfully reproduces the M18 Hellcat, and the figure is outstanding. Having previously built the older AFV M18, I can say this kit is a step up. I highly recommend Tamiya’s kit for those interested in World War II armor models.
| REFERENCES |
“M18 Hellcat”, Wikipedia, Worldwide Web, November 2024.
“The M18 Hellcat Tank Destroyer,” The Army Historical Foundation, November 2024.
“The American M18 Hellcat”, War History Online, November 2024.
Blair
Stewart 19
December 2024 Copyright ModelingMadness.com. All rights reserved. No
reproduction in part or in whole without express permission from the editor.
If you would like your product reviewed fairly and fairly quickly, please
contact
the editor or see other details in the
Note to
Contributors.