
| KIT: | Tamiya 1/35 Tiger I (early) |
| KIT #: | 48202 |
| PRICE: | $125.00 MSRP |
| DECALS: | Six options |
| REVIEWER: | Bill Michaels |
| NOTES: | Radio Control set included. |
| HISTORY |
The Commander was pleased with his new Tiger tank. While not the biggest cat on the prowl, it still could make its presence felt on the battlefield. The Tiger was parked next to a wall, near the corner, in a perfect ambush spot…waiting for its prey.
 The commander did not have long to
wait— soon, a bigger cat came along. Dusty, a 3 year old Siamese/Himalayan mix,
was coming down the hall, right into the ambush. As he approached the corner,
the tank came to life and popped out from its hidden spot. The tank roared
forward, the turret with the 88mm gun training around as it advanced.
The commander did not have long to
wait— soon, a bigger cat came along. Dusty, a 3 year old Siamese/Himalayan mix,
was coming down the hall, right into the ambush. As he approached the corner,
the tank came to life and popped out from its hidden spot. The tank roared
forward, the turret with the 88mm gun training around as it advanced.
Dusty took one look at the roaring Tiger, and beat a hasty retreat. The heavy tank couldn’t hope to keep up with the agile cat, so it didn’t pursue. Instead, it retreated back into it’s hiding spot, to await another feline target…….
Ahhh, the joys of indoor RC tanks!
See the preview for the history of the real Tiger I, and a description of what’s in the box.
| THE KIT |
I gave a thorough description of the kit’s contents in the preview, so I’ll just hit the highlights here. This deluxe RC kit is the standard Tamiya 1/35 scale Tiger I kit, modified for Radio Control operation. The combined kit includes everything needed, except batteries, paint, and glue.
This RC version of the kit is based on Tamiya’s Tiger I (early) kit 35216, which was released in the 1990s. (The standard version of the kit is still a very nice kit.) This kit is not based on the 1970s vintage motorized kit. The RC version of the kit was released in 2000.
Radio Control System:
 The included
RC unit provides three channel control. An RC tank needs at least two channel
control-- forward/reverse, and steering. This unit provides that, plus a
third channel to control a motor and gearbox for turret rotation. The tanks in
this series come with radios on one of four different frequencies.
The included
RC unit provides three channel control. An RC tank needs at least two channel
control-- forward/reverse, and steering. This unit provides that, plus a
third channel to control a motor and gearbox for turret rotation. The tanks in
this series come with radios on one of four different frequencies.
When operating a radio controlled model, only one model can be operated at a time on a given frequency. These RC tanks use one of four frequencies in either the 27 MHz or 40 MHz bands. (Two in each band, identified as “A” and “B”. My unit is labeled “27A”.) The 27 MHz and 40 MHz frequencies are generally used by RC toys, while the 75 MHz band is used by more serious RC boat and car hobbyists. RC units operating on 27MHz or 40 MHz are more susceptible to interference, partly as a result of the fact that these inexpensive units are less able to detect and reject interference. Used in applications such as this RC tank, they should be fine, however, as it is unlikely the vehicle is going to be driven far away from the transmitter.
The model needs a 9 volt battery for the transmitter, and four AAA batteries to power the tank. The instructions caution you not to use nicad batteries. The instructions don’t say why, but the reason is that standard AAA batteries are 1.5 volts per cell, so a set of four yields 6 volts. “Triple A” nicads are only 1.2 volts each, so a four cell pack will only have 4.8 volts.
If running time and/or the cost of disposable batteries is a concern, it shouldn’t be too hard to replace the AAA battery box with a 6 volt NiMh rechargeable pack. In addition to being rechargeable, a NiMh pack would also give longer runtime. However, this may not be a practical solution unless you already own a suitable charger- the cost of a rechargeable pack and charger may be a bit much unless you can use it with other RC models as well.
The radio and wiring harness inside the tank comes all pre-wired. This includes the three motors, battery box, switch, and receiver. The motors are wired with different color wires for identification- the left side motor has yellow and green wires, while the right side has blue and red wires.
| CONSTRUCTION |
Construction
The twenty-page instruction booklet is very thorough. Some of the assembly steps are very complicated, though, so you have to pay close attention to the order of assembly. Several times during the construction of the model I found I had missed something in an earlier step, and had to go back to fix something.
The
gearboxes for the tracks are assembled first, then the gear box for the turret
is assembled. All of the parts (gears, shafts, screws) are shown full size
in the instruction steps, so that you get the right part. Still, I managed
to get a 26-tooth gear from the turret gearbox mixed up with a 28 tooth gear
from the right track gearbox. The fit was close enough that everything
seemed fine. 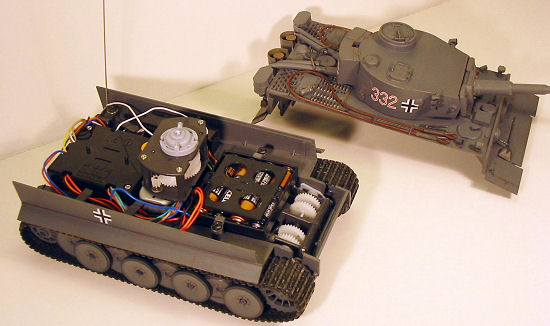 However,
when I went to test the unit after installing the tracks, I found that the right
gearbox was slipping. That’s when I discovered my error. Fortunately,
everything goes together with screws, so it was easy to partially disassemble
the affected gearboxes and swap the gears.
However,
when I went to test the unit after installing the tracks, I found that the right
gearbox was slipping. That’s when I discovered my error. Fortunately,
everything goes together with screws, so it was easy to partially disassemble
the affected gearboxes and swap the gears.
I recommend painting the lower hull and roadwheels before assembling the running gear. There are dozens of roadwheels to paint—it is easier to do them while they are still attached to the sprue. I airbrushed everything German Panzer Gray, and then brush painted the tires with scale black. When I was ready for them, I removed the wheels from the sprue, and all I had to do was clean up the attachment points and then touch up the paint on the tires.
Assembly of the running gear and lower hull was pretty easy, as everything fits so well. You have to take your time, though, as some of the construction diagrams are pretty busy, and a lot of the parts have to go “just so”.
The tracks are Tamiya’s glue-able vinyl. I glued them together using model cement as recommended, and set them aside. I was working on the model off and on, so it was a couple of weeks before I was ready to use the tracks. In that period, the cement seems to have cured well- as the tracks have held together well so far!
I have a couple of comments to make on the assembly of the running gear. First, invest in a good screwdriver. Most of the parts go together with Phillips-head screws, and some of them have to tightened fairly well. You don’t want to be using a cheap screwdriver that slips and chews up the heads of the screws. I bought a good quality screwdriver at the local hardware store- one of those with the hardened tip – the kind where the tip is a different color from the rest of the steel shaft.
Second, it will seem as if some of the bolts used for the road wheel axles are too long- that there is too much play in and out for the roadwheel to slide in and out from the hull. I was concerned at first, but didn’t want to break or strip out something by over-tightening the bolts, so I didn’t do anything at the time. It turns out that I needn’t have worried— after the track is installed, the guide teeth of the track keep the roadwheels properly aligned. This was one of many cases where I wondered if I had done something wrong, but it turns out I didn’t. My advice is, when in doubt, double or triple check the parts against the instructions. If you’re sure they match, then go on- you’ll find a future step addresses the question.
One of the
inner roadwheels in the middle of the tank gets an extra plastic ring that adds
a little diameter to the wheel. At the time, I wasn’t sure why this was there,
but I figured it out later. The slightly oversize roadwheel in the middle of
the vehicle gives a slight pivot point for the tracks, so they don’t lie
absolutely flat on the floor. This makes the model much easier to turn, as it
reduces the friction of the track on the ground. Another case of the clever
engineering in the kit….
Assembly of the upper hull is very straightforward, and just like the standard Tiger I kit. The kit includes vinyl hose for the air intake hoses, a nice touch. The upper hull has one deviation from scale appearance—a small slot in the rear deck to allow the steel whip antenna for the radio receiver to pass through from the lower hull. Also, the upper hull is not glued to the lower hull, so there is a visible seam where the two meet along the sides of the hull. (Because it falls on a natural seam, it won’t be very visible.)
When you finish the kit, you’ll have a lot of leftover parts. The RC version of the kit includes all of the sprues found in the standard kit, plus some additional sprues with the special RC versions of the parts. As a result, you end up with a number of leftover parts- sprockets, idler wheels, and other suspension parts. Also destined for the spares bin are a nice commander figure, some extra pioneer tools, and the anti-aircraft machine gun.
Just like kit 35216, the moldings are of very good quality. There is no flash on the parts, and minimal mold lines. The kit is engineered such that there are no ejector pin marks that will need to be filled. As would be expected with an operational model, the kit comes with standard vinyl tracks, molded in a metallic gray color.
| COLORS & MARKINGS |
Paint and Markings:
There is a good size decal sheet with markings to create one of six different vehicles. Because this was a “fun” project, I didn’t want to paint a complicated camouflage scheme. The kit is molded in dark gray plastic, so I figured it would be easier to paint overall gray than one of the lighter colors. Also, since this was an operating model, there was a greater chance of the paint getting scratched, so I figured the scratches would be less noticeable on an overall gray model. So, I picked this scheme:
 -
Tank No.
332, sPzAbt 503, Russia, October 1943, in overall Panzer Gray.
-
Tank No.
332, sPzAbt 503, Russia, October 1943, in overall Panzer Gray.
The model was airbrushed with PollyScale German Panzer Dark Gray. As I mentioned earlier, the tires on the roadwheels were painted with PollyScale scale black. Most of the upper hull details were painted gunmetal or scale black, as appropriate. The tow cables were painted using Model Master acrylic rust color, then dry brushed with a little black and silver to bring out the detail.
Normally, I’d paint the tracks with a rust colored base, add a dark wash, and drybrush with some lighter rust color, and silver. However, I was concerned with the paint flaking off as the tracks flexed as they moved, so I just left them the base color. I did add a little highlighting using my silver artist’s pencil to make it look a little nicer for the photos.
Weathering and Decals:
I bushed a coat of future on the turret sides and the hull, where the decals would go. The decals went down fine with Micro-Sol and Micro-set. After everything had cured for a few days, I overcoated the decals with a second brushed-on coat of future. After that had set for a couple of days, I lightly airbrushed the whole model with Pollyscale flat clear.
I kept weathering to a minimum, as a heavily weathered vehicle with new-looking tracks wouldn’t look right. I did highlight edges and valleys with my rust and silver artist pencils. At this point, I decided the model was complete—it was time for some photos and then off to stalk the cat!
| CONCLUSIONS |
Highly Recommended. If you want a radio control model that is also a good scale model, and don’t want to spend hundreds of dollars on a 1/16 scale RC tank, then this series of kits may be just the ticket. While they list for about $125, I got mine from the local shop (Spare Time Shop, Marlboro, MA) on sale for $99, and I’ve since seen them for even less from places such as Tower Hobbies. (Though shipping may eat up any additional savings.)
 The kit’s
engineering is superb- the motors, gearboxes, and running gear went together
well. The model runs well, responds well to the transmitter, and the rotating
turret is the best part—it is really realistic looking as it the motor and
gearbox hums as it slowly traverses. The model is not designed to run in wet or
really rough terrain, though, so I’ve only run mine indoors so far.
The kit’s
engineering is superb- the motors, gearboxes, and running gear went together
well. The model runs well, responds well to the transmitter, and the rotating
turret is the best part—it is really realistic looking as it the motor and
gearbox hums as it slowly traverses. The model is not designed to run in wet or
really rough terrain, though, so I’ve only run mine indoors so far.
The only drawback to the tank is that the speed is not proportional— your only choices are forward, stop, or reverse. You can only advance on the family pet at one speed. But, to be fair, adding proportional speed control would have required a more sophisticated RC unit, and driven the price up significantly.
If you’d like to see a short video of the tank in action, click here. I’ll leave the link enabled for as long as I can, but I expect that eventually, I’ll exceed the allowed download bandwidth for my free earthlink web age, and have to remove the file. (So don’t complain to Scott if the link doesn’t work!)
January 2006
| REFERENCES |
Tiger I, Schiffer Military History Vol. 44, by Horst Scheibert; copyright 1991, Schiffer Publishing, West Chester, PA
If you would like your product reviewed fairly and quickly by a site that has over 300,000 visitors a month, please contact me or see other details in the Note to Contributors.