Bandai 1/48 Star Wars X-Wing (Moving Edition)
| KIT #: | 0196419 |
| PRICE: | $80-100 |
| DECALS: | One option |
| REVIEWER: | Donald Zhou |
| NOTES: | Advantages: Well detailed, lighting kit and motor included, It is nearly “Perfect Grade” Disadvantages: Electronics little brittle, you have to think it through if you want to color this thing. |
| HISTORY |
…A long time ago, in a galaxy far far away…
Thus begin probably the most profitable and the most popular Sci-Fi film franchise ever! Now, Star Wars is not just a great sci-fi film, but it is also very widely known for its eclectic collection of vehicles, some of which had entered sci-fi stardom. Vehicles like the Millennium Falcon, TIE fighter, and the Star Destroyer (Imperial Star Destroyer. Colloquially known throughout the War verse as an Imp Star D) etc became the go to vehicles in sci-fi lore in general. One of the most well-known, however, has to be the X-Wing.
 The Incom
T-65 X-Wing became the symbol of the Alliance. It was supposed to be built for
the Galactic Empire for general use. But the original design team had other
ideas. When the Empire wizened up and tried to fully take over the Incom
Corporation, the entire design team defected and the Rebellion instead set up
the manufacturing in secrecy to produce the X-Wing instead. Eventually, again
ironically, the Empire opted for the cheaper TIE Fighters. Despite the
annexation, Incom became synonymous with the Rebellion, much to the chagrin of
its Board.
The Incom
T-65 X-Wing became the symbol of the Alliance. It was supposed to be built for
the Galactic Empire for general use. But the original design team had other
ideas. When the Empire wizened up and tried to fully take over the Incom
Corporation, the entire design team defected and the Rebellion instead set up
the manufacturing in secrecy to produce the X-Wing instead. Eventually, again
ironically, the Empire opted for the cheaper TIE Fighters. Despite the
annexation, Incom became synonymous with the Rebellion, much to the chagrin of
its Board.
The X-Wing is a totally different concept to the TIE. While the TIE is cheap, easy to produce, had very little in the way of armaments (just two laser cannons), no shields and no hyperdrive, the X-Wing has them all. It is armed with four Tiam & Bak TK9 laser cannons, one on each wing tip, two on top, two on the bottom. These cannons can be programmed to fire in unison, or sequentially. Usually, due to a cooldown and recharge period, the fire control computer is programed to fire the cannons sequentially one at the time after the other, automatically calculated and triangulated onto the targets positon, adjusting for the target’s speed and direction. The cannons are only fired in unison in extremis situations. It is also armed with two Krupx MG7A proton (say PROton, not PHOton! Photon torpedoes are the much larger anti-matter torpedoes used in Star Trek) torpedo launchers located just beneath the cockpit, each launcher is armed with up to 5 round clip of torpedoes although at the time of Yavin, the cash-strapped rebellion can only afford to arm each X-Wing with 2 torpedoes, one in each launcher. In the end, the fighter gained massive fame when Luke Skywalker, using the Force, was able to jam both torpedoes down the Death Star exhaust port, destroying it completely with all hands except Vader. The craft offers a single cockpit, hosting a single pilot with a droid socket outfitted to the R2 series of astromech droids. The pilot do all the piloting and fighting duties. The droid act as a co-pilot, usually responsible for navigation, damage control and shield modulation. The craft is also equipped with a hyperdrive, allowing for quick “hit-and-fade” style missions where the craft suddenly appears, doing quick strike on say, a hapless Imperial convoy, then quickly fade back into hyperspace. It is also equipped with a shielding device that allows the pilot (with the astromech droid doing the hard work) to modify the shield to guard the entire craft, or concentrate the shields on a specific area, such as the craft’s “six-o’clock”.
 The X-Wing
soon became the go-to craft for any Rebellion pilots. The Death Star kill
notwithstanding, it also did escort duty when the Rebel base at Echo Base was
found, escorting transport ships out of the danger zone. It soon supplemented
and eventually outright replaced the obsolescence Y-Wing. It has enough speed
and more than enough maneuverability to tangle with the Empire’s TIE/Ln fighters
and in the right hands, could go toe to toe with the faster TIE Interceptor and
emerge victorious. The pilots appreciated the fighter’s shielding systems, which
allows it to survive a few blasts from the TIE’s cannons (which led to a major
complaint from Imperial pilots that they may get a bead on a X-Wing, they may
even get a few shots in, but in the end, still watch as the X-Wing escape due to
its shielding), giving the pilot a chance to escape. Meanwhile, with its
powerful Tiam & Bak laser cannons, one shot is usually more than enough to shred
a defenseless TIE.
The X-Wing
soon became the go-to craft for any Rebellion pilots. The Death Star kill
notwithstanding, it also did escort duty when the Rebel base at Echo Base was
found, escorting transport ships out of the danger zone. It soon supplemented
and eventually outright replaced the obsolescence Y-Wing. It has enough speed
and more than enough maneuverability to tangle with the Empire’s TIE/Ln fighters
and in the right hands, could go toe to toe with the faster TIE Interceptor and
emerge victorious. The pilots appreciated the fighter’s shielding systems, which
allows it to survive a few blasts from the TIE’s cannons (which led to a major
complaint from Imperial pilots that they may get a bead on a X-Wing, they may
even get a few shots in, but in the end, still watch as the X-Wing escape due to
its shielding), giving the pilot a chance to escape. Meanwhile, with its
powerful Tiam & Bak laser cannons, one shot is usually more than enough to shred
a defenseless TIE.
The craft found absolute favor with the famous Rogue Squadron, which uses it for any missions except those very specific ones that requires a more specialized craft. Otherwise, they just tend to use the X-Wing for all sorts of missions due to its “jack-of-all-trades” nature. The craft eventually achieved even more massive fame, when Wedge Antilles, the other sole survivor of the original Death Star attack mission, was able to penetrate the Death Star II defenses, and fire his own protons at the stations massive reactor’s power regulator, helping the Rebellion destroy the massive Imperial construct. Some 40 years later, an improved version, the T-75 is still in service with the Resistance….Although I much prefer the now “Legends” (FEH!!!!) version that the X-Wing, even though still in service, was replaced by the like of Freitek (Made up of the original defected and escaped X-Wing design team) E-Wing fighters.
| THE KIT |
Check my preview at this link. What I said is all true except one thing. FOLLOW THE INSTRUCTIONS TO THE LETTER!!!!!! Why is this so important, well, let’s just say, I found out the hard way that there is a special reason and that reason is covered below! Other than that, there is no special pitfalls or other mistakes except like me, you make one all to yourself!
| CONSTRUCTION |
Construction is just as simple as said in the preview.
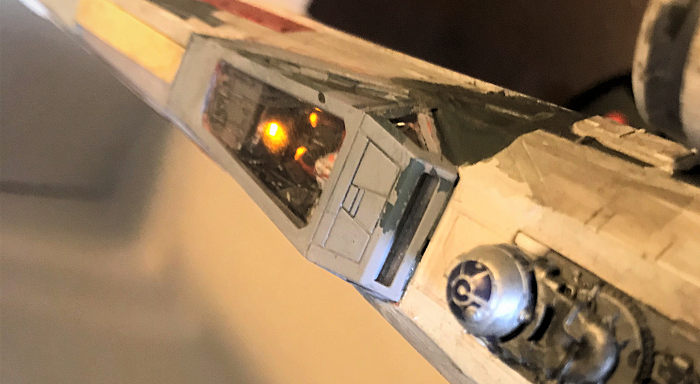
The first thing you do is check if the light harness and motor is operable. Then
assembly can truly begin. The first thing to be aware is the light that goes to
the instrument panel. Be sure the light is secure and in the right place. Mine
was slightly out of place and when it was time to put the fuselage halves
together, a slight seam appeared. Be sure you wrap the black light reflect
stickers tightly around the LED diode and insert it tightly into the instrument
panel. As for the cockpit itself, I elected to paint it flat black, followed by
a wash of dark grey to bring out the details. For Luke, I painted him flat
white, with flesh faces. The helmet especially was weathered with silver, black
and tan ala the films. The decal sheet does contain the rebellion symbols for
the helmet so I applied them here and a day glow orange for the visor……Wish that
part is clear to show off the eyes but it works.
 Besides, once
you put on the targeting computer aiming device, if you so choose too, it hardly
matters. I didn’t cause, you know, Luke eventually blew up the Death Star using
the force. Decals are also added for the instrument panels and the coaming.
Afterwards, it was cemented onto the correct place in the lower fuselage.
Besides, once
you put on the targeting computer aiming device, if you so choose too, it hardly
matters. I didn’t cause, you know, Luke eventually blew up the Death Star using
the force. Decals are also added for the instrument panels and the coaming.
Afterwards, it was cemented onto the correct place in the lower fuselage.
The rest is straightforward. Again, everything is snap tight. This again, allowed me to keep the colored panels off until final assembly. Make sure the motor is secured well in the rear of the fuselage. I used superglue to really put it in place. The fuselage was done in two days…Would be much quicker if I have the extra time. You could probably finish it in less than 4 hours if you are so inclined simply because it’s detailed for the modeler that does not suffer AMS and so easy and have such great fit that you don’t need to worry about anything else. I had to put a little filler on the fuselage spot that the slightly misfit instrument panel LED pushed out. But again, that was mainly my fault.
Now the wings. The wings are a little more complicated. And no, do not, and I repeat DO NOT think you can assemble them all in one go and then just slap the wings onto whatever slot you feel! Trust me! That does not work! I did that and as you about to see, I ran into one major hellhole of a brouhaha later!
The wing assembly goes like this: Put the detail
inserts into the hole in the wings. Put in the fence slot, join the upper and
lower wings together. For the engines, put in the front engine fan blade face
(why the hell would a deep space fighter need fan blade is beyond me since space
is a vacuum), attach the front face, attach the middle container. It is here, if
you didn’t read the instructions EXACTLY, that you are going to run into your
first problem since I didn’t realize that the bottom wings contain the landing
gears and thus, are a bit different then the top wings. The end result will be
some panels didn’t fit exactly, necessitating fillers. Before you put on the
middle panel, be sure you hide the engine LED
 harness
through it and out the rear panel, leading to the engine exhaust. The exhaust
has four pieces, four just to deal with the fact that they needed to contain the
LED diode. Make sure they are wrapped tight in their black reflect stickers and
insert them as deep as possible to the exhaust cone so the light doesn’t reflect
out of the white tube.
harness
through it and out the rear panel, leading to the engine exhaust. The exhaust
has four pieces, four just to deal with the fact that they needed to contain the
LED diode. Make sure they are wrapped tight in their black reflect stickers and
insert them as deep as possible to the exhaust cone so the light doesn’t reflect
out of the white tube.
Then com the wing to fuselage attachment assembly. The four wings are attached onto the four slots on the motor assembly. Be sure the motor are spread into “attack position” for ease of assembly. It is here that I ran into my major problem since I didn’t read the instructions and assembled the wings ever which way. The top went on ok. But the bottom wings, again, the bottom wings are a little different than the top, has major fit issues. The worst the starboard wing. The top piece just will not fit onto the slot and got pushed up completely out of place, necessitating me with a dremel tool to sand it down to the point where it fits better and using putty to correct the differences in height and a plasticard to remake the panel lost to the surgery. The port wings was better, but still need sanding down to make the wing fall correctly into place. Again, you can avoid this problem if you just read the instructions to the letter!
The rest are the main wing cannons, and these goes together nicely. I elected to cement them in place. To the paint shop we go!
| COLORS & MARKINGS |
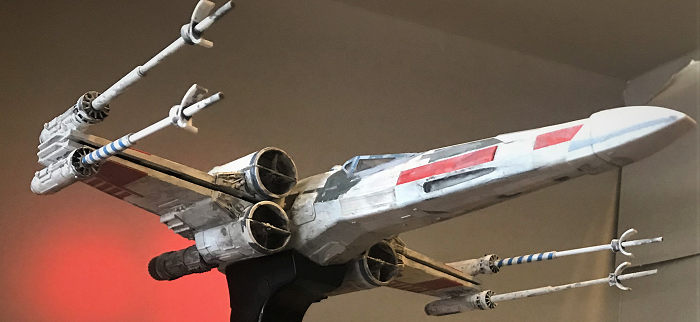
Main painting is light grey. Yes, in the movie the
ship looks far whiter but after painting, the color just look right. This is
because all rebel/Alliance fleet ships are far far dirtier than their Empire
counterparts. This also mean the ship will undergo heavy weathering. Before that
can happen though, I used tape to tape up the cockpit, the proton torpedo launch
tubes, and the engine exhaust nozzles. The wings were kept in “attack” position
to help spraying. I then used Testor’s light grey to spray on the first coat.
After that is completely dried, I then used my dirty thinner bottle, scratched
the bottom, and then used paint leftovers to thin and then dirty up the ship!
Yes, you read that right, dirty paint leftovers! Believe it or not, this
actually worked great since that thinner bottle has all sorts of paint leftover
all mashed together to the point you can’t tell what is what, and when thinned
and placed on the model, just look like a bird which went through all sorts of
planet and their atmosphere and collected all of their dirt and dust. A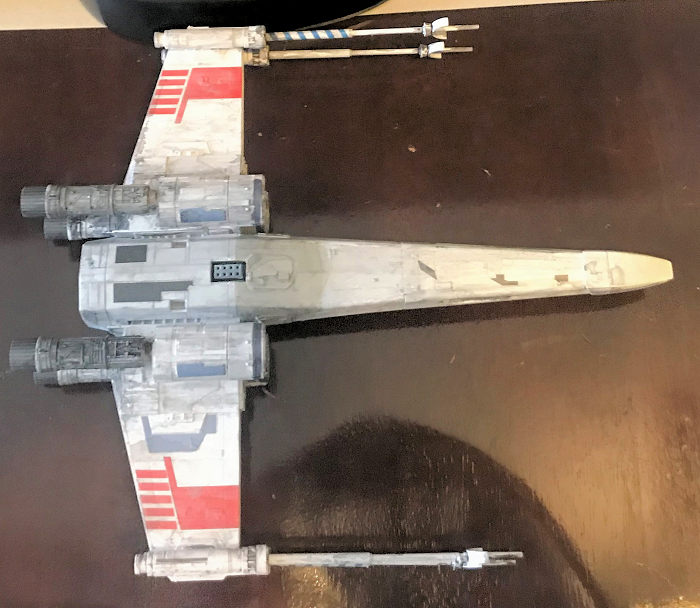 fter
that is dried, a second coat is then put on. This is followed by the decals.
Just a warning on Bandai’s decals. They are thin but react very well to Mr.
Mark’s Softner but will not crumple to pieces like Cartograph’s (Like my E-2C
Hawkeye kit). But just make sure to keep your fingers away cause your digits
will rip them right off until fully dried. Several did, I pieced some together,
but left some as “damaged” and when fully weathered, actually looked the part!
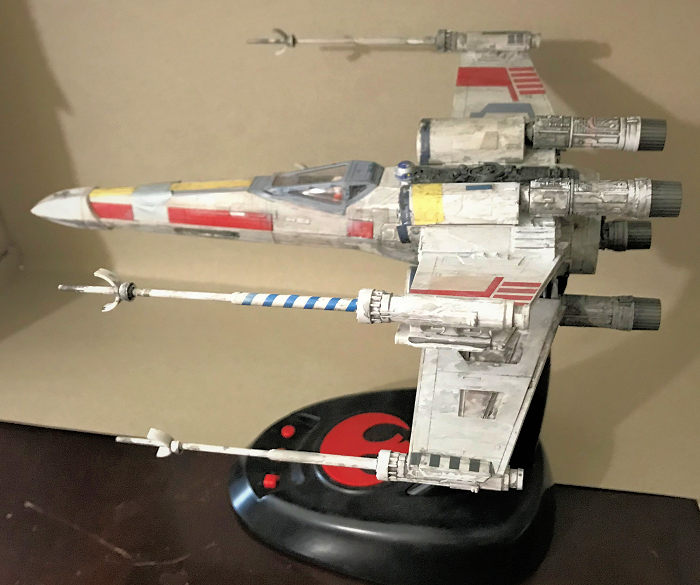
The only option in the kit is Luke Skywalker’ “Red 5”, which was used in the
climatic “Death Star Trench Run” battle in the original Star Wars. However, if
you want any other X-Wings, third party had already came out with nearly if not
all the X-Wings seen in the original Trilogy and even “Rogue One” so you do have
your options.
fter
that is dried, a second coat is then put on. This is followed by the decals.
Just a warning on Bandai’s decals. They are thin but react very well to Mr.
Mark’s Softner but will not crumple to pieces like Cartograph’s (Like my E-2C
Hawkeye kit). But just make sure to keep your fingers away cause your digits
will rip them right off until fully dried. Several did, I pieced some together,
but left some as “damaged” and when fully weathered, actually looked the part!
The only option in the kit is Luke Skywalker’ “Red 5”, which was used in the
climatic “Death Star Trench Run” battle in the original Star Wars. However, if
you want any other X-Wings, third party had already came out with nearly if not
all the X-Wings seen in the original Trilogy and even “Rogue One” so you do have
your options.
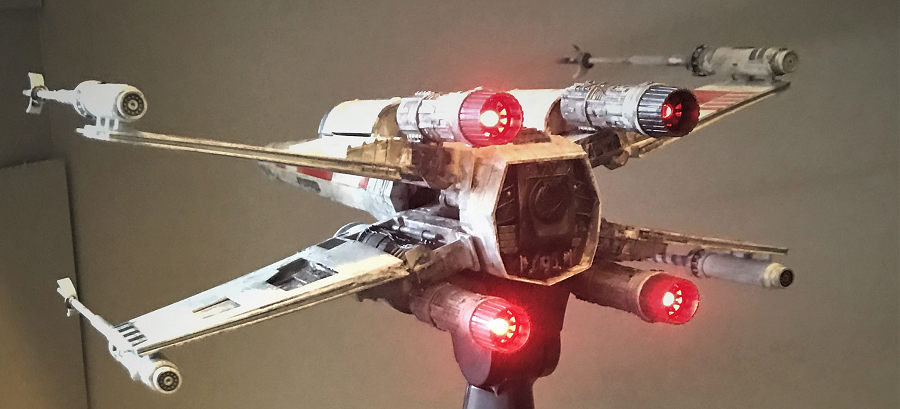
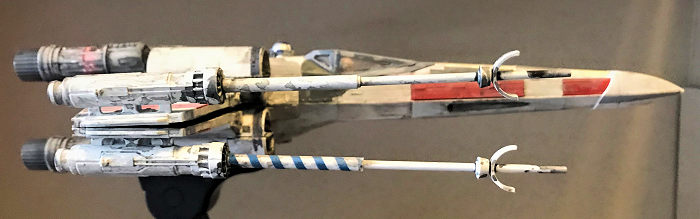
I now also added the colored panels and the weathering can truly begin. Super heavy slobs of jet black acrylics were used to blacken the engine exhaust pipes cause from pics and the movie, these areas just are plain dirty. Burnt metal were used to highlight the exhaust areas, again, reached into the bottom of my dirty thinner bottle and grabbed a glob of paint leftovers, this time not nearly as thin, and slobbered into the cavities between the wings. Then more jet black followed by beige were used to weather the ship further. Afterwards, the ship just look plain to hell dirty! I thought it might even be too dirty but a friend on Facebook pointed out that Alliance ships are THAT dirty, X-wings especially since they were used, abused, flew into the ground, fixed up again, then flew into the ground again! Maintenance were only done to keep the birds flying and sans everything else! Broken to the beyond ships that finally can never fly were promptly stripped of parts and donated to other needy ships to the points all the ships had cobbled and hodgepodge of parts collected over the years! So yes, there WERE THAT dirty and more! Almost reminds me of the Corsairs that participated in the Battle of Solomons (Speaking of which, I really need to get my two Tamiya 1/32 F4U’s done!). Anyways, after that, I removed the tapes and began final constructions.
| FINAL CONSTRUCTION |
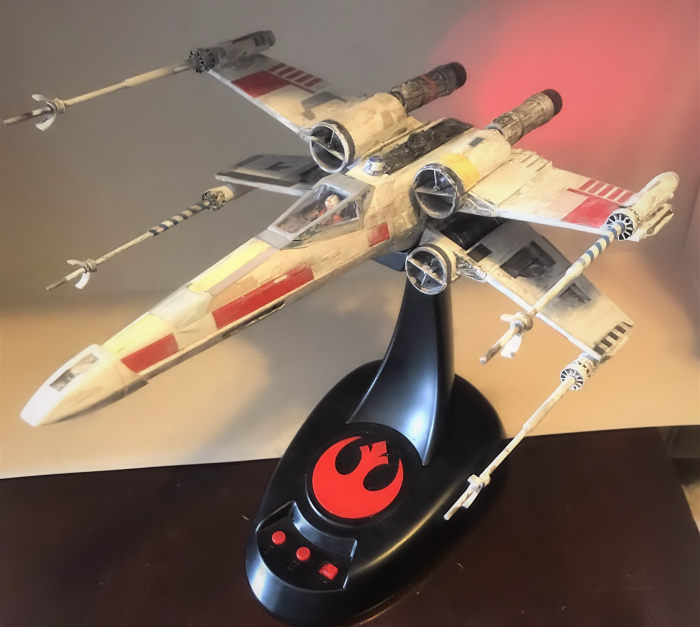 The ship is
almost done. I finally cemented the laser cannon barrels into place. They were
mostly kept off during painting and decal session to prevent them being knocked
off or broken, I also placed the exhaust pipes into place. They were not
cemented so I can adjust the light harness inside, which I had to do to one of
them cause the LED emitters were stuck too further in and lit up the pipes
instead. I also assembled the landing footpads but most of the time, the bird
will be on the display stand. I really do want another X-wing to display in the
“landed” mode but jeebus holly christdomhood! Fine Molds 1/48 version is now
over $150 on Evilbay!!! GRAHHH!!! Why didn’t I bought one when it was
available?!?!?!? Finally but not lastly, how could I forget, there is a
half-bodied R2D2 figure (that again, you can paint as any of the R2’s used in
the original Trilogy). I sprayed it with silver dome and semi-gloss white body
and used the kit’s decals to doll it up and then put the model on its display
stand/control device. Model Done!!!
The ship is
almost done. I finally cemented the laser cannon barrels into place. They were
mostly kept off during painting and decal session to prevent them being knocked
off or broken, I also placed the exhaust pipes into place. They were not
cemented so I can adjust the light harness inside, which I had to do to one of
them cause the LED emitters were stuck too further in and lit up the pipes
instead. I also assembled the landing footpads but most of the time, the bird
will be on the display stand. I really do want another X-wing to display in the
“landed” mode but jeebus holly christdomhood! Fine Molds 1/48 version is now
over $150 on Evilbay!!! GRAHHH!!! Why didn’t I bought one when it was
available?!?!?!? Finally but not lastly, how could I forget, there is a
half-bodied R2D2 figure (that again, you can paint as any of the R2’s used in
the original Trilogy). I sprayed it with silver dome and semi-gloss white body
and used the kit’s decals to doll it up and then put the model on its display
stand/control device. Model Done!!!
| CONCLUSIONS |
And that is that. Just wish this kit would be a little cheaper. The asking price is $100. I caught this on sale at the local Hobbytown for $88. But then again, until Disney stop being the Evil Emperor and just god dang sort this copyright, who is who, and what is what out, the price probably will not go down any lower. But the price is well spend since this kit is good enough to be almost “Perfect Grade”…..I just wish they include say Wedge Antilles and his R2 unit in the kit but that would be nitpicking at its finest! Overall, this kit is an absolutely blast to build and a joy when on its display stand! Just make sure you FOLLOW THE INSTRUCTIONS TO THE LETTER!!! Ok fine, an IPMS friend pointed out the gimmicky nature of this kit, but then again, some Bandai kits are that. But that is a minor quibble! Again, unless Disney sorts out the copyright issues, this is practically the only affordable 1/48 X-wing out there and again, third-party now have just about every version of the X-wings flown by everyone from the Trilogy and Rogue One. Now, onto my freaking Millennium Falcon “Perfect Grade” (well, after I finish my 1/350 TOS Enterprise that is)…It never ends does it?
13 May 2019
Copyright ModelingMadness.com
If you would like your product reviewed fairly and fairly quickly, please contact the editor or see other details in the Note to Contributors.
Back to the Main Page Back to the Review Index Page Back to the Previews Index Page