Revell 1/72 Millennium Falcon
| KIT #: | 5093 |
| PRICE: | $125.00 |
| DECALS: | Oneoption |
| REVIEWER: | Shanee Cowland |
| NOTES: |
HDA ModelworX, Revell, Fine Molds Decals After Market: Para Graphic Photo etch, 3D Printed parts, Homemade LED/Fiber Optic Light Kit. |
| HISTORY |
The Millennium Falcon, Han Solo’s YT-1300 space freighter is the well known “fastest hunk-o’-junk in the galaxy” that won the hearts of so many fans of the original Star Wars Trilogy in the seventies and eighties. Revived for the new Disney Star Wars movies, the space freighter has lost none of its appeal. Having been a fan of the movie since the original was released in 1977, I am not the only model builder who continues to see the appeal of the Falcon. The complexity, lighting opportunities, battle damage and the stains of oil and grease all over the fuselage endear it to me as more of a work of art than a standard assembly.
 Industrial
Light and Magic originally built a five foot prop for the original Star Wars, A
New Hope (ANH) movie in the late seventies. The details on this model were built
with greeblies created from model kits sourced from model shops in California
and some can identify the kits from whence they came (Panther tank here, Porsche
engine there etc.).
Industrial
Light and Magic originally built a five foot prop for the original Star Wars, A
New Hope (ANH) movie in the late seventies. The details on this model were built
with greeblies created from model kits sourced from model shops in California
and some can identify the kits from whence they came (Panther tank here, Porsche
engine there etc.).
When ILM started production of the models for The Empire Strikes Back (TESB), the original five foot model was considered too large and cumbersome for the maneuvers needed on screen. Because of this, a second prop, the 32 inch Falcon was built with some glaring differences between them (such as the fact that the TESB model has five landing gear legs and the ANH model has only three).
Disney has worked hard to explain the differences between the two designs in the newer movies. In the Solo movie, Han trashes the ship while attempting to lose some Tie Fighters and destroys two of the front landing gear legs (which I guess subsequently get rebuilt between ANH and TESB).
| THE KIT |
This Revell Master Series kit (2015) is a reboxing of the Fine Molds kit released in 2006 in 1/72 scale. Since then, Bandai released their Perfect Grade 1/72 Millennium Falcon in 2018. Bandai’s kit is based on the original 5 foot prop used in ANH while the Fine Molds kit is a closer representation of the 32 inch prop used in TESB.
The last Millennium Falcon kit I built was the MPC/ERTL kit That I also reviewed here. I have built several of these kits and, although they build up quite nicely, They had some issues. The sidewalls are very thick, the greeblies, being molded on, lacked detail and the cockpit looks more like something you would see in a naval vessel! My own paint job of this falcon left a lot to be desired so I decided that I would invest in a better kit and planned to do a better overall job. I found this kit ‘used’ on eBay for a, reasonable, $125. With the MPC Falcon, I had put together my own simple home-brew light kit. For this kit I planned to improve the lighting aspect of the build as well as the paint job. And then I did what most of us do and stash it away in a closet. Finally in 2023 I found the courage to tackle what had become my white whale of a model and started the build.
 The
FineMolds kit comes with over 900 parts though not all of them are used. Many of
the parts are the hundreds of greeblies that adorn the outer hull structure. The
box is a large top opening box divided down the middle with the top and bottom
hull pieces and a few large parts on one side and a number of sprues of
greeblies etc on the other side. All are molded in light tan plastic that fit
together well and have good location pins to place them correctly. Flash is at a
minimum and the kit detail is good. Included in the kit is a stand to display
the falcon in flight. The instructions come in a clearly printed 39 section
black and white booklet. The last section shows some nice pictures of the
completed model although all are in black and white. In addition to the booklet
is a large full color poster of the top of the 32 inch prop and several
reference pictures of other angles of the Falcon. I have read some critiques of
the kit that say that the falcon is too flat in shape and also a little longer
than it should be. A comparison between this falcon and the Bandai falcon shows
them to be quite different. But unlike models of real aircraft, the Falcon
appeared in various guises and none were identical so it really didn’t bother
me.
The
FineMolds kit comes with over 900 parts though not all of them are used. Many of
the parts are the hundreds of greeblies that adorn the outer hull structure. The
box is a large top opening box divided down the middle with the top and bottom
hull pieces and a few large parts on one side and a number of sprues of
greeblies etc on the other side. All are molded in light tan plastic that fit
together well and have good location pins to place them correctly. Flash is at a
minimum and the kit detail is good. Included in the kit is a stand to display
the falcon in flight. The instructions come in a clearly printed 39 section
black and white booklet. The last section shows some nice pictures of the
completed model although all are in black and white. In addition to the booklet
is a large full color poster of the top of the 32 inch prop and several
reference pictures of other angles of the Falcon. I have read some critiques of
the kit that say that the falcon is too flat in shape and also a little longer
than it should be. A comparison between this falcon and the Bandai falcon shows
them to be quite different. But unlike models of real aircraft, the Falcon
appeared in various guises and none were identical so it really didn’t bother
me.
The kit comes with two cockpit options. One is a plastic frame only and the other is clear plastic that needs to be masked. It also comes with figures of Solo, Chewbacca and several other main Star Wars Characters. One of the bigger flaws of the kit is a lack of battle damage. This needs to be (carefully) created yourself if you want a screen accurate model.
In addition to the kit, I purchased 3D resin printed parts of the landing gear ‘pie cans’ and the belly guns, I also purchased ParaGraphix photo etch, HDA ModelworX gun-bay decals and some duplicate FineMolds kit decals on eBay to use as spares. I used greeblies to recreate some of the battle damage and guitar wire to represent landing gear hoses. Finally, I also added my own 3D printed contributions.
| CONSTRUCTION |
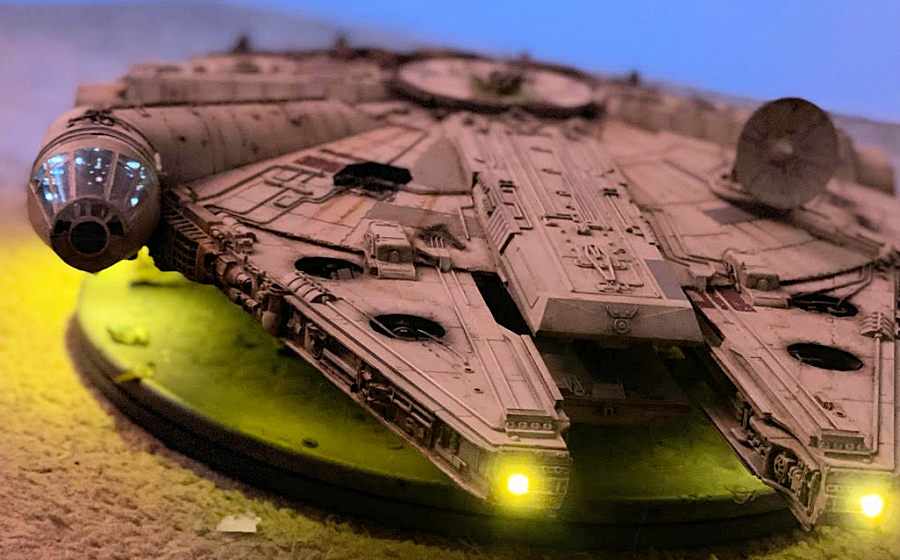
Had I just wanted to build the model, it would have been easy to just follow the instructions as laid out. My vision was far more complex. I wanted to include lighting in the cockpit and gun bays, an engine that glows blue, red and white landing lights and illumination from the landing gantry. Additionally, I wanted to be able to control which lighting was on at any time so I needed multiple switches. Finally, I didn’t want an ugly cable connected to the Falcon so I needed a rechargeable battery to be housed within (and to have a recharging port). The switches and the charging port all needed to be concealed when not in use and the kit is designed for none of these things.
 The Bandai
Falcon does all of this by having a removable back quarter of the hull to
provide access to batteries and switches. There was no way that I was going to
be able to remove the top or bottom of the hull without some skilled engineering
and kit reworking. My design was to include the bank of switches and a charging
port hidden behind a side wall that could be held in place using small strong
magnets. Because I had built a similar falcon before, I was familiar with the
wiring needed for LEDs and switches and some of the other necessities for
lighting a model kit however this was the first time using fiber optic cables.
The Bandai
Falcon does all of this by having a removable back quarter of the hull to
provide access to batteries and switches. There was no way that I was going to
be able to remove the top or bottom of the hull without some skilled engineering
and kit reworking. My design was to include the bank of switches and a charging
port hidden behind a side wall that could be held in place using small strong
magnets. Because I had built a similar falcon before, I was familiar with the
wiring needed for LEDs and switches and some of the other necessities for
lighting a model kit however this was the first time using fiber optic cables.
The build, with my lighting and options made it far more complex than just building the kit out of the box.
First I used a soldering iron to add battle damage to the hull. The docking ring damage is substantial on the movie Falcon so I melted all the way through the plastic and re-built the inside of the docking ring using greeblies and plasticard.
Because almost all of the lighting is in the underside of the Hull, it required me to add the greeblies and paint the bottom hull before installing the lights. The hull interior was painted in a paint and primer in black to prevent light leakage through the plastic. Inside the hull I added a 3D printed bracket to hold the 4.5 V rechargeable R/C battery and another one to hold the charging port.
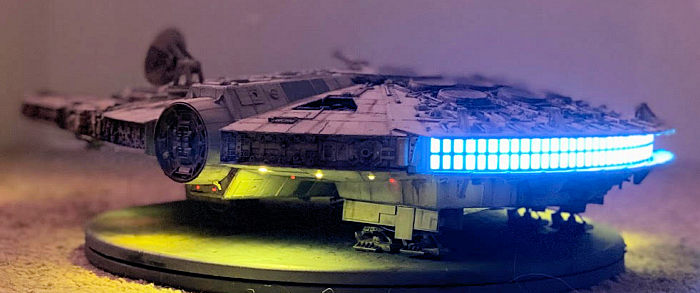
The wiring harness consisted of fiber optic cables, hot glued to LEDs (red and soft glow white) which were each soldered to resistors, and attached together to the switch or battery. It was something of a mess as I’m not a wiring expert but it worked. When the harness was complete, I threaded the fiber optic cables through holes drilled into the lower hull. Once they were all in place, I cut them to length and melted the ends of the cables so that they didn’t slide back through
 In addition
was an LED lighting strip for the engine. The kit provided an arced box that
held the engine exhaust parts. In order to illuminate the engine I cut a slot
into the side of this box and attached the LED strip along the inside. In front
of the LEDs I added a piece of blue translucent plasticard that allowed the
light to diffuse through giving the engine a cool blue hue.
In addition
was an LED lighting strip for the engine. The kit provided an arced box that
held the engine exhaust parts. In order to illuminate the engine I cut a slot
into the side of this box and attached the LED strip along the inside. In front
of the LEDs I added a piece of blue translucent plasticard that allowed the
light to diffuse through giving the engine a cool blue hue.
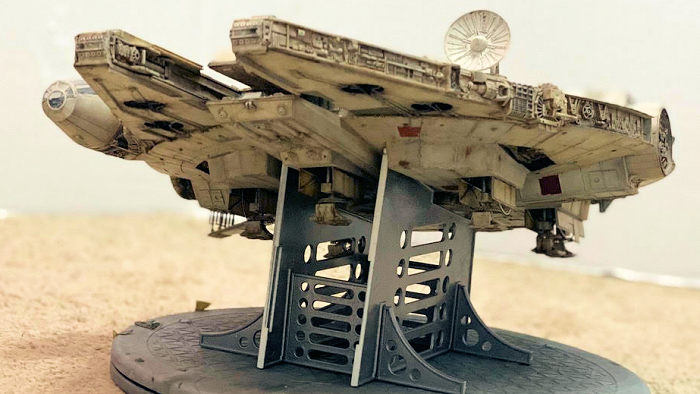
The kit allows you to display the model with the landing gantry down or up but does not provide an interior. My plan was to have both. I built a landing gantry open and 3D printed a short section of curved corridor inside with an LED light illuminating the entrance and also built a closed landing gantry with plasticard. The fit for the landing gantry part was sufficiently snug that no real engineering was required to hold it in place.
The upper and lower gun bays for the kit provided reasonable plastic detail but there were no wall details. I illuminated them by placing a thin piece of translucent plasticard over the ladder tube and inserted an LED behind the plasticard then
I used HDA ModelworkX decals to provide details on the walls of the gun bays.
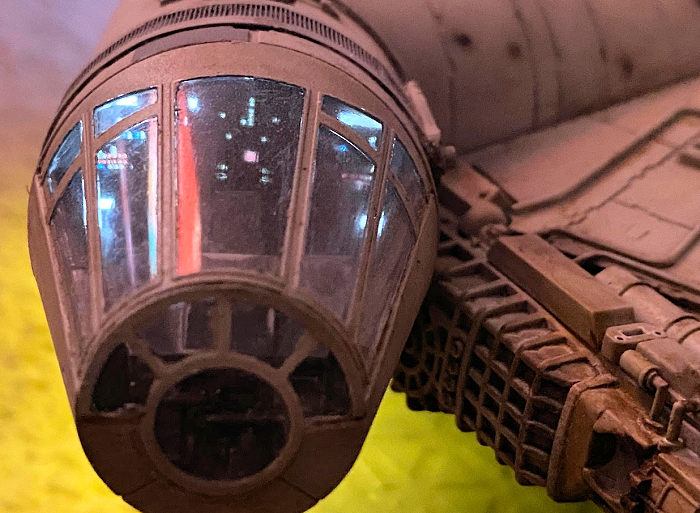
The last part of the wiring to complete was to put into place the LEDS that backlit the cockpit when I attached the hull top. This was nerve wracking as there was no way to access the wiring from that point. I modified the kit cockpit by replacing the back wall with the ParaGraphix photoetch overlayed with the aftermarket decal. With two LEDs backlighting the cockpit I had a pretty satisfying cockpit.
I attached the top and the bottom of the Falcon nervously as it is not easy to undo this major step. The top and bottom were secured in place with screws that were disguised with greeblies. The model kit comes with the option of landing gear down (without doors) or closed landing gear doors. I addressed this by making plasticard doors that attached to the inside of the landing gear bays. I also made some modifications to the landing gear legs adding the 3D printed ‘Pie Cans’ and guitar wire hoses.
From then on, all that remained of building the kit was adding the greeblies.
| COLORS & MARKINGS |
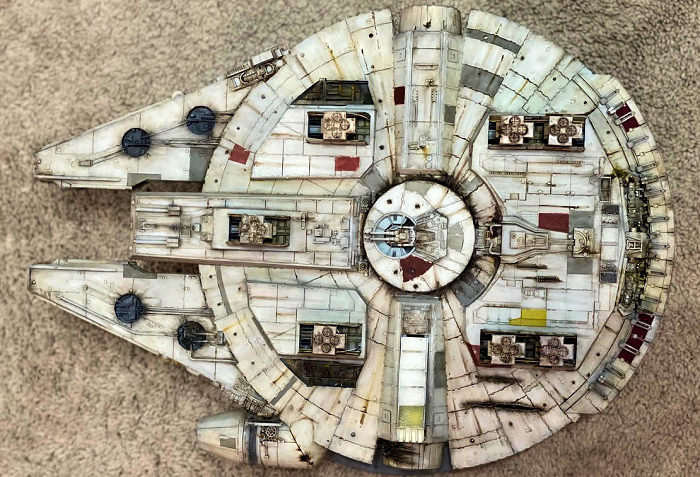
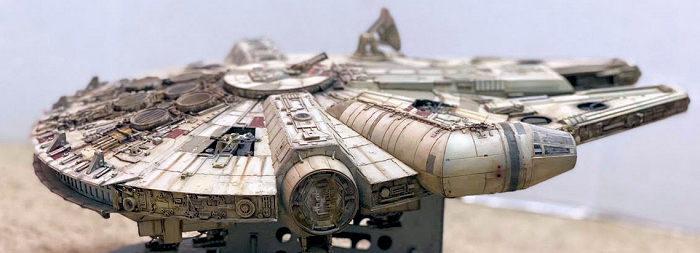
 Once
the greeblies were attached, I began painting the beast, I mean the Falcon!
First a primer coat and then pre-shading in Tamiya Dark Iron. I prefer Dark
Iron to Flat black as the result is slightly warmer. For the main hull
color, I used Tamiya White and Tamiya Deck tan at a ratio of about 4:1. This
took about four light coats. Previous Falcon models have ended up being too
grey and with too heavy panel lines and on this kit, it was important to me
that neither of those were the case. Lots of YouTube builders discard the
decals on the Falcon and paint the color panel sections instead but with so
much top surface (and my limited skill with masking tape), I decided that I
would use decals instead. These were problematic. The decals were large and
both sets were old resulting in regular breakages. In addition, the older
Fine Molds decals fit better and the colors were slightly different but
broke more easily. The Revell decals were stronger but often didn’t quite
fit the panel. The end result was a combination of both sets of decals with
some delicate paint touches. Fortunately, the Falcon looks like she has been
to a few scrap yards in her time so the mismatches all adds to her
character.
Once
the greeblies were attached, I began painting the beast, I mean the Falcon!
First a primer coat and then pre-shading in Tamiya Dark Iron. I prefer Dark
Iron to Flat black as the result is slightly warmer. For the main hull
color, I used Tamiya White and Tamiya Deck tan at a ratio of about 4:1. This
took about four light coats. Previous Falcon models have ended up being too
grey and with too heavy panel lines and on this kit, it was important to me
that neither of those were the case. Lots of YouTube builders discard the
decals on the Falcon and paint the color panel sections instead but with so
much top surface (and my limited skill with masking tape), I decided that I
would use decals instead. These were problematic. The decals were large and
both sets were old resulting in regular breakages. In addition, the older
Fine Molds decals fit better and the colors were slightly different but
broke more easily. The Revell decals were stronger but often didn’t quite
fit the panel. The end result was a combination of both sets of decals with
some delicate paint touches. Fortunately, the Falcon looks like she has been
to a few scrap yards in her time so the mismatches all adds to her
character.
Once a clear coat was applied, the final weathering could be applied. I used a dirty wash of oils over the entire ship first with a wide flat brush, then wiped most of the residue off. This got rid of the clean tan surface and depth and age to the surface. Then it was a case of adding oily streaks all over the surface. This was part artistic license and part using the reference materials I had available to me. This was my favorite part of the whole build as it was when the model really came to life.
| CONCLUSIONS |
 The Fine
Molds/Revell Master Series Millennium Falcon is a great kit for anyone who
has the time to commit to it. It builds together nicely out of the box
(although you may need replacement decals) and there are after market add
ons available (although they are getting rarer). This kit is getting harder
to find (and more expensive) and for both the kit and the after-market
stuff, eBay was my friend. If you are not bothered about which Falcon you
want to build, but want to include a light kit, the Bandai model might be an
easier choice. The Bandai Perfect Grade Millennium Falcon includes a
lighting kit but in truth any Millennium Falcon model is going to be a fun
build because the kit provides you with a blank canvas on which you can
really get creative.
The Fine
Molds/Revell Master Series Millennium Falcon is a great kit for anyone who
has the time to commit to it. It builds together nicely out of the box
(although you may need replacement decals) and there are after market add
ons available (although they are getting rarer). This kit is getting harder
to find (and more expensive) and for both the kit and the after-market
stuff, eBay was my friend. If you are not bothered about which Falcon you
want to build, but want to include a light kit, the Bandai model might be an
easier choice. The Bandai Perfect Grade Millennium Falcon includes a
lighting kit but in truth any Millennium Falcon model is going to be a fun
build because the kit provides you with a blank canvas on which you can
really get creative.
If you are going to get this
model, be prepared to set some time aside. As someone who typically takes
about a month to roll out a 1/48 model aircraft, this took more than a year
of work (18 months on and off).
If you have never
worked with LEDs or fiber optics, this is a great opportunity to try. This
was my first model kit where I used fiber optic cables and it really wasn’t
that bad. There are plenty of resources on the internet to help calculate
voltages, how to use fiber optics and make something really cool.
10 June 2026 Copyright ModelingMadness.com. All rights reserved. No
reproduction in part or in whole without express permission. If you would like your product reviewed fairly and fairly quickly, please
contact the editor or see other details in the
Note to
Contributors.