MPC/ERTL 1/78 Millennium Falcon
| KIT #: | 8917 |
| PRICE: | $50.00 |
| DECALS: | None |
| REVIEWER: | Shanee Cowland |
| NOTES: |
After Market: Home brew LED/side-glow kit Pros: reasonably inexpensive & reasonably accurate. Cons: Bad fit, poor instructions few after market accessories and less accurate than other options. |
| HISTORY |
The Millennium Falcon, Han Solo’s YT-1300 space freighter is the well known “hunk o’ junk” that features in most of the Star Wars franchise movies. It appears in several forms in the original trilogy, Solo and the final trilogy (and may have appeared in one of the prequels as well although I’m less familiar). I’ve been a fan of Star Wars since watching the original in the movies in 1977 and its always seemed like the most charismatic of spaceships. Through those movies it changes in a number of ways – not just with the addition of weathering and battle damage.
 ILM
originally built a five-foot Millennium Falcon prop for filming of A New Hope
(ANH). However at some point it was deemed too large and difficult to maneuver
for several of the shots needed for The Empire Strikes Back (ESB) so a second
thirty-two inch prop was assembled. Surprisingly, there are some considerable
differences between the two props (and the set builds). Most obvious is that the
ANH (five foot) Millennium Falcon has three landing legs but the ESB (thirty two
inch) Falcon has five! This little snippet of information I only became aware of
when I started to research and build this model!
ILM
originally built a five-foot Millennium Falcon prop for filming of A New Hope
(ANH). However at some point it was deemed too large and difficult to maneuver
for several of the shots needed for The Empire Strikes Back (ESB) so a second
thirty-two inch prop was assembled. Surprisingly, there are some considerable
differences between the two props (and the set builds). Most obvious is that the
ANH (five foot) Millennium Falcon has three landing legs but the ESB (thirty two
inch) Falcon has five! This little snippet of information I only became aware of
when I started to research and build this model!
The MPC/ERTL model that I built was a 1996 re-boxing of a 1977 model released by MPC. To my knowledge it was the first Millennium Falcon released in either 1/78 or 1/72 scale and depicts the original five-foot prop with three landing legs. Since then Fine Molds (re-released by Revell) and Bandai have both released significantly improved versions of the thirty-two inch and five foot prop respectively (although at far greater cost).
| THE KIT |
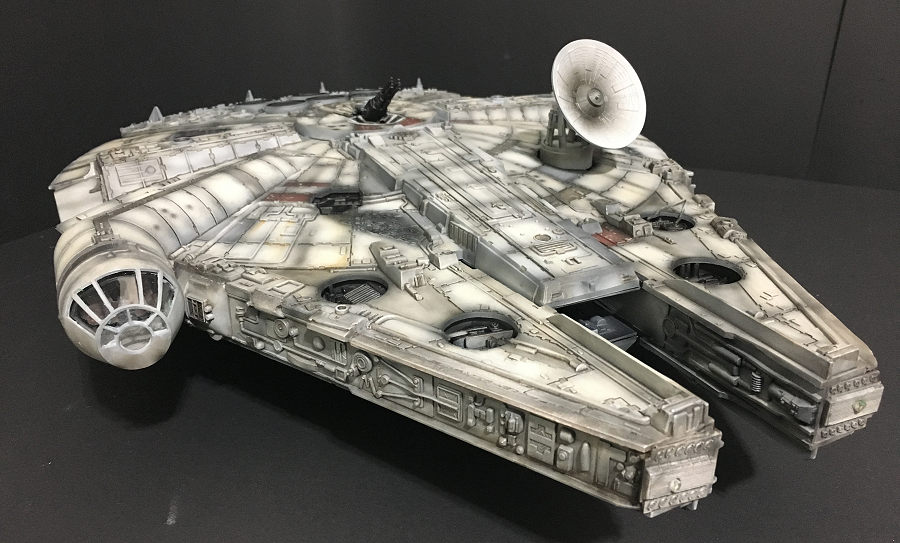
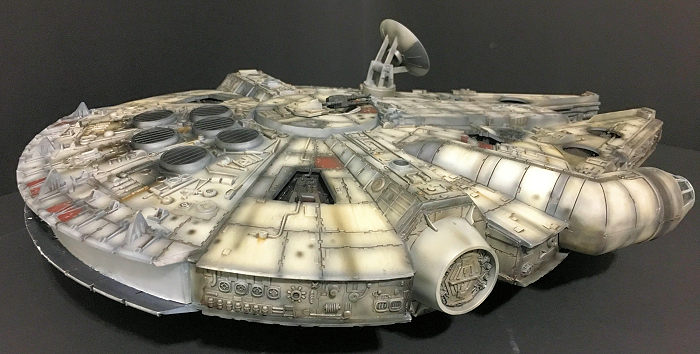
The model contains over a hundred parts that give a reasonable depiction of the Millennium Falcon. No decals were provided but being more than twenty years old, would likely to have been of little use. There was considerable flash on most of the parts and sprues and required a lot of work before building.
Two clear sprues were included for the cockpit, gun bays and two large arcs that enclose the engine. The back of the cockpit was also provided as a clear part. Most of the “greeblies” were molded onto the top, bottom and sides of falcon.
 The model can
be positioned with the landing gear up or down and in fact can also be built
with removable landing gear so that you can position it in flight, and then when
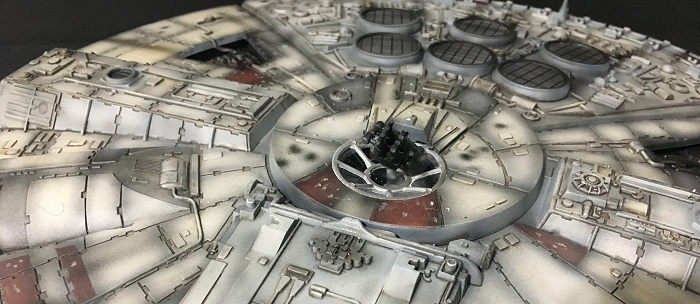
the mood takes you, position it landed. The dish and guns are also moveable.
The model can
be positioned with the landing gear up or down and in fact can also be built
with removable landing gear so that you can position it in flight, and then when
the mood takes you, position it landed. The dish and guns are also moveable.
One big negative about the kit was the lack of a clear paint scheme and a pretty bleak instruction set. Had it not been for the trusty internet, I would have needed to purchase a reference book to identify where the different colored parts of the hull The only reference provided was the box cover. The fit of the parts ranged from adequate to very bad and assembly required a significant amount of modifications using copious amounts of filler and Evergreen styrene where even the filler was insufficient.
There are also some major design issues with the kit, for example the engine section at the back is clear and would look directly into the cavernous interior of the model were you not block it with some styrene. There is also no interior structure to the gun bays, which would again, allow you to see straight into the model with no internal structure represented.
| CONSTRUCTION |
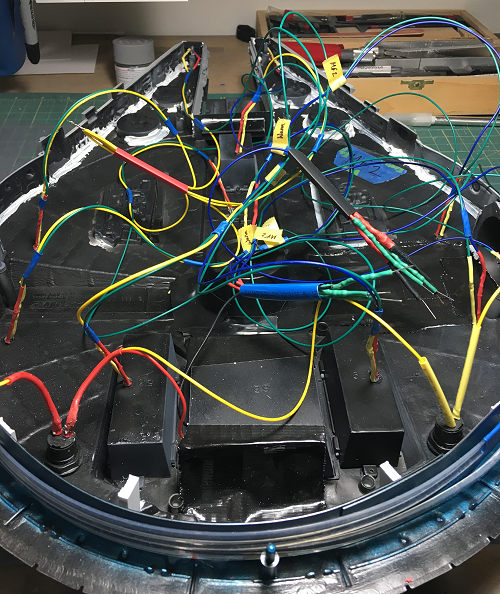 Having
looked around the internet for inspiration, I was impressed at the number of
Millennium Falcon recreations that involved lighting, lowering ramps and even
sound effects so I decided that I wanted my model to include some of these. I
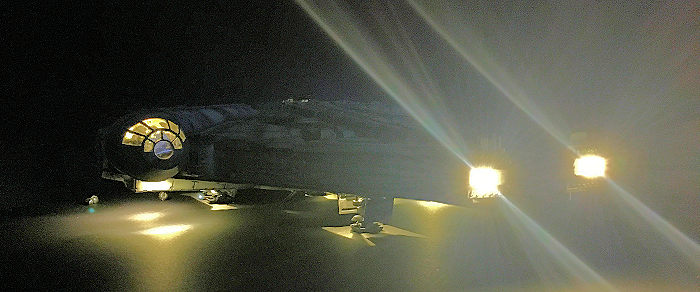
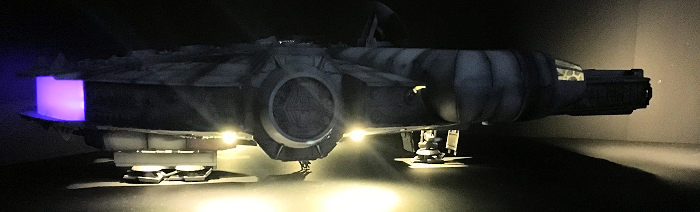
planned to include 3 mm warm white LEDs for use as headlights, to provide
backlight to the cockpit, in both gun bays, in the landing gear legs and also
four landing lights. In addition to these I used side glow fiber optic cable
attached to two blue LEDs to provide my engine glow. The LEDs, switches and
battery were soldered, tested and set aside.
Having
looked around the internet for inspiration, I was impressed at the number of
Millennium Falcon recreations that involved lighting, lowering ramps and even
sound effects so I decided that I wanted my model to include some of these. I
planned to include 3 mm warm white LEDs for use as headlights, to provide
backlight to the cockpit, in both gun bays, in the landing gear legs and also
four landing lights. In addition to these I used side glow fiber optic cable
attached to two blue LEDs to provide my engine glow. The LEDs, switches and
battery were soldered, tested and set aside.
Once the wiring was completed I marked and drilled the holes in the lower hull. This was an extremely nerve wracking time. I also decided that this would be a good point to add battle damage. The Millennium Falcon has several large sections of damage, which I added by melting the styrene using a soldering iron. This too was nerve wracking but I was very happy with the result that gave more realistic battle damage than paint alone could have done.
The next phase was to address a number of the sub assemblies of the model. These included the dish, guns, cockpit, landing gear and landing gear doors. This mainly went without issue with the exception of the clear part of the cockpit. The fit for this was very poor and required several attempts at gluing and regluing for it to hold.
At this point I turned to my kit modifications. I used small plastic disposable condiment cups as the top and bottom gun bays. They were a near perfect fit and glue was more for my peace of mind than to hold them in place. Behind the engines I used styrene sheet to provide a barrier to obscure the innards of the model. I painted these metallic blue to reflect the blue side glow fiber optic cable.
 Installing
the landing gear bays into the lower hull piece was fiddly as the bays hold the
landing gear doors in place. As with the rest of the kit, fit was far from
perfect but I wanted to be able to open and close the doors so they could not be
glued, while at the same time I needed the landing gear bays to be able to take
the weight of the Falcon. As one kept breaking, I used several pieces of styrene
to help secure the landing gear bays onto the lower hull piece.
Installing
the landing gear bays into the lower hull piece was fiddly as the bays hold the
landing gear doors in place. As with the rest of the kit, fit was far from
perfect but I wanted to be able to open and close the doors so they could not be
glued, while at the same time I needed the landing gear bays to be able to take
the weight of the Falcon. As one kept breaking, I used several pieces of styrene
to help secure the landing gear bays onto the lower hull piece.
Once the landing gear was in place it was possible to add the sidewall sections and the clear plastic engine cover. There are eleven of these sections that need to be glued to the lower hull. They needed to be installed before I could add the wiring to the lower hull, as I needed headlights to be drilled into the front mandible wall section. This went without too much drama.
 Once the
wiring was in place, secured and tested it was possible to attach the top and
bottom together. There are a number of pins that need to meet on top and bottom
hull pieces and this was fiddly with the sidewall parts in place. Once done, it
was possible to seal the sidewall to the top of the hull. This required some
styrene to close a particularly gaping gap along the edges of the mandibles.
Once the
wiring was in place, secured and tested it was possible to attach the top and
bottom together. There are a number of pins that need to meet on top and bottom
hull pieces and this was fiddly with the sidewall parts in place. Once done, it
was possible to seal the sidewall to the top of the hull. This required some
styrene to close a particularly gaping gap along the edges of the mandibles.
Attaching the cockpit tube was also fiddly and the fit quite poor. It required some trimming and filling of pieces to make it fit reasonably well. Installing guns, dish and legs concluded assembly but as these were positioned without needing glue and went without a hitch.
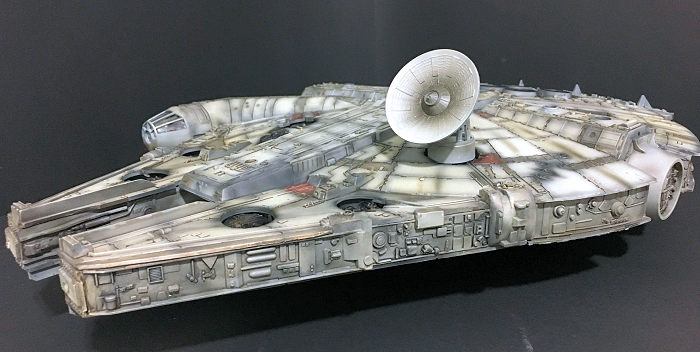
| COLORS & MARKINGS |
 The model was
primed using Rustoleum flat grey primer. I used Tamiya Acrylics to paint the
falcon. Pre-shading was done with Flat Black (XF-1). The hull was a combination
of Sky Grey (XF-19), Deck Tan (XF-55) and Flat White (XF-2). The red hull panels
were equal parts Flat Red (XF 7) and Hull Red (XF 9). I used IJN Grey (XF 77)
for the grey hull panels. Post shading was done in flat black (XF-1) and smoke
(X-19). The panel lines were picked out in Tamiya Dark Brown Panel Line Accent
Colors and I did final weathering using oil paints.
The model was
primed using Rustoleum flat grey primer. I used Tamiya Acrylics to paint the
falcon. Pre-shading was done with Flat Black (XF-1). The hull was a combination
of Sky Grey (XF-19), Deck Tan (XF-55) and Flat White (XF-2). The red hull panels
were equal parts Flat Red (XF 7) and Hull Red (XF 9). I used IJN Grey (XF 77)
for the grey hull panels. Post shading was done in flat black (XF-1) and smoke
(X-19). The panel lines were picked out in Tamiya Dark Brown Panel Line Accent
Colors and I did final weathering using oil paints.
| CONCLUSIONS |
I found this to be a fun if challenging build – not because of its complexity but because of its poor engineering. It can be found for a good price and can be turned into a quite nice build given the time. There is a lot of scope for expansion of this kit if you are willing to tinker and upgrade. After market accessories are pretty thin on the ground given the age of the kit so modifications may well need to be self made.
| REFERENCES |
Kit History: scalemates.com
Shanee Cowland 18 October 2019 Copyright ModelingMadness.com. If you would like your product reviewed fairly and fairly quickly, please contact the editor
or see other details in the
Note to
Contributors. Back to the Main Page
Back to the Review
Index Page
Back to the Previews Index Page