Dragon 1/35 Red Army Scouts & Snipers
| KIT #: | 6068 |
| PRICE: | $14.95 |
| DECALS: | None |
| REVIEWER: | Joe Essid |
| NOTES: |
We've come a long way, Comrades, since the 70s |
| HISTORY |
The film Enemy at the Gates, or better still, the 1999 novel War of the Rats by David L. Robins, shows how fiercely Nazi and Soviet snipers fought a nasty little war amid the larger carnage at Stalingrad. A duel allegedly occurred between snipers Vasily Grigoryevich Zaytsev and the Erwin König, the central drama of both film and novel.
Did it really happen? Zaytsev said so in his memoirs. He told Robins by phone about it, who in turn told this reviewer and his writing students the tale. No surviving German records attest, however, to König's existence. Zaytsev says that he got his enemy's name from a German prisoner.
Whatever took place, Zaytsev and other snipers (some of them women) killed lots of German officers, thus becoming a defining terror of the fighting along the banks of the Volga. Stalingrad may have outdone any battle in the Second World War for both the ferocity and proximity of the two sides. I've read in the old Ballantine history that in the vicinity of the Tractor Factory, squads might bivouac a few yards apart; life-and-death struggles would erupt over controlling a single hallway. And for those foolish enough (or ordered) to cross open ground, a sniper's Mauser or Mosin-Nagant might end it all in a split second.
With the Germans beefing up sniper training on their long retreat after 1942, one unforeseen effect of the War of the Rats would be the deaths of many Allied troops in hedgerow fighting of Normandy, where German marksmen would flank and pick off their targets at ranges long and short.
| THE KIT |
Deep breath, modeler: this is your first review of a kit, after returning to the hobby regularly a few years ago.
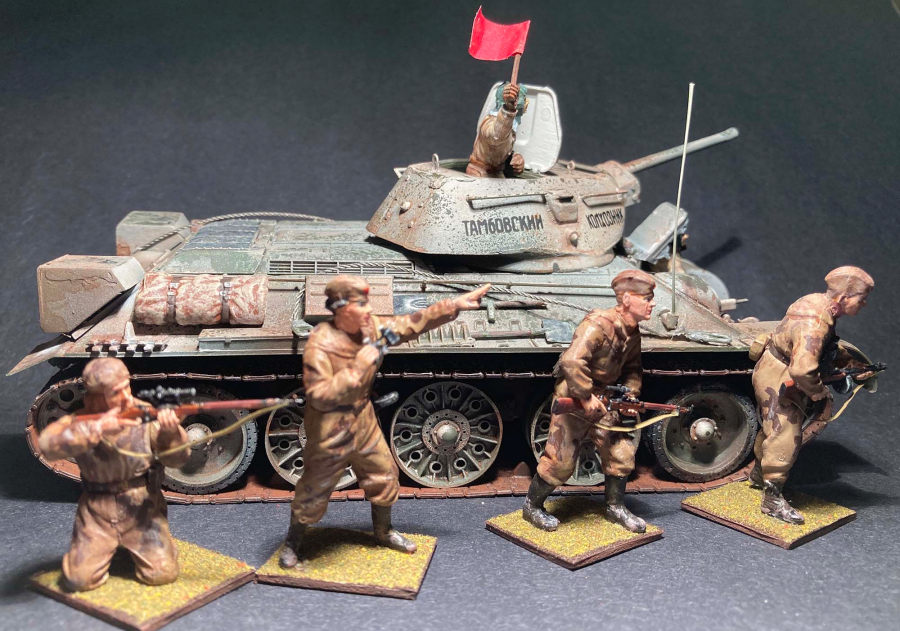
During the pandemic I had more time to work on kits, mostly aircraft but also some armor. I built a Tamiya T-34/76 and though it came with a fairly good commander and driver, I needed some tiny Soviets to put around the vehicle. I'd wanted winter figures, as I'd modeled the tank with mud-spattered whitewash over its usual Soviet green paint.
While in a Hobbytown branch, however, I spotted these Dragon 1/35 figures. For a deer hunter like me, the skill of scouting, as well as the optics and precision of a well-made, walnut-and-steel bolt-action rifle also commend the subject matter.
My memories of modeling figurines
in 1/35 date to the late 70s, when I was building kits not that different from
my T-34. These vintage kits are pure nostalgia the evoke memories of friends
departed, yet I didn't look forward to painting vintage infantry. Nearly half a
century (!) ago, my results looked about as distinc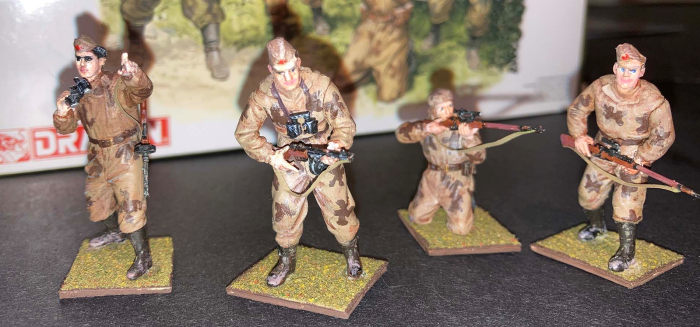 tive as those green army men:
every soldier was the same dude. That said, I've done a good deal of
white-metal-miniature painting for roleplaying games and tabletop wargames
since, so I figured it would be fun to try with plastic.
tive as those green army men:
every soldier was the same dude. That said, I've done a good deal of
white-metal-miniature painting for roleplaying games and tabletop wargames
since, so I figured it would be fun to try with plastic.
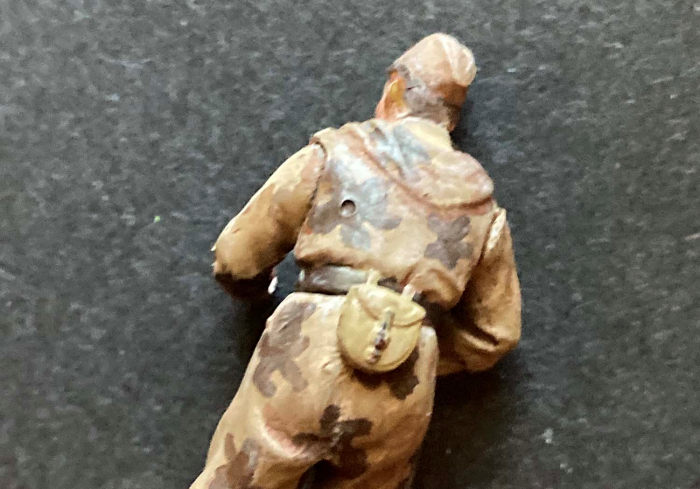
Dragon's kit depicts four subjects, all in spring or fall kit for the Red Army. Two male snipers and two scouts (one female) are included. Compared to 1970s Tamiya figs, these come with many parts. The weapons caught my eye. Nothing screams "Great Patriotic War" like PPSh-4a submachineguns. As my late buddy and fellow modeler Gary Braswell would say about the gun, "Fascists! Hear the voice of Communism!" Alas, the kit features no Commissar with his Makarov, to shoot an insufficiently zealous comrade in the back of the head. Come what may, on to Berlin, workers! The Boss expects your full participation to rid the Rodina of Hitler's revanchist thugs!
Details such as the gas-compensators on the barrels looked exquisite, at least at first glance. I was more eager to see the Mosin-Nogant sniper rifles, since I've handled a few real ones, including a pristine example still in Soviet packing materials. Here too Dragon did well, down to the rifle bolts, bladed front sights, and barrel-bands on the stocks. For the figures, the head sculpts looked really strong; uniform details a bit less so.
| CONSTRUCTION |
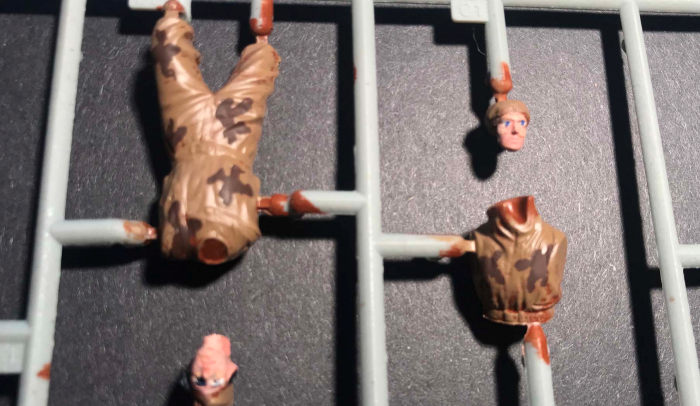
I found no flash to be removed, though parting lines would emerge with drybrushing. After pre-shading and initial painting I cut the figures from the sprues and tried to use CA glue to stick my little snipers together. Later I had to switch glues. More on that in a bit.
Thick struts connect most parts to sprues. These proved difficult to cut closely in some cases. I had to use an X-acto and/or sanding sticks to remove the stubs from the figures, but luckily most were in uniform folds, the tops of caps, and other areas amendable to smoothing out. No putty needed. All of the figures stand unassisted. Arms fit decently, matching the spot on the torso so the figure cradles his or her weapon.
The smaller parts, however, are easy to break. I snapped a pair of binoculars in two removing it from the sprues. Luckily, I recovered both halves, put them on the sticky side of a strip of tape, where a drop of CA glue repaired things.
 Perhaps Dragon molds lower
extremities in two pieces to conserve plastic or to avoid parting lines. While
only one figure--notably, with a one-piece lower torso--left the molds wearing a
line that I sanded down. Meanwhile, those with two-piece torsos proved vexing in
a humorous way. Perhaps due to my overzealous application of CA, the seams
between the legs tended to bubble at the posterior as the CA cured. I had to
apply a sanding stick to two Red Army bottoms. Sorry, Comrades! You must look
proper when reporting for duty.
Perhaps Dragon molds lower
extremities in two pieces to conserve plastic or to avoid parting lines. While
only one figure--notably, with a one-piece lower torso--left the molds wearing a
line that I sanded down. Meanwhile, those with two-piece torsos proved vexing in
a humorous way. Perhaps due to my overzealous application of CA, the seams
between the legs tended to bubble at the posterior as the CA cured. I had to
apply a sanding stick to two Red Army bottoms. Sorry, Comrades! You must look
proper when reporting for duty.
As the figs came together, I switched glues for the arms and boots. I found that CA would not bind well on these figures' extremities, and when the female scout, henceforth Svetlana, fell to my hardwood floor (no carpet monster here) I retrieved only her patriotic torso. The tip of her pointing finger had broken off, never to be found, but a tiny bit of stretched sprue, then a dip in putty, restored our Hero of the Soviet Union, Bionic Svetlana. I found her head a ways from the modeling table, then a boot. The other boot took longer, but I also came up with a sliver of decking from a 1/700 Battleship Yamato and part of the forward fuselage of an Airfix P-51B. Score!
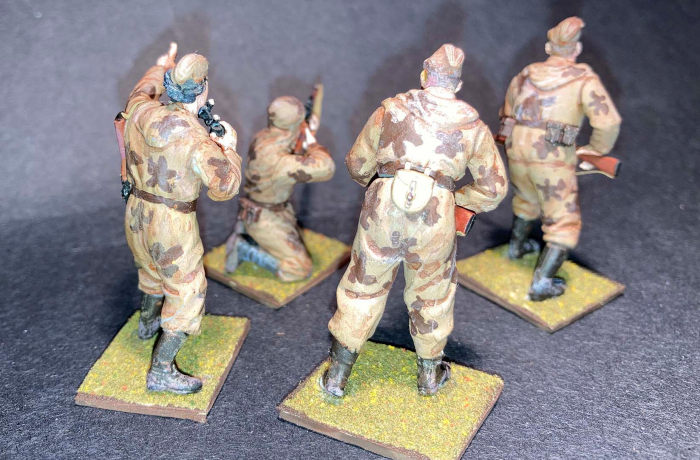
The final results were still not pleasing for the heads; three of the figures show a lot of "crud" I should have removed from the joints. It shows more in the photos than in the display case, so blame the modeler for overzealous use of CA. Next time, a thin coat of plastic cement!
| COLORS & MARKINGS |
I began by studying the box, as there are no other assembly or painting instructions. I started with what I called my Comrade Sniper Zaytsev figure, kneeling behind a scoped rife with a hood, cap, and unique uniform for this quartet of figures. I had already washed the sprues in soapy water, rinsed, then let them dry.
I sprayed the sprues and parts with the same Dupli-Color Adhesion Promoter I use for repainting or dyeing 1/1 scale auto plastics. This clear primer goes on in a fine mist, making the surface more amenable to painting with any type of finish. On a car, or a figure for wargaming, where surfaces get more abrasion, it holds up very well. On a model unlikely to be handled much? Perfect.
Then I brushed with Testors Model-Master Rust enamel (alas, a casualty of Testors being devoured by Rust-Oleum). Gun barrels and other metal bits, got black. Why rust? I find that if I drybrush the slightest bit of white over a dark color, I'll see any hidden mold-marks to remove.
My wargaming projects showed me the joys of hand-painting small figurines that then appeared on the gaming table. Lots of tiny brushes, from 0 to 10-0, are all one needs, as well a good light and a steady hand.
After the rust, I preshaded with ruddy flesh-tone Vallejo acrylics on the faces and any exposed skin. I then washed with thinned Tamiya flat brown acrylic, before drybrushing in lighter flesh colors. The idea here is to start with any visible skin, but still going (except for light-skinned subjects) from dark to light. Were I painting French Colonial troops, I'd begin with a dark brown base and go lighter from there. The three men got more of a brown wash, with some emphasis on five-o-clock shadow. Svetlana remained fairer skinned, but not tarted up. No lipstick at the front, comrade! Factories are for making bullets, not decadent bourgeois trappings!
 I usually like to rough out my
figures' uniforms first, then do the final details. In this case, the photo with
the roll of Frog Tape shows the rough stage before detailing. The faces are
coming into focus, but even at that stage, Svetlana has white "warpaint" under
her eyes. Still, posing the figs at this point usually gives me a sense of how
they look together as a unit, so I can fine-tune details and colors.
I usually like to rough out my
figures' uniforms first, then do the final details. In this case, the photo with
the roll of Frog Tape shows the rough stage before detailing. The faces are
coming into focus, but even at that stage, Svetlana has white "warpaint" under
her eyes. Still, posing the figs at this point usually gives me a sense of how
they look together as a unit, so I can fine-tune details and colors.
While still on the sprues, the heads got eyebrows, lips in a pinkish-brown (sounds horrid, but it looks good in 1/35). Then with my favorite "eyeball brush" I added the whites of the eyes. My favored technique involves making the whites comically large, like anime models, before dotting the irises. If the eyes look aligned, I paint around the whites with flesh tones until the eyes look right for that scale.
Using the sprues with their thick connectors to hold the tiny heads proved a revelation. I found my steadiness increased greatly, as did deftness of drybrushing highlights. Uniforms got a similar but coarser treatment, with brown blotches (Tamiya XF-10 Flat Brown) over lighter brown (Tamiya XF-52 Flat Earth). Soviet uniforms were often in "Amoeba" camo, with brown splotches looking like cartoon "splats" on tan or green cloth. I went tan, which some sources identify as an Autumn camo. No matter for the Great Patriotic War: wear what you have on hand, workers!
Then it was time to remove bits from sprues, I wished that I'd scribed the details on the uniforms, as Roger M. Jackson did for the commander of a 1/35 Walker Bulldog reviewed here. I liked that kit and subject so much I ordered one online. I'll try the technique next time with darker preshading. For now, I took a very fine brush and went again around the edges of tunics and hoods before final drybrushing. Some details, such as the red stars on cap peaks, never really came together. They look like little red circles, even in 1/35. There the molding needed re-scribing. Next time!
For the footwear, I wanted to capture the fascinating Kirza boot, an artificial leather made of a composite material. Most examples I've seen are brownish black, which I achieved by adding Citadel Acrylic black to Tamiya Flat Brown until it "eyeballed" right. The soles got a darker hue that I then drybrushed with brown on the kneeling figure, to simulate the work done by General Mud.
Actual leather accessories got a dark oxblood mix of Citadel red, black, and Tamiya Flat Brown until it approximated, in scale, photos online and the colors on the box.
The wooden "furniture" on Soviet guns was often Arctic Birch, far lighter than walnut often used by other nations. The weapons depicted in the kit would also be nearly new, unlike the seasoned, often warm look of "old wood" we often see on vintage rifle stocks today. The stocks got a base coat of Tamiya Flat Brown, with enough black, red, and yellow added to approximate Arctic Birch. As others here have noted, Tamiya colors dry darker than they appear.
Everything at last got sprayed down with some of my dwindling stock of Testors Flat Clear Lacquer. I then put a dot of Future on the guns' furniture, the lenses of the optics, as well as eyeballs and lips, something I've long done with wargaming figs. For the weapon stocks, my goal was not to make them look as good as my pampered hunting rifle but to distinguish the weapons from the Red Army's drab, dirty uniforms.
| FINAL CONSTRUCTION |
 Before the arms, optics, and weapons went on, I found more
parting lines from the molds in bad places, such as the side of a cap or outside
of a leg, that needed to be scraped off and repainted. I found one large
ejector-pin mark on the back of a sniper, filled with putty and sanded. I found
arm fitment to be rather poor on two figures, and that may be the mistake of the
author. The arms posed well with weapons in them, so I let them be. I filled
seams between shoulder and upper arm with a line of white school glue. It
self-levels nicely and I've never tried it for this application before.
Before the arms, optics, and weapons went on, I found more
parting lines from the molds in bad places, such as the side of a cap or outside
of a leg, that needed to be scraped off and repainted. I found one large
ejector-pin mark on the back of a sniper, filled with putty and sanded. I found
arm fitment to be rather poor on two figures, and that may be the mistake of the
author. The arms posed well with weapons in them, so I let them be. I filled
seams between shoulder and upper arm with a line of white school glue. It
self-levels nicely and I've never tried it for this application before.
Finally, I used another extinct brand of paint, Polly Scale Dark Panzer Yellow
(really a Khaki when dry) to paint a bit of the Frog tape. With a new X-acto
blade I cut the painted tape into very small strips, then painted the sticky
side. With a tab of CA to a weapon's stock, they make passable slings.
I may incorporate these Ruskies into a Stalingrad diorama one day, with a knocked out German tank and some rubble, but for now I put them on small mat-board bases with railway sand, to pose alongside the T-34.
| CONCLUSIONS |
What fun! I recommend it, despite a few assembly issues that would be a challenge for young modelers. As with most figures kits, construction is not the big issue; challenges arise with painting, to avoid a toy-like final result. I spent about 10 (!) hours painting these figures in several sessions. I strongly advise scribing around hoods and uniform seams, as well as removing molding marks before getting too far into the build.
| REFERENCES |
Jukes, Geoffrey. Stalingrad: The Turning Point. NY: Ballantine, 1968.
Kirza. https://en.wikipedia.org/wiki/Kirza
Robins, David L. War of the Rats. NY: Bantam, 1999.
3 May 2021 Copyright ModelingMadness.com. All rights reserved. No
reproduction without express permission. If you would like your product reviewed fairly and fairly quickly, please contact the editor or see other details in the
Note to
Contributors.