|
KIT: |
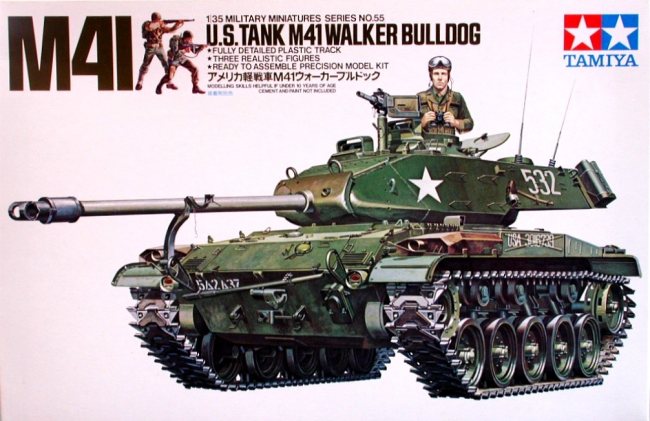
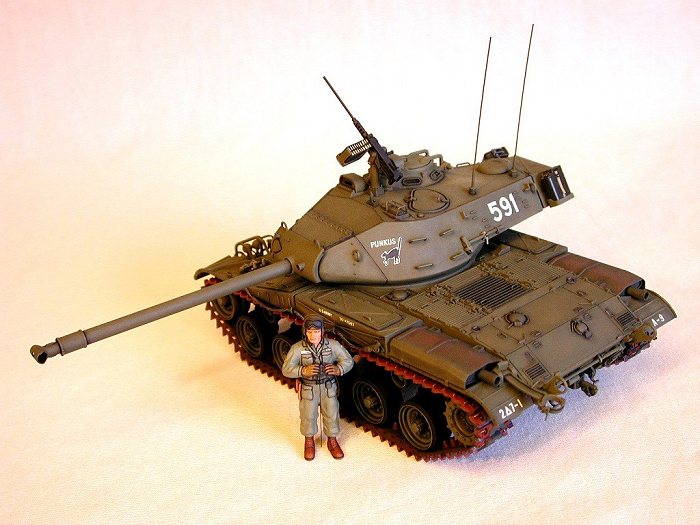
Tamiya 1/35 M41 Walker Bulldog |
|
KIT # |
35055 |
|
PRICE: |
$12.50 |
|
DECALS: |
Three schemes |
|
REVIEW: |
Roger Jackson |
|
NOTES: |
|
|
HISTORY |
The M-41 Walker Bulldog was the last of a long line of light tanks (discounting the M-551 Sheridan) to equip U.S. armored units, serving primarily in reconnaissance platoons. Designed in the late ‘40s, development was accelerated at the onset of the Korean War, where M-24 Chaffee-equipped units found themselves hopelessly out-gunned by Soviet-built T-34s provided to the North Korean Army.
Although arriving in theater prior to the armistice, M-41s engaged in no tank v tank combat against communist forces. Bulldogs served mainly as armored scouts and provided direct fire support to infantry units while they struggled to consolidate their positions as truce talks in Panmunjom drew to a close.
Following the war, M-41s equipped various battalions deployed in Europe, Panama, Hawaii, and Alaska, in addition to state-side units. In the early ‘60s, the Bulldog was phased out in favor of the Sheridan (not a true tank). National Guard and Army Reserve components inherited these vehicles, supplanting the few remaining Chaffees and Stuarts.
Many Walker Bulldogs were exported abroad, with over half of the total produced ending up in Central and South America, Europe, Asia, and the Middle East. Those currently still in service have been overhauled and up-graded numerous times, resulting in improved fuel economy, drivability, armament and armor protection.
The basic specifications for the original as-built M-41 were:
 Length………………….………………....26.9
feet
Length………………….………………....26.9
feet
Height…………………………………….….8.6 feet
Weight………………………………51,796 pounds
Main Armament………….….…...76mm cannon
Secondary Armament….....coaxial .30 caliber machinegun
Antiaircraft Armament……..flexible .50 caliber machinegun
Engine………………...Continental 6-cyl 500hp AOS-895-3 gasoline
Transmission……….GMC CD 500-3 automatic
Maximum Road Speed……………….44.7 mph
Maximum Range………………..…………..100 miles
Crew…………………………………….………… four
|
THE KIT |
Tamiya’s M-41 Walker Bulldog kit consists of 125 parts molded in olive green plastic, 14 vinyl polycap retainers for the roadwheels and drive sprockets, and a pair of silver-gray vinyl tracks. Instructions are furnished in both English and Japanese and while the text is somewhat ambiguous, the exploded parts views in each assembly step are useful in providing the clarity required for a logical build. Decals are provided for three different versions: one US Army machine and a pair of Japan Ground Self Defense Force (JGSDF) schemes.
This model is one of the company’s earliest releases, originally issued in the early ‘70s. As such, it features none of the niceties typical of today’s state-of-the-art kits. The basic shape and proportions look good but many items have been simplified and several details are omitted altogether. The torsion rod arms are all molded integral with the lower hull and the front lift rings have been omitted. No tow cable is provided though it is a standard-issue item with all US tanks. The tracks feature detail on one side only with the inner pads neglected completely, though the track horns are adequately addressed.
Three figures are included, but as the two infantrymen have WWII-style uniforms and accouterments (eg: leggings and combat service shoes instead of high-top combat boots), only the tank commander is appropriate for the vintage that this tank represents. A motorized version of this kit apparently exists (doubtless marketed in Japan, where Godzilla can stomp the stuffings out of it in the latest movie sequel), as the lower hull has holes molded in it for the on/off switch and battery clearance, and is designed to snap together with the upper deck to facilitate battery changes.
|
CONSTRUCTION |
 I began construction with the hull, filling the motorization
holes and rebuilding the transmission covers. Evergreen plastic sheet and rod
were used here, installed with cynoacrylic glue to fill small gaps. I removed
the storage bracket from the pintle, then installed the pintle in the
"mounted" position. A new storage bracket was fabricated and glued to
the rear of the hull. Similarly, I removed the storage brackets from the track
wrench, made new ones from sheet brass, then attached them to the rear as well.
The drive sprockets, road wheels, and return rollers were assembled as per the
instructions and press-fitted onto the spindles.
I began construction with the hull, filling the motorization
holes and rebuilding the transmission covers. Evergreen plastic sheet and rod
were used here, installed with cynoacrylic glue to fill small gaps. I removed
the storage bracket from the pintle, then installed the pintle in the
"mounted" position. A new storage bracket was fabricated and glued to
the rear of the hull. Similarly, I removed the storage brackets from the track
wrench, made new ones from sheet brass, then attached them to the rear as well.
The drive sprockets, road wheels, and return rollers were assembled as per the
instructions and press-fitted onto the spindles.
I replaced the main gun tube with a suitably sized piece of K & S aluminum tubing. The muzzle brake/fume extractor assembly was razor-sawed off the kit part and re-attached to the new tube with Crazy Glue. The coax machinegun was made from a hypodermic needle set into a new mount constructed of 1/16" and 3/32" K & S tubing sleeved together. I replaced the mantelet’s lifting rings with mild steel wire, sectioned from a paper clip. A couple more doo-dads and the main gun assembly was finished.
 The top deck required the most work, with many details
simplified and others missing. Diagonal braces on the front fenders were made
from .020 Evergreen sheet. The missing front lifting rings were made from round
terminal lugs (an automotive electrical item), reshaped and inserted into
pre-sawed slots at the front of the hull. The missing sponson box stiffening
gussets were made from .050" Evergreen rod, sanded flat on one side, cut to
the proper length, and attached with Testor’s liquid cement. When dry, I
sanded them slightly to reduce their height. Holes were drilled edgewise into
the front and rear fenders to attach the fender skirts (which were never used on
production vehicles, though all tanks had the holes).
The top deck required the most work, with many details
simplified and others missing. Diagonal braces on the front fenders were made
from .020 Evergreen sheet. The missing front lifting rings were made from round
terminal lugs (an automotive electrical item), reshaped and inserted into
pre-sawed slots at the front of the hull. The missing sponson box stiffening
gussets were made from .050" Evergreen rod, sanded flat on one side, cut to
the proper length, and attached with Testor’s liquid cement. When dry, I
sanded them slightly to reduce their height. Holes were drilled edgewise into
the front and rear fenders to attach the fender skirts (which were never used on
production vehicles, though all tanks had the holes).
I added clear styrene to the driver’s vision blocks, then painted them dark blue on the inside. Missing driver’s hatch supports were installed on the glacis, using brass L-shaped K & S stock and reshaped bits of sprue, while the pioneer tool bracket was relocated rearward from its incorrect, original position. No horn was supplied (!) so I added one, along with a brush deflector attached to the left headlight guard. The headlights were drilled out (one on each side) to accept MV model railroad lenses.
 At the rear of the deck, I rebuilt the mufflers with sheet
styrene and aluminum tubing. The travel lock got some additional details while a
new snaplock for it was fabricated from scratch. I replaced all the molded-on
fuel cap release handles with brass wire, then did the same for the handles on
the sponson box covers. Tie-down cleats on the rear deck and fenders were
replaced with .013" guitar string, bent into a ‘U’ shape.
At the rear of the deck, I rebuilt the mufflers with sheet
styrene and aluminum tubing. The travel lock got some additional details while a
new snaplock for it was fabricated from scratch. I replaced all the molded-on
fuel cap release handles with brass wire, then did the same for the handles on
the sponson box covers. Tie-down cleats on the rear deck and fenders were
replaced with .013" guitar string, bent into a ‘U’ shape.
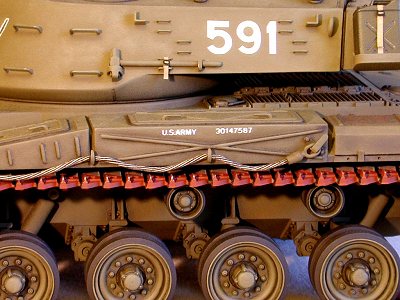
Sheet styrene was used to fill the undersides of the sponson boxes, then the deck was mated to the hull. Massive gaps at the rear were filled with shim stock then sanded flush. I scratch-built a tow cable from brass picture hanging wire then hung it on newly-added brackets installed on the left sponson box and front fender.
Moving to the turret, all the molded tie-down cleats were
substituted with guitar string replacements. The grab handles were similarly
fashioned from brass wire, while I
 made the lifting rings out of paper clip
material. Additional brackets were added with K & S "L" stock and
new jerrycan holders were constructed of aluminum sheet. The cans themselves are
Italieri units, with straps from thin paper strips and Verlinden photo-etched
buckles.
made the lifting rings out of paper clip
material. Additional brackets were added with K & S "L" stock and
new jerrycan holders were constructed of aluminum sheet. The cans themselves are
Italieri units, with straps from thin paper strips and Verlinden photo-etched
buckles.
The TC and gunner’s periscopes were rebuilt with clear styrene used for the glass. I used Grandt Line bolt heads to detail the periscope guards and simulate the attachment points for the rubberized-canvas mantelet cover (not always fitted). I added hatch handles and a snaplock for the loader’s hatch with various bits of metal, along with a brush guard for the loader’s periscope made from straight pins.
All the windows in the commander’s cupola were drilled out and replaced with clear styrene. To allow the TC figure to stand in his hatch properly, I added a sheet styrene shelf inside the turret. New brackets for the sledge hammer were made from sheet aluminum then inserted into slots cut into the sides of the turret.
 A new .50 caliber machinegun was built, using the receiver
from Tamiya’s M-48A3 kit and a scratch-built barrel and trunnion block
assembly. I built a new ammo can and bracket from rectangular brass channel and
used a True Details photo-etched brass ammo belt inside the can. Photo-etched
bits were used for the weapon’s front and rear sight, while steel wire formed
the charging handle and travel lock release.
A new .50 caliber machinegun was built, using the receiver
from Tamiya’s M-48A3 kit and a scratch-built barrel and trunnion block
assembly. I built a new ammo can and bracket from rectangular brass channel and
used a True Details photo-etched brass ammo belt inside the can. Photo-etched
bits were used for the weapon’s front and rear sight, while steel wire formed
the charging handle and travel lock release.
A couple of lengths of .020" guitar string were used for the antennas, glued to the kit-furnished mounts, then attached in the appropriate locations. After gluing the upper and lower turret halves together I noticed the main gun fully depressed due to the added weight of the new aluminum tube. I solved this problem by attaching lead weights to the breech end (inside the turret) to act as a counter balance. After dropping the sledge hammer into its bracket and sliding the track wrench into its retainers, it was off to the paint shop.
|
PAINT & DECALS |
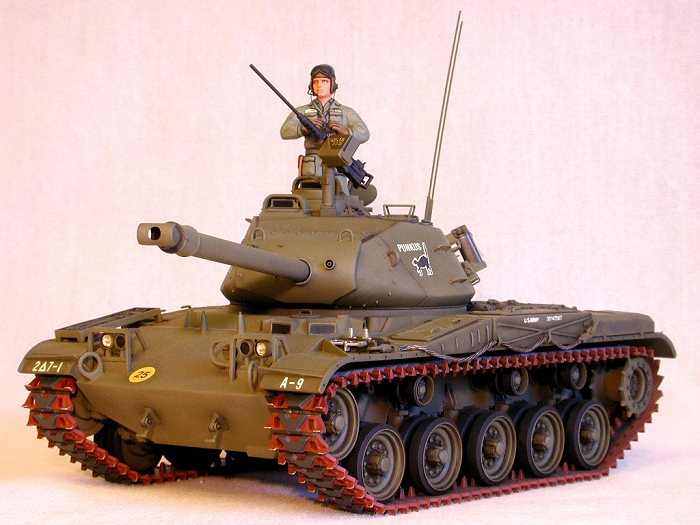
I started by spraying flat black into all the recesses and ninety-degree corners. Next, I feathered the corners out with dark green (34079) and used this color on the underside of the hull, fenders, and turret. The base color was next, consisting of olive drab (34087) slightly darkened with flat black. To create some artificial shadow and depth, I sprayed straight olive drab onto all the horizontal top surfaces.
 The muffler shrouds, notorious for rusting after only minimal
use, were painted with Testor’s rust, dry-brushed with charcoal gray, then
dusted with powdered graphite, applied with a Q-Tip. I burnished the graphite
slightly, producing a faint, metallic sheen. The tires on the road wheels and
return rollers were done in Testor’s rubber.
The muffler shrouds, notorious for rusting after only minimal
use, were painted with Testor’s rust, dry-brushed with charcoal gray, then
dusted with powdered graphite, applied with a Q-Tip. I burnished the graphite
slightly, producing a faint, metallic sheen. The tires on the road wheels and
return rollers were done in Testor’s rubber.
Decals were next, consisting of a mix of the kit markings, a few items from a Roco Minitank accessory sheet, plus some things from my spares box. Solvaset was used to set them into position and get them snuggled down to the matte paint. When they were fully dry, I used Testor’s Dullcote to seal everything up and provide a uniform matte base for the weathering.
I began by using a technique I call "scuff-brushing". Using a stubble-bristled brush and lightened khaki paint, I scuffed the larger surface areas individually, starting in the centers and working outward. The amount of paint is minimal (like dry-brushing) to avoid overdoing the effect. Top surfaces were done a little heavier to simulate the bleaching effects of sunlight. I hit the decals as well to tone them down a bit.
Next, I applied a black wash, using Liquitex tempera watercolor, into the engine grates, around the fuel caps, on the wheels, and other areas I wished to highlight. Powdered graphite, applied with a sable-haired brush, was dusted onto various areas to provide a suitable amount of "grunge". I again Dullcoted the model to seal these effects. Finally, I dry-brushed the model using Testor’s armor sand (30277). Once again, I sprayed a light mist of Dullcote overall.
|
CONSTRUCTION CONTINUES |
The jerrycans were painted with a home-brewed mix of dark olive green (24064) and attached with Elmer’s white glue, along with their tie-down straps. I painted the tow cable and spare track-links with Testor’s steel and used flat black for the rubber trackpads.
I assembled the vinyl tracks then painted them with Testor’s rust. Steel was dry-brushed over the end pins, cleats, and track-horns, while the rubber trackpads were brush-painted individually with Euro 1 gray (36081). Note: these tracks are not Tamiya’s best effort, having no inner trackpad detail. It may be possible to use a shortened set of M-2 Bradley tracks (cleat and pad detail is similar) if the drive sprockets are slightly modified.
 When the tracks were dry I teased them into position over the
wheels. A final coat of Testor’s Dullcote was sprayed over the entire model to
ensure uniformity of finish, thus completing the model.
When the tracks were dry I teased them into position over the
wheels. A final coat of Testor’s Dullcote was sprayed over the entire model to
ensure uniformity of finish, thus completing the model.
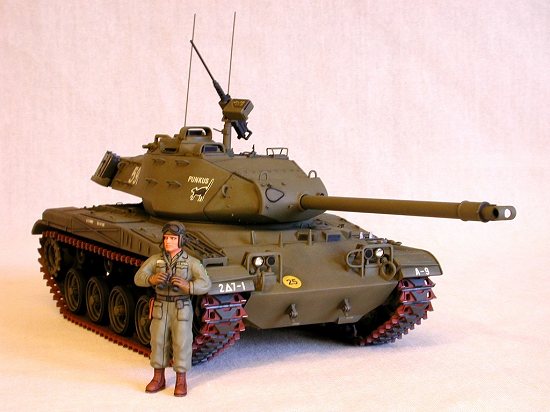
The tank commander was assembled with gap-filling Hot Stuff after pre-fitting the arms to the torso. I used an X-acto knife to carve and rescribe some of the details to give them more definition, notably the web belt, holster, and engineer’s transit (compass) pouch. The CVC helmet was detailed by correcting the earphone assemblies, then adding a boom microphone and intercom cable. I reshaped the dust goggles for a more accurate appearance then gave the boots a little help as well, carving the heel and instep arches to the correct tapered configuration.
I used Testor’s olive drab (ANA 613) for the basic fatigue uniform color, drybrushed with SAC bomber tan (34201) to add some highlights. Olive drab (34087) was used for the canvas web belt and pouches while light tan (30219) was used for the holster (holsters made prior to 1956 were un-dyed cowhide). Testor’s leather was used for the boots, as brown footwear was issued until 1957.
I used black ‘dot’ decals for the eyeballs after first painting the whites with Testor’s gloss white. After painting the flesh-tones on the face, I used lighter shades to dry-brush the highlights and create some artificial shadows. Liquitex watercolor was again used as a wash, to amplify the effect. Verlinden provided the uniform insignia decals (correct for the mid-fifties time-frame, according to AR 670-1).
Solvaset was used to get the decals to conform to the irregularities of the sleeves and chest, and when fully dry, I sprayed the figure several times with Testor’s Dullcote.
|
CONCLUSIONS |
Armor is not my primary MOS, though I enjoy an occasional break from my usual aircraft projects. Antiquated as this kit may be, it still has a lot of potential. A little time and some adequate reference material will give anyone interested in US armor an opportunity to bring this kit to life. There are no major gaffs in the kit’s basic molding and the omitted details are easily added. Super-detailers have not been neglected as there are several photo-etched and resin sets available for this model. One of the mail-order houses had this kit discounted to a near-giveaway price and I just couldn’t resist ordering one. My only regret is that I didn’t order a couple more, as the basic chassis is used for a number of other interesting vehicles of the same vintage.
|
REFERENCES |
M41 Walker Bulldog In Action; Jim Mesko; Squadron-Signal Publications
Armor In Vietnam-A Pictorial History; Jim Mesko; Squadron-Signal Publications
The History Of The Vietnam War; Charles T. Kamps Jr; The Military Press
The World’s Armies-An Illustrated Review; Chris Westhorp; The Military Press
Various Internet Web Sites
ã March 2001 Roger M. Jackson
If you would like your product reviewed fairly and quickly by a site that averages over 2,000 visits a day, please contact me or see other details in the Note to Contributors.