Special Hobby 1/72 Do-27 'Civilian Service'
| KIT #: | SH 72349 |
| PRICE: | $24.00 |
| DECALS: | Three options |
| REVIEWER: | John Summerford |
| NOTES: |
| HISTORY |
 (Excerpted from
Wikipedia) The Do 27 was widely employed as a general-purpose aircraft,
frequently being used for utility transport and liaison duties. On 27
June 1955, the original prototype performed its maiden flight in Spain.
A total of 40 Do 27s were manufactured in Spain by Construcciones
Aeronáuticas SA, designated CASA-127. However, the majority of
production aircraft were constructed at Dornier's main base in Germany;
the first German-built aircraft conducted its first flight on 17 October
1956. A total of 428 Do 27s would be produced in Germany
(Excerpted from
Wikipedia) The Do 27 was widely employed as a general-purpose aircraft,
frequently being used for utility transport and liaison duties. On 27
June 1955, the original prototype performed its maiden flight in Spain.
A total of 40 Do 27s were manufactured in Spain by Construcciones
Aeronáuticas SA, designated CASA-127. However, the majority of
production aircraft were constructed at Dornier's main base in Germany;
the first German-built aircraft conducted its first flight on 17 October
1956. A total of 428 Do 27s would be produced in Germany
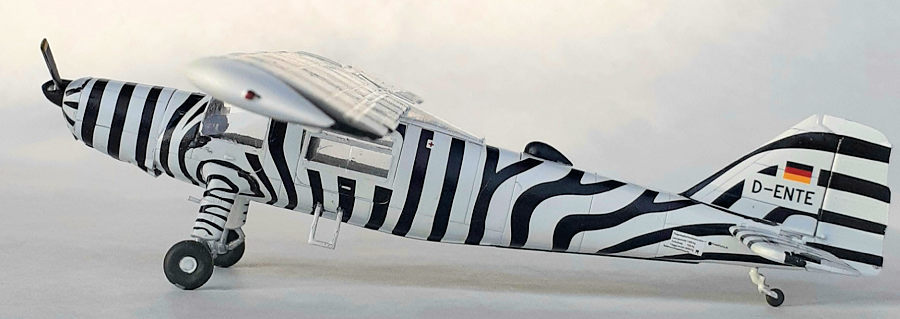
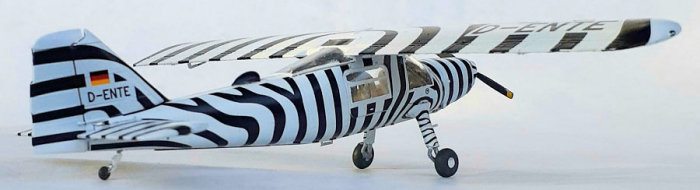
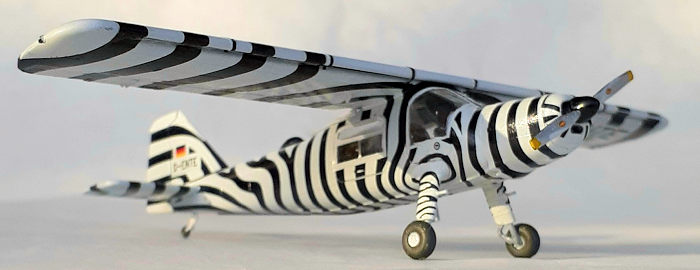
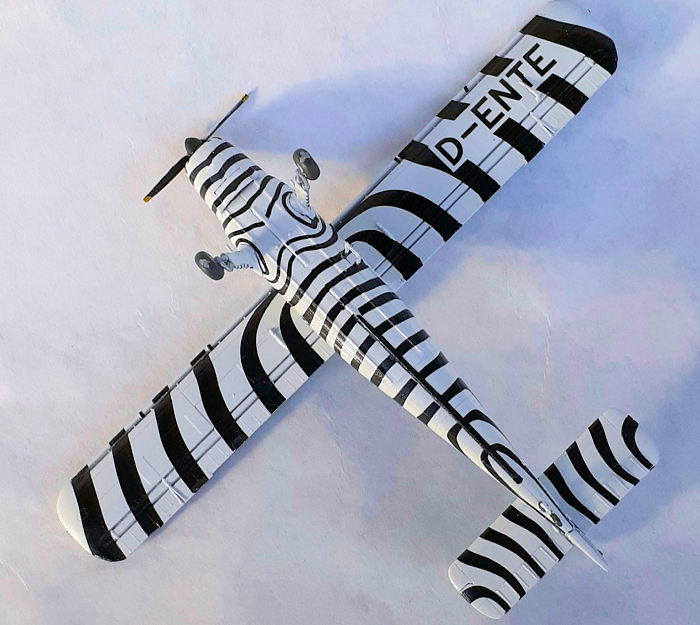
(From the box) Dornier Do72B-2, D-ENTE, Tanzania 1958-59 was flown by Michael Grzimek, a West German zoologist and filmmaker.
| THE KIT |
 Torben Plesberg has
previously reviewed the military version of this kit and that can be found
at this
link.
Torben Plesberg has
previously reviewed the military version of this kit and that can be found
at this
link.
The differences here are two different cabin layouts and two different sets of landing gear, plus decals for three civilian aircraft. The first marking option, the one presenter here, has a zebra striped scheme. The second option a swiss based operator in all yellow with red details. The final option an attractive white wing, tail, and upper fuselage with lime green lower fuselage plus black trim and anti-glare panel. This was operated by Lutheran Mission Aviation Services in Papua-New Guinea.
| CONSTRUCTION |
As per usual, construction starts with the cabin. There are not a lot of parts here and the fuselage was closed up in less than two hours.
 The engine front and
cowl come next followed by the wing assembly, which being forewarned about a
potential warping problem, was clamped to a length of basswood. While that
was curing, the tail and nose were offered up to the fuselage.
The engine front and
cowl come next followed by the wing assembly, which being forewarned about a
potential warping problem, was clamped to a length of basswood. While that
was curing, the tail and nose were offered up to the fuselage.
The instructions call for installing the clear parts after the wing is attached. I opted to mask and attach them before the wings. There is enough of a lip for the pieces to drop into place. The windshield is actually a pair of doors and the instructions include information about fabricating the needed strut braces, but their location is vague. A gap was left at the center post of the doors and that was addressed with Tamia filler thinned with their lacquer thinner.
Attaching the wing was easy. Like the other clear parts, the rear window dropped into place, however it was masked after installation.
I also masked the attaching studs on the landing gear to paint and decal them separately and glue them on later. Thus, it was time for paint.
| COLORS & MARKINGS |
It couldn’t be a simpler painting task, gloss white. Of course, that doesn’t mean easier. A light coat of rattle can gray primer was shot over the side and front windows to match the interior color followed by a light coat of white primer over everything. I managed a smooth, glossy coat of paint ready for the zebra stripe decals.
I usually apply the first decal on the underside in case I encounter any difficulty. I also like to work from one end to the other. As such I applied the little decal on the nose vent that is just ahead of the main gear struts. That was a piece-of-cake. The stripes that are on the nose front are individual decals, so I thought to apply the cowl stripes decal to use for reference points. As any student of military history will tell you, “No plan survives contact with the enemy.” The decal wraps around the cowl and has a line that runs along the top centerline. It was very difficult to maneuver it into position without it folding on itself. I suggest cutting the decal into two pieces along one side of the centerline stripe. Decal solvent is required
 So, I moved to the top
side of the stabilizer It was here that I noticed that the ID numbers for
each decal are upside-down relative to the decal, so I constantly referred
to the guide to make sure I had the correct location for the decal. I moved
around the model, avoiding wet decals and frequently pausing. When I got to
the main gear legs, I slit the decals prior to wetting so that they could
wrap around foot-step bar. I also separated the bottom rudder stripe and
applied it after the rest of the decal was in place. Note that the upper
wing decals wrap around the leading-edge slats. There are holes in the
carrier film for the underwing decals. It might be a good idea to cut the
decals through the holes and apply the decals in smaller sections. I got
cocky and tried to apply the top nose decal as one unit instead of cutting
into two and the left side folded on itself. I had to clean that up with
paint. While I was at it, I did some touch-ups here and there.
So, I moved to the top
side of the stabilizer It was here that I noticed that the ID numbers for
each decal are upside-down relative to the decal, so I constantly referred
to the guide to make sure I had the correct location for the decal. I moved
around the model, avoiding wet decals and frequently pausing. When I got to
the main gear legs, I slit the decals prior to wetting so that they could
wrap around foot-step bar. I also separated the bottom rudder stripe and
applied it after the rest of the decal was in place. Note that the upper
wing decals wrap around the leading-edge slats. There are holes in the
carrier film for the underwing decals. It might be a good idea to cut the
decals through the holes and apply the decals in smaller sections. I got
cocky and tried to apply the top nose decal as one unit instead of cutting
into two and the left side folded on itself. I had to clean that up with
paint. While I was at it, I did some touch-ups here and there.
Everything was unmasked and more touch-ups done. The last pieces attached were the dorsal dome, landing gear, foot step, and the prop came last.
| CONCLUSIONS |
Special Hobby had the A Team create this one. It’s a nifty little kit, though some may find the panel lines too deep. I’ve stated before that I dislike modeling in 72nd scale, but I’m tempted to do another one in the white and green scheme and have the cockpit doors open.
Applying the decals felt like rigging a biplane, slow and somewhat tedious. If I were do it again, I would start around the front and side windows, them work outward from there. I put in about twelve hours on this project with roughly half of that time decaling.20 April 2021
Copyright ModelingMadness.com. All rights reserved.
If you would like your product reviewed fairly and fairly quickly, please contact the editor or see other details in the Note to Contributors.